Register Workloads (Early Access)
Overview
The Register Workloads feature lets customers bring existing virtual machines or workloads into the Dizzion Frame platform as persistent desktops without recreating or migrating resources. It supports all Dizzion-approved infrastructures including AWS, Azure, Google Cloud, IBM Cloud, and Nutanix AHV. This feature is ideal for migration scenarios from e.g. Citrix, Microsoft, or Omnissa, enabling smooth A/B and acceptance testing alongside existing environments.
Prerequisites
Before registering workloads, ensure the following:
- The cloud account containing the workloads has been imported into Frame using the standard cloud account creation procedure. See: Add Cloud Account for more information.
- This feature only works for Windows Operating Systems
- The workloads are accessible over the network and can be reached using VNC, Microsoft RDP, Citrix HDX, Omnissa (VMware) Blast, or any other supported connection protocol.
- For manual installation, you need administrative privileges on the workload VMs to install the Frame Guest Agent. For unattended installation, make sure the Frame Agent Setup Tool (FAST) is downloaded and setup for automated installation.
- Workloads must have outbound network connectivity on TCP port 443 (HTTPS) to access the registration URL, which is provided in the setup instructions below.
- All networking requirements must be met as described in the reference documentation here .
Workflow:
Step 1. – Create a Persistent Desktop Account
· Here are more details about Persistent Desktops
Step 2 - Register Workloads from console by:
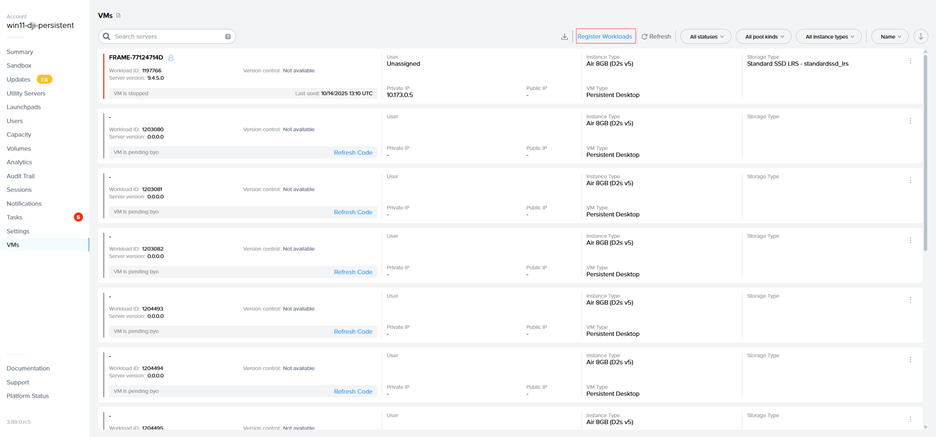
· Go to the VMs page and select the “Register Workloads.”
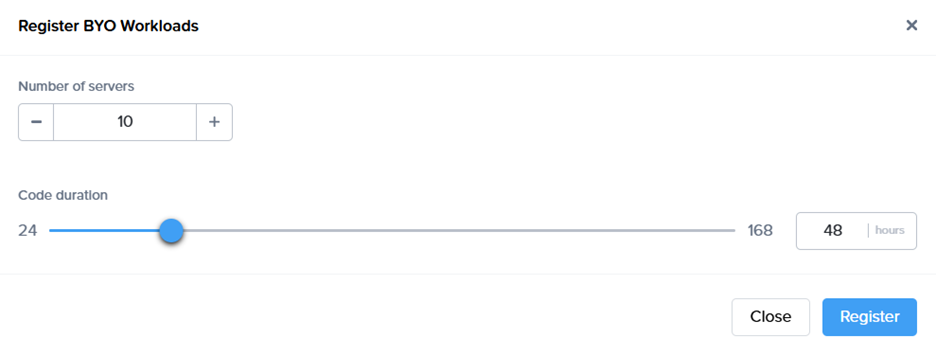
· Specify the number of workloads you want to import into a persistent desktop pool.
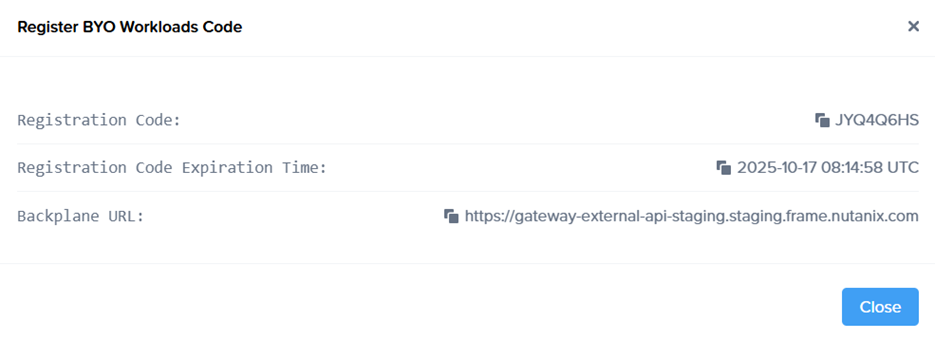
 a registration code with an expiration time, along with the backplane URL will be displayed.
· New objects appear on the VMs page, serving as placeholders until the actual virtual machines register. If the registration code expires, refresh the page to generate a new one.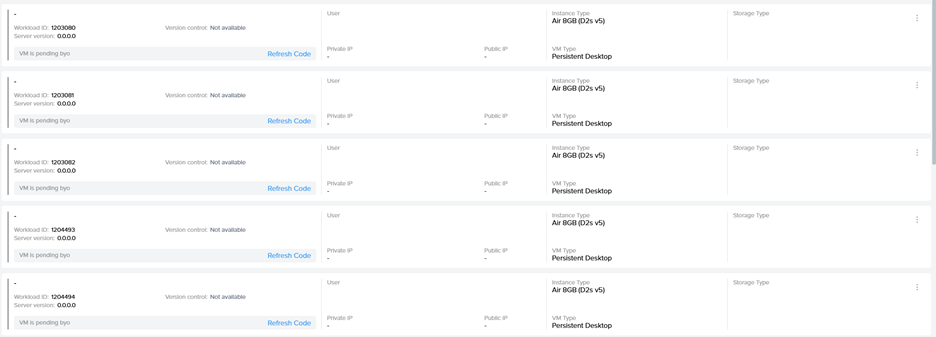
Step 3 - Install Frame Guest Agent on Workloads
Manual installation
On each workload VM, connect using VNC, Microsoft RDP, Citrix HDX, Omnissa (VMware) Blast, or another preferred protocol, then run the Frame Agent Setup Tool (FAST) with the registration parameters.
Download the installer, the Frame Agent Setup Tool (FAST)
Run the registration command
frameagentsetuptool.exe install frameimage registrationcode=<code> registrationurl=<url>Replace <code> and <url> with the values generated in Step 2 of the Workflow.
Registration via UI:
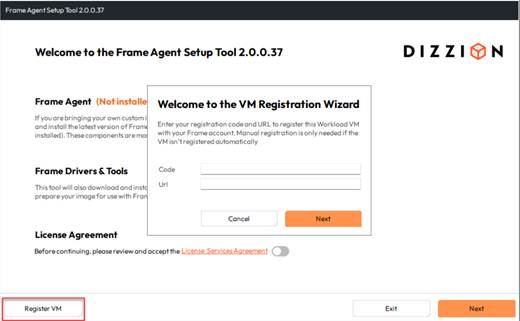
Use <code> and <url> with the values generated in Step 2 of the Workflow.
Unattended Installation
For larger environments, the Frame Agent Setup Tool (FAST) can be deployed automatically using standard management tools.
Recommended Methods
- PowerShell Script: Run locally or remotely or distribute via GPO.
- Intune / Endpoint Manager: Package FAST as a Win32 app and assign to devices.
- Cloud Startup Scripts: Add the command to Azure Custom Script, AWS User Data, or GCP startup metadata for automatic registration at boot.
- Use any third-party deployment tool of your choice.
Tips
- Always use the latest installer.
- Test with one VM before broad rollout.
- Ensure outbound connectivity to the registration URL.
Step 4 - Automatic Registration
After running the command, the Frame Guest Agent automatically registers the workload. Each workload then appears in the Persistent Desktop Production Pool as an unassigned persistent desktop.
Step 5 - Manual Assignment
Once the workloads are visible on the VMs page, manually assign each imported persistent desktop to the corresponding user through the Frame Console.
Step 6 – Create a Launchpad
Set up a desktop Launchpad for end users to access these VMs, if it doesn’t already exist and configure SAML2 permissions.