Account Administration
Account Creation, Settings, Organizations, Support Authorization, Administration, LaunchPads, Bring Your Own Workloads (Remote PC)
- Account Creation
- Settings
- Organizations
- Support Authorization
- Administration
- Launchpads
- Bring-Your-Own Workloads (Early Access)
Account Creation
Frame Customer and Organization Administrators can create and manage multiple accounts from their Admin console. Each account is created:
- With an AHV, AWS, Azure, GCP or IBM (Infrastructure as a Service, IaaS) cloud account,
- In an on-premises datacenter (if created with an AHV Cloud Account) or a public cloud region (if created with an IaaS Cloud Account),
- In a virtual network (VLAN, VPC, or VNET),
- Non-persistent or persistent, and
- Having its own base image, unique set of applications, URLs, application and/or desktop Launchpads, and properties.
Attention
Before creating a Frame account, be sure to review and understand the network configuration requirements discussed in further detail in Network Configuration Requirements.
Infrastructure
Public Cloud
When creating a Frame account in public cloud (AWS, Azure, GCP, or IBM), the Customer or Organization Administrator may choose from one of four different network deployments. Account creation instructions for each network deployment model are provided in the next section.
- Frame-Managed Networking (Public network): all workload VMs have public IP addresses. Frame Platform creates the VNET or VPC.
- Frame-Managed Networking (Private network): all workload VMs have private IP addresses. Frame Platform creates the VNET or VPC.
- Frame-Managed Networking (Private network with Streaming Gateway Appliance (SGA)): all workload VMs have private IP addresses with one public IP address. Frame Platform creates the two VNETs or VPCs (one for the workload VMs and the second for up to 4 SGA VMs).
- Customer-Managed Networking: all workload VMs have private IP addresses. The customer is solely responsible for configuring and managing the network containing the Frame account workload VMs, routing between end users and the workload VMs, and creation of the SGA (if required).
Administrators creating new accounts with Frame base images may find that account creation takes longer when a new base image is available since the updated image needs to be applied.
AHV Infrastructure
When creating a Frame account on AHV infrastructure, the Customer or Organization Administrator creates the Frame account in an existing VLAN in the registered AHV Cloud Account. If the customer requires the SGA to support users accessing the workload VMs from the Internet without a VPN, they will deploy the SGA VM(s) independently in a DMZ LAN.
- Customer-Managed Networking (Private network): all workload VMs have private IP addresses. The customer is solely responsible for configuring and managing the network containing the Frame account workload VMs and routing between end users and the workload VMs.
- Customer-Managed Networking (Private network with Streaming Gateway Appliance (SGA): all workload VMs have private IP addresses. The customer is solely responsible for configuring and managing the networks containing the Frame account workload VMs and SGA VM(s) and routing between end users and the SGA VM(s) and between the SGA VM(s) and the workload VMs.
Create a New Frame Account Entity
-
Administrators with the appropriate role can create new accounts by selecting Accounts in the left-hand menu from the Customer or Organization Dashboard in their Admin Console.
-
Click the Create Account link located on the upper right portion of the screen. The first set of parameters to specify will determine the infrastructure, location, and networking option for the Frame account.
Use the tabs below to find instructions for each network deployment configuration:
Public Networking
Customers who wish to rapidly create a Frame account on the public cloud infrastructure for users accessing the virtualized applications/desktops from the Internet can choose this option. This procedure will provision a Frame account with the network requirements and architecture as defined in Public Cloud (Default) Network Requirements. All workload VMs will have public IP addresses.

| Field/Button | |
|---|---|
| Organization | If account created at the customer level, this field is visible. Select or search for the top-level organization the account will reside under. |
| Account Name | Frame automatically generates an account name for you, but you can edit this field if desired. The account name will be displayed in the account Dashboard and Launchpad. |
| Account URL | This editable field designates the unique identifier for the account, when referencing the account in a URL. The format for the string referenced above would appear as: USE https://use.difr.com/frame/customer/org/test-acct-123 DEU https://deu.difr.com/frame/customer/org/test-acct-123 |
| Cloud Provider | Select the desired cloud or IaaS (Infrastructure-as-a-Service) provider for your account. |
| Workload Engine |
EC2 - virtual machines which are billed by AWS per pricing for EC2 instances
WSC bundle - only used for CloudPC setups
WSC managed instances -only windows 11 BYO License is supported |
| Cloud Account | Select the desired cloud account to use, if there is more than one cloud account for that cloud provider. |
| Region | Specify the desired datacenter you would like the account to be created in. |
| Networking | Select Frame-Managed Networking |
| Network Type | Select Public Network. |
| Customize VPC Settings |
Select to specify a VPC/VNET CIDR. If left unchecked, a randomized CIDR (e.g., 10.{0-255}.0.0/18) will be used. To connect this VPC/VNET to another network (peer, VPN, etc.), use a non-overlapping CIDR (e.g., 10.0.0.0/20, 192.168.0.0/24). You can change the CIDR later in Dashboard > Settings > Networking, provided no network resources are attached.
|
Private Networking
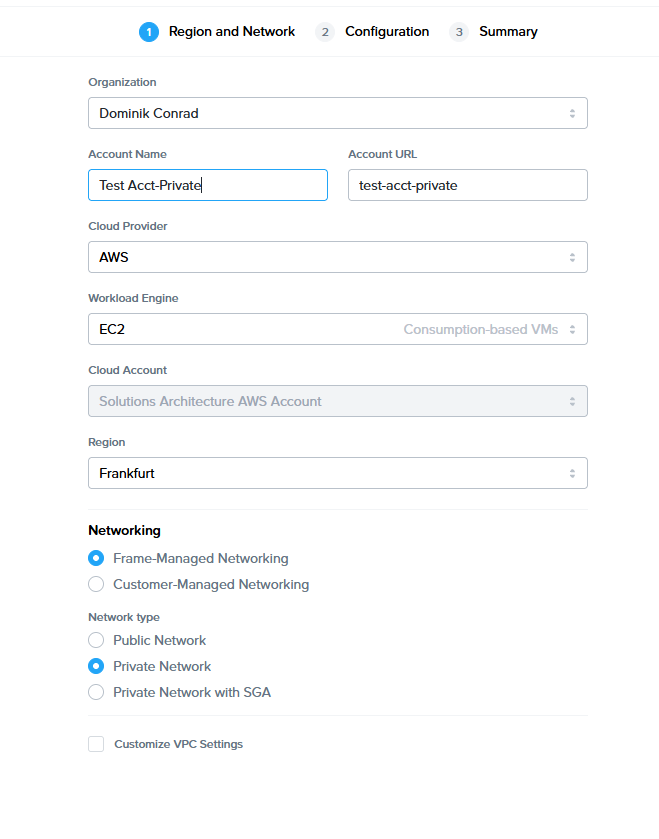
Customers who wish to create a Frame account on the public cloud infrastructure for users accessing the virtualized applications/desktops through a private network can choose this option. This procedure will provision a Frame account with the network requirements and architecture as defined in Public Cloud with Private Networking. All workload VMs will only have private IP addresses.
Networking and routing must be configured to reach the workload VMs, otherwise the customer will not be able to access the Sandbox, Utility Servers, or production VMs.
| Field/Button | Description |
|---|---|
| Organization | If account created at the customer level, this field is visible. Select or search for the top-level organization the account will reside under. |
| Account Name | Frame automatically generates an account name for you, but you can edit this field if desired. The account name will be displayed in the account Dashboard and Launchpad. |
| Account URL | This editable field designates the unique identifier for the account, when referencing the account in a URL. The format for the string referenced above would appear as: USE https://use.difr.com/frame/customer/org/test-acct-private DEU https://deu.difr.com/frame/customer/org/ttest-acct-private |
| Cloud Provider | Select the desired cloud or IaaS (Infrastructure-as-a-Service) provider for your account. |
| Workload Engine |
EC2 - virtual machines which are billed by AWS per pricing for EC2 instances
WSC bundle - only used for CloudPC setups
WSC managed instances -only windows 11 BYO License is supported
|
| Cloud Account | Select the desired cloud account to use, if there is more than one cloud account for that cloud provider. |
| Region | Specify the desired datacenter you would like the account to be created in. |
| Networking | Select Frame-Managed Networking |
| Network Type | Select Private Network. |
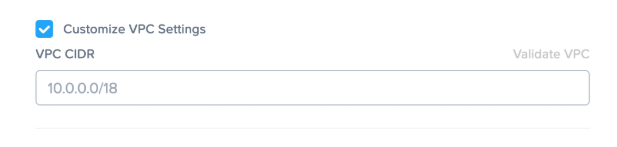
| Customize VPC Settings |
Select this checkbox to specify a specific VPC/VNET CIDR. If you plan to connect this VPC/VNET to another network through a peer, VPN, or other private connection, you need to specify a non-overlapping CIDR (e.g.,
|
Private Networking with SGA
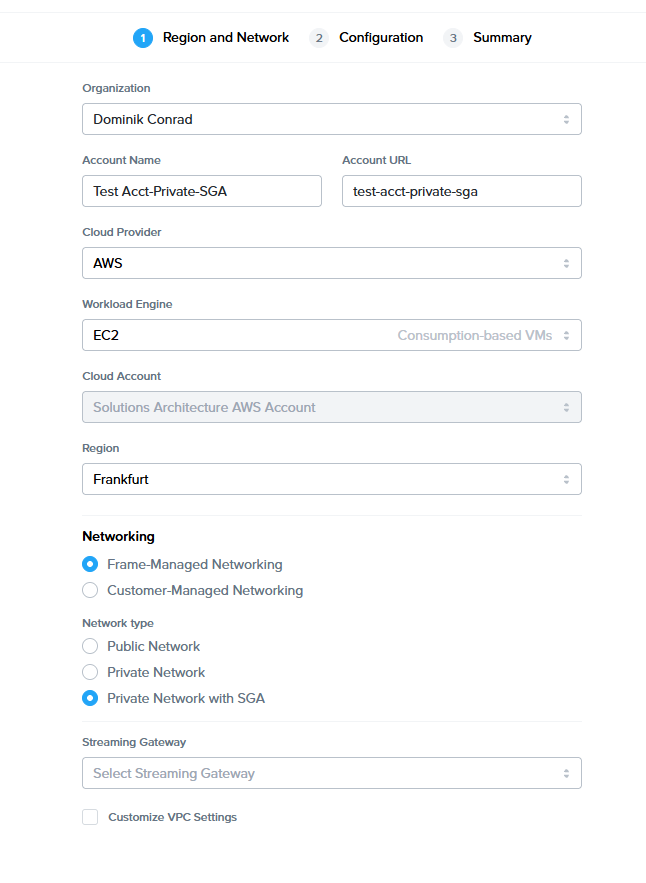
Customers who wish to create a Frame account on the public cloud infrastructure for users accessing the virtualized applications/desktops through a single public IP address can choose this option. This procedure will provision a Frame account with the network requirements and architecture as defined in Public Cloud with Private Networking and SGA. All workload VMs will only have private IP addresses.
| Field/Button | Description |
|---|---|
| Organization | If account created at the customer level, this field is visible. Select or search for the the top-level organization the account will reside under. |
| Account Name | Frame automatically generates an account name for you, but you can edit this field if desired. The account name will be displayed in the account Dashboard and Launchpad. |
| Account URL | This editable field designates the unique identifier for the account, when referencing the account in a URL. The format for the string referenced above would appear as: USE https://use.difr.com/frame/customer/org/test-acct-private-SGA DEU https://deu.difr.com/frame/customer/org/ttest-acct-private-SGA |
| Cloud Provider | Select the desired cloud or IaaS (Infrastructure-as-a-Service) provider for your account. |
| Workload Engine |
EC2 - virtual machines which are billed by AWS per pricing for EC2 instances
WSC bundle - only used for CloudPC setups
WSC managed instances -only windows 11 BYO License is supported
|
| Cloud Account | Select the desired cloud account to use, if there is more than one cloud account for that cloud provider. |
| Region | Specify the desired datacenter you would like the account to be created in. |
| Networking | Select Frame-Managed Networking |
| Network type | Select Private Network with SGA |
| SGA | Select your Streaming Gateway Cluster |
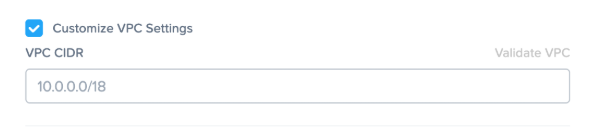
| Customize VPC Settings | Select this checkbox to specify specific CIDRs for the workload VPC If you do not enable this feature and specify a CIDR, Frame will set the workload CIDR to a randomized IP address range of 10.{0-255}.0.0/18 If you plan to connect the workload VPC/VNET to another network through a peer, VPN, or other private connection, you need to specify a non-overlapping CIDR (e.g., 10.0.0.0/20, 192.168.0.0/24).The VPC/VNET CIDR can be changed after the Frame account is created under Dashboard, Settings, Networking, as long as there are no customer-provisioned network resources (e.g., peers, VPNs, gateways, etc.) attached to the Frame-provisioned VPC/VNET. |
| VPC CIDR | Specify the workload VPC/VNET CIDR in CIDR notation. CIDR must be a minimum of /24. |
SGA Instance Types
Frame Platform will provision SGA VM(s) on the following instance/machine types. These VMs will run 24x7 since users need to be able to access the workload VMs at any time.
- AWS: c5.xlarge
- Azure: D4 v3
- GCP: e2-standard-2 (SGA 3), e2-standard-4 (SGA 4)
- IBM: cx3d-4x10 (SGA 4 only)
Customer Managed Network
Customers who wish to create a Frame account on the public cloud infrastructure in an existing network (VPC or VNET) can choose this option. The existing VPC or VNET must comply with the network requirements and architecture as defined in Public Cloud with Private Networking. By default, all workload VMs will only have private IP addresses.
Until the customer configures networking, security groups, and routing to reach these workload VMs, the customer will not be able to access the Sandbox, Utility Servers, or production VMs.
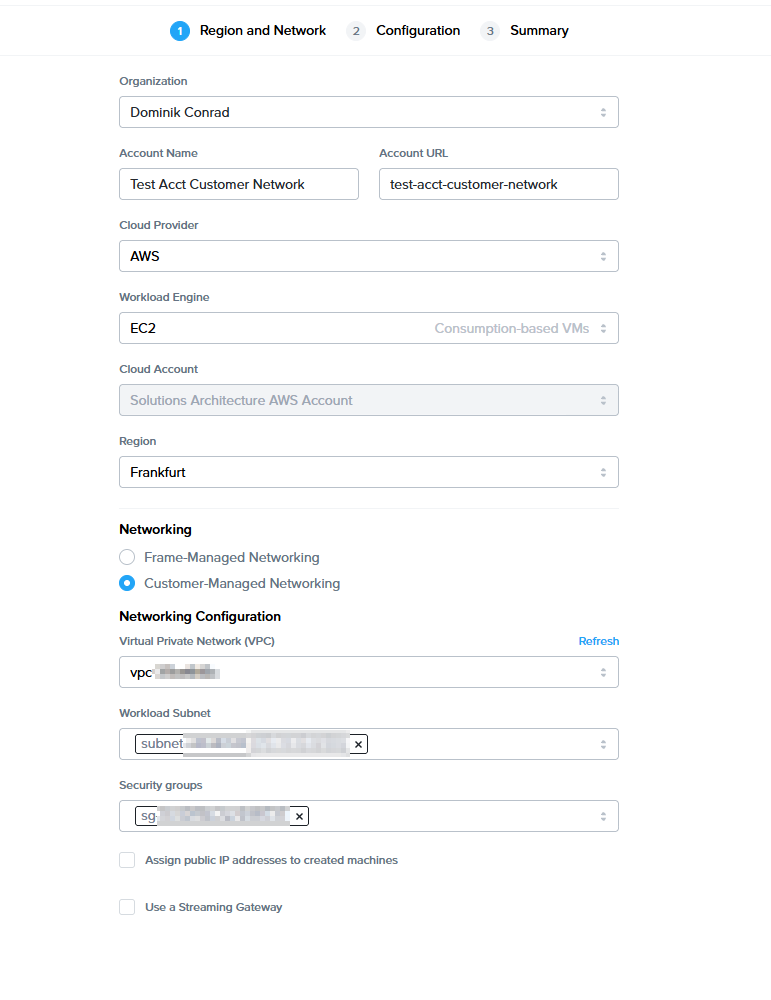
| Field/Button | Description |
|---|---|
| Organization | If account created at the customer level, this field is visible. Select or search for the top-level organization the account will reside under. |
| Account Name | Frame automatically generates an account name for you, but you can edit this field if desired. The account name will be displayed in the account Dashboard and Launchpad. |
| Account URL | This editable field designates the unique identifier for the account, when referencing the account in a URL. The format for the string referenced above would appear as: USE https://use.difr.com/frame/customer/org/test-acct-customer-network DEU https://deu.difr.com/frame/customer/org/ttest-acct-customer-network |
| Cloud Provider | Select the desired cloud or IaaS (Infrastructure-as-a-Service) provider for your account. |
| Workload Engine |
EC2 - virtual machines which are billed by AWS per pricing for EC2 instances
WSC bundle - only used for CloudPC setups
WSC managed instances -only windows 11 BYO License is supported
|
| Cloud Account | Select the desired cloud account to use, if there is more than one cloud account for that cloud provider. |
| Region | Specify the desired datacenter you would like the account to be created in. |
| Networking | Select Customer-Managed Networking. |
| Virtual Private Network (VPC) | Specify the desired VPC/VNET from the list of the existing VPCs/VNETs in the specified region for the registered public cloud account. |
| Workload Subnet | Pick the subnet(s) from the list of subnets in the specified VPC or VNET. |
| Security groups (AWS only) | Pick the security group(s) from the list of security groups for the specified AWS VPC. |
| Assign public IP addresses to created machines | If you select this option, all newly-provisioned machines in the VNET/VPC will have public IP addresses, in addition to private IP addresses. |
| Use Streaming Gateway | Select this option and specify the existing SGA 4 cluster that will be attached to this Frame account. |
Azure Infrastructure
While an Azure security group is not required in the above Frame account creation workflow, an Azure security group must be provisioned on the VNET/subnet before Frame account creation. Specific inbound/outbound rules will be dependent on how the Frame traffic is routed, as defined in Public Cloud with Private Networking.
Nutanix AHV
Customers who wish to create a Frame account on the AHV infrastructure must choose this option. The AHV cluster and VLAN configuration comply with the network requirements and architecture as defined in Frame on AHV. All workload VMs will only have private IP addresses.
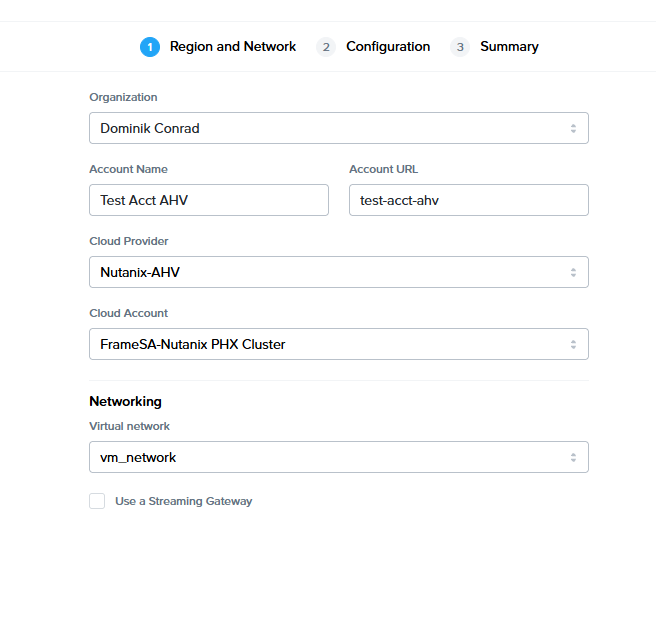
| Field/Button | Description |
|---|---|
| Organization | If account created at the customer level, this field is visible. Select or search for the top-level organization the account will reside under. |
| Account Name | Frame automatically generates an account name for you, but you can edit this field if desired. The account name will be displayed in the account Dashboard and Launchpad. |
| Account URL | This editable field designates the unique identifier for the account, when referencing the account in a URL. The format for the string referenced above would appear as: USE https://use.difr.com/frame/customer/org/test-acct-ahv DEU https://deu.difr.com/frame/customer/org/ttest-acct-ahv |
| Cloud Provider | Select the desired AHV-based Nutanix Cloud Provider for your account. |
| Cloud Account | Select the desired cloud account to use, if there is more than one cloud account for that cloud provider. |
| Region | Specify the desired datacenter or cluster you would like the account to be created in. |
| Virtual Network | Specify the desired VLAN from the list of the existing VLANs in the registered AHV Cloud Account. With Frame accounts on AHV, the CIDR block is defined in Prism Central/Prism Element and not within Frame. |
- After selecting the Next button, you will be asked to specify the Frame account configuration.
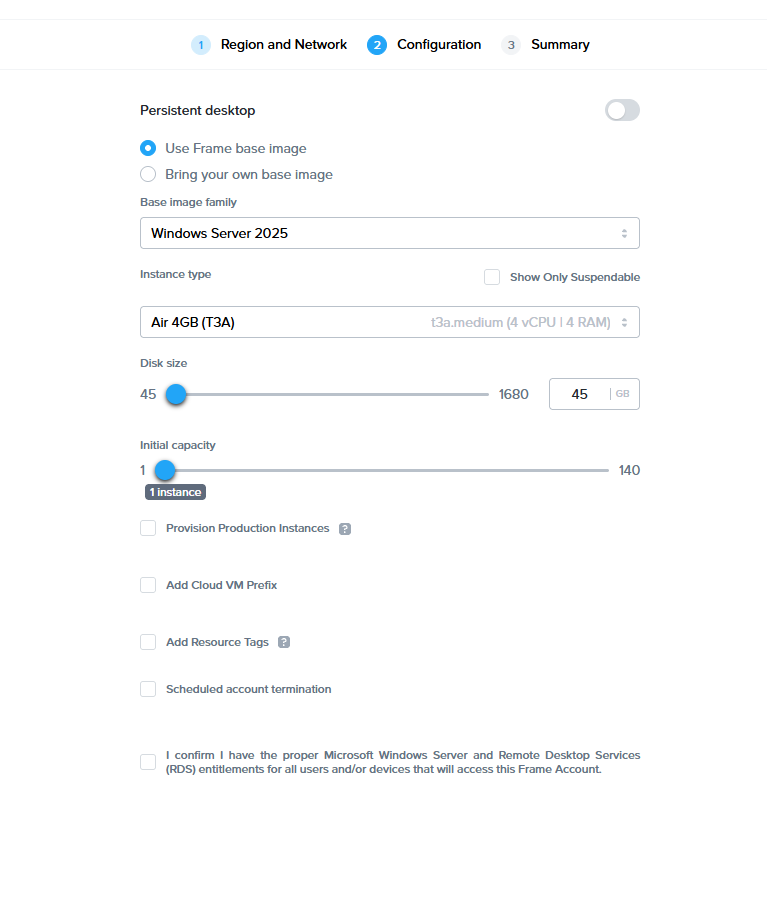
| Field/Button | Description |
|---|---|
| Frame/BYO base image | If you have already configured your organization or customer entity with a BYO base image, you can select the “Bring your own base image” radio button and use your custom base image here. Otherwise, select Use Frame base image (public cloud only). |
| Base image family | Select the base server type/version for the account. The options for image family vary depending on the cloud provider. |
| Instance type | Select the system type of the Sandbox upon account creation. The system type can be modified at a later time from the Dashboard of the account. |
| Add Resource Tags | This toggle will enable you to specify one or more resource tags that will be added to cloud provider resources provisioned by Frame (public cloud only). |
| Cloud VM Prefix | If desired, specify the prefix that will be prepended to the name of each virtual machine provisioned by Frame. |
| Disk size | Use the slider or the editable field next to it to specify the initial Sandbox disk capacity upon account creation. We recommend you start with the smallest disk size since you can always increase the Sandbox disk size in the Dashboard. |
| Initial capacity | Use the slider to specify the number of workload VMs you would like provisioned upon account creation. You can adjust capacity settings any time after account creation. |
| Provision Production Instances | Enable this toggle if you wish to provision production instances using the base image immediately at Frame Account creation. |
| Persistent Desktop | This toggle will enable “Persistent Desktops” for your account. If you wish to deliver non-persistent desktops or individual applications to your users, do not select the Persistent Desktop option. |
| Scheduled Account Termination | Select this option if you wish to have Frame terminate the Frame account on a specific date and time. |
* The AWS infrastructure must either be customer-managed (BYO) or Dizzion-provided (Complete customers only). Legacy Frame customers using Frame IaaS are not eligible.
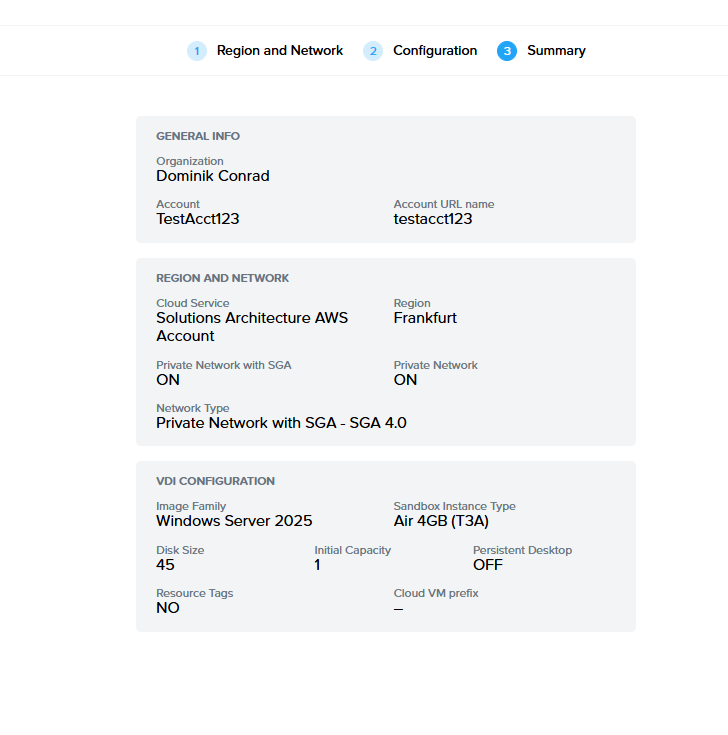
- Review the configuration you have specified in the first two steps of the account creation wizard and click Create in the bottom right corner of the window. Once the operation is complete, the new account will populate in the accounts list.
Troubleshooting
"My Sandbox is taking a long time to provision on my new account..."
-
The typical time required to create a new instance (for the Sandbox on a new account) is 10-15 minutes for public cloud. This time is necessary as the Sandbox image is being created from the Frame-provided base image. After creation, updates are applied incrementally and there may be a reboot required for an update – this can extend the provisioning time for the Sandbox to over 15 minutes.
-
In some cases, if there is a problem with provisioning the first Sandbox, the system may go into a recovery process that will terminate the original instance and start over with a new Sandbox which could result in a provisioning time closer to 30 minutes.
-
If the above process takes between 30 minutes to an hour, there could be a problem with a lack of capacity in your AHV cluster or service limits with your IaaS cloud subscription. For example, provisioning can't proceed when a virtual machine limit is reached with the request by Frame Platform for a new instance. In this case, you should check your IaaS service/quota limits.
"My Sandbox failed to provision during account creation..."
-
When publishing to provision instances with storage volumes (especially GPU-backed instances), there is a possibility that the instance and/or storage limit can be reached in the given region (e.g. the default limits for GPU instances on new IaaS accounts are typically very low per region).
-
If instance storage limits in a given region are hit, provisioning of the Sandbox for the new account will fail.
-
If the Sandbox VM cannot be provisioned during the Account creation process due to lack of availability of that instance type, the administrator will be prompted to retry creating the Sandbox or change the instance type.
"My account creation failed..."
-
For each account, a new VPC/VNET is required when creating an account using Frame networking. IaaS providers limit the number of VPCs or VNETs that can be created.
-
If an issue is encountered when creating VPCs or VNETs due to the limit being hit, the account creation will fail.
"I can't access my Sandbox after account creation..."
If a Frame account using Frame Networking (Private Networking) or Customer-Managed Networking is created, the Sandbox may not be created successfully or accessible from the Internet. The Administrator must verify that the network configuration requirements are satisfied.
"How do I request a capacity limit increase from my IaaS provider?"
In general, when provisioning accounts, the IaaS cloud account must have sufficient capacity/limits to support the instance, storage, VPC/VNET and networking demands. If limits are reached, the owner of the IaaS account must request limit increases by submitting a support ticket with their IaaS provider.
"I need help, how do I contact support?"
If you need additional help, contact our Frame support team using the guide on our support page.
Settings
Administrators can manage a wide range of settings from an entity Dashboard's settings page. The configurable settings for this page depends on which entity level it is being accessed from (Customer, Organization, or Account level.) varies.

| Tab | Description |
|---|---|
| Basic Info | Allows administrators to update the Frame Account Name, URL name, description, and notes on the Frame account. |
| General | Provides administrators with the ability to enable Quick Publish and/or Test Publish, generate Session Reports, set the machine name prefix for non-domain-joined workload VMs, and enable custom terminal and login banners. |
| Session | Defines the behavior of a Frame session, including the features available to the users, time limits, keyboard mappings and profiles, and Advanced Terminal and Server Arguments. |
| Networking | Allows administrators to view and update the Frame account's networking settings. |
| Availability Zones | Enable AWS and GCP Availability Zones for Enterprise Profiles and Personal Drives. |
| Profiles | Enable and manage Enterprise Profile volume settings. |
| Personal Drives | Enable and manage Personal Drive settings. |
| Domain Settings | Defines the parameters for joining your test/production workload VMs to your Windows domain, if required for your use case(s). |
| Deployment Group | Determines when a Frame Account's workload VMs will receive the latest version of the Frame Guest Agent (FGA), Frame Server, and any associated drivers or components. |
| Shutdown Timeout | Determines the interval of time (in minutes) that Frame checks to see if a VM is in a state where it can be powered off (no session). By default Frame checks every 60 minutes. |
| Scheduled Termination | Enable or disable the scheduled termination of a Frame account. |
| Terminate | Terminate a Frame account. |
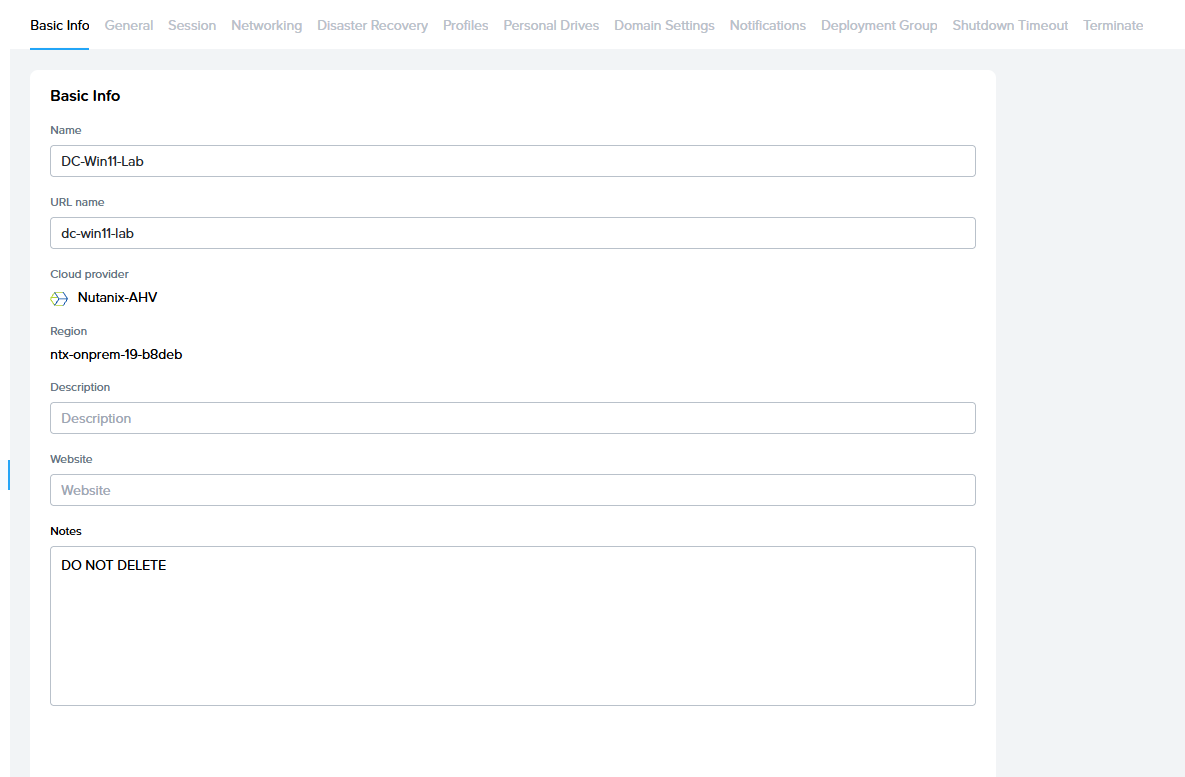
Basic Info
The Basic Info tab allows administrators to update the Account Name, Account URL, and other information associated with your Frame Account. These values were specified during the creation of the account.
- From the Frame Account Dashboard, go to Settings page. Click on the Basic Info tab if you are on a different Settings tab.
| Field | Description |
|---|---|
| Name | This editable field specifies the account name which will be displayed in the account Dashboard and Launchpad. |
| URL name | This editable field designates the unique identifier of the URL for users to access the login page. Note: This value is used as part of the URL for users to access the login page or Launchpad. If you change this value, you will need to make sure to communicate this change to your users and update references to the Account URL in any websites or documentation. |
| Description | This editable field allows you to describe the Frame Account. It is currently only displayed in the Frame Console for administrators. |
| Website | This editable field is only visible in the Frame Console to administrators. The field is not used by Frame. |
| Notes | This editable field is only visible in the Frame Console to administrators. The field is not used by Frame. |
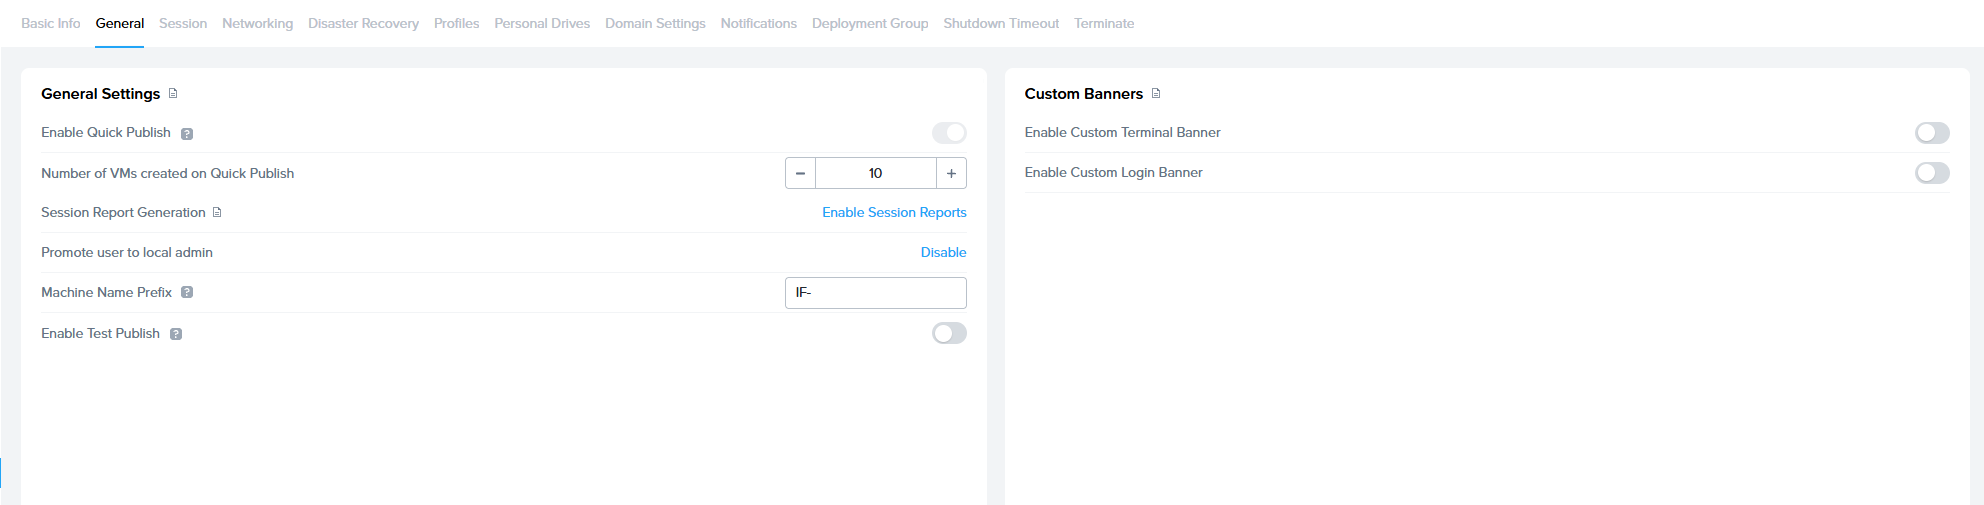
General
The General tab allows administrators to enable/disable general settings on the account.
- From the Frame Account Dashboard, go to Settings page. Click on the General tab if you are on a different Settings tab.
| Field | Description |
|---|---|
| Enable Quick Publish | Refer to Quick Publish documentation for further details. |
| Session Report Generation | Refer to Session Reports documentation for additional details. |
| Promote user to local admin | If disabled, the Frame session will use the local Windows user FrameUser who does not have local Windows administrator access. If enabled, the Frame session will use the local Windows user Frame who is in the local Windows Administrators group. |
| Machine Name Prefix | Frame will provision VMs with the specified Machine Name Prefix value to create a unique machine name for each workload VM. |
| Enable Test Publish | Refer to Test Publish documentation for further details. |
| Enable Custom Terminal Banner | Refer to Custom Terminal Banner documentation. |
| Enable Custom Login Banner | Refer to Custom Login Banner documentation. |
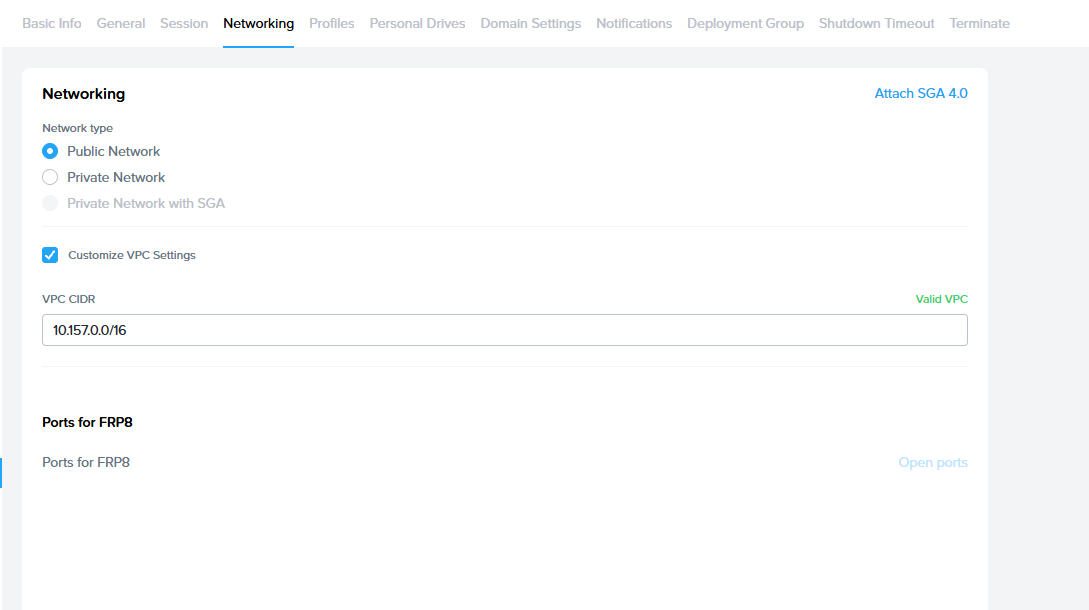
Networking
The Networking tab allows administrators to review the networking configuration for the Frame Account.
- From the Frame Account Dashboard, go to Settings page. Click on the Networking tab if you are on a different Settings tab.
| Field | Description |
|---|---|
| Networking | This field specifies whether the Frame account was created using Frame-managed versus Customer-managed networking. |
| Network type | For accounts created using Frame-managed networking, this field specifies whether the workload VMs are on a public network, private network, or a private network with one or more Streaming Gateway Appliances. |
| Customize VPC Settings | This field shows the VPC/VNET CIDR value for accounts created using Frame-managed networking with a specified VPC/VNET CIDR. |
Details on the networking deployment models are discussed in the Networking Requirements documentation.
Administrators should not modify any of these Networking settings unless they have consulted a Frame Solutions Architect and validated the change in a test network and Frame account.
Shutdown Timeout
The Shutdown Timeout feature is accessible from any account Dashboard.

The Frame platform automatically checks for VMs that are in an unutilized state (no active or disconnected session) to power off every 60 minutes, by default. The Shutdown Timeout feature allows the administrator to adjust the length of that interval (in minutes) as needed to accomodate for infrastructure costs or user experience. This setting can be adjusted to a minimum of 5 minutes and a maximum of 30 days (43,200 minutes).
Administrators leveraging public cloud infrastructure should exercise caution when adjusting this value as:
-Increasing the Shutdown Timeout value causes the VMs to remain powered on for longer increments, which increases total infrastructure usage and cost.
- Decreasing the Shutdown Timeout value can substantially reduce infrastructure usage by turning off VMs sooner when not in use, but it may adversely affect the user experience. This is particularly true for Persistent Desktop scenarios, where users might frequently encounter delays as they wait for VMs to power up between sessions.
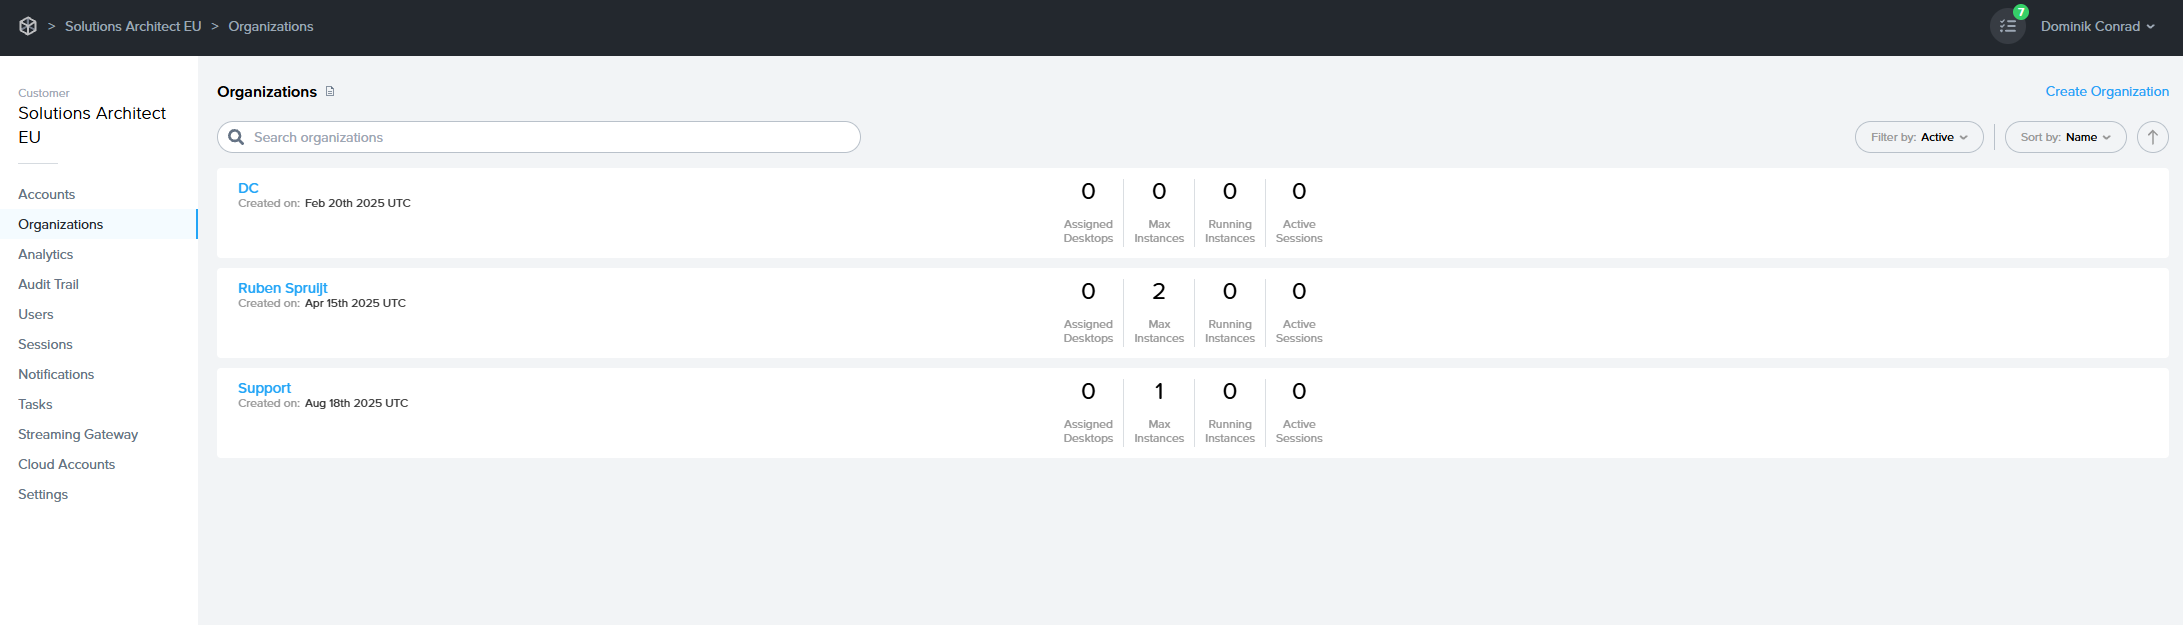
Organizations
Customer administrators have permissions to add, edit, and deactivate organization entities in the Frame console. This guide outlines how administrators can add, configure, and delete organization entities.
Create an Organization Entity
-
From the Frame Admin Console, select Organizations in the left-hand menu from the Customer page. Click Create Organization in the upper right hand corner of the page.
-
A new window will appear. Add the name for the organization in the Name field of the window. The URL name will automatically generate but can be modified as desired. Click Create after adding the Organization entity name.
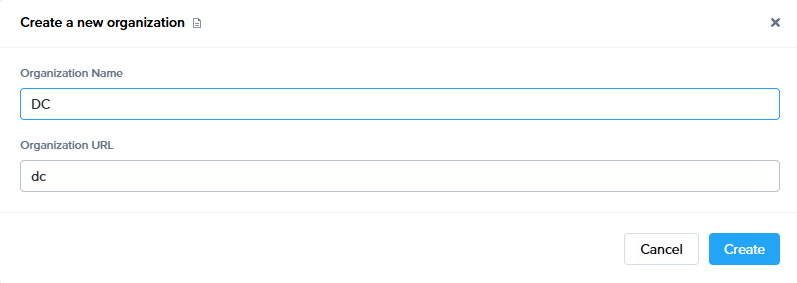
- Your newly created organization entity will appear in the Organizations list.
Update your Organization
Administrators can easily make configuration updates to their Organization entity from the Frame console. Simply navigate to the desired Organization from the Customer Dashboard view, click the Organization you wish to modify, and then navigate down to the Settings page to make your changes. Be sure to click Save in the upper right corner of the page.
Configurations applied to the organization entity will affect the entirety of the organization and any accounts listed underneath it (where applicable).
Basic Info
After clicking Update, you will be taken to the Basic Info tab of the Organization entity's update page. You can edit any of the fields listed below:

- Name: Edit the name of your organization in this field.
- URL name: This specifies the slug of the URL unique to your organization. For example, specifying “documentation” would look like this:
https://use.difr.com/[customer_URL]/documentation/[account_URL] - Description: Add a description about the organization.
- Website: Place the web address for your organization here (for example,
https://www.google.com). - Notes: Add any relevant notes about your organization to this section.
Settings
Under the Settings tab, administrators can enable custom terminal and login banners. Check out our guide on Banners and Classification Labeling to see if this feature would be appropriate for your use case.

If you would like to enable custom Terminal or Login banners for all accounts listed under your organization entity, you can do so here. Click Save to apply your settings.
Terminate
Administrators can navigate to the Terminate tab of the Organization Update page if they wish to terminate their organization entity. Before any entity can be terminated, certain criteria must be met. Please see our Terminate an Entity guide for more details.
Support Authorization
By default, Frame support administrators are granted full access to all organizations and accounts for troubleshooting purposes. Customer Administrators or Limited Customer Administrators may opt out of default support for their account at any time by adjusting their support options.
Modifying Support Authorization
If you wish to modify support authorization options, navigate to the desired entity where you wish to apply this change (Customer or Organization) and click on the Users from the left-hand menu from either the Customer or Organization Dashboard within the Admin Console.
- Full access to all organizations and accounts: grants Frame support engineers the same level of access as a Customer Administrator.
- Full access without ability to start sessions and manage users: Frame support engineers may not start sessions to your workload VMs.
- No access: Frame support engineers have no access to your Customer, Organization(s), and Accounts.
Click Save in the upper right corner to apply your changes.
Only Frame support engineers will be able to access your account with support access enabled. If you would like to authorize other Frame personnel, you can add them in the [Authorized Frame Personnel](#authorized-nutanix-personnel) section.
Authorized Frame Personnel
Administrators may grant access to a single Frame admin or other Frame personnel on a temporary basis by adding them as Authorized Frame Personnel. Under the Support Options section, click Add Personnel and enter the email address of the Frame employee you would like to invite. Click Save in the upper right corner of the screen when you are done.

To revoke access, simply click the trashcan symbol listed to the right of the Frame staff member you would like to remove from the Authorized Frame Personnel list. Click Save to apply your changes.
Administration
Navigating Frame Admin Console
Customer Administrator
Customer administrators have the highest level of access in the Frame tenant (learn more about our Frame tenant hierarchy here). Customer admins will see the Customer Dashboard of the Frame Admin Console upon login, where they are able to administer and configure settings that pertain to all organizations and accounts under the Customer entity. As an example, configuring a third party IdP such as Okta at this level would mean that all end users under all Organizations and Accounts in the Frame tenant would be able to authenticate with Okta, if desired.
Additionally, Customer admins can see analytics, audit trail, and session data across the entirety of the Frame tenant. For example, if there are five organizations listed under a single Customer entity, clicking on Sessions in the left-hand menu would allow the admin to see all sessions for all five Organizations and their Accounts at once. To put it simply, all resources configured and data accessed at this level will apply to all Organizations and Accounts under the Frame tenant.

Customer administrators can configure tenant-level settings from this page. By clicking on the Organizations Dashboard, Customer admins can access and administer associated Organization entities. Read on to learn about how Customer and Organization admins can manage organizations below.
Organization Administrator
Organization administrators have the second-highest level of access in the Frame tenant (learn more about our Frame tenant hierarchy here). Customer admins will see their Organization Dashboard upon login, where they are able to administer and configure settings that pertain to all accounts under that Organization. All resources configured and data accessed at this level will apply to all Accounts listed under the Organization entity.

Tipp - Wondering Where you Are, Check your browser tab to see which Frame entity you're accessing. This information is available to admins even while accessing their account Sandbox!
 :
:
Navigating your Frame Account Dashboard
Account Administrator
The Account administrator has access to any accounts assigned to them by the Customer or Organization admin. If you are an Account administrator, you will find yourself on the Dashboard Summary page of the Frame Account Dashboard upon login. Account administrators manage many important aspects of the end user experience, including but not limited to Launchpad and Sandbox configuration, Capacity and Session Settings, and more.
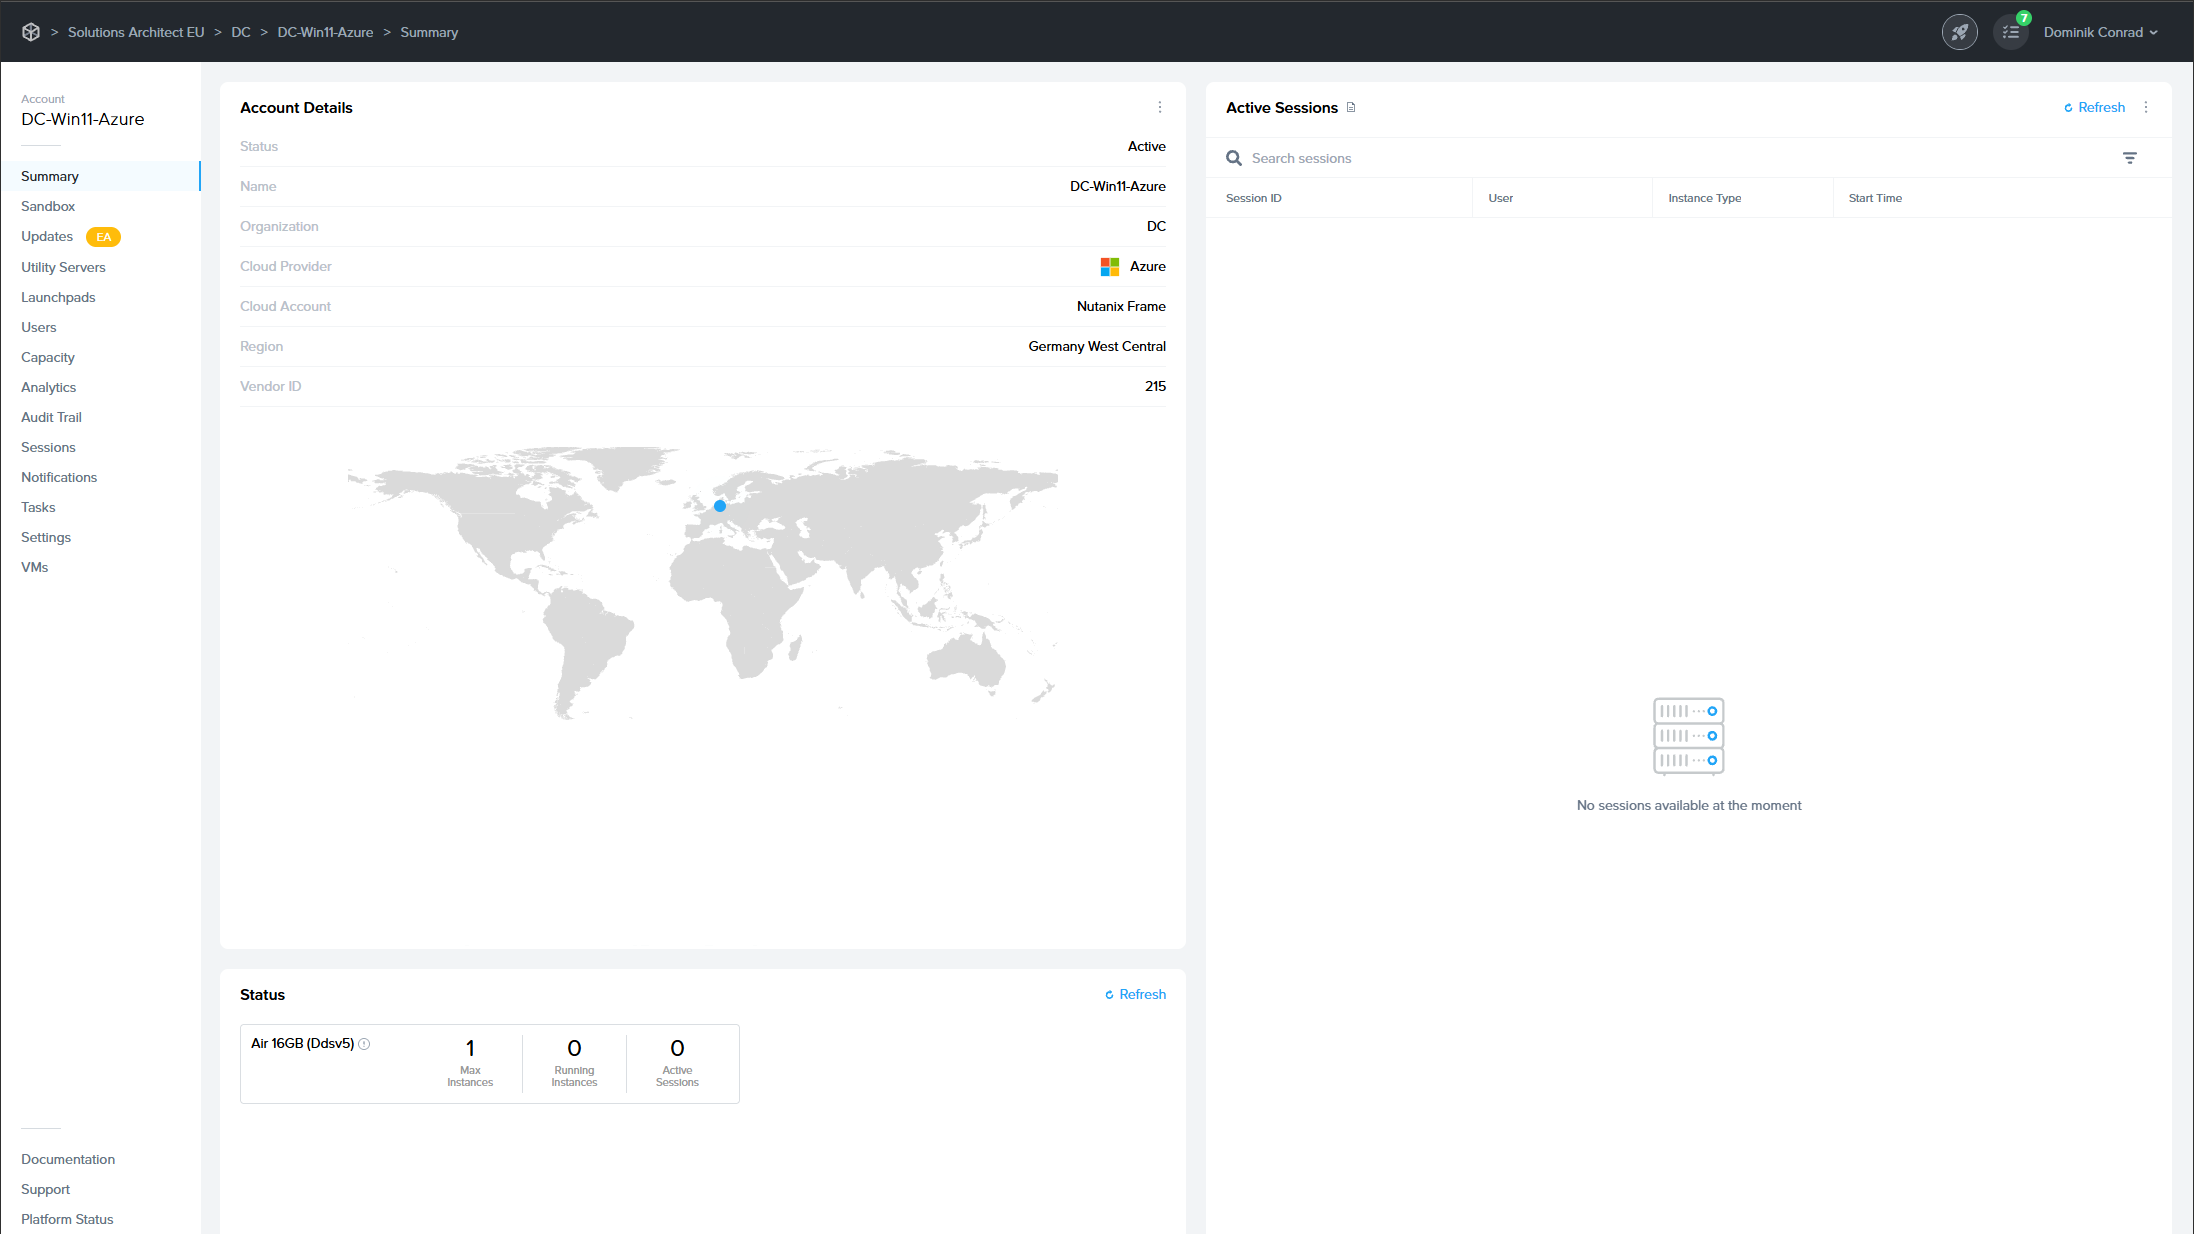
Summary Page
The Account Dashboard Summary page shows you many details about your account at a glance. Under Account Details pane, Frame Console lists:
- Status: Active denotes this Frame account is available for use.
- Name: Name of the Frame account.
- Organization: Name of the organization that the account belongs to.
- Cloud Provider: Infrastructure provider (AHV, AWS, Azure, or GCP)
- Cloud Account: Name of the cloud account where the Frame account workload VMs are present.
- Region: Public cloud region or AHV Cloud Account name.
- Vendor ID: ID associated with this Frame account.
Under the Account Details kebab menu, Frame admins can enable / disable Maintenance Mode.
The Status pane lists each of the pools (as defined in Capacity) created in this Frame account and for each pool, the maximum number of production instances, number of powered on production instances, and number of production instances currently in use.
Active Sessions
The Active Sessions page lists the user sessions currently in progress.

- Session ID: Unique identifier for the session. Important to provide when discussing a user session issue with Frame Support.
- User: First name and last name of the user, as provided by a third-party identity provider integration or Basic Authentication.
- Instance Type: Name of the instance type for this workload VM. Instance type names are specific to the underlying infrastructure. In the case of AHV, the instance type name will be the name you defined under the Cloud Account for AHV. This name corresponds to the name of the pool in Capacity.
- Bandwidth: Average bandwidth consumed in the session since session start. Hover over the bandwidth value to see the min, average, and max bandwidth consumed since session start.
- Frame Rate: Average frame rate in the session since session start. Hover over the frame rate value to see the min, average, and max frame rate since session start.
- Latency: Average latency measured in the session since session start. Hover over the latency value to see the min, average, and max latency since session start.
- Start Time: Number of seconds, minutes, or hours since the user started their session.
Administrators can see additional details about the user including location data by hovering over the user name tied to the active session.

The administrator can select the kebab menu to the right of each active session for additional actions:
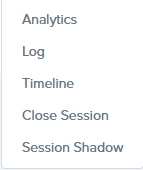
- Analytics: Show detailed information about Network and Streaming, System Health, Login Performance and Application Performance for each session
- Log: Provides a list of log entries when the session started, disconnected, and resumed. Active sessions will not have a log entry for when the session ended.
- Timeline: Displays a timeline of the session.
- Close Session: Administrator can close the active session. The end user will see a message stating that the administrator closed their session.
- Session Shadow: The Session Shadowing feature allow admins to connect to a user session to observe the user's primary display and control the mouse and keyboard, as necessary.
Launchpads
The Launchpad is the end user-facing part of the Frame platform interface where users launch and manipulate applications. The Frame platform allows you to have multiple Launchpads that can be customized for different use cases and workflows. Launchpads are attached to Accounts and, at their core, they are a representation of the applications that are available for streaming.
An example of a simple application Launchpad:

Clicking on the Rocket icon in the bottom left corner of the page will show users all Launchpads they have access to (including titles and thumbnails).

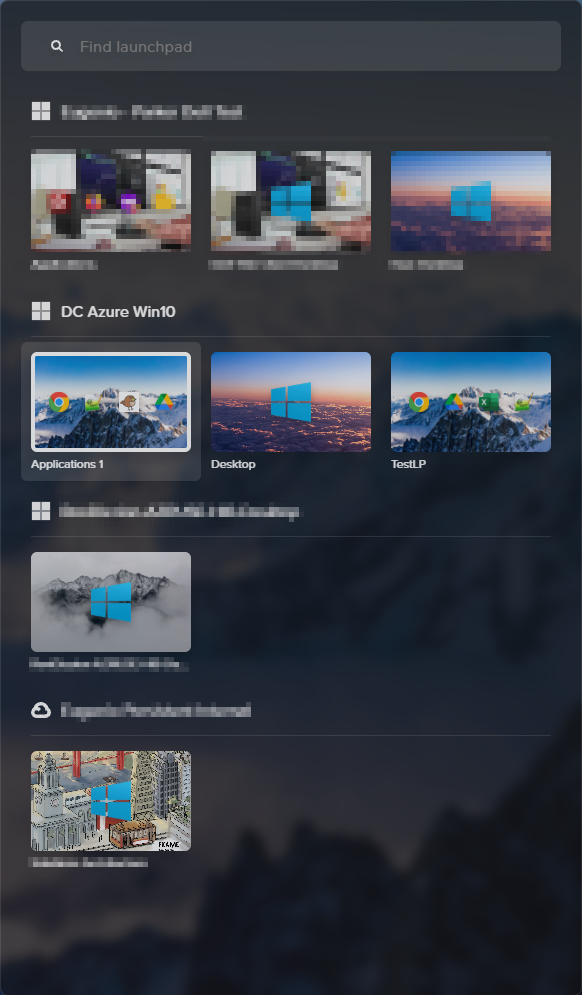
From this interface, the end user can easily access any or all of the Launchpads they have access to. This provides an efficient entryway into any of their applications and desktops. The rest of this guide will focus on creation and administration of these Launchpads.
Application vs. Desktop Launchpads
End users may use two distinct types of Launchpads. Application Launchpads are designed to serve multiple application sets to end users, while Desktop Launchpads provide a single icon that takes the user to a limited Desktop environment. Desktop environments give users access to applications within the session instead of the Launchpad interface.
Add a Launchpad
Administrators can create and configure Launchpads by navigating to the Launchpads page of their Account Dashboard. Start by clicking Add a Launchpad in the middle of the page.

Application Launchpad is not available with Persistent Desktop Frame accounts. If you wish to deliver individual applications to your users, create a non-persistent Frame account.
Whether you would like to deliver Applications or a Desktop interface to your users, select the desired Launchpad type and enter a name and URL slug into the corresponding fields. For this example, we'll select the Application Launchpad type.

Click Add Launchpad once all details have been entered. Your Dashboard interface will now display your new Launchpad:
Configure a Launchpad
In the Launchpad panel, admins can modify the name, URL name, and instance types they would like accessible to their end users. Admins can also switch between Application and Desktop Launchpad types and select their launchpad background image.
Click on the kebab menu in the upper right corner of this section to delete the Launchpad or modify session settings specific to this Launchpad. Read more about session settings by clicking here or navigating to the Session Settings section of Frame Platform documentation.
Application Launchpad
Administrators can use the Layout section to choose which applications are visible to the end user when accessing their Application Launchpad. Click Manage Applications to toggle which applications you wish to display in the layout area.

Admins can group app icons together into folders and/or change the order as desired. Click Save once you've made the desired changes.

Here is an example of an Application Launchpad:
Application Auto Launch
For administrators who want to send users directly into their app session, skipping the Launchpad completely, enable the Application Auto Launch slider. This feature is applicable only for Launchpads with a single application.
Application Launchpad 2.0
Administrators delivering Frame sessions via Application Launchpad can now provide an enhanced experience to end users with App Mode 2.0. App Mode 2.0 allows end users to access their onboarded applications from the Frame start menu within the session.
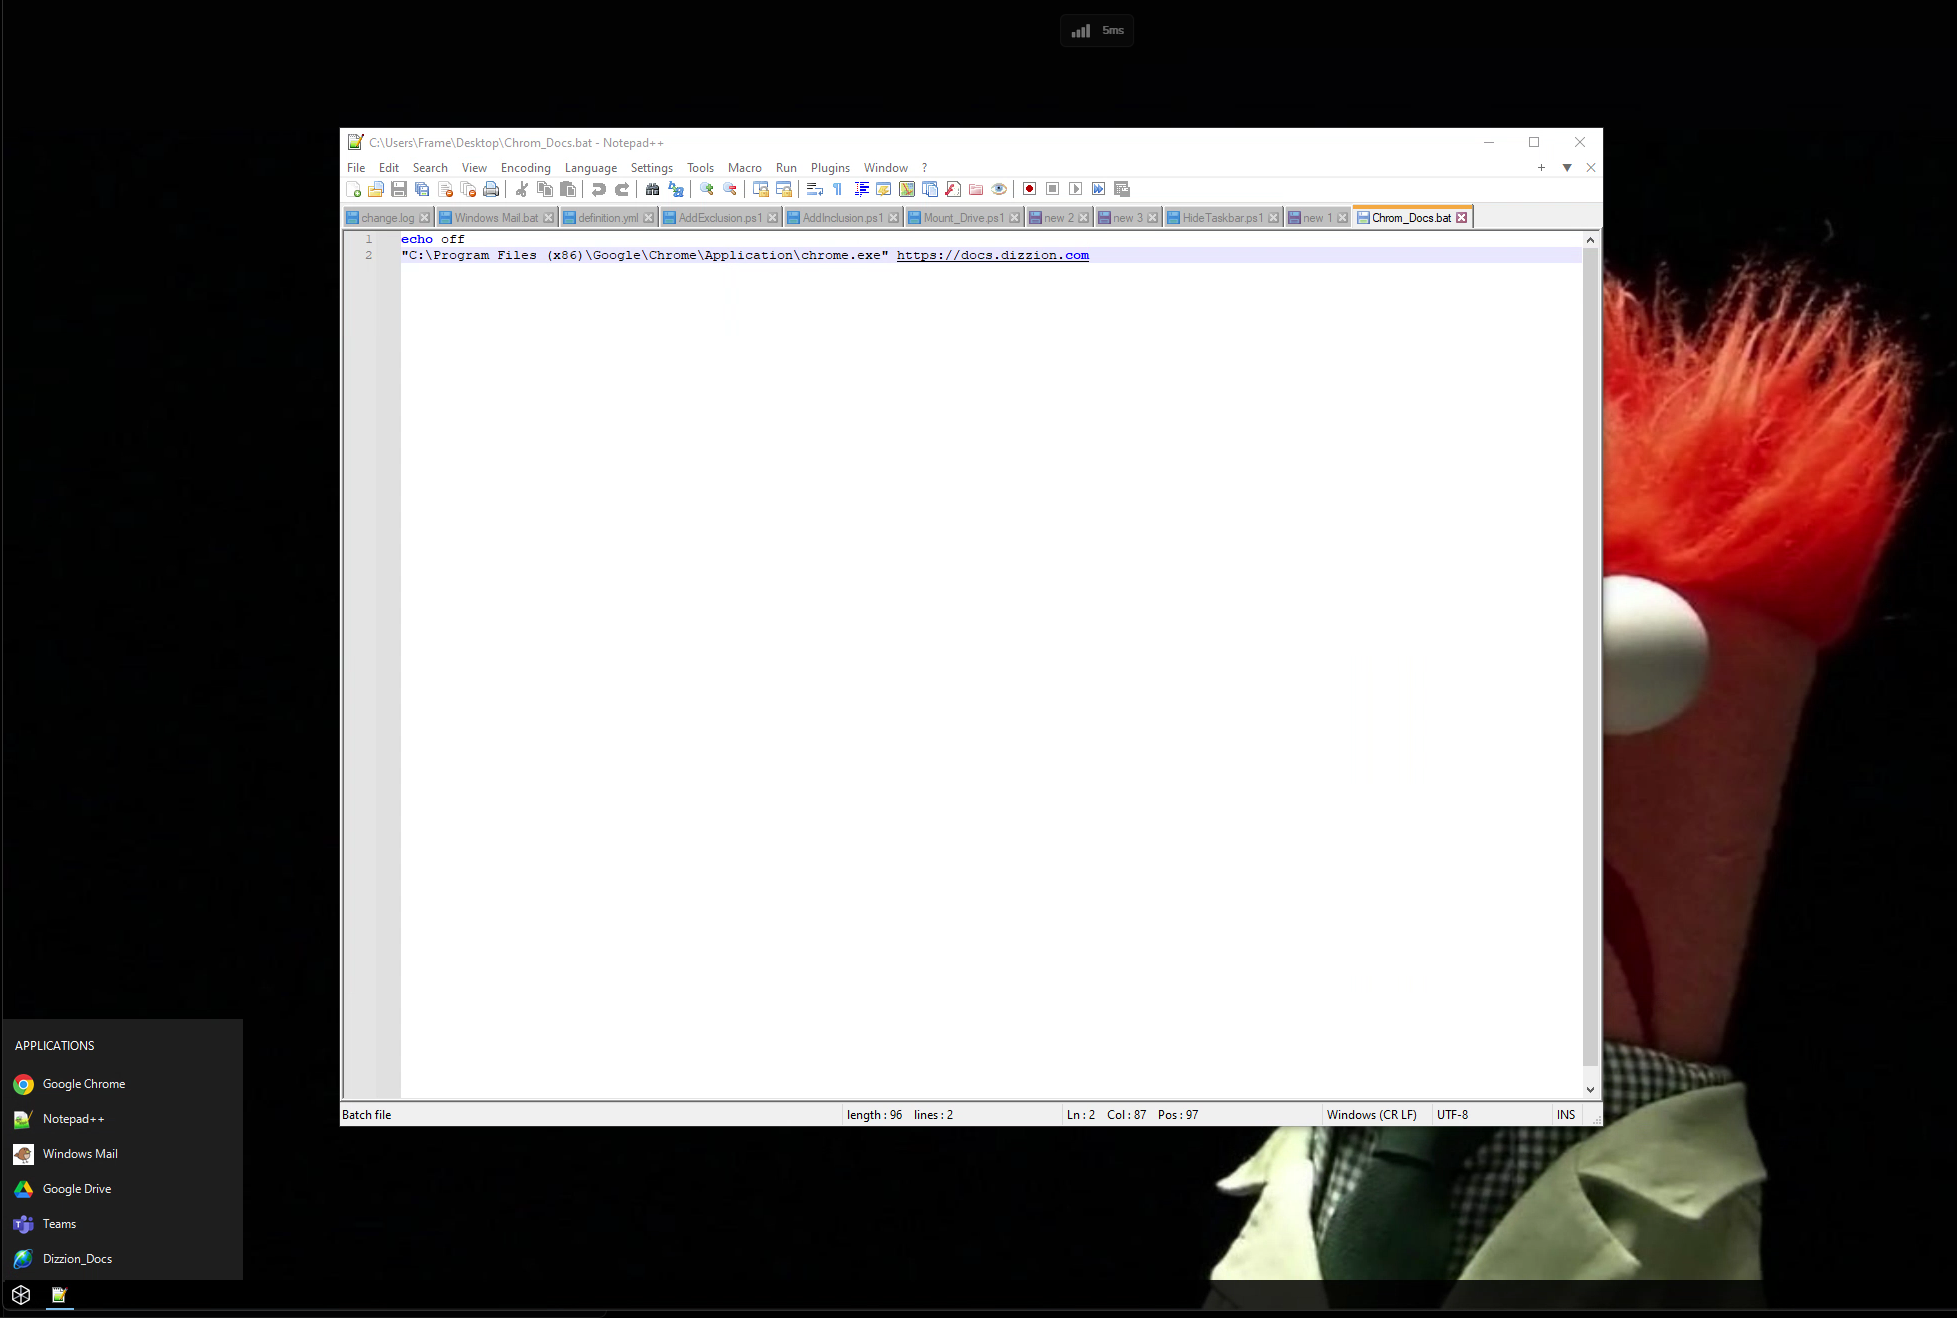

Administrators can hide the Windows Task Bar with App Mode 2.0. Refer to Autohide the Windows Task Bar in App Mode 2.0 to understand how to use FGA Scripting to set the appropriate registry key to autohide the Windows Task Bar.
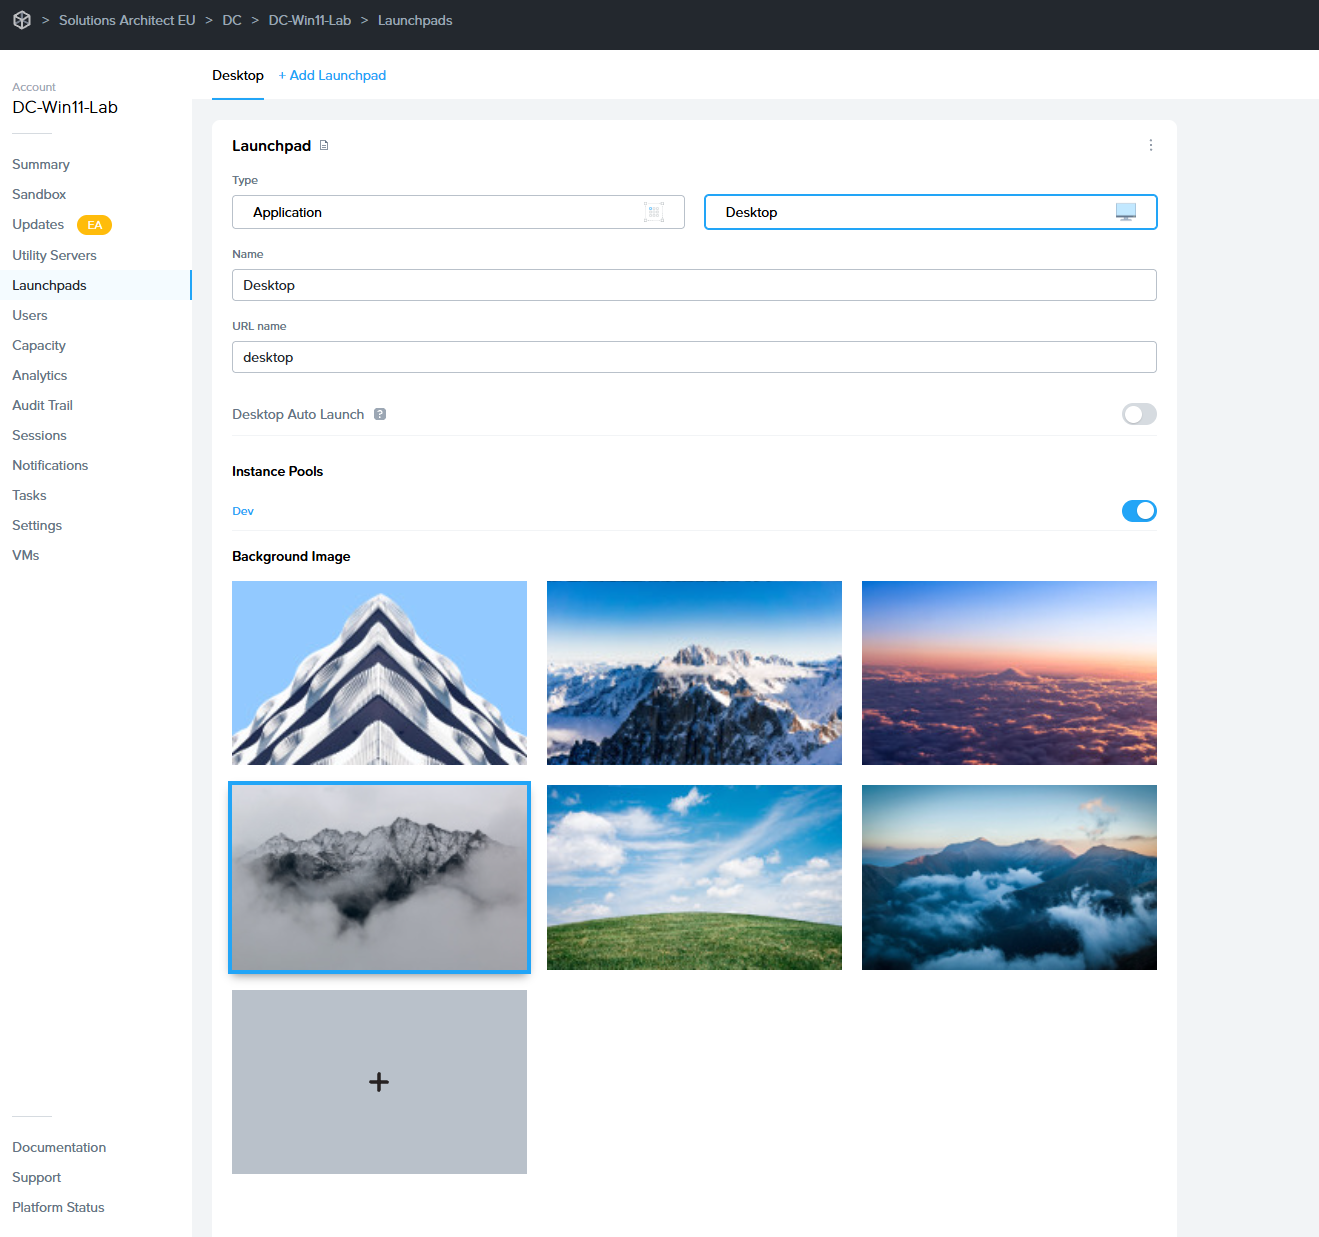
Desktop Launchpad
Desktop Launchpad settings are identical to Application Launchpad settings, however, there is no "Applications" section. Desktop Launchpads only consist of one Desktop icon, so there is no layout configuration necessary.

Here is an example of a Desktop Launchpad:

Desktop Auto Launch
For administrators who want to send users directly into their desktop session, skipping the Launchpad completely, enable the Desktop Auto Launch slider.
Launchpad Appearance
Administrators can add their own custom Launchpad background images by simply clicking the gray plus symbol listed under Background image on the Launchpad page of their Dashboard. A file browser will launch, select the image you would like to use for your Launchpad background.

NOTE: Your custom background image cannot exceed 3 MB in size.
Test Launchpads
Test Launchpads are Launchpads tied to Test Pools, which are created with the Test Publish feature. This part of the guide details how to create Test Launchpads.
Before you create a Test Launchpad, you must have already done the following:
- Enabled the Test Publish Feature in the Settings page of the Dashboard.
- Added at least one Test Pool in Capacity.
- Configured at least a max capacity of 1 for at least one Test Pool.
- Performed a Test Publish.
To create a Test Launchpad, go to Dashboard > Launchpad. Add a new Launchpad and enable the Test Launchpad toggle. You need to specify if this Test Launchpad will be an Application or Desktop Launchpad before clicking Add Launchpad.

Bring-Your-Own Workloads (Early Access)
Overview
The Bring Your Own Workload feature enables customers to bring their own Windows desktops, workstations, servers, or virtual machines - whether physical, virtual, or cloud-hosted - and integrate them seamlessly into the Dizzion platform for secure, remote access.
This functionality Remote PC provides a simple way to add and register workloads that reside outside Dizzion-managed infrastructure, enabling access through the same Dizzion interface and delivering a consistent user experience powered by the Frame Remoting Protocol (FRP) and secured by the Streaming Gateway Appliance (SGA).
By creating this type of account and registering your devices (VMs, desktops, or servers), you gain the ability for end users to securely connect to these devices directly through a browser, leveraging WebRTC-based streaming powered by the Frame Remoting Protocol (FRP). This enables consistent, low-latency experience without requiring a VPN or native client installation.
This Remote PC feature is applicable for:
- Windows PCs, Desktops, Workstations, Laptops.
- Racked servers and workstations in on-premises datacenters and co-locations.
- Cloud VMs hosted by non-Dizzion-supported infrastructure providers such as Microsoft Hyper-V, Microsoft Azure Stack Local, VMware/Broadcom vSphere, Citrix XenServer, Redhat Virtualization (RHV), Oracle KVM, Proxmox VE, Alibaba Cloud, Oracle Cloud Infrastructure (OCI) and others.
- Cloud VMs hosted by Dizzion-supported providers (AWS, Azure, GCP, IBM, Nutanix AHV) where customers prefer not to import the cloud account.
The process eliminates the need for traditional cloud setup steps (such as provider, region, or VPC/VNET selection) and allows registration using a single registration code and URL.
Prerequisites
Before registering your workloads make sure the following requirements are met:
- This feature currently only works for Windows operating systems
- Workloads must have outbound network connectivity on TCP port 443 (HTTPS) to access the registration URL, which is provided in the setup instructions below.
- All networking requirements must be met as described in the reference documentation here.
- For manual installation, you need administrative privileges on the workload VMs to install the Frame Guest Agent. For unattended installation, make sure the Frame Agent Setup Tool (FAST) is downloaded and set up for automated installation.
- A Persistent Desktop account needs to be set as explained bellow
Workflow
Step 1 – Create new Persistent Account from Console – New Account Type
· In the Create Account wizard, open the Account Type dropdown menu and select ‘Bring Your Own Workload’.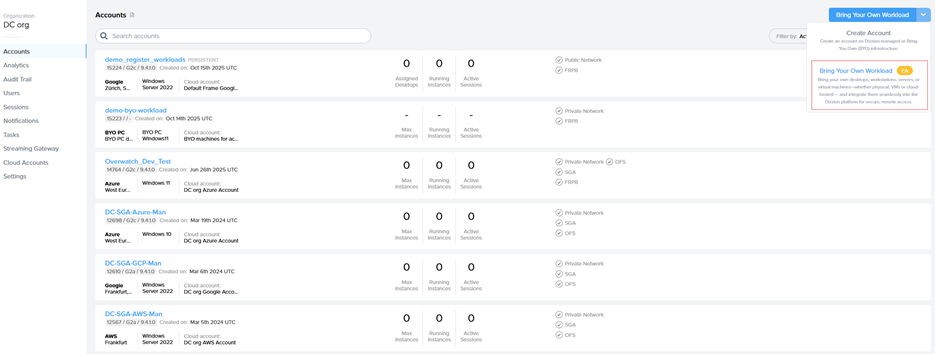
· Enter an Account Name and URL and click Create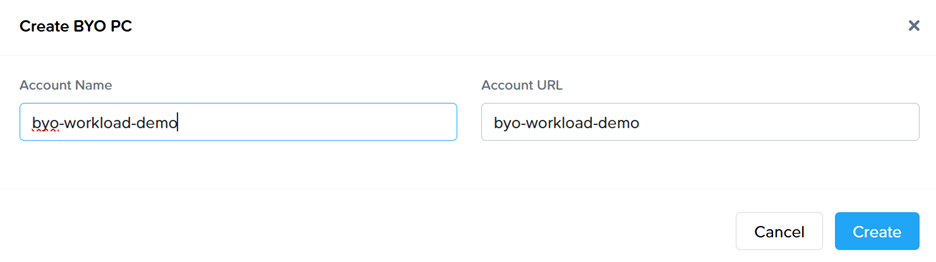
Step 2 – Register Workloads
· Go to the VMs page and select the “Register Workloads.”
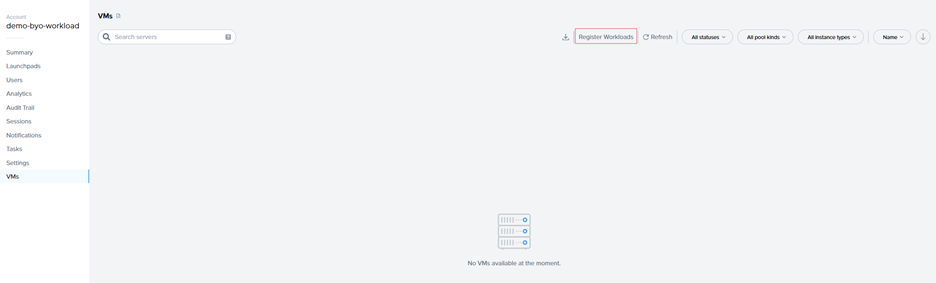
· Specify the number of workloads you want to import into a persistent desktop pool.
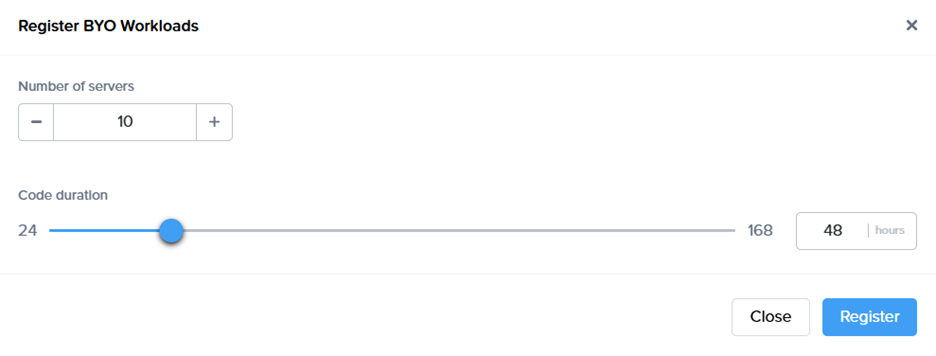
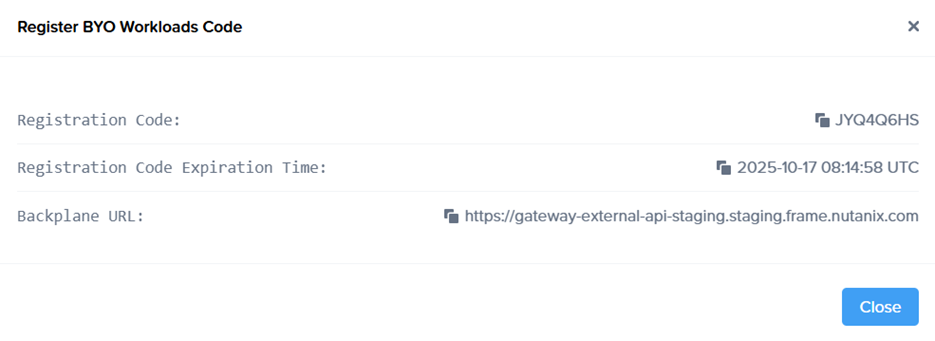
· A registration code with an expiration time, along with the backplane URL will be displayed. Copt the Code and URL so it can be used later.
· New objects appear on the VMs page, serving as placeholders until the actual machines register. If the registration code expires, refresh the page to generate a new one.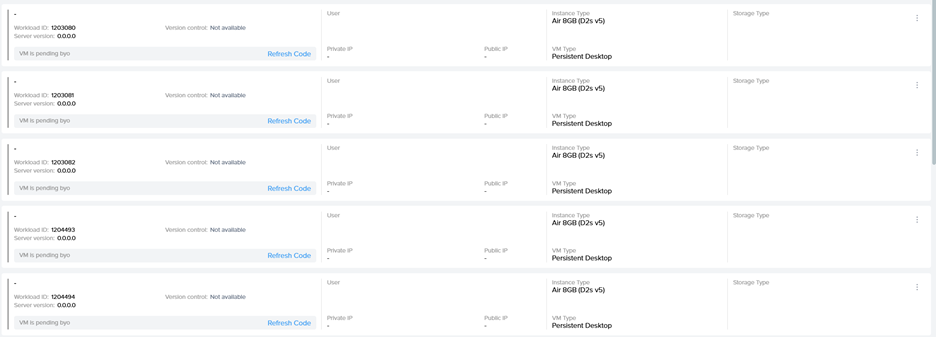
Step 3 - Install Frame Guest Agent on Workloads
Manual installation
On each workload VM, log in physically or connect remotely using VNC, Microsoft RDP, Citrix HDX, Omnissa (VMware) Blast, or another preferred protocol. Download the installer, the Frame Agent Setup Tool (FAST): http://downloads.difr.com/prod/frame-components/FrameAgentSetupTool.exe
Registration via command prompt:
frameagentsetuptool.exe install frameimage registrationcode=<code> registrationurl=<url>
Replace <code> and <url> with the values generated in Step 2 of the Workflow.
Registration via UI:
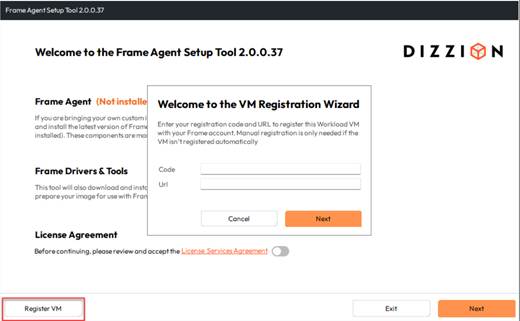
Use <code> and <url> with the values generated in Step 2 of the Workflow.
Unattended installation
For customers who prefer unattended installations of FAST, this can be deployed automatically using standard management tools.
Recommended Methods
- PowerShell Script: Run locally or remotely or distribute via GPO.
- Intune / Endpoint Manager: Package FAST as a Win32 app and assign to devices.
- Cloud Startup Scripts: Add the command to Azure Custom Script, AWS User Data, or GCP startup metadata for automatic registration at boot.
- Use any third-party deployment tool of your choice.
Step 4 - Automatic Registration
After running the command, the Frame Guest Agent automatically registers the workload. Each workload then appears in the Persistent Desktop Production Pool as an unassigned persistent desktop. This normally will take some minutes.
Step 5 – Create Launchpad
Set up a desktop Launchpad for end users to access these VMs and configure e.g. SAML2 permissions.
Notes:
Since the workloads are added to Frame without an associated Cloud Account, the Dizzion DaaS and Cloud PC orchestration capabilities available in standard persistent desktop accounts, such as provisioning, scaling, and image management, are not supported.
The primary purpose of this account type is to provide secure and remote access to existing devices by leveraging the Streaming Gateway Appliance (SGA) and Frame Remoting Protocol (FRP) for high performance, browser based access to Windows Desktops.
There are several limitations to consider:
- No Sandbox support: Sandbox creation and related operations are not available.
- Limited management actions: Computers can only be rebooted (soft reboot through the Frame Guest Agent) or terminated (removed from the Frame console without actions on the device itself).
- Persistent desktop operations such as backup, restore, resize, and similar actions are not supported.
- Manual assignment required: Imported desktops are not automatically assigned to users.
- Enterprise Profiles, Personal Drives, and Domain Joined settings are not available.