USB to Web Serial Redirection on Frame
Overview
The Web Serial feature allows end users to connect and redirect serial devices through the browser within a Frame session.
This enables communication with devices such as sensors, barcode scanners, and industrial controllers directly from within the virtual environment.
Example use case: A user connects a local COM device to a remote application that requires serial communication.
Prerequisites
Before using Web Serial, make sure the environment meets the following requirements:
· You must be running Frame Server version 9.4 or higher, along with Frame Terminal version 7.0.0.15rc1.1 or newer.
· Your Frame App should be at least version 7.9.
· Additionally, the Com0Com driver must be installed on the remote machine. This driver can be downloaded from https://sourceforge.net/projects/com0com/, or — preferably - installed automatically using the Frame Agent Setup Tool (FAST).
Once these components are in place, you can proceed with configuring Web Serial redirection.
Setup Guide
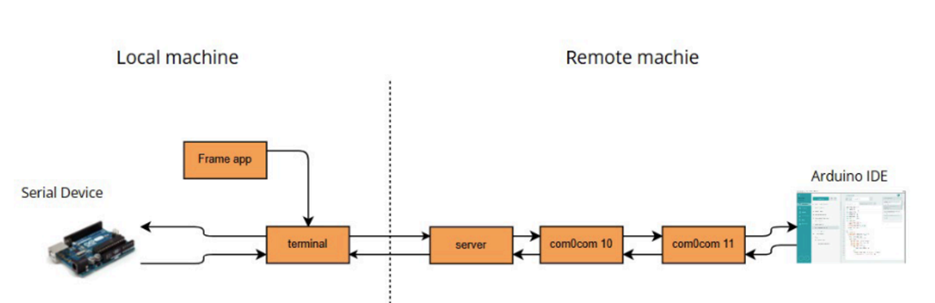
Step 1 – Create a Virtual Port Pair (Com0Com)
After installing the Com0Com driver, create a virtual port pair that links two emulated serial ports - for example, COM4 and COM5.
These ports will appear automatically in Windows Device Manager under “Ports (COM & LPT).” The paired ports act as two ends of a communication channel, enabling redirection between your local serial device and the remote application running inside the Frame session.
Step 2 – Enable Web Serial Redirection
To enable Web Serial, make sure that USB Redirection is turned on. This feature must be active for the serial connection to function correctly within a Frame session.
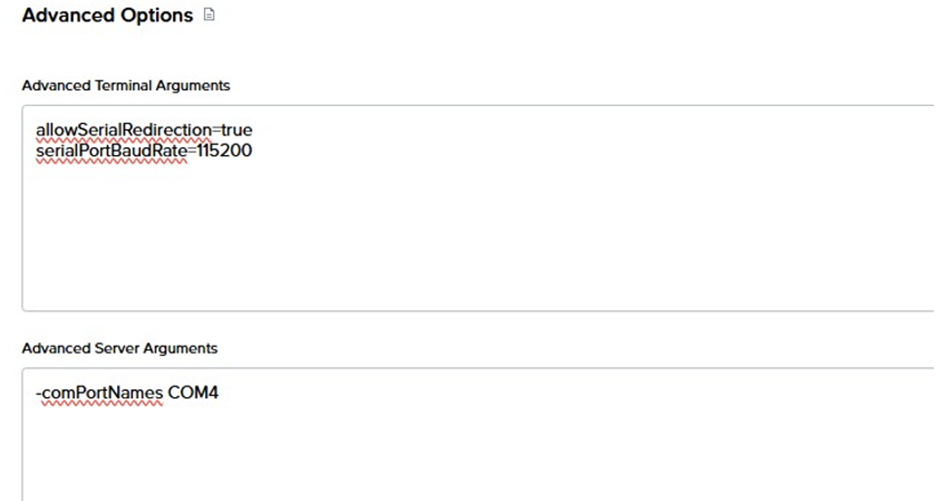
Next, specific advanced arguments must be configured on both the server and the terminal.
On the server side, you should include the argument that defines the virtual port name used for redirection. The argument is written as “-comPortNames” followed by the name of the virtual port {nameOdVirtualPort}. For example, if your virtual port is COM4, the argument would reference that port.
On the terminal side, two arguments must be added. The first one, “allowSerialRedirection =true” enables serial redirection itself. The second one, “serialPortBaudRate={the desired baud rate}” specifies the communication speed for the redirected serial device. For most devices, a baud rate of 115200 is commonly used.
Together, these server and terminal arguments instruct the Frame environment which port to use and how quickly to communicate with the device. When properly configured, the remote application inside the Frame session will be able to access and exchange data with the connected serial device through the browser.
Step 3 – Additional Server Arguments
If needed, you can fine-tune serial communication by adding the following additional server arguments. Each one adjusts how data is read or written through the serial port.
|
Argument |
Type |
Description |
|
-serialReadIntervalTimeout |
int |
Maximum read time in milliseconds between two bytes |
|
-serialReadTotalTimeoutMultiplier |
int |
Read multiplier |
|
-serialReadTotalTimeoutConstant |
int |
Total read time in milliseconds |
|
-serialWriteTotalTimeoutConstant |
int |
Total write time in milliseconds |
|
-serialWriteTotalTimeoutMultiplier |
int |
Write multiplier |
These arguments are optional but can be used to optimize serial performance for specific devices or workloads.
Step 4 – Additional Terminal Arguments
You can also define advanced settings for the serial port directly in the terminal arguments.
The available parameters are:
|
Argument |
Type |
Description |
|
serialPortDataBits |
int |
Default 8 |
|
serialPortStopBits |
int |
Default 1 |
|
serialPortParity |
string |
Default ‘none’ |
These parameters determine how data is framed and transmitted over the serial connection. The default values are typically suitable for most devices.
Step 5 – Connecting the Serial Device
Once everything is configured correctly, an “Add Serial Device” option will appear in the USB menu within the Frame session.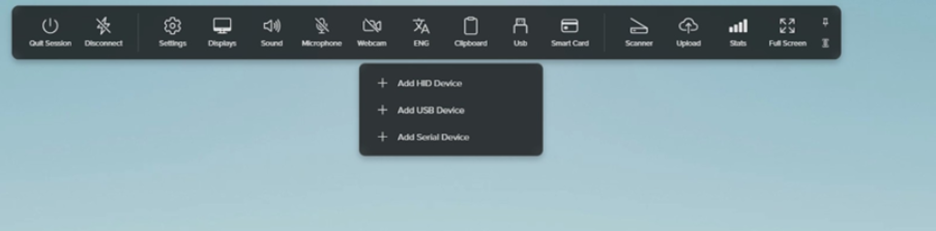
When you click Add Serial Device, you will be prompted to select a local serial device for redirection.
The server will use the virtual port defined in its advanced arguments (for example, COM4), while the remote application will connect to the corresponding paired port (for example, COM5).
Once connected, your application can communicate directly with the redirected serial device.
Troubleshooting on Ubuntu Client
If you encounter the error message “failed to open device with network error” when connecting from an Ubuntu client, it usually indicates a permission issue.
To fix this, run the following command in the terminal:
sudo usermod -a -G dialout $USER
After executing this command, log out and log back in to apply the permission change.