Microsoft Entra ID
Integrating Microsoft Entra ID Single Sign On (formerly Azure AD SSO) is a quick and easy process. Before we get started, take note of five pieces of data that you'll be using to set up a proper SAML2 integration.
-
The Frame SAML2 Integration Name. This is an arbitrary name value that you'll need to come up with. This value is used to uniquely identify your integration with Frame and used to craft the SAML2 URIs, as well as used as a search vector for troubleshooting and logs.
-
The Entra ID Federation Metadata Document URL. This is the Entra ID-provided URL where Entra ID keeps the SAML metadata for your Microsoft Entra ID application. The metadata URL must be publicly accessible to the Frame Platform on the Internet.
-
The Entity ID from your Microsoft Entra ID application.
-
The Redirect URL. This is the Frame destination URL that will process the Entra ID-generated assertions/claims after users authenticate through Entra ID.
-
The Entity URL that you will use as your landing page. Please see the Entities and URLs section to help you decide/find the right URL.
Getting Started
To begin, let's create a URL-friendly SAML2 IntegrationApplication NameID (also referred to as Entity ID) that we'll use in a few places throughout our setup.setup, Continueas belowwell as a Custom Label which will be displayed on the login page for helpusers, for example.
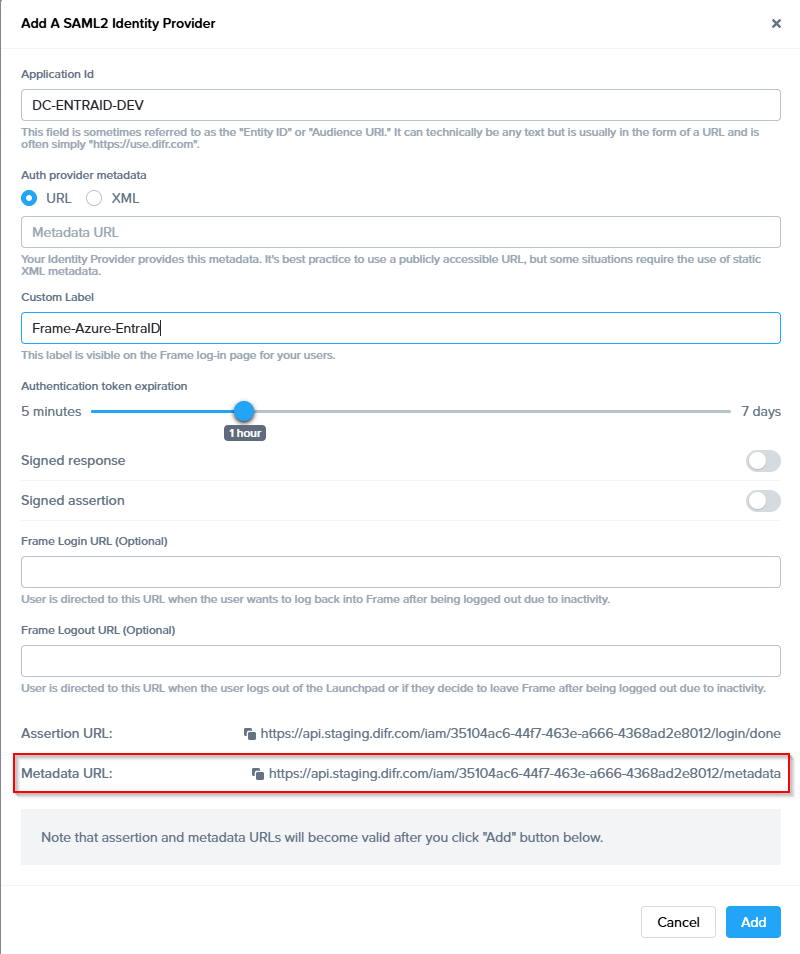
Application ID: DC-ENTRAID-DEV
Custom Label: Frame-Azure-EntraID
Click "add" to save the changes for later
Follow the steps to create a SAML 2 Provider explained in the General SAML2 Integration section, until you see until you see the template with the missing configuration info, and examplescopy thatthe youMetadata canURL usewhich will be needed later in yourthe SAMLsetup. integration.From
Integrationleave Namethe examplestab for Entra ID
Your SAML2 Integration Name is a case-sensitive, URL-friendly, unique,open, and descriptivecontinue value that representswith the integrationconfiguration between your Entra ID and Frame. This value can have only letters, numbers, andin the dashAzure symbol; no space or punctuation are allowed.
We recommend using something that includes descriptive information, such as your company and identity provider's names. This integration name is tied to your SAML2 endpoints on Frame and using descriptive names can be useful for debugging.
Optionally, fill out the information below to get a recommendation of what you could use. console.
IMG URLS for US and EU Backend US: https://img.console.nutanix.com/saml2/done/<Integration-name>/ EU: https://img.deu.difr.com/saml2/done/<integration-name>/
Your SAML2 Integration Name is a case-sensitive, URL-friendly, unique, and descriptive value that represents the integration between your Entra ID and Frame. This value can have only letters, numbers, and the dash symbol; no spaces or punctuation are allowed.
Configure Entra ID
Frame supports the ability for Entra administrators to use Entra ID Enterprise Applications
With an Enterprise Application, you benefit from being able to:
1. Have Frame automatically logout your users from Entra ID when they log out of Frame.
2. Enable Entra ID to redirect your users to a specific URL after the users are logged out of Frame and Entra ID.
3. Explicitly specify the users and groups who can access Frame.
To create an Enterprise Application, you will need to have at least one of the following Entra ID permissions:
-
Global Administrator: This role has the highest level of access to an Entra ID tenant and can perform any action in Entra ID tenant and can perform any action in Entra ID, including creating enterprise applications.
-
Cloud Application Administrator: This role can create and manage enterprise applications in Entra ID but cannot manage the Entra ID tenant itself.
-
Application Administrator: This role can create and manage enterprise applications in Entra ID but only for a specific set of applications assigned to them by a Global Administrator or Cloud Application Administrator.
In case you do not have any of above Entra ID Roles, you can create an Entra ID App Registrationhowever, you will not have the Enterprise Application benefits described above.
Considerations
-
If you are registering your own Azure subscriptions, you might have already created app registration by following our BYO Azure Subscription process. For integrating Entra ID to Frame as a SAML2 identity provider, please create a new Enterprise Application for user authentication purposes.
-
If you want Frame to redirect your users to log out of Entra ID and be redirected to a specific web page after they log out of Frame, please submit a support case describing where your SAML2 IdP Provider is registered (e.g., the Frame Customer or Organization entity), the SAML2 Integration Name, and the URL you wish Entra ID to redirect the users to after they are logged out of Entra ID.
Configure Enterprise Application
To configure a Microsoft Entra ID Enterprise Application:
-
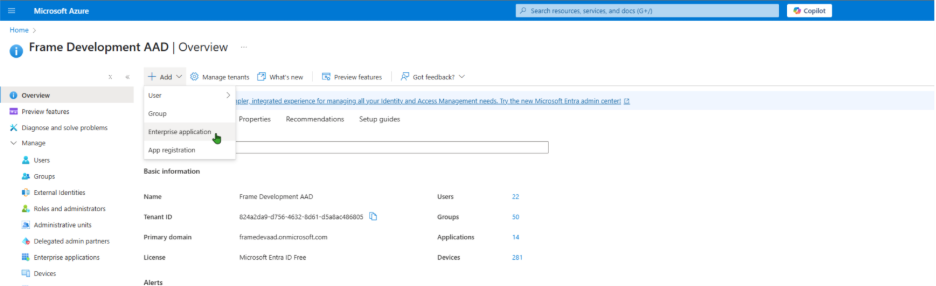
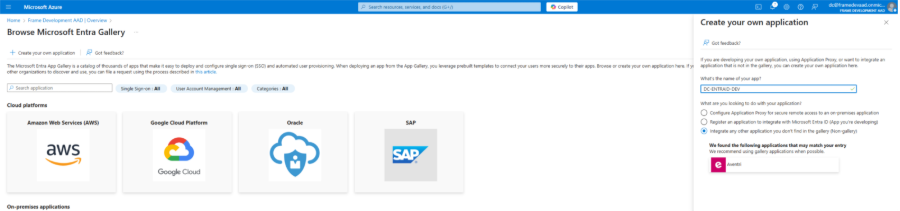
First, go to your Azure portal. Search for "Enterprise Registrations" in the top search bar. Click on it, in the results list. You can also open Microsoft Entra ID, click on +Add, and select Enterprise Applications.
-
Click on Create your own application, enter the name of your app (e.g., "Dizzion Frame", for our demo we have chosen "DC-ENTRAID-DEV), select the option “Integrate any other application you don't find in the gallery (Non-gallery)” and click on Create.
We recommend to use the Application name also as Entity ID later on

-
Once the new application has been created, open the Properties configuration page.
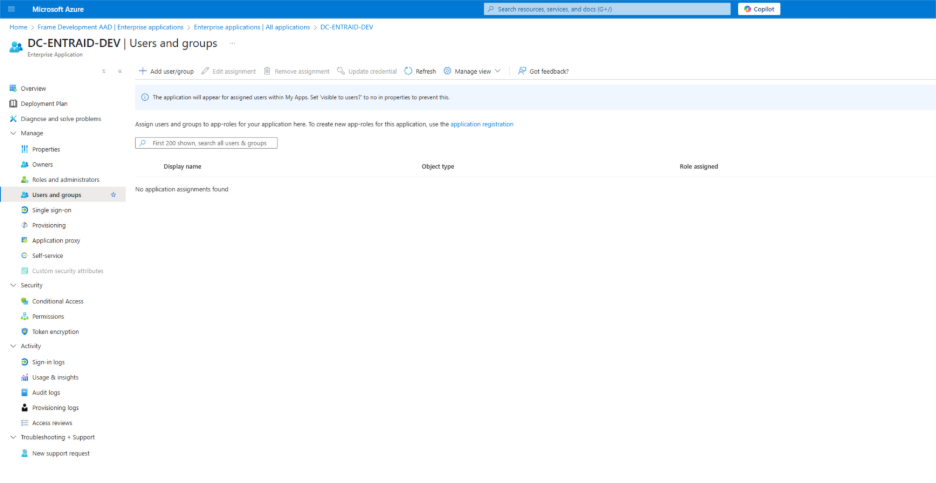
a. If you only want specific users or groups to be able to authenticate to this application, make sure that the Assignment required? slider is set to Yes. Click on Save. Then go to Users and groups, click Add user/group and select desired users/groups who will be able to access Frame.
b. Click on “application registration" to set the homepage URL and click save
(optional upload a logo png )
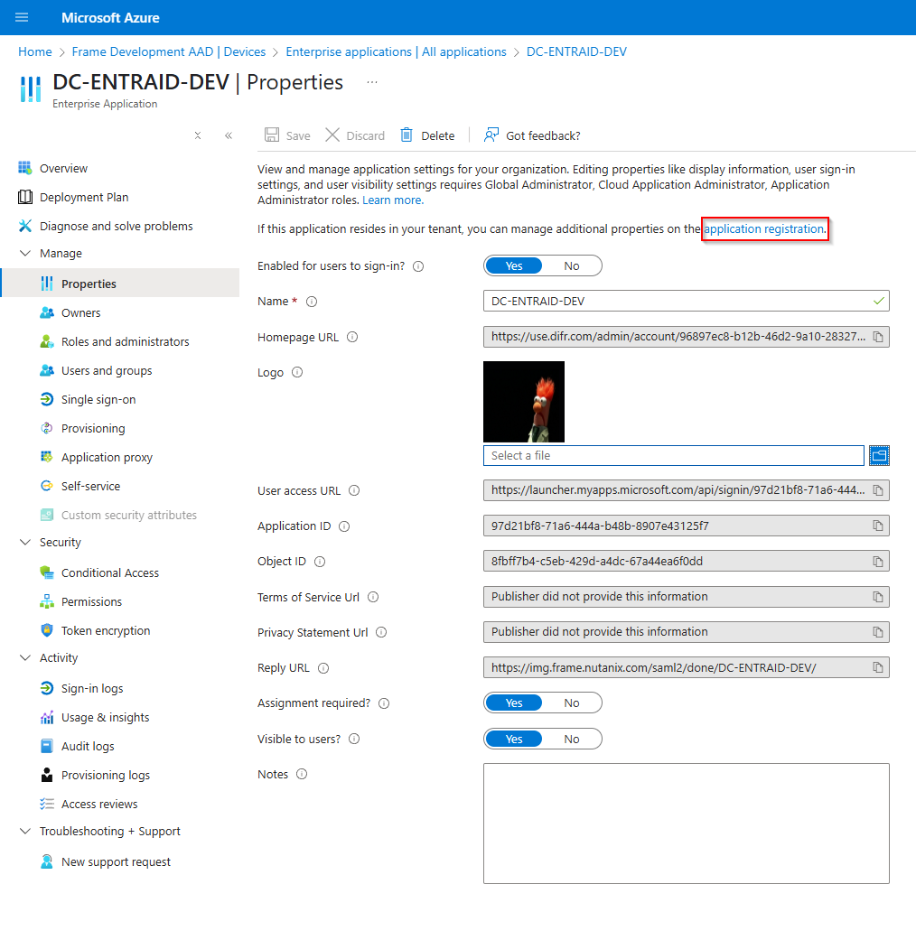
c. If you want anyone from your Entra ID tenant to be able to authenticate to this application, make sure that the Assignment required? slider is set to No. Click on Save.
-
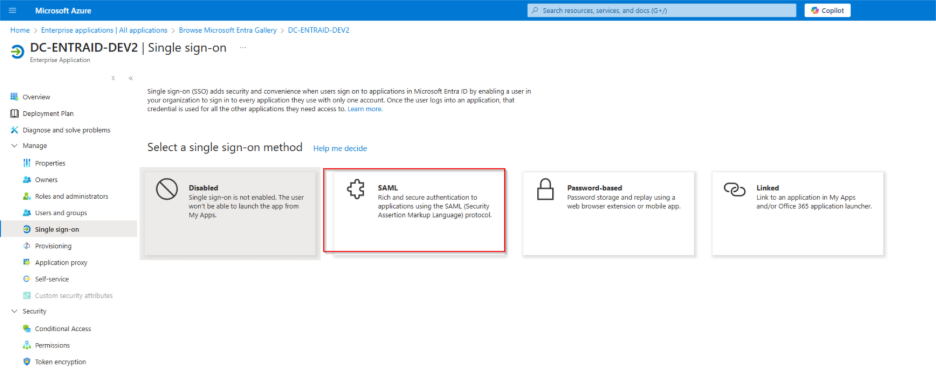
Switch to Single sign-on and select SAML as config option
-
For Basic SAML configuration click edit and set the identifier (Entity ID) and the reply URL, For the Entity ID use the Integration Name that have been set for The Enterprise Application

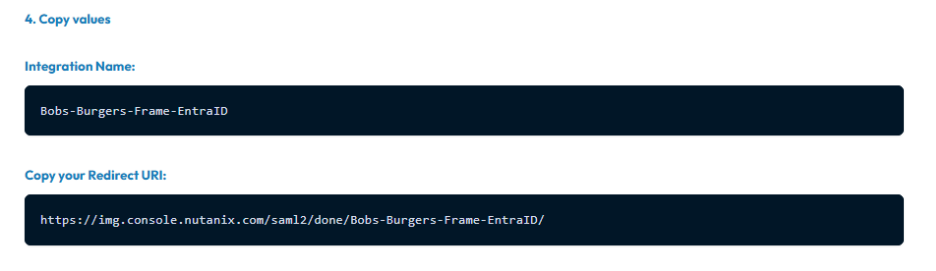
Reply URLS: US: https://img.console.nutanix.com/saml2/done/<Integration-name>/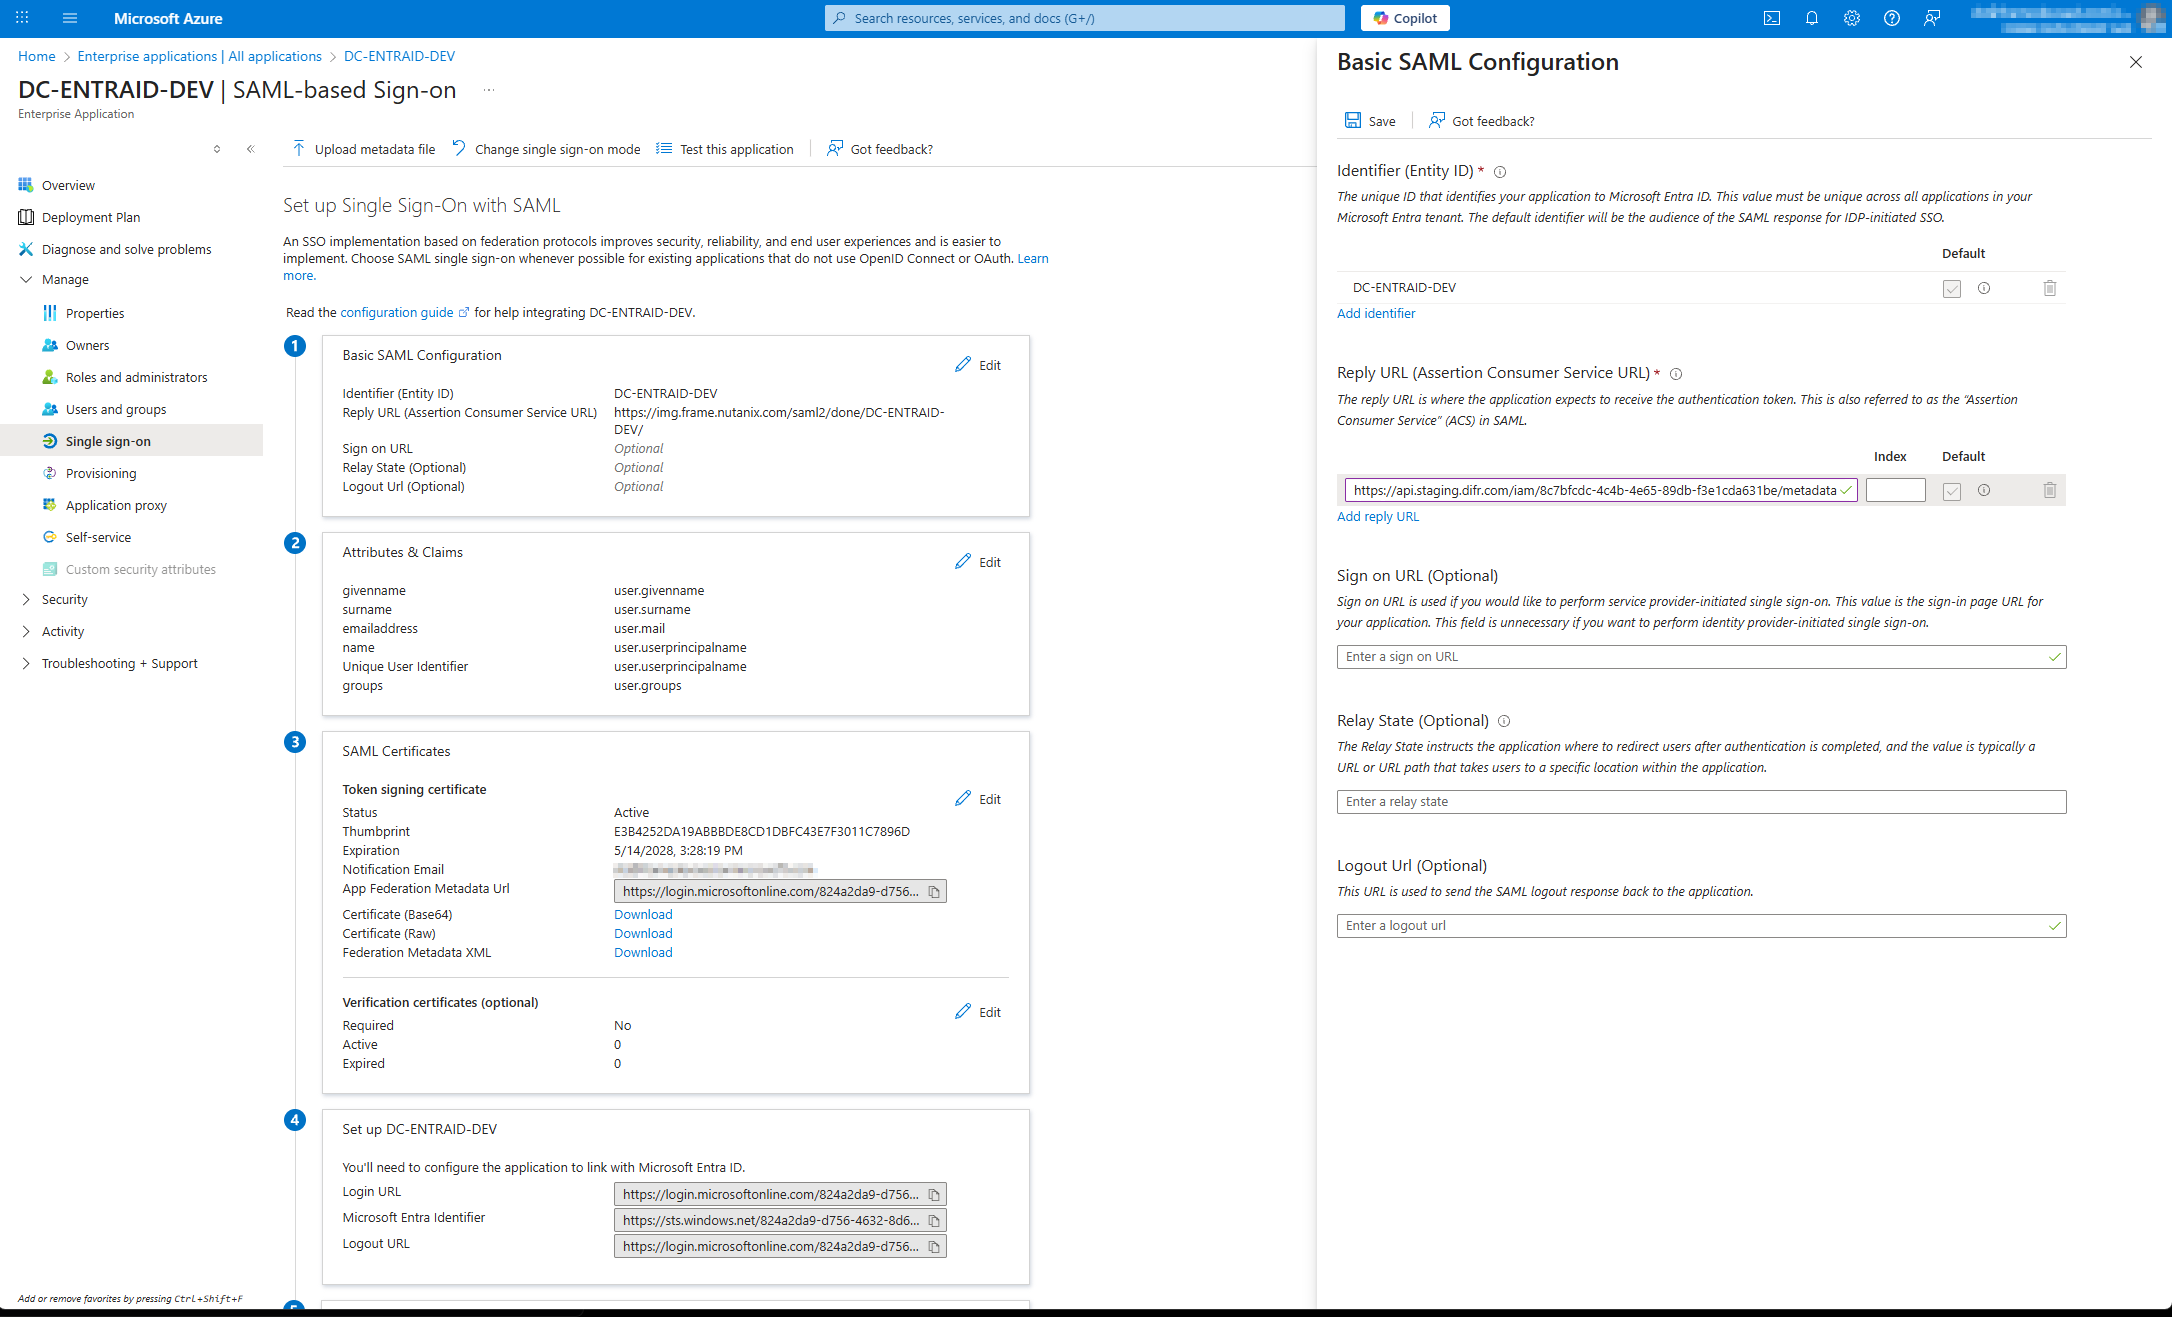
EU: https://img.deu.difr.com/saml2/done/<integration-name>/
Be sure to replace YOUR-UNIQUE-SAML-INTEGRATION-NAME in the URL with your own SAML Integration Name. Slash (“/”) after your unique SAML Integration Name is mandatory!
-
Move to Attribute & Claims, go to edit and create a new group claim
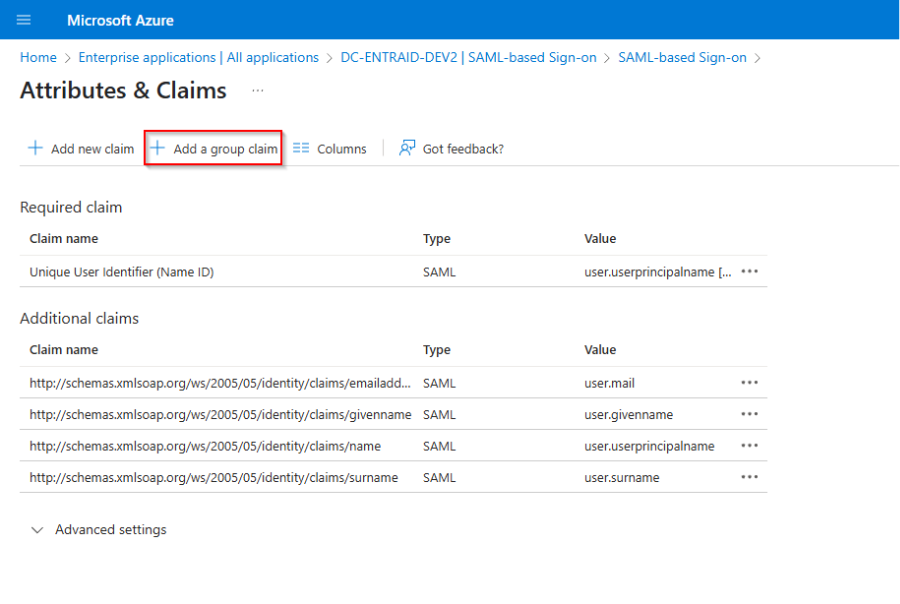

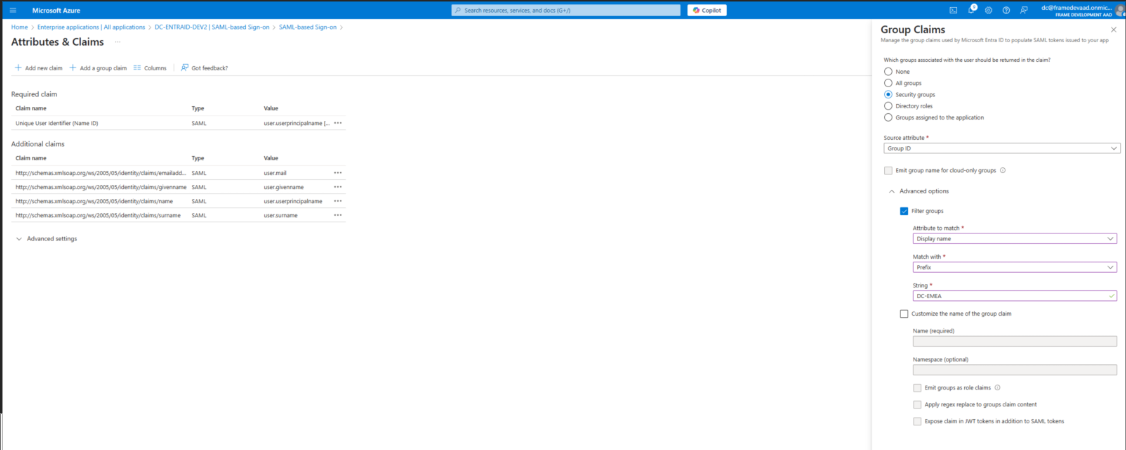
Select security group and save.
Optional if users are member of more then 150 groups you can filter for specific groups which will then be sent in the group claims.
NOTE:
If a user is a member of Group B, and Group B is a member of Group A, then the group claims for the user will contain both Group A and Group B. When an organization's users have large numbers of group memberships, the number of groups listed in the token can grow the token size. Entra ID limits the number of groups that it will include in a token up to a maximum of 150 for SAML assertions and 200 for a JWT. If a user has more than 150 groups, the groups are omitted in the SAML assertion. A link to the Microsoft Graph endpoint to obtain group information is included instead. Further details are at Microsoft's Entra ID documentation.
Recommendation: Create a unique group for all users which should have access to Frame via ENTRA ID and set the filter within the group claim to point at this group to prevent any issues with group membership values.
-
Go back to the Single sign-on overview and copy the Entity ID and the metadata URL

CreateConfigure the SAML2 Authentication Integration Provider in Frame
-
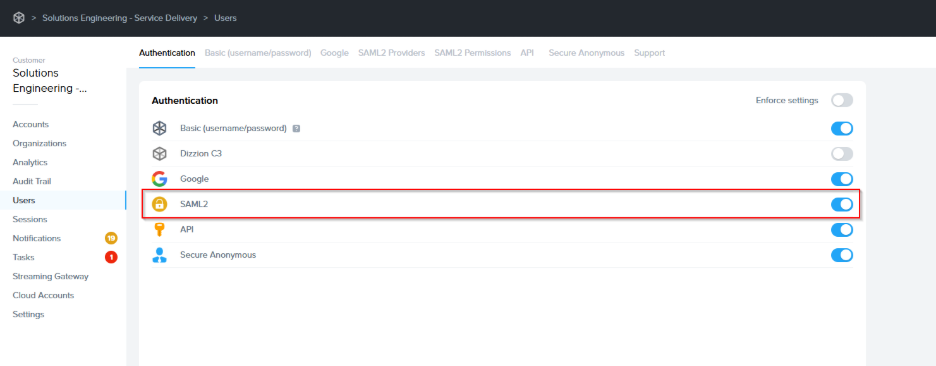
OpenNavigateupa new tab and navigate to your Frame account. ASAML2authentication integration can be configured at any level (depending on administrative access) by navigatingback to theAdminFramepageconsole which from the Getting started section and continue with the SAML2 provider configuration by clicking on theellipsis listed next to the desired entity name. SelectUsersfrom themenuthat appears.
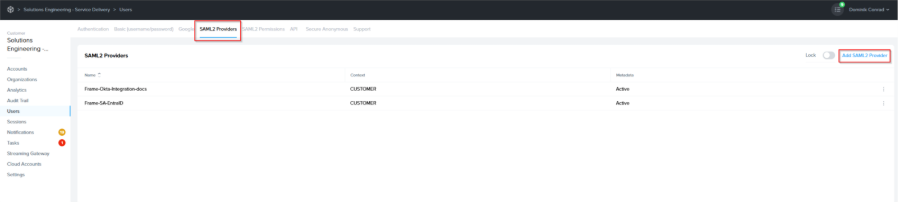
UnderAuthentication, enable theSAML2toggleandclickselectSavein the upper right corner.
ClickAdd SAML2 Provider.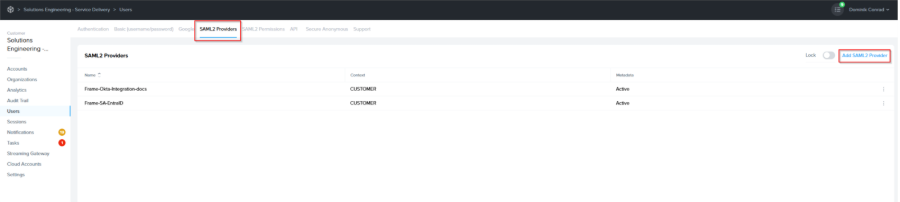
A new window will appear prompting you to enter some of the information you obtained earlier.
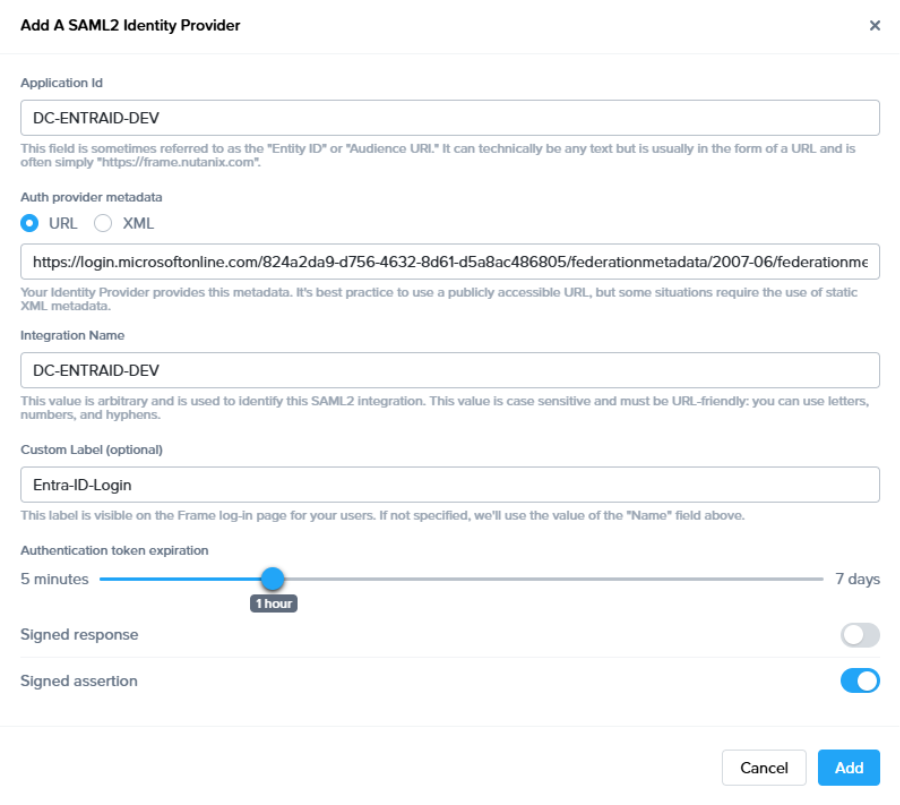

Application ID: The value here
:needs to matchPastethe value set as the "EntityIDID" fromGettingStepStartedsection
Auth provider metadata:
CheckClick theURL“XML” option and paste theFederationcontents of the MetadataDocumentXMLURLfileyoufromcopiedStep 4.- Custom Label:. Allows Admins to customize Frame's Sign in
steppage chiclets/buttons associated with this SAML2 integration. - Authentication token expiration: Choose a token expiration duration that supports your end-user workflows and complies with your security policies.
- Enable “Signed assertion”
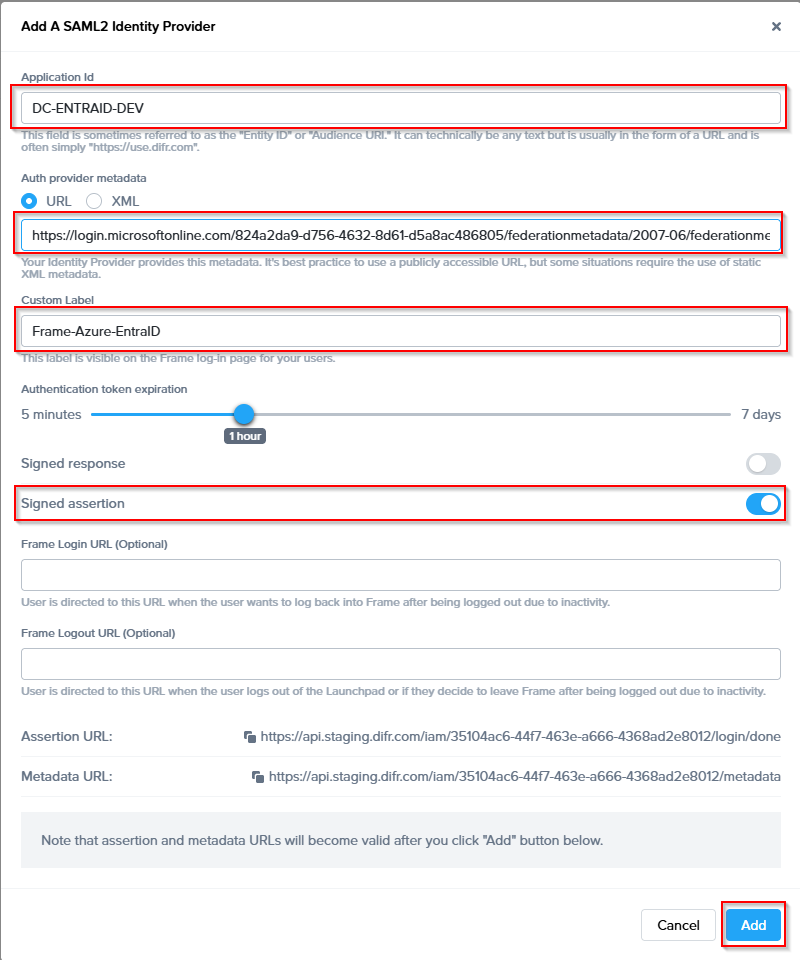
- Assertion Consumer Service (ACS) URL
7: Theintoendpointthiswherefield.the Identity Provider (IdP) delivers SAML authentication responses after a successful login. - Metadata URL: A publicly accessible URL providing your Service Provider's SAML metadata, used by Identity Providers to configure and establish trust.
Optional - Frame Login URL: user is directed to this URL when the user wants to log back into Frame after being logged out due to inactivity.
- Frame Logout URL: user is directed to this URL when the user logs out of the Launchpad or if they decide to leave Frame after being logged out due to inactivity.
Lastly, confirm that everything is entered correctly and click Integration NameAdd: Enter the SAML2 Integration name defined in the Getting Started section of this page. .
Custom Label:When specified, this value will be usedinthe login page asSign in with <Custom Label>. Enter “Entra ID” or customize it however you like.
Authentication tokenexpiration:Set thedesiredexpirationtime for the authentication token. This can range from 5 minutes to 7 days.
Signed response:Leave this toggle disabled.
Signed assertion:Enable this toggle.
After filling out the required fields, click Add. Next, it's time to set up permissions for our users based on their email address or passed group claims if you configured groups in your Entra ID App Registration.
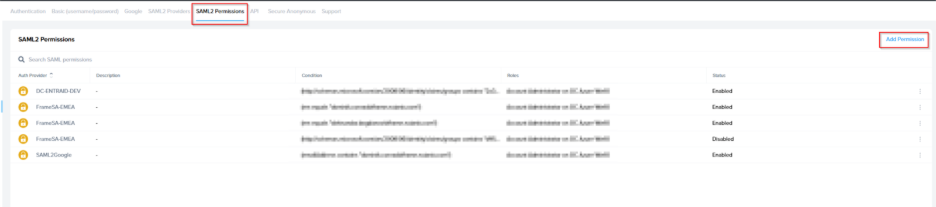
Configuring SAML2 Permissions
Once the SAML2 Provider is successfully configured in the Frame Console, administrators will need to add authorization rules from the SAML2 Permissions tab listed to the right of the SAML2 Provider tab.
Add roles/permissions for your users by following our Roles and User Permissions with a SAML2 IdP guides.
Once you've configured permissions for your users, that's it! You're ready to test signing into Frame at your Entity URLs (Launchpad, Account Dashboard, etc.)!
Configuring SAML2 Group Permissions
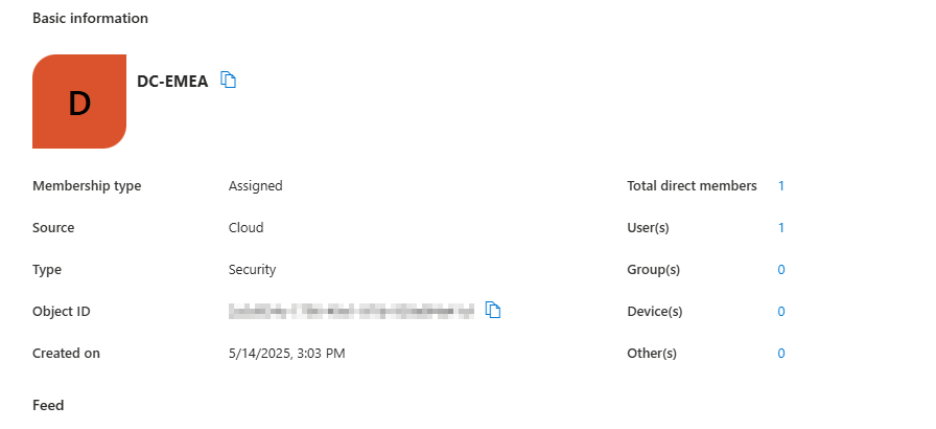
-
Next, get the Object ID of the group or groups you would like to use for assigning user permissions. You can obtain this from the Groups console in Azure Active Directory. Find the group you would like to use, click on it, and copy the Object ID as shown below:
-
From here, navigate to the Users > SAML2 Permissions section of your Frame Console, either through the account Dashboard or by clicking on the ellipsis next to the entity you're configuring and selecting “Users.” Click Add Permission at the top-right.
-
Select your Entra ID integration from the drop-down menu under For provider. Next, choose how you'd like to allow access under the Allow access section. If you're doing some simple testing, “Always” is great. For more granular controls, you can apply roles when ALL or ANY conditions are matched. For simplicity, we chose Click When any condition is satisfied. Under the Conditions section, enter the URL to Microsoft's claims translation schema as the attribute type:


http://schemas.microsoft.com/ws/2008/06/identity/claims/groups
-
Grant whichever role you would like the specified group to have. For us, we assigned a simple role of Launchpad User for one of our accounts Launchpads. Click “Save” once you've completed all the fields as described above. The next time someone tries to sign into Frame Console, they'll be assigned permissions as configured here if there's a match.
Test SAML2 login
-
Go back to Azure console Navigate to your Enterprise Application and select Single sign-on
-
At the bottom of the page there is an option to test single sign-on


-
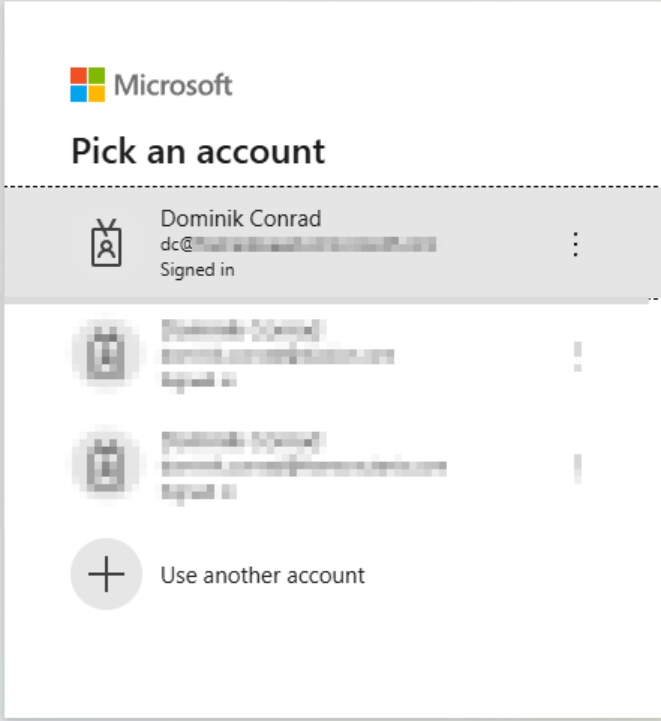
On the left-hand side click on Test sign in, a new browser window will pop up with the Microsoft login prompt, enter the user and password


-
You will then be logged into your Frame environment according to the permissions that have been set.

Accessing Frame with Entra ID
Your Entra ID integration will now appear to your users as a sign in button on the Frame Entity URL's sign in page. Reference the above Frame Entity URLs section to provide the right URLs to your users.
If the SAML2 Provider was configured for a Customer, Organization, or Account entity URLs, you should now see a new sign in button when viewing the entity's URL as shown below: