Bring-Your-Own Workloads (Early Access)
Overview
The Bring Your Own Workload feature enables customers to bring their own Windows desktops, workstations, servers, or virtual machines - whether physical, virtual, or cloud-hosted - and integrate them seamlessly into the Dizzion platform for secure, remote access.
This functionality Remote PC provides a simple way to add and register workloads that reside outside Dizzion-managed infrastructure, enabling access through the same Dizzion interface and delivering a consistent user experience powered by the Frame Remoting Protocol (FRP) and secured by the Streaming Gateway Appliance (SGA).
By creating this type of account and registering your devices (VMs, desktops, or servers), you gain the ability for end users to securely connect to these devices directly through a browser, leveraging WebRTC-based streaming powered by the Frame Remoting Protocol (FRP). This enables consistent, low-latency experience without requiring a VPN or native client installation.
This Remote PC feature is applicable for:
- Windows PCs,
Desktop,Desktops, Workstations, Laptops. - Racked servers and workstations in on-premises datacenters and co-locations.
- Cloud VMs hosted by non-Dizzion-supported infrastructure providers such as Microsoft Hyper-V, Microsoft Azure Stack Local, VMware/Broadcom vSphere, Citrix XenServer, Redhat Virtualization (RHV), Oracle KVM, Proxmox VE, Alibaba Cloud, Oracle Cloud Infrastructure (OCI) and others.
- Cloud VMs hosted by Dizzion-supported providers (AWS, Azure, GCP, IBM, Nutanix AHV) where customers prefer not to import the cloud account.
The process eliminates the need for traditional cloud setup steps (such as provider, region, or VPC/VNET selection) and allows registration using a single registration code and URL.
Prerequisites
Before registering your workloads make sure the following requirements are met:
- This feature currently only works for Windows operating systems
- Workloads must have outbound network connectivity on TCP port 443 (HTTPS) to access the registration URL, which is provided in the setup instructions below.
- All networking requirements must be met as described in the reference documentation here.
- For manual installation, you need administrative privileges on the workload VMs to install the Frame Guest Agent. For unattended installation, make sure the Frame Agent Setup Tool (FAST) is downloaded and set up for automated installation.
- A Persistent Desktop account needs to be set as explained bellow
Workflow
Step 1 – Create new Persistent Account from Console – New Account Type
· In the Create Account wizard, open the Account Type dropdown menu and select ‘Bring Your Own Workload’.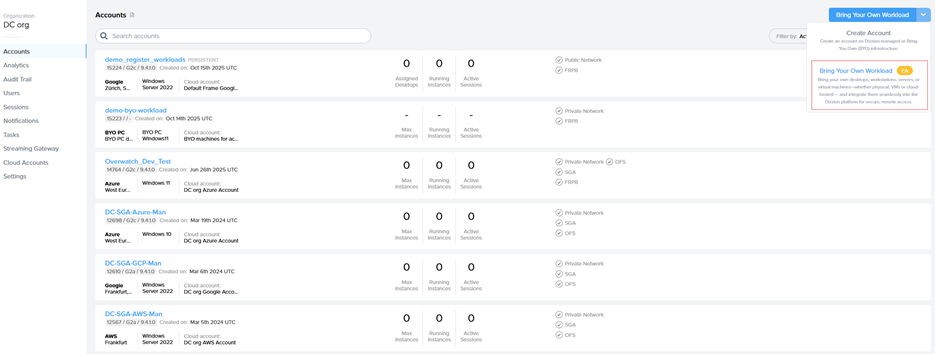
· Enter an Account Name and URL and click Create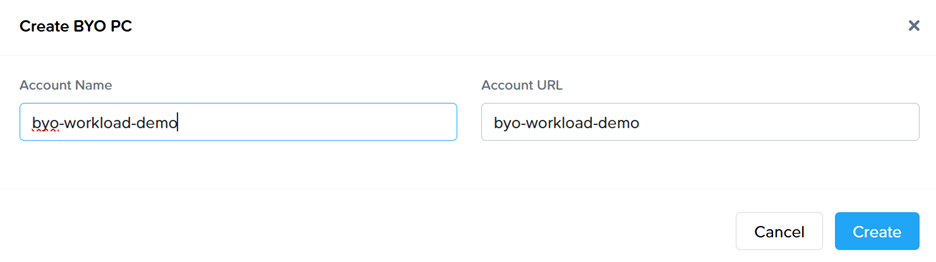
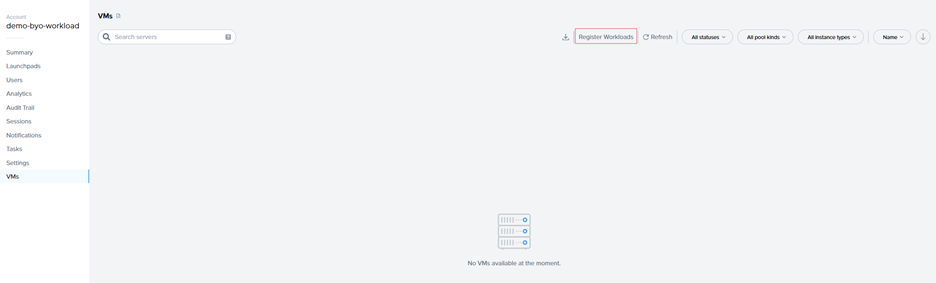
Step 2 – Register Workloads
· Go to the VMs page and select the “Register Workloads.”
· Specify the number of workloads you want to import into a persistent desktop pool.
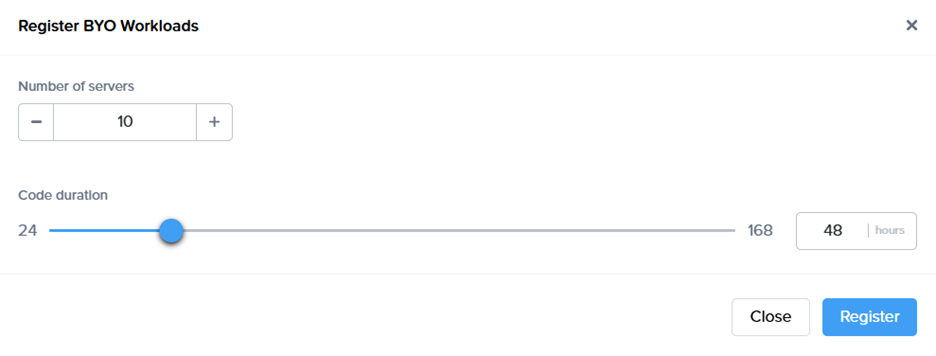
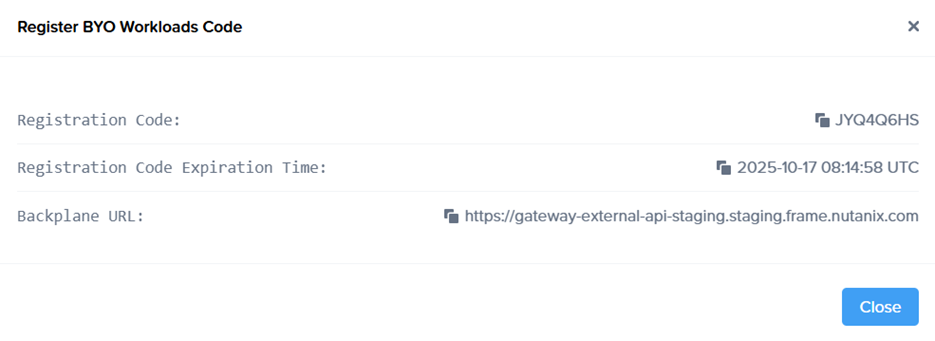
· A registration code with an expiration time, along with the backplane URL will be displayed. Copt the Code and URL so it can be used later.
· New objects appear on the VMs page, serving as placeholders until the actual machines register. If the registration code expires, refresh the page to generate a new one.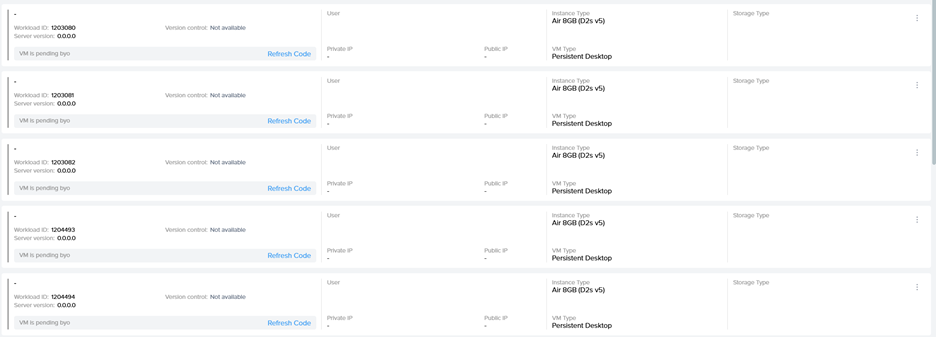
Step 3 - Install Frame Guest Agent on Workloads
Manual installation
On each workload VM, loginlog in physically or connect remotely using VNC, Microsoft RDP, Citrix HDX, Omnissa (VMware) Blast, or another preferred protocol. Download the installer, the Frame Agent Setup Tool (FAST): http://downloads.difr.com/prod/frame-components/FrameAgentSetupTool.exe
Registration via command prompt:
frameagentsetuptool.exe install frameimage registrationcode=<code> registrationurl=<url>
Replace <code> and <url> with the values generated in Step 2 of the Workflow.
Registration via UI:
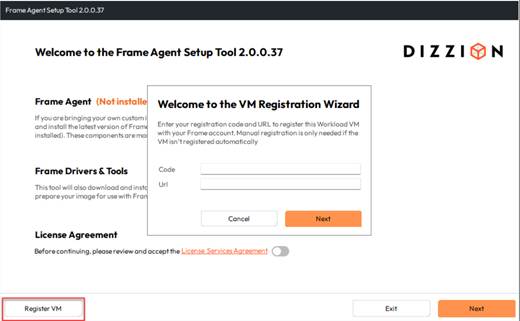
Use <code> and <url> with the values generated in Step 2 of the Workflow.
Unattended installation
For customers who prefer unattended installations of FAST, this can be deployed automatically using standard management tools.
Recommended Methods
- PowerShell Script: Run locally or remotely or distribute via GPO.
- Intune / Endpoint Manager: Package FAST as a Win32 app and assign to devices.
- Cloud Startup Scripts: Add the command to Azure Custom Script, AWS User Data, or GCP startup metadata for automatic registration at boot.
- Use any third-party deployment tool of your choice.
Step 4 - Automatic Registration
After running the command, the Frame Guest Agent automatically registers the workload. Each workload then appears in the Persistent Desktop Production Pool as an unassigned persistent desktop. This normally will take some minutes.
Step 5 – Create Launchpad
Set up a desktop Launchpad for end users to access these VMs and configure e.g. SAML2 permissions.
Notes:
Since the workloads are added to Frame without an associated Cloud Account, the Dizzion DaaS and Cloud PC orchestration capabilities available in standard persistent desktop accounts, such as provisioning, scaling, and image management, are not supported.
The primary purpose of this account type is to provide secure and remote access to existing devices by leveraging the Streaming Gateway Appliance (SGA) and Frame Remoting Protocol (FRP) for high performance, browser based access to Windows Desktops.
There are several limitations to consider:
- No Sandbox support: Sandbox creation and related operations are not available.
- Limited management actions: Computers can only be rebooted (soft reboot through the Frame Guest Agent) or terminated (removed from the Frame console without actions on the device itself).
- Persistent desktop operations such as backup, restore, resize, and similar actions are not supported.
- Manual assignment required: Imported desktops are not automatically assigned to users.
- Enterprise Profiles, Personal Drives, and Domain Joined settings are not available.