SAML2 Integration Migration Guide
SAML2 Integration Migration Guide
As part of an ongoing platform modernization effort, Frame is migrating SAML2 authentication services to a new domain structure.
This change is required because Frame is discontinuing the use of legacy nutanix.com-based domains for authentication services. As a result, existing SAML2 integrations must be migrated to new domains to ensure continued and supported operation.
- In the US region, this change affects authentication endpoints under the img.frame.nutanix.com domain.
- In the DEU region, the authentication service is being moved to a subdomain that already hosts the Frame backend.
This simplifies the overall domain structure used for user authentication.
The updated domain structure simplifies network configuration, particularly for customers with on‑premises desktop deployments that rely on strict network allow‑listing.
To minimize disruption, the migration process allows you to:
- Create and validate a new SAML2 integration in parallel with the existing one
- Migrate users and authorization rules incrementally
- Verify end‑user access before decommissioning the old integration
Migration Overview
The migration is performed by creating a new SAML2 integration alongside the existing one, validating it, and then migrating data from the old (source) integration to the new (target) integration.
At a high level, the process consists of the following phases:
- Create and configure a new SAML2 integration
- Verify that the new integration works as expected
- Migrate users and permissions from the old integration
- Validate end-user access
- Decommission the old integration
Each phase is described in detail below.
1. Create a New SAML2 Integration
Start by creating a new SAML2 integration in Frame.
Configure the integration according to the SAML2 documentation.
- On the IdP side, you may reuse the existing application configuration if your IdP allows it (for example, by adding additional entity IDs, ACS URLs, or domains).
- If reusing the existing application is not possible, create a new application in your Identity Provider and configure it for the new integration.
At this stage, the existing SAML2 integration should remain active and unchanged.
2. Verify the New Integration
Once the new SAML2 integration is configured:
- Perform a test login using the new integration.
- Confirm that authentication completes successfully.
- Ensure that user attributes (such as email, username, or external ID) are mapped correctly. This can be done by creating a test user for login or use a existing one which can be removed afterwards.
Only proceed to migration after you are satisfied that the new integration works correctly.
3. Migrate Data from the Existing Integration
After validating the new integration, you can migrate data from the existing (source) integration.
3.1 Start the Migration
- Locate the existing (source) SAML2 integration.
- Click on the three-dot menu next to it.
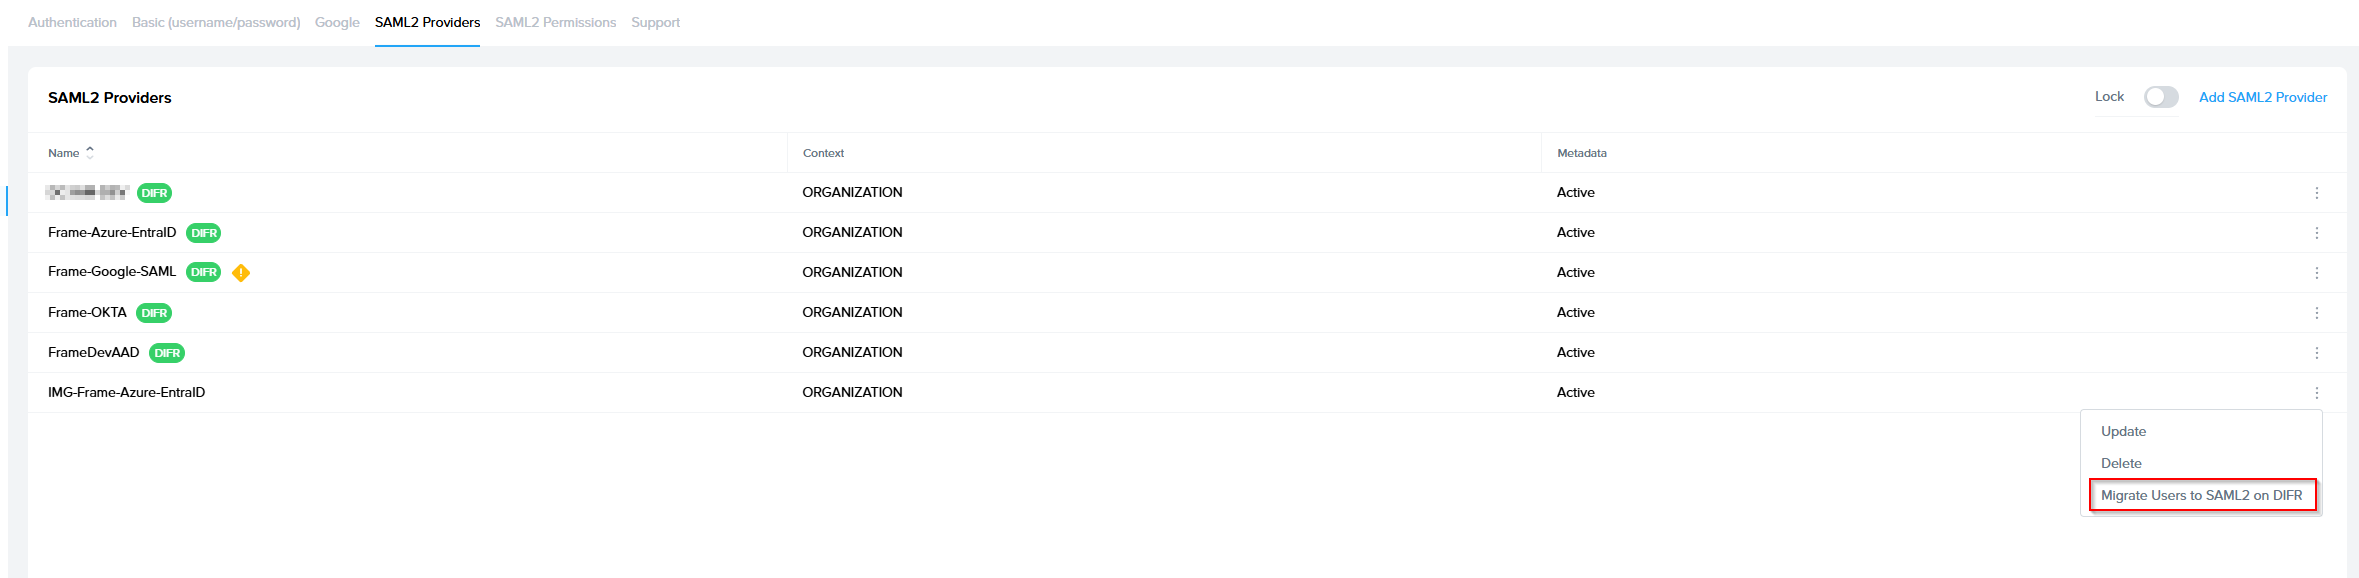
- Select “Migrate to …” and choose the newly created SAML2 integration as the target.
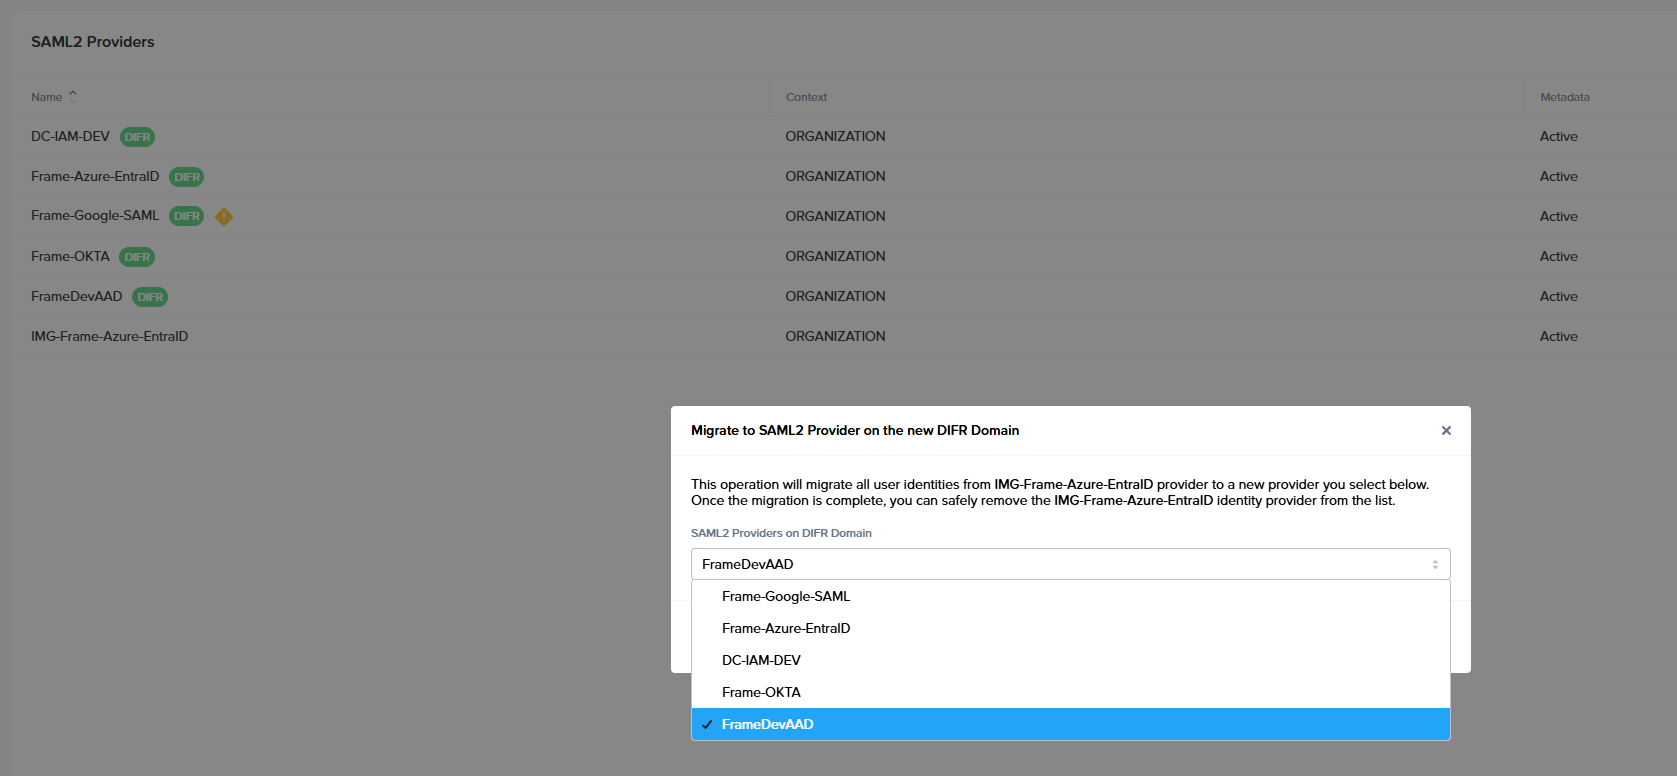
3.2 Migration Execution
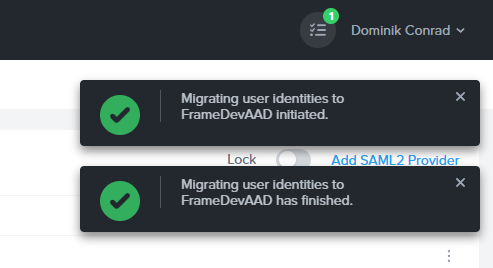
- The migration runs as a background task.
- You can continue working while the migration is in progress.
- When the task completes, you will receive a notification.
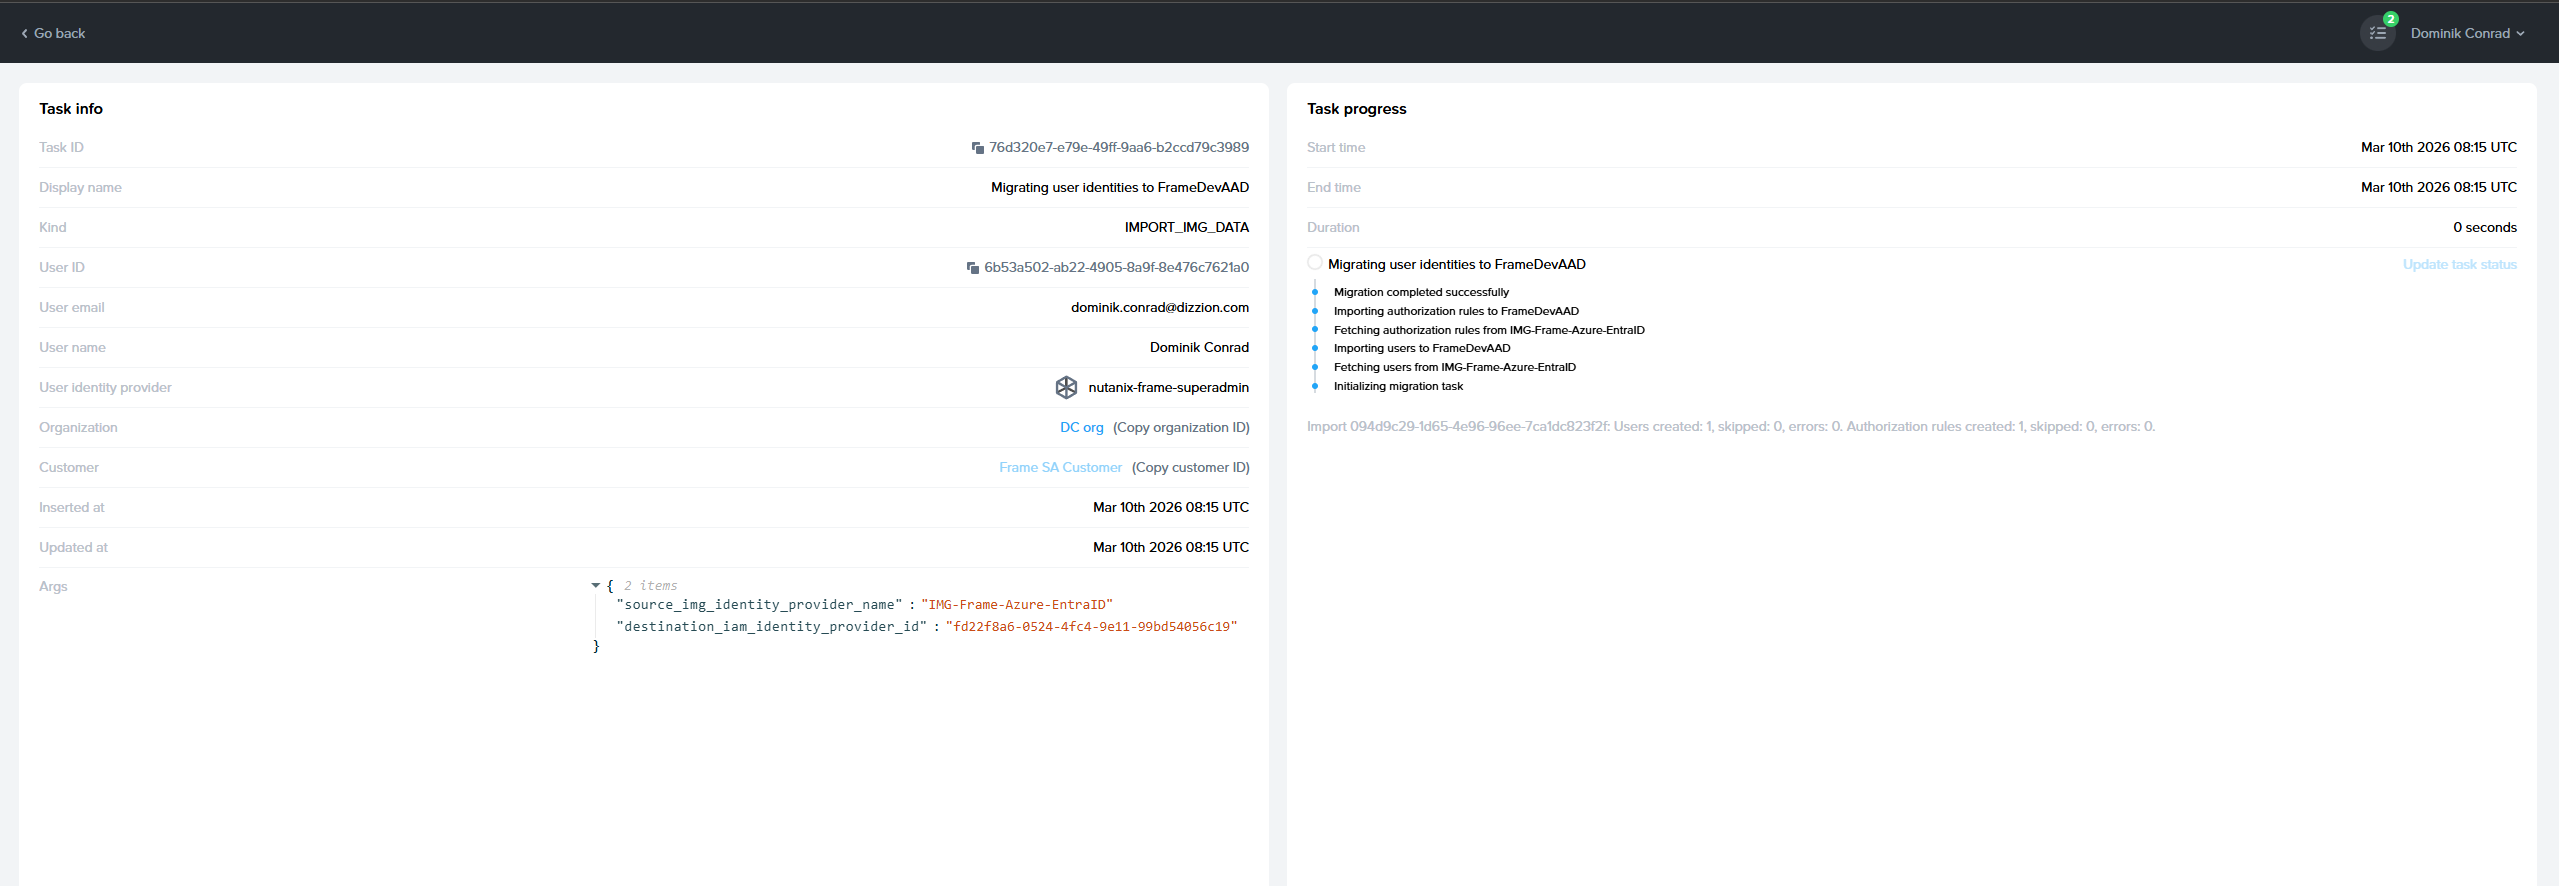
3.3 Migration Results
- The notification can be opened to review detailed results of the migration.
- The results include information about migrated users, authorization rules, and any skipped items.

Explanation:
- Users created: number of copied users from old to the new integration
- Users skipped: number of users that were already copied to the new integration (in case you are running migrate for the second time)
- Users error: some user could not be copied, and in that case, you should contact support to resolve the problem so users can be copied or maybe you decide to skip them if they are old
- Authorization rules copied: number of SAML2 Permission rules copied to the new integration
- Authorization rules skipped: already copied
- Authorization rules errors: contact support to solve this
4. Validate End-User Access
Once the migration has completed:
- Verify that users can log in through the new SAML2 integration.
- If your users have:
- Persistent desktops
- User profiles
- Personal drives
confirm that they receive the same resources as before.
At this stage, both integrations may coexist, but users should primarily authenticate using the new integration.
5. Remove the Old Integration
After you have confirmed that:
- All required users are migrated
- Authentication works as expected
- User resources are preserved
we recommend removing the old SAML2 integration.
This completes the migration process.
Optional
Running an Additional Migration Pass
If you need additional time to verify the new integration, you may keep the old integration active for a limited period.
During this time, it is possible that new users authenticate through the old integration. These users do not yet exist in the new integration
To address this, before deleting the old integration, you can run the migration again.
Additional Migration Pass
- Open the three-dot menu on the old integration.
- Select “Migrate to …”.
- Choose the same new integration as the target.
This second migration will:
- Migrate only newly added users and authorization rules
- Skip users and roles that already exist in the target integration
As a result:
- The migration typically completes much faster
- The results may show a high number of skipped users and skipped authorization roles
This behavior is expected and indicates that only the differences were applied.
If no new users were added since the previous migration, all users may be skipped.