# Publishing

Once you have installed one or more applications, tested them in the Sandbox, set up a [Desktop Launchpad](https://docs.difr.com/books/platform-administrators-guide/page/launchpads#desktop-launchpad) or [Application Launchpad](https://docs.difr.com/books/platform-administrators-guide/page/launchpads#application-launchpad), and [defined your production capacity](https://docs.difr.com/books/platform-administrators-guide/page/capacity), you're ready to publish. There are three types of publishing:

- **Publish**: A standard publish will always create the **max** number of instances specified in the account's Capacity settings for each configured Instance Pool before the existing instances are terminated.
- **Quick Publish**: Quick publish allows administrators to specify how many production instances (less than or equal to Default Capacity **max**) are created on publish and powered on for each Instance Pool before any existing instances are terminated. Frame will then continue to create the remaining new VMs for each Instance Pool up to the Max Instances setting. This results in a quicker publish; however, it can result in a temporary reduction in the number of instances for each Instance Pool.
- **Test Publish**: This feature allows you to test Launchpad functionality and Sandbox changes in your Frame account before committing your changes to your production environment.

<p class="callout info"> **Publishing requires capacity**  
 Before publishing, you will need to set your [production capacity](https://docs.difr.com/books/platform-administrators-guide/page/capacity). Setting your production capacity specifies the amount of VMs you would like to publish your Sandbox image to. If you are not familiar with this, you can read more about system capacity and elastic instance management in our documentation [here](https://docs.difr.com/books/platform-administrators-guide/page/capacity).If there are no instance types with a max set to at least 1, **publishing will be disabled**.</p>

## Fundamentals

A **Publish** pushes any changes and configurations made to the Sandbox image to the production (or test) instances and, in turn, to the end users accessing your Frame-managed workload VMs.

[![image.png](https://docs.difr.com/uploads/images/gallery/2025-10/scaled-1680-/Xv0image.png)](https://docs.difr.com/uploads/images/gallery/2025-10/Xv0image.png)

### Initiating a Publish

Once your Sandbox is configured as desired and you're ready to publish, follow the steps below:

1. Navigate to the **Sandbox** page of your account Dashboard and ensure your Sandbox is powered on.
2. Click **Publish** in the top right corner of the Sandbox panel. A confirmation dialog will appear.
    
    <figure>![Are you sure you want to continue?](https://docs.difr.com/uploads/images/gallery/2025-10/publish-dialog.png)
    
    </figure>
3. Click **Publish** to confirm. The Sandbox panel will update and show a status of `PUBLISHING`. Progress updates about the publish are displayed at the bottom of the Sandbox card.
    
    <figure>![Sandbox in PUBLISHING status](https://docs.difr.com/uploads/images/gallery/2025-10/publishing-2025.png)
    
    </figure>
4. The status will return to `STOPPED` once the publish is complete. You can also see the status of your publish by clicking on your tasks (next to the bell icon in the upper right corner of your console) or by navigating to the Notification Center page accessible from the sidebar of the Dashbaord.

That's it! Now that the publish is complete, all *production instances* have been updated with the latest image from the Sandbox.

### Cancelling a Publish

**Cancel Publish** gives administrators the ability to cancel or abort an ongoing Publish or Test Publish task.

With this feature, administrators can cancel a Publish that has been accidentally initiated or a publish that is consuming more time than usual.

<p class="callout info"> You may cancel a publish up \*\*until the time Frame Platform begins creating production or test instances\*\* (depending on whether you invoked a Publish, Quick Publish, or a Test Publish, respectively).</p>

#### From Sandbox

To cancel an ongoing Publish from the Sandbox, once your Sandbox is in the Publishing state, go to the Sandbox page and under the kebab menu, the **Cancel Publish** option can be selected:

<figure id="bkmrk--1">![Dashboard > Sandbox - Cancel Publish](https://docs.difr.com/uploads/images/gallery/2025-10/cancel-publish2025.png)

</figure>#### From Notification Center

To cancel an ongoing Publish or Test Publish from Notification Center, once your Sandbox is in the Publishing state, follow the steps:

1. Navigate to the Notification Center page of your account Dashboard.
2. On the Task tag, click on the ellipsis listed next to the Publishing Sandbox to Production task and choose **Cancel**.
    
    <figure>![Dashboard > Notification Center > Cancel](https://docs.difr.com/uploads/images/gallery/2025-10/cancel-publish2.png)
    
    </figure>
3. Choose “Yes” on the next screen.
    
    <figure>![Confirm Cancel Publish Request](https://docs.difr.com/uploads/images/gallery/2025-10/cancel-publish3.png)
    
    </figure>
4. A notification will appear on the upper right-hand side stating the task was canceled.
    
    <figure>![Dashboard > Notification Center > Cancellation Confirmed](https://docs.difr.com/uploads/images/gallery/2025-10/cancel-publish4.png)
    
    </figure>

#### Troubleshooting

If the publishing Sandbox to production task status is not updating, reload or refresh the page in your browser for the current status.

## Advanced Publishing

In general, we strongly recommended that customers publish during off-peak hours whenever possible.

### Publish

By default, running a regular Publish will create new VMs based on the Max Instances specified within [Capacity](https://docs.difr.com/books/platform-administrators-guide/page/capacity) for each configured Instance Pool. Once all new VMs are created, existing VMs will be terminated and new user sessions will start utilizing the new VMs. For public cloud Accounts, newly created VMs are powered on and ready for use immediately after creation. For AHV Accounts, newly created VMs remain powered off and unavailable for hosting sessions until existing VMs are completely terminated.

### Quick Publish

When Quick Publish is enabled (default for AHV Accounts), Frame will create new VMs within each Instance Pool up to the specified amount (10, by default) **before any existing instances are terminated**. Once the specified amount of new VMs are created for a given Instance Pool, they will be powered on and immediately made available for new sessions and Quick Publish will be considered complete. Once the Quick Publish process is complete, all other existing VMs will then be terminated and will no longer be available for hosting user sessions. Frame will then continue to create the remaining new VMs for each Instance Pool up to the Max Instances setting.

Because Quick Publish temporarily reduces the effective max instance capacity, **it is generally not recommended for public cloud Accounts**.

For AHV Accounts, enabling Quick Publish is generally recommended as it eliminates downtime during a publish by making a smaller pool of new VMs immediately available for user sessions while the larger pool of new VMs are created and powered on. It is recommended that Quick Publish is configured to equal the maximum expected number of new user sessions per hour during off-peak hours of your largest Instance Pool (if this number is not known, start with a value equal to 10% of your Max Instances setting). Customers should ensure that their AHV Cluster is properly sized to support the additional number of powered-on VMs created during the Quick Publish process.

<p class="callout info"> **Reminder   
 By default, all AHV-based accounts use the quick publish function**. The default number of production instances created on publish is 10. If you wish to override this number, follow the instructions below.</p>

1. From your account Dashboard, navigate to the **Settings** page. Under the *General* tab, **enable quick publish** as shown below.
    
    <figure>[![image.png](https://docs.difr.com/uploads/images/gallery/2025-10/scaled-1680-/MWZimage.png)](https://docs.difr.com/uploads/images/gallery/2025-10/MWZimage.png)
    
    </figure>
2. Once enabled, you have the option to set the number of production instances you would like to be created on each publish. Smaller batches are faster, we recommend 5-10.
    
    [![image.png](https://docs.difr.com/uploads/images/gallery/2025-10/scaled-1680-/xR3image.png)](https://docs.difr.com/uploads/images/gallery/2025-10/xR3image.png)

Click the **Save button** in the upper right corner of your Dashboard to apply your changes.

<figure id="bkmrk--2"></figure><p class="callout info"> If the min value in your capacity settings is set to less than the quick publish value specified, the quick value publish settings are ignored and a regular publish is performed.</p>

That's it! You have successfully enabled quick publish for your Frame account. Any publish operations initiated from this point forward will be Quick Publishes.

### Test Publish

**Test Publishing** gives administrators the ability to test their updated Sandbox image in a “Test Instance Pool” which is **separate from their production instances**. This gives administrators the option to alter the instances in an isolated environment, completely identical to production, without concern of interrupting access to the normal production instances. Test publishes can easily be rolled back via the restoration of a backup, or promoted to the active published configuration, depending on the results.

[![image.png](https://docs.difr.com/uploads/images/gallery/2025-10/scaled-1680-/ISZimage.png)](https://docs.difr.com/uploads/images/gallery/2025-10/ISZimage.png)

Before a test publish, you will need to set your [test capacity](https://docs.difr.com/books/platform-administrators-guide/page/capacity#add-test-pool). Setting your test capacity specifies the amount of VMs you would like to publish your Sandbox image to. If you are not familiar with this, you can read more about system capacity and elastic instance management in our documentation [here](https://docs.difr.com/books/platform-administrators-guide/page/capacity#add-test-pool).  
  
  
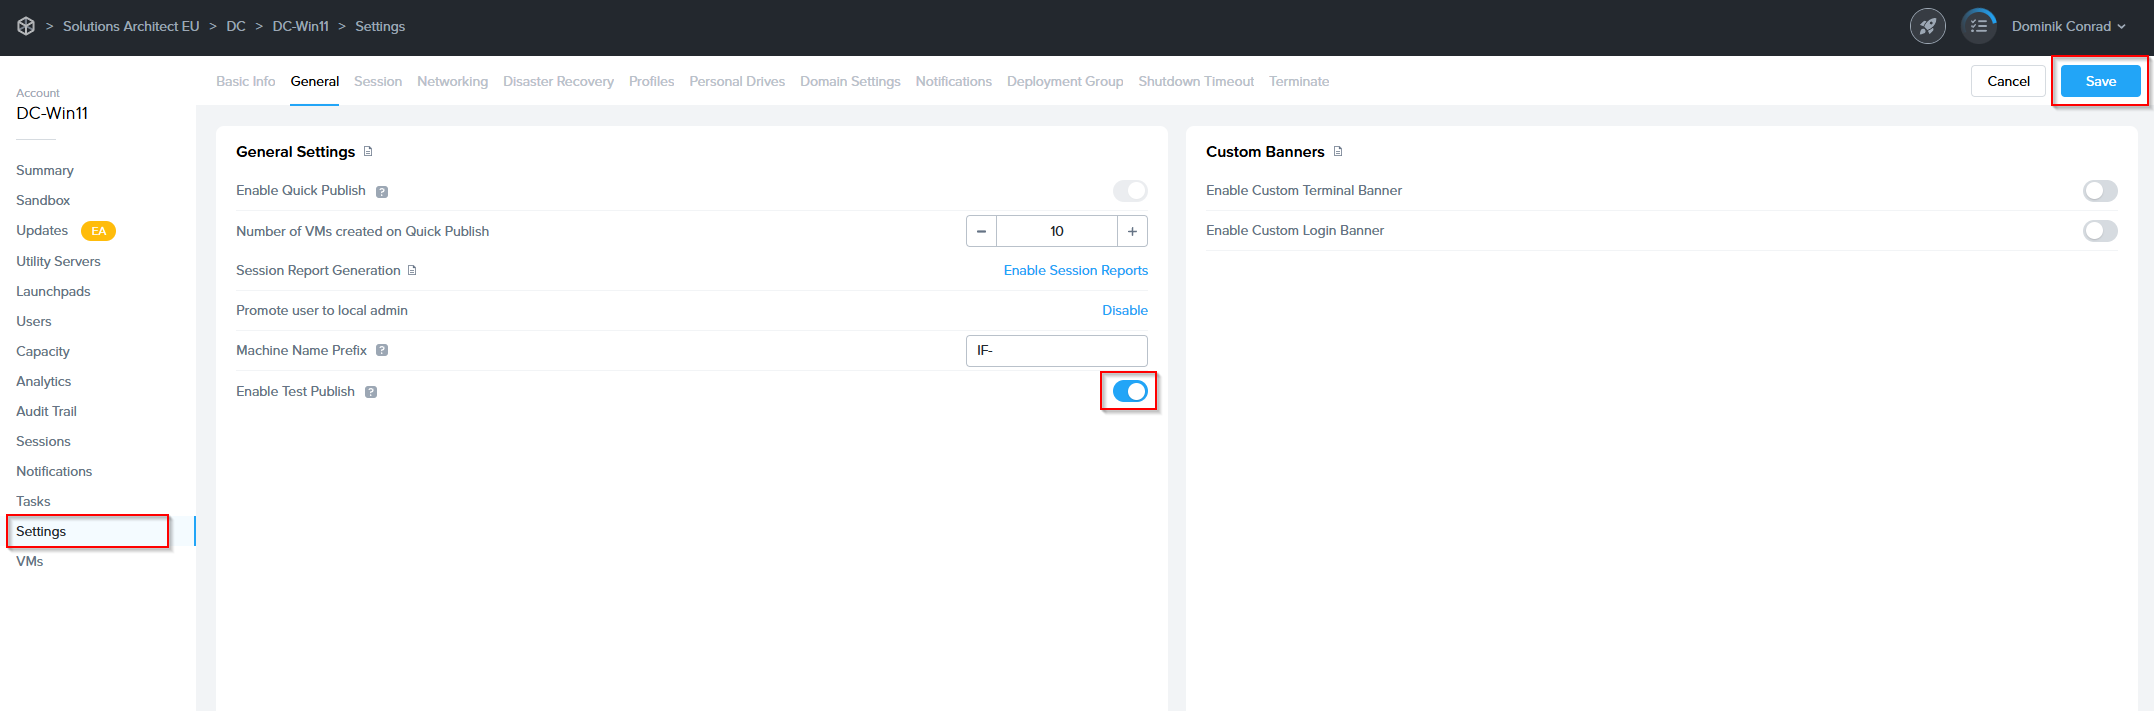
1\. In your Frame Account Dashboard under the **Settings** tab, **Enable Test Publish**. Click the **Save** button to apply the change.

[![image.png](https://docs.difr.com/uploads/images/gallery/2025-10/scaled-1680-/wYWimage.png)](https://docs.difr.com/uploads/images/gallery/2025-10/wYWimage.png)
2\. A prompt will appear, notifying you that the Test Publishing feature **cannot be disabled once enabled** on an account.   
 Click **Confirm**

<p class="callout warning"> **Warning**  This change cannot be undone once enabled for your account.  
</p>

[![image.png](https://docs.difr.com/uploads/images/gallery/2025-10/scaled-1680-/Ff5image.png)](https://docs.difr.com/uploads/images/gallery/2025-10/Ff5image.png)

3\. Next, verify you have at least one Test Pool under [Capacity](https://docs.difr.com/link/114#bkmrk-add-test-pool-1).

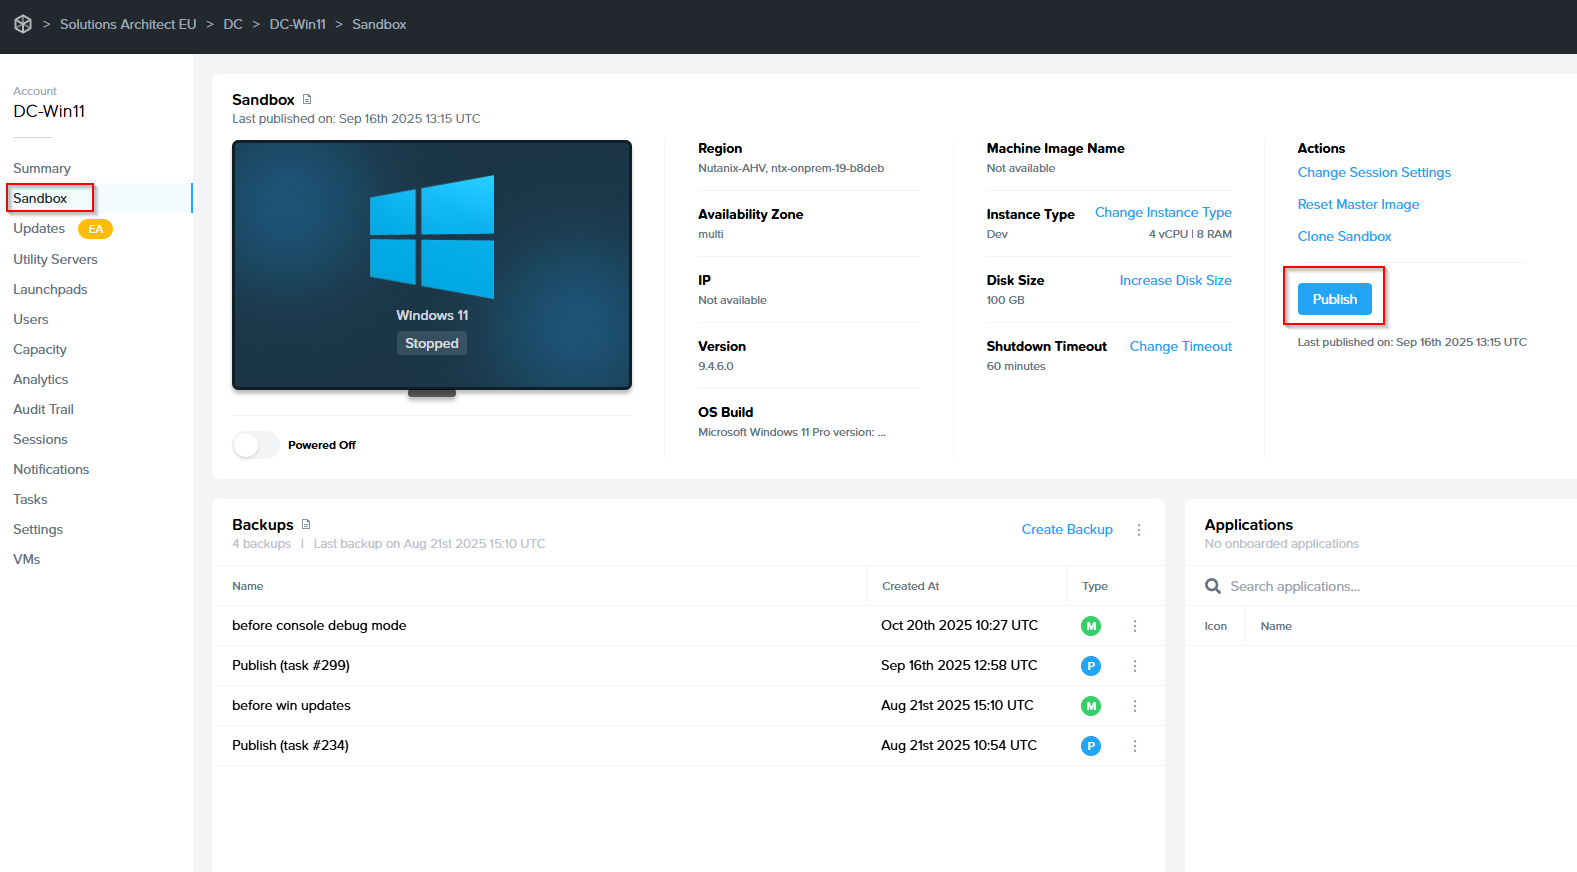
4\. When you wish to perform a test publish, navigate to the **Sandbox** page of the Dashboard and click the **Publish** button in the   
 Sandbox panel.

<p class="callout warning">**Caution**  
 Frame strongly recommends creating a backup of your Sandbox before Test Publishing. In the event you wish to discard all changes to the test environment and return to the original Sandbox configuration, you will be able to restore your backup.</p>

[![image.png](https://docs.difr.com/uploads/images/gallery/2025-10/scaled-1680-/92Aimage.png)](https://docs.difr.com/uploads/images/gallery/2025-10/92Aimage.png)

5\. The Publish dialog will appear, providing a dropdown menu to select your desired publish option. Select **Test Publish** and then   
 click the **Test Publish button** to initiate provision of the test publish instances.

[![image.png](https://docs.difr.com/uploads/images/gallery/2025-10/scaled-1680-/VBjimage.png)](https://docs.difr.com/uploads/images/gallery/2025-10/VBjimage.png)

Lastly, you will want to create some Test Launchpads for your Test Instances. This will allow admins to test sessions and determine whether to promote the test publish to production users or not.

Once the test publish is complete, you will want to **test the changes from a Test Launchpad**. Do that now by navigating to a test Launchpad and launching a session. Manually verify the changes while in the session.

- **If everything is ok**, it's time to **promote** our test publish! Move on to the next step.
- **If there are any issues**, go back to your Sandbox and make necessary changes and initiate another Test Publish for further testing.

6\. Next, we'll **promote** our Test Publish. To begin, click the **Publish button** in the top right corner of the Sandbox panel once again.   
 This time, our confirmation dialog will provide a **Promote** option. Select and click the **Promote button**.  
  
[![image.png](https://docs.difr.com/uploads/images/gallery/2025-10/scaled-1680-/GDRimage.png)](https://docs.difr.com/uploads/images/gallery/2025-10/GDRimage.png)  
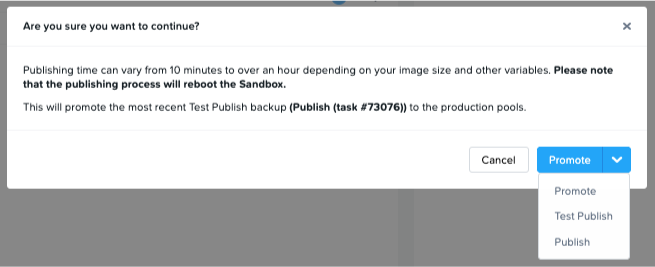
Once the promoted Publish is complete, your users should be able to access production instances with all of your changes applied.

<p class="callout info">  **Note**  
 Promotion of a Test Publish does not create a new Sandbox backup.</p>