Virtual Machines
VMs Dashboard, Capacity, Availability Zones, Persistent Desktops Administration, Cloning, Utility Servers, Register Workload
- VMs
- Capacity
- Availability Zones
- Persistent Desktops Administration
- Cloning
- Utility Servers
- Register Workloads (Early Access)
VMs
The last page listed on the left side of your Account Dashboard is the VMs page.
The VMs page is available on Account-level Dashboards only.
Non-persistent Accounts
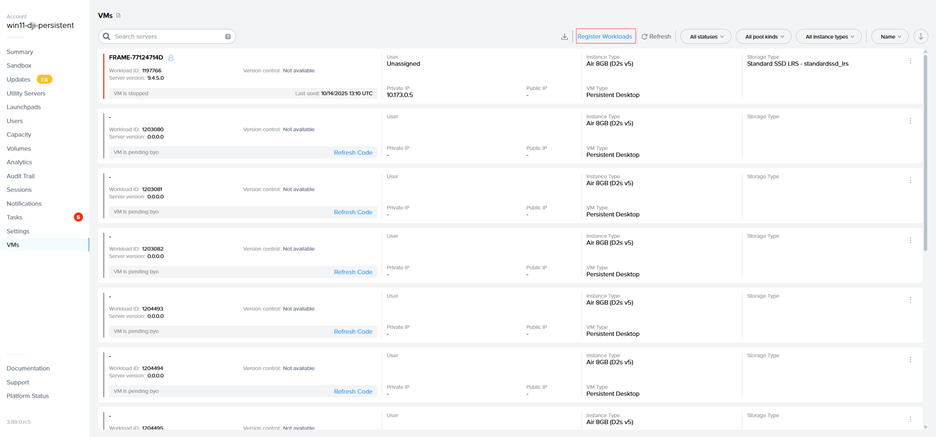
The VMs page displays a list of all VMs associated with your Frame account. Server information is listed by workload ID, server name, public IP, private IP, VM type, instance type, and server status. The example below shows the Vms page for a non-persistent Frame account.

VMs Page
- Workload ID: Unique identifier for the workload VM. This ID value can be used to search for the corresponding VM in your infrastructure portal.
- Machine Name: Name of the machine, as reported by Windows or Linux. The <img src={require('./images/dji_icon.png').default} alt="locally available" style="display: inline"/> icon means that the machine is domain-joined. Hovering over the machine name will display the type of Windows Active Directory domain join (Classic or AD).
- Public IP: Public IP address or the FQDN of the workload VM. In the case of an FQDN, it will resolve to a private IP address if the Frame account was created with private networking.
- Private IP: Private IP address of the workload VM.
- VM Type: Specifies the type of workload - Sandbox, Utility Server, Persistent Desktop, Production, Test, or Shadow.
- Instance Type: Name of the instance type for this workload VM. Instance type names are specific to the underlying infrastructure. In the case of AHV, the instance type name will be the name you defined under the Cloud Account for AHV.
- Status: Current status of the workload VM
- Almost ready: VM is currently undergoing maintenance or in the process of powering on.
- In session: The VM is currently being used by a user.
- Rebooting: VM is rebooting.
- Running: VM is powered on and available.
- Starting: VM is powering on.
- Stopped: VM is powered off.
- Stopping: VM is being powered off.
For Persistent Desktop Frame accounts, the VMs page will also include a **User** column showing the user email address assigned to the persistent desktop.

If you want to see the latest status, refresh the page at any time by clicking the "Refresh" button in the upper right corner of the page.
For each VM type and the workload VM status (Running, Stopped, In session, etc.), administrators can perform actions on the workload VM by clicking on the kebab menu.

Non-persistent Frame Accounts
| VM Status(es) | Action | Description |
|---|---|---|
| Almost ready, In session, Rebooting, Running, Starting | Reboot | Reboot the virtual machine. Reboot reboots the VM when the session ends. Force Reboot ends the session and reboots the VM immediately. |
| Almost ready, In session, Rebooting, Running, Starting | Stop | Power off the virtual machine. |
| Stopped, Stopping | Start | Power on the virtual machine. |
In addition to the above VM actions, the following actions are available in non-persistent Frame accounts, regardless of the VM status:
| VM Status(es) | Action | Description |
|---|---|---|
| All | Installed Software | List the software (name, publisher, and version) installed on the persistent virtual machine (e.g., Sandbox, Utility Server). |
| All | Enable RDP Debug | Refer to RDP Debug Mode documentation. |
| All | Terminate | Terminate the virtual machine. VM will be re-provisioned using the last published Sandbox image. If the VM is the Sandbox, then the VM will be re-provisioned using the most recent backup or if there is no backup, the master image the Sandbox was created from. |
Persistent Desktop Frame Accounts
| VM Status(es) | Action | Description |
|---|---|---|
| Almost ready, In session, Running, Starting, Stopped, Stopping | Change instance type | Switch the persistent desktop VM to use a different instance type. Available to all VM Types except Shadow. |
| Almost ready, In session, Running, Starting | Reboot | Reboot the virtual machine. Reboot reboots the VM when the session ends. Force Reboot ends the session and reboots the VM immediately. |
| Almost ready, In session, Running, Starting | Stop | Power off the virtual machine. |
| Running, Stopped | Reassign | Reassign the currently assigned persistent desktop to another user who does not have an assigned persistent desktop. Refer to Reassign Persistent Desktops. |
| Running | Assign | Assign the unassigned persistent desktop to a user who does not have an assigned persistent desktop. |
| Stopped | Unassign | Refer to Unassign Persistent Desktops. |
| Stopped, Stopping | Start | Power on the virtual machine. |
In addition to the above VM actions, the following actions are available in persistent Frame accounts, regardless of the VM status:
| VM Status(es) | Action | Description |
|---|---|---|
| All | Installed Software | List the software (name, publisher, and version) installed on the persistent virtual machine (e.g., Sandbox, Utility Server, and persistent desktop). Available to all VM types except Shadow. |
| All | Enable RDP Debug | Refer to RDP Debug Mode documentation. |
| All | Terminate | Terminate the virtual machine. VM will not be re-provisioned. If the VM is the Sandbox, then the VM will be re-provisioned using the most recent backup or if there is no backup, the master image the Sandbox was created from. Refer to Terminate a Persistent Desktop. |
Capacity
Before you can deliver your applications and desktops to your users, you first have to set up one or more pools of production instances – this defines the “capacity” of your account. Each production pool corresponds to a specific instance type (e.g., # of vCPUs/core, memory, and GPU). You can set up your production pool capacity to power on/off dynamically based on user demand. Elastic Instance Management or “elasticity” is a rule-engine in the Frame platform that allows an administrator to configure immediate access to instances by defining how many instances should be powered on at specific times. Admins can schedule capacity for each pool by clicking “Capacity” listed on the left side of the Dashboard and clicking on the tab for the pool.
You can define one or more production pools with the same instance type.
Additionally, you can set up and manage one or more pools of test instances so that you can publish image changes to a smaller group of users before publishing the image changes to your users accessing the production instances.
Default Capacity
Three key parameters define the default capacity of each pool:
-
Minimum number of instances (Min): The minimum number of instances powered on at a given time that can be accessed by users immediately.
-
Buffer instances (Buffer): Additional powered-on instances that are ready for a user within seconds. Set this to a number of users you expect will connect within a 2-minute window of time (the time it takes to boot an instance).
-
Max number of instances (Max): The desired number of instances (concurrent users) to be provisioned for the pool. The administrator should determine this number based on peak session concurrency since this is a hard limit.

As an example, let's say that you have an “Air 8GB” pool with a minimum of 5, a buffer of 3, and a max of 20 under “Default capacity.” The system will work as follows:
-
With no user load, 5 Air 8GB instances will be running ready to accept a connection (the minimum).
-
Once three users connect, there will only be two powered on instances left from the original set of “minimum” instances. Since the buffer is set to 3, the system will automatically power on an additional instance, so that there are at least 3 “buffer” instances – three in use and three ready for new users.
-
Each time a new user connects to consume one of the buffer instances, another instance will automatically be turned on to replenish the buffer.
-
As more users connect, more instances will get provisioned – but the system will always attempt to maintain a buffer of 3 instances to ensure that new users get connected as quickly as possible to a session.
-
The platform will continue to scale up until it reaches the maximum value, which is 20 in this case. The 21st user (and all subsequent users) will get an “out-of-capacity” message when attempting to connect.
-
As users disconnect and instances become free, the system will also power down instances automatically. Note that instances will remain on in full one-hour increments and automatically turn off if not in use, based on your capacity settings.
-
Eventually, as user demand decreases back to zero, the powered on instance count will go back down to the minimum of 5.
You can have a minimum of 0 and a buffer of 0 to ensure that instances are powered on only when a user requests an application or desktop. In this case, users will have to wait a few minutes (typically 2-3 minutes) for the instance to become available after the users request their apps or desktops. They'll be notified that an instance is powering on.
It is best to set the min and buffer to 0 and the max to 1 when publishing for the first time since you are still testing everything out.
Important Note that min and buffer instances incur hourly usage whether users are connected or not. You can set both to 0, so instances will only boot on-demand. This conserves usage, but users must wait approximately 2 minutes to start a Frame session.
Active Capacity
The Frame platform allows admins to define “active capacity” for certain times of day for certain days of the week. For example, you may want your minimum and buffer increased during specific hours on specific days when you expect an increase in usage. To schedule active capacity, simply click anywhere on the Active Capacity scheduling table to create a start time and then drag to the end time. This can be adjusted at any time by clicking from the desired start/end edge and dragging.
With Active Capacity, you can define the following parameters for each time window:
-
Minimum number of instances (Min): The minimum number of instances powered on at a given time that can be accessed by users immediately.
-
Buffer instances (Buffer): Additional powered-on instances that are ready for a user within seconds. Set this to a number of users you expect will connect within a 2-minute window of time (the time it takes to boot an instance).

You can click and drag the scheduled entry and move it anywhere on the calendar to change the time. Click on the entry itself to make adjustments to the min/buffer settings or manually edit the time schedule.

The example above shows our active capacity schedule: Monday through Friday between 7 AM and 5 PM, the minimum will be set to 5 with a buffer of 15. If the fields under Active Capacity are left blank, the system will use the Default Capacity specified on the left side of the page.
Be sure to save your changes by clicking the blue **Save** button in the upper right corner of the window.
Capacity per Pool
Admins can define pool capacity depending on the instance type being used. For example, you may have a team of power users requiring an instance type with more RAM or vCPUs. You can then set active capacity for that instance type by clicking on the corresponding instance type tab and defining those values.

In the example below, we have enabled a minimum of two Air 16GB instances to be running and available between the hours of 9 AM and 3 PM UTC every Thursday and Friday of the week. The active capacity has only been set for the Air 16GB instance type. Administrators may specify default and active capacity settings for any of their instance types by clicking on the corresponding tab, adjusting settings, and clicking Save.

Add Test Pool
Admins can add test pools for a given cloud infrastructure, once they have enabled Test Publish.
To add a new test pool, go to Capacity from the Dashboard and click on the + Add Instance Pool option to the right of the existing pools.

At the prompt, create a Test Instance pool by selecting the desired Instance Type, providing a name, and enabling Test Instance Pool. Click the Add button to confirm your choices and create the test pool.

You will see a T icon in the newly-created tab, along with the word Test to the right of the Capacity and instance pool name, denoting that this instance pool is a test pool. Configure the capacity of the new Test Pool by specifying Minimum, Maximum, and Buffer values.

Any test instances provisioned count towards the maximum number of workload VMs provisioned for your Frame Customer entity and in determining [Per VM](/subscription#per-vm-subscription) subscription overage.
Add Production Pool
Admins can add additional production pools for a given cloud infrastructure. To add a new production pool, go to Capacity from the Dashboard and click on the + Add Instance Pool option to the right of the existing production pools. A new window will appear, select your new instance type from the drop-down menu and click Add.

The selected instance type will now be added to your set of production pools. You can check your Tasks widget for the status of your pool creation request.


Once the production pool for your new instance type has been created, it will appear as a selectable tab at the top of the Capacity page where you can modify capacity settings.
Modify/Delete Pools
A pool with a Default Capacity max of 0 can be deleted from the pool list. To delete a pool, go to Capacity from the Dashboard and select on the pool you wish to delete. Click on kebab icon and select the Delete option. From the same menu, you may also Rename your pool.

Frame will request that you confirm the deletion of the instance type pool - Delete to delete the pool and Cancel to cancel the pool deletion request.

A pool must have the Default Capacity max value be 0 before the pool can be deleted.
Availability Zones
Availability Zones (AZs) are isolated locations within data center regions provided by various IaaS providers. They offer high availability, fault tolerance, and redundancy by allowing resources to be distributed across multiple zones. Proper use of Availability Zones can significantly enhance the resilience of your infrastructure and services. In the context of Frame platform, single AZs must be used for customers wishing to enable Personal Drives or Enteprise Profiles for their account, depending on infrastructure provider.
However, it's crucial to understand the implications of moving resources between Availability Zones. Changes to AZs can have significant impacts which we will discuss in more detail below.
Persistent Desktops: Customers using Persistent Desktop accounts can change their Availability Zones once their account is created, but their Persistent Desktops will have to be recreated.
Supported Infrastructure Providers
Frame supports the use of AZs for the following IaaS providers:
- Amazon Web Services (AWS)
- Google Cloud Platform (GCP)
- IBM Cloud VPC Early Access (Known as "Multizone Regions" or MZRs)
Frame does not currently support the ability to select a single AZ for Azure-based accounts.
Configuring Availability Zones in Frame Console
In the Frame console, you can manage Availability Zones by navigating to the Availability Zones section under the Settings tab of your Account's Dashboard. Here, you can toggle the use of a single Availability Zone. Please note that Enterprise Profiles and Personal Drives require setting a single Availability Zone before being enabled for an account.

Key Considerations
Moving Availability Zones
When considering moving resources between Availability Zones, keep the following points in mind:
- Manual backups are not necessary before moving AZs as this action is already performed as part of the process.
- Switching to a single AZ in Console will move all volumes to the specified AZ except for the Sandbox VM.
- Once created, disks reside in one AZ until they are deleted, and VMs in the pool can be scattered across multiple zones. With the “use single zone” option, all VMs are provisioned in one AZ, necessitating the recreation of VMs in the selected zone. Volumes are created in the same zone, recorded as the designated zone for that account.
- If needed, customers can change from one single AZ to another. This process involves recreating all the volumes in the newly selected zone. However, this change is rarely necessary.
Procedure
Moving your Frame resources to a single AZ is simple and can be done with only a few clicks. Follow the steps below if you plan on enabling Enterprise Profiles or Personal Drives for your account.
- From the Dashboard of your account, click on the Settings link on the left-hand side.
- Click the Availability Zones tab.
- Under Availability Zones, enable the "Use a single availability zone" toggle and select your desired AZ (availability zone).
Resources
More details around availability zones for your preferred IaaS provider can be found below:
Persistent Desktops Administration
By default, Frame accounts are "stateless." This means that all changes made to an instance are lost after the session closes. The instance is then returned to a pool where it waits to be served to the next user. The Frame platform also offers an alternative option called "Persistent Desktops."
Persistent Desktops are stateful, desktop-only instances that are individually assigned to users. Users are given administrative control over their own desktop – they can install and manage their own unique application sets and settings in their own persistent environment. Account administrators can still monitor usage and basic session activity through the account Dashboard.
Persistent Desktop accounts can be created and configured:
- On one of the supported infrastructures
- For Windows domain-joined instances, if required
Applicability
Persistent Desktops were designed for organizations that prefer to give their users more control over their own environments. Frame Account administrators still configure the Sandbox image to serve as the base for all instances in the pool, but end users manage their own instances once assigned. If required, Persistent Desktops can be domain-joined so enterprises can manage them through a Windows domain.
Requirements
-
Users must be able to authenticate to the platform using either:
-
If the persistent desktop Frame account is configured to join the persistent desktop VMs to a Windows domain, users may be required to authenticate to the Windows domain before accessing their assigned Windows desktop.
Setup
The Persistent Desktops feature is enabled upon account creation. It cannot be enabled on accounts that have already been created, since provisioning and infrastructure management of a Persistent Desktop account is handled differently than on a non-persistent Frame account.
Persistent Desktop Lifecycle
The state of a persistent desktop instance can be defined in the following ways:
- Currently assigned to a user ("Assigned Persistent Desktop")
- Currently unassigned, but was previously assigned to a user ("Unassigned Persistent Desktop")
- Waiting to be assigned to a new user ("Shadow Persistent Desktop")
When a user starts a Frame session and has not been assigned a persistent desktop, Frame associates the user's identity (as defined by the combination of identity provider they used to authenticate to Frame and their email address) to a Shadow Persistent Desktop. This persistent desktop is now the user's Assigned Persistent Desktop. If there are no Shadow Persistent Desktops available, the user will receive an error. Once a Shadow Persistent Desktop has been assigned, then Frame will provision another Shadow Persistent Desktop using the last published Sandbox, provided that the sum total of Assigned, Unassigned, and Shadow Persistent Desktops is less than or equal to the Max possible number of users set in Capacity.
Each time the user authenticates to their identity provider and the identity provider passes to Frame the user's email address, Frame will broker the user into their Assigned Persistent Desktop instance.
Administrators can also unassign a user from their Assigned Persistent Desktops as well as reassign a previously logged in user to the Assigned Persistent Desktop.
Finally, if the administrator can terminate a persistent desktop whether the desktop is Assigned or Unassigned.
Capacity Administration
Account capacity settings work a little differently than a non-persistent Frame account as there is only one pool of persistent desktops.

-
Max possible number of users: Enter the max number of expected users (instances) for the account in this field. This value governs the sum total number of Assigned, Unassigned, and Shadow Persistent Desktops that can exist at anytime in the Frame account. Frame will terminate shadow persistent desktops if this value is reduced below the sum of the number of assigned, unassigned, and shadow persistent desktops.
-
Shadow Pool Count: Frame will provision the specified number of shadow persistent desktop VMs at publish.
-
Minimum Unassigned VMs: Frame will attempt to maintain the specified number of minimum unsigned VMs as unassigned VMs are assigned to new users.
-
Keep running instances for new users: Enabling this toggle keeps a Shadow Persistent Desktop instance running at all times, so it is immediately available to new users (assuming the total number of Assigned, Unassigned, and Shadow Persistent Desktops is less than the specified Max possible number of users).
Once a Shadow Persistent Desktop instance is assigned to a user, Frame will provision a new Shadow Persistent Desktop subject to the Max possible number of users value. By default, the number of Shadow Persistent Desktop is set to 1. This value can be increased on request by contacting Support.
When using AWS, GCP, or Azure, enabling this toggle will result in infrastructure costs for the time that the Shadow Persistent Desktops are running, even though it is not being actively used. Keeping this toggle off eliminates those infrastructure costs, but a new user will need to wait for the instance to power on before the instance can be assigned to them for their first Frame session. This can take upwards of 10-15 minutes, depending on the infrastructure.
- Keep instances running: Specifies when and for how long the persistent desktop VMs will stay powered on.
- Basic: The persistent desktop is powered on when the user requests access to their persistent desktop. The persistent desktop will remain on for the next full hour increment, measured from when the instance was first powered on, even if the user closes their session. For example, if the persistent desktop was powered on at 9:05 AM and the user used their persistent desktop until 12:30 PM, then the active, but not used persistent desktop would be powered off at 1:05 PM. The time period can be lowered to 15 minutes by contacting Support.
- Always: The persistent desktop powers on and will remain powered on unless the persistent desktops are rebooted or powered off by the end user or administrator.
- Wake up instances: Instances can be powered on at a specific time of the day. Those persistent desktop VMs that are not in use will remain powered on for the next full hour increment, as measured from when the instance was first powered on, and then powered off. The time period can be lowered to 15 minutes by contacting Support.

Sandbox Image Management
Managing your Sandbox image on a Persistent Desktop account is the same as a non-persistent, regular Frame account. The difference lies in how your changes are propagated to the workload instances. Since an instance is assigned to each user when they log in for the first time, any Sandbox updates published after the assignment will apply only to the Shadow Persistent Desktop. Assigned and Unassigned Persistent Desktops will not be affected by the publish of the Sandbox.
If the same changes to the Sandbox must be applied to Assigned or Unassigned Persistent Desktop instances, an account administrator must use them to those instances or terminate the Assigned or Unassigned Persistent Desktop, as discussed in Terminate a Persistent Desktop.
Terminating an instance will permanently delete all data on that instance. Any data a user needs from their instance, such as work files or software licenses, should be retrieved from their persistent desktop before the account administrator terminates their instance.
Updates
The Updates page of your Account Dashboard displays any required OS or Frame updates for your VMs. More details can be found in the Updates section of our documentation.
Persistent Desktop Volumes
Administrators can manage the persistent desktop backups for individual users by navigating to the Volumes page in the account Dashboard. The first tab is the Volumes tab which provides a list of named user volumes, the volume size and status, and the available free space for each volume. There are also additional operations, described below, accessible under the kebab menu in the upper right corner of the page.

If you are looking for a specific volume, you can use the search bar at the top of the page to search by volume name.
Autogrow Settings
If you anticipate that your users will need to increase their Persistent Desktop disk size regularly, you can set Frame parameters to scale up as needed automatically. To do this, navigate to the Volumes page, click on the kebab menu and select Autogrow settings. A new dialog box will appear:

Here, you can specify the threshold at which the disk size will automatically increase for established users. By default, the disk volume will automatically be increased by 10 GB when there is less than 5 GB of free space remaining. You can adjust these values as you see fit for your users.
You can enforce a maximum disk volume size by enabling the Limit maximum volume size slider and setting the Maximum volume size. Enable autogrow settings must be enabled first. If you do not enable Limit maximum volume size, there is no limitation on how large the individual user's persistent desktop volume can autogrow.
Be sure to click Confirm once you have adjusted the settings as desired.
Backup All Volumes
You can backup all persistent desktop volumes (versus individual persistent desktop volumes) by clicking on the kebab menu and select Backup all persistent desktop volumes. You will be asked to confirm that you wish to proceed.
Clone
You can clone the persistent desktops from one Frame account to another Frame account using the Clone persistent volumes feature. This feature is only for persistent desktop Frame accounts on Nutanix AHV clusters.
-
Before you initiate the clone operation, you can specify whether the clone operation will replace persistent desktops in the destination Frame account if the same owners have assigned persistent desktop in the source Frame Account:
- Disable Replace Assigned Volumes (default) will direct the clone operation to skip the cloning of any persistent desktops from the source Frame account whose owners have assigned persistent desktops in the destination Frame account.
- Enable Replace Assigned Volumes to copy all persistent desktop volumes from the source to destination Frame account. If there are owners with assigned persistent desktops in both the source and destination Frame accounts, the owners' assigned persistent desktop volume from the source Frame account will replace the persistent desktop volume in the destination Frame account.
-
Then click on Clone button to proceed or Cancel button to cancel the clone operation request.
The clone operation **will not** delete the persistent desktop volumes in the source Frame account.
Prerequisites
- Nutanix Remote Site must be configured between the two AHV Clusters.
- The destination Frame account must exist in Frame Console.
Process
The persistent desktop VMs in the source Frame account will be powered off before the clone operation commences. If there are any users in session, the clone operation will block until all users have finished their sessions and Frame can power off their persistent desktop VMs.
Once the clone operation completes, Frame Platform will power on the persistent desktop VMs based on Capacity Administration Keep instances running setting.
Backups
The Backups tab provides the account administrator with a detailed view of available backups for the volume specified under the Volume drop-down menu at the top of the window. Details include the name, time/date of creation, type of backup, and the number of backups for the volume (shown in the lower right corner of the window).

Manual Backup and Restore
To create a backup, simply click the blue Create backup link in the upper right corner of the window. A new window will appear prompting you to select the volume you wish to backup from the drop-down menu. Be sure to provide a name for this backup as well. From there, click Create in the bottom right corner of the window.

In order to create a persistent desktop volume backup, you must ensure the instance is in a **stopped** state.
The status of your backup will appear in your Notification Center:

Once completed, the new backup will appear in your list. You can restore a backup at any time by clicking on the kebab menu to the right of the desired backup and clicking Restore.
Restoring from a previous backup will replace the volume with the backup image you select. Any changes made since the selected backup was created will be erased. 2. You can set the number of manual backups that are retained under Settings, Number of Manual Backups Retained.
Schedule Backups
To schedule automated backups of all persistent desktops, simply click the kebab menu in the upper right corner of the backups section and click on Settings. A new window will appear with a toggle to enable Scheduled Backups.

Enable the toggle and specify your scheduled backup settings.
- First Backup Time: The time when Frame will start the backup of the persistent desktops.
- Time Zone: Time zone associated with the time to start the backup of the persistent desktops.
- Scheduled Backup Interval: Periodicity for when the backups are taken (e.g., value of means backup daily).
- Number of Scheduled Backups Retained: Frame will retain up to the specified number of scheduled backups.
Click Confirm to proceed.
In order for a persistent desktop to be included in the next scheduled backup event, the persistent desktop must:
1. Be in or status. If the persistent desktop is , Frame will power off the persistent desktop before the disk is backed up.
If a user is , the persistent desktop will not be included in the scheduled backup event.
2. Have been powered on for the disk to have changed since the last scheduled backup event.
If you change the backup schedule, the revised backup schedule takes effect on the next day.
Delete a Backup
You can delete a backup by clicking on the kebab menu mentioned above and selecting Delete.
info User-managed Backups
Administrators can decide whether or not they would like their users to manage their own system backups. User-managed backups can be enabled by navigating to the Settings page in the Dashboard and enabling the Are persistent desktops backups allowed toggle listed under General settings.

Once enabled, end users can manage their backups from their profile page. More information about this feature can be found in the Navigating your Frame Account Guide.
Change Instance Type
Some administrators may wish to change their Persistent Desktop user's instance type to accommodate the user's needs. For instance, the end user may need a higher-performing instance type after taking on a project which requires video editing and graphic design. Since Persistent Desktop accounts are structured differently than a standard Frame account, this process is also slightly different (but still simple!).

- Next, click the kebab menu to the right of the Persistent Desktop and select Change instance type.

- Select the desired instance from the drop-down menu. Click Save.

- You will receive status updates for the operation through the Notification Center.

The instance type update will be reflected in the listed details under the Servers tab.
For public cloud infrastructure, changing the instance type requires the new VM to power on after the existing persistent desktop disk is attached to the new VM and the old VM is terminated.
Reassign Persistent Desktops
Administrators can reassign an Assigned Persistent Desktop to a different user (or let an existing user be reassigned to their Persistent Desktop via a different Identity Provider) by going to the Status page within the Account Dashboard. Before proceeding to the instructions, please carefully read the considerations below:
Considerations
-
The desired user must have already logged in to the Frame Account using the identity provider and email address specified by the administrator. If the user is not visible in the drop-down menu, then they have not logged in to Frame using that specific Identity Provider. Ensure the user first logs in to the Frame Account before reassigning the Assigned Persistent Desktop to the user.
-
Any existing applications, configurations, files, application data, local user profiles, etc. will still remain on the VM when you reassign a Persistent Desktop. If desired, administrators can reassign the VM to themselves first if they need to perform any maintenance before reassigning to a new user.
-
The VM cannot be in use by a Persistent Desktop user.
-
If a user already has a Persistent Desktop assigned to them within the same Frame account, they cannot be assigned to another Persistent Desktop. Administrators attempting to do so will see an error message that reads “Bad Request: Invalid request. Selected user already has assigned instance with same account.”
Procedure
-
Navigate to the Status page on the Account Dashboard and select the Servers tab. You can hover over the machine name on this list to see more details (including the user name assigned to the Persistent Desktop VM).

-
Click on the kebab menu to the right of the Persistent Desktop to be reassigned and click Reassign.

-
When you select Reassign, the following window will appear:

-
Use the drop-down menus to select the Identity Provider the user will be accessing the platform with and the new user's email address.
-
Click Save when you're ready. Once the desktop has been reassigned, you can hover over the machine name of the Persistent Desktop VM to verify the change has been made.
Unassign Persistent Desktops
Administrators can unassign a user from their Assigned Persistent Desktop at anytime. Once the user is unassigned from their persistent desktop, the persistent desktop is an Unassigned Persistent Desktop.
Considerations
-
The administrator cannot unassign an Assigned Persistent Desktop if the persistent desktop in use by a Persistent Desktop user.
-
If the user starts a session after they were unassigned from their Assigned Persistent Desktop, Frame will:
- Assign the user a Shadow Persistent Desktop, if one exists, and this persistent desktop will now be an Assigned Persistent Desktop.
- Broker the user to an existing persistent desktop that the administrator assigned to the user using the Reassign Persistent Desktops feature (prior to the user starting a session in Frame Console).
If the administrator does not want the user to get a new persistent desktop, then they must remove the user's authorization to access the Frame persistent desktop account.
Procedure
Terminate a Persistent Desktop
If an assigned persistent desktop is no longer needed, you can terminate the persistent desktop with the following procedure:
Frame will not create a new instance to replace the terminated Persistent Desktop. The next time the user logs into Frame and requests a desktop, Frame will:
- Assign the user a Shadow Persistent Desktop, if one exists, and this persistent desktop will now be an Assigned Persistent Desktop.
- Broker the user to an existing persistent desktop that the administrator assigned to the user using the Reassign Persistent Desktops feature (prior to the user starting a session in Frame Console).
If the administrator does not want the user to get a new persistent desktop, then they must remove the user's authorization to access the Frame persistent desktop account.
Cloning Persistent Desktop Workload VMs Across Frame Accounts
Frame supports cloning Persistent Desktop (PD) workload VMs from one Frame account to another using the Clone feature. This functionality is available across all supported cloud providers, including Nutanix AHV, provided that both the source and destination accounts are deployed on the same Cloud Account.
Cloning Scenarios
The table below summarizes which cloning scenarios are supported:
| Cloning Scenario | Supported? | Additional Notes |
|---|---|---|
| Non-Domain Joined Instance (Non-DJI) → Non-DJI | ✅ | No restrictions. |
| Non-DJI → Domain-Joined Instance (DJI) | ✅ | Admins must configure the domain post-cloning. |
| DJI (Same Domain) → DJI (Same Domain) | ✅ (with additional steps) | Source VM is backed up before cloning. The original VM is deleted from the source account after cloning to maintain domain integrity. |
| DJI (Different Domains) → DJI (Different Domains) | ❌ | Domain trust/security constraints prevent this operation. |
| Other cloning scenarios | ❌ | Not allowed. |
Cloning a **persistent desktop to a different account has certain limitations if the source account is domain-joined**. Users will see a **warning message** in the UI before proceeding. The clone operation does not delete Persistent Desktop volumes in the source Frame account unless explicitly required by domain management policies.
Prerequisites
Before initiating a clone, ensure the following requirements are met:
- Both source and destination accounts must be deployed on the same Cloud Account.
- Both accounts must use the same Cloud Service and Image Family.
- The destination Frame account must be fully deployed before cloning.
- If cloning between domain-joined accounts, verify that domain configurations align to prevent conflicts.
- Cloning across different domains is not supported.
Cloning Process
Cloning
Organizational and Customer administrators are granted the ability to clone from current and backup Sandbox/Utility Server images to other accounts. This feature is ideal for scenarios where administrators have configured an image to their liking and would like to re-use it in other accounts.
There are two options when cloning a Sandbox or Utility Server:
- Clone a Sandbox or Utility Server - this operation triggers the backup of the source disk before copying the backup to the destination Frame account and restoring the backup as the destination Sandbox or Utility Server disk. Each clone operation generates another new backup.
- Clone from a Backup - this operation copies the specified source disk backup to the destination Frame account and restores the backup as the destination Sandbox or Utility Server disk. This clone operation does not generate a new backup.
Considerations
- Only Organization and Customer-level administrators can initiate a clone.
- Cloning works only in account entities that have been created within the same public cloud account or if the source/destination AHV clusters have been configured bidirectionally with a Remote Site).
- Cloning from an existing Sandbox or Utility Server backup is faster than cloning from a Sandbox or Utility Server because the Frame control plane does not have to take a backup of the Sandbox or Utility Server virtual machine disk. Furthermore, if you need to clone the Sandbox from one source Frame account to more than one destination Frame account, cloning from an existing Sandbox backup is highly recommended.
Clone a Sandbox or Utility Server
The Sandbox/Utility server cloning operation will copy the Sandbox/Utility server image in one account to a Sandbox/Utility server in a different account.
You must initiate the Sandbox/Utility Server cloning operation in the account you wish to copy the image from.
Follow the steps listed below to clone an image from one Sandbox/Utility server to another Sandbox/Utility server.
-
Navigate to the Dashboard of the account you would like to clone the Sandbox or Utility server from.
-
From the Sandbox or Utility Servers page of your Dashboard, navigate to the desired Sandbox or Utility server you wish to clone from. Click on the ellipsis next to the desired system and select Clone to Another Account.

-
In the following dialog, select the account(s) you would like to clone the current Sandbox/Utility server image to. A check box will appear next to each account you select. You can click the account again to de-select the account.

If you are cloning a Sandbox, you are required to select the first checkbox before you can initiate Sandbox cloning:
- I agree to have Sandbox on
selected Account Name(s)deleted and replaced with a copy of the Sandbox from the current account: Confirm you want the current Sandbox image to replace the Sandbox image of each of the specified Frame account(s).
If you are cloning a Utility server, you are required to select the checkbox before you can initiate Utility server cloning:
- I agree to have this Utility server cloned to
selected Account Name(s): Confirm you want the current Utility server image to be used to create a Utility server in the specified Frame account(s).
The second and third checkboxes will only be shown when cloning Sandboxes:
- Publish after the clone has successfully finished: If selected, the Sandbox for each destination Frame account will be published once the current Sandbox image has been cloned.
- Join the cloned Sandbox to
selected Account Name(s)Account Domain: This option is only visible if the destination Frame account(s) are configured to use a Windows domain. Select this checkbox if you want the cloned Sandbox to be joined to the Windows domain, as configured in the destination Frame account.
- I agree to have Sandbox on
-
Click Clone to confirm cloning. The action will start. The status information will be updated when the Sandbox clone operation has successfully completed.
-
The account Sandbox/Utility Server you are cloning the image to will be temporarily unavailable. The operation status will be displayed in the “Pending requests” list above the system.
Clone from a Backup
If you would like to clone a Sandbox or Utility server backup image to another account's Sandbox or Utility server, you can do so by navigating to the Backups table listed under the Sandbox/Utility server of the account you will be cloning from.
-
Click the ellipsis listed next to the backup you wish to clone from and select Clone.

-
In the following dialog, select the account(s) you would like to clone the current Sandbox/Utility server backup to. A check box will appear next to each account you select. You can click the account again to de-select the account.
If you are cloning from a Sandbox backup, you are required to select the first checkbox before you can initiate Sandbox cloning:
- I agree to have Sandbox on
selected Account Name(s)deleted and replaced with a copy of the Sandbox from the current account: Confirm you want the current Sandbox image to replace the Sandbox image of each of the specified Frame account(s).
If you are cloning a Utility server backup, you are required to select the checkbox before you can initiate Utility server cloning:
- I agree to have this Utility server cloned to
selected Account Name(s): Confirm you want the current Utility server image to be used to create a Utility server in the specified Frame account(s).
The second and third checkboxes will only be shown when cloning Sandbox backups:
- Publish after the clone has successfully finished: If selected, the Sandbox for each destination Frame account will be published once the Sandbox backup has been cloned.
- Join the cloned Sandbox to
selected Account Name(s)Account Domain: This option is only visible if the destination Frame account(s) are configured to use a Windows domain. Select this checkbox if you want the cloned Sandbox to be joined to the Windows domain, as configured in the destination Frame account.
- I agree to have Sandbox on
-
Click Clone to confirm cloning. The action will start. The status information will be updated when the Sandbox clone operation has successfully completed.
-
The account Sandbox/Utility Server you are cloning the image to will be temporarily unavailable. The operation status will be displayed in the Summary page of your Dashboard.
Utility Servers
A Utility Server is a stand-alone, general purpose Windows server that can be helpful for a variety of use cases, including:
- License server: Install a network licensing manager for your software on a Frame Utility server. Your production instances can then connect to this server to get the licenses.
- Backend for a client-server application: Host a database or other backend function in the Utility server directly on your Frame account. Essentially, your entire system can be hosted in the cloud.
- Shared file server: Store files that can be accessed by all of your users.

Similar to your Sandbox, the Utility server is accessed from the Frame Dashboard, where you can power it on and connect to install applications. Unlike the Sandbox, however, the Utility server will NOT power off automatically. It was designed for use cases where you need the server to run 24x7.
By default, the Utility server is configured as a relatively low-powered machine (ideal for being a license server). If you wish to use this for a database or another more demanding back-end function, you can adjust the system type from your Dashboard (we will discuss this in more detail below).
The Utility server will be available to the rest of your instances within the VPC/VNet. After setting up your Utility server, you'll need to open any necessary ports in your Utility server's Windows Firewall.
Connecting to an On-Premises server
Though we typically recommend using the Utility server for client-server applications, we understand that connections to on- premises servers might be needed. Getting your application working with an established server from your own network will require one of two scenarios:
- Configure your network to allow outside connections to the server. At that point, you'd configure the application to connect to whatever domain or IP address information you want to use for establishing the connection, and it should work without issue. By default, Frame doesn't restrict outbound connections from our sessions, only inbound ones.
- Configure a VPN tunnel from the instances to your network. This requires the use of a VPN client that allows you to configure the traffic routing rules.
Create a new Utility Server
Creating a new Utility server is relatively simple. From your Dashboard navigate to the “Utility Servers” tab.
Click the Add Utility Server button in the center of the page. A dialog will appear giving you a number of options to configure your Utility server:

- Server name: Set the desired name for your Utility server.
- Image family: Select the image family you wish to use for your Utility server.
- VM size: Select the desired VM size based on your use case. License servers typically do fine with an Air 4GB.
- Disk size: Use the slider or the editable field next to it to select the desired disk size based on your use case. Please note that Windows will typically consume about 25 GB of storage space on its own.
Once you have configured the Utility server as desired, click Add Server to start the provisioning process.
Configuration
You can make multiple adjustments to your Utility server by clicking on the kebab menu in the upper right corner.

- Power Off: You can power off your Utility server from the Dashboard without having to be in a Utility server session.
- Reboot: You can reboot the Utility server from the Dashboard without having to be in a Utility server session.
- Rename: A dialog will appear prompting you to enter a new name for the Utility server.
- Delete: Deleting the Utility server will also delete any data associated with the Utility server, including backups. This action cannot be reversed and the data cannot be recovered.
- Change Instance Type: Switch between low-powered and high-powered instance types as necessary. Note that for public cloud infrastructure, changing the instance type requires the new VM to power on after the existing Utility server disk is attached to the new VM and the old VM is terminated.
- Increase Disk Size: You can increase the disk size as needed for your Utility server. Note that you cannot decrease the disk capacity once a disk increase has been implemented.
- Session Settings: Admins have the ability to configure a separate set of session settings for their Utility servers. More information about session settings is available under the Session Settings documentation page.
- Clone to Another Account: The Utility server cloning operation will clone (copy) the Utility server image from the Frame account you are on to one or more destination Frame accounts.
Backups
Utility server backups can be performed manually on demand. To learn more about Backups, visit Backups.
Updates
The Updates page of your Account Dashboard will display any needed OS or Frame-related updates for your Utility server. More details can be found in the Updates section of our documentation.
Register Workloads (Early Access)
Overview
The Register Workloads feature lets customers bring existing virtual machines or workloads into the Dizzion Frame platform as persistent desktops without recreating or migrating resources. It supports all Dizzion-approved infrastructures including AWS, Azure, Google Cloud, IBM Cloud, and Nutanix AHV. This feature is ideal for migration scenarios from e.g. Citrix, Microsoft, or Omnissa, enabling smooth A/B and acceptance testing alongside existing environments.
Prerequisites
Before registering workloads, ensure the following:
- The cloud account containing the workloads has been imported into Frame using the standard cloud account creation procedure. See: Add Cloud Account for more information.
- This feature only works for Windows Operating Systems
- The workloads are accessible over the network and can be reached using VNC, Microsoft RDP, Citrix HDX, Omnissa (VMware) Blast, or any other supported connection protocol.
- For manual installation, you need administrative privileges on the workload VMs to install the Frame Guest Agent. For unattended installation, make sure the Frame Agent Setup Tool (FAST) is downloaded and setup for automated installation.
- Workloads must have outbound network connectivity on TCP port 443 (HTTPS) to access the registration URL, which is provided in the setup instructions below.
- All networking requirements must be met as described in the reference documentation here .
Workflow:
Step 1. – Create a Persistent Desktop Account
· Here are more details about Persistent Desktops
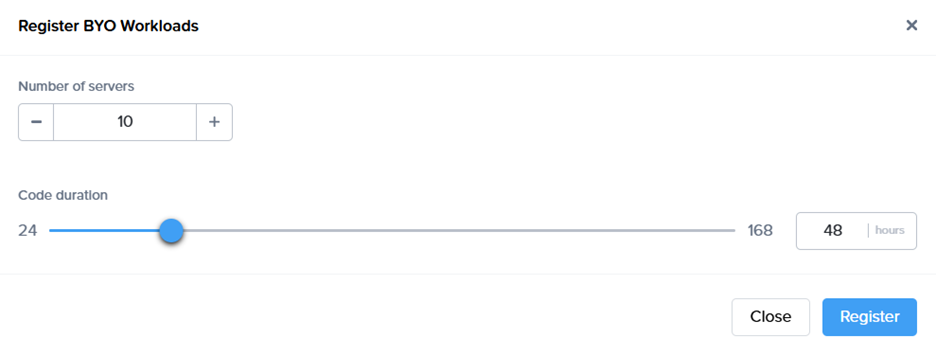
Step 2 - Register Workloads from console by:
· Go to the VMs page and select the “Register Workloads.”
· Specify the number of workloads you want to import into a persistent desktop pool.
 a registration code with an expiration time, along with the backplane URL will be displayed.
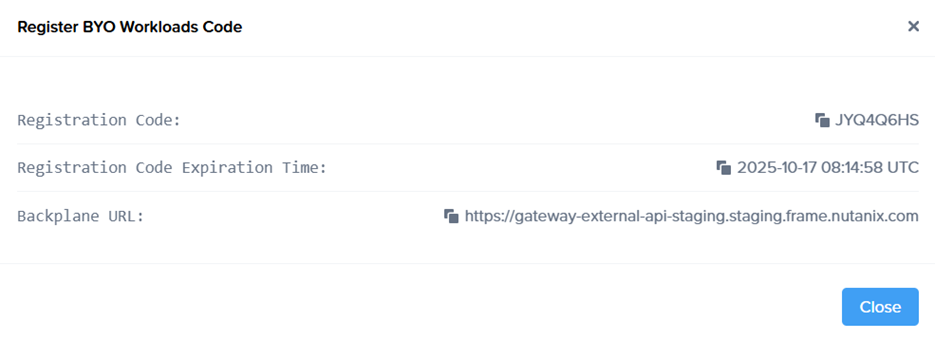
· New objects appear on the VMs page, serving as placeholders until the actual virtual machines register. If the registration code expires, refresh the page to generate a new one.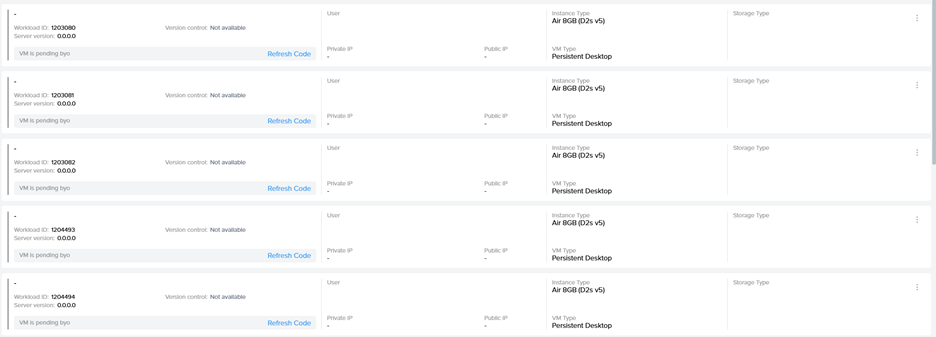
Step 3 - Install Frame Guest Agent on Workloads
Manual installation
On each workload VM, connect using VNC, Microsoft RDP, Citrix HDX, Omnissa (VMware) Blast, or another preferred protocol, then run the Frame Agent Setup Tool (FAST) with the registration parameters.
Download the installer, the Frame Agent Setup Tool (FAST)
Run the registration command
frameagentsetuptool.exe install frameimage registrationcode=<code> registrationurl=<url>Replace <code> and <url> with the values generated in Step 2 of the Workflow.
Registration via UI:
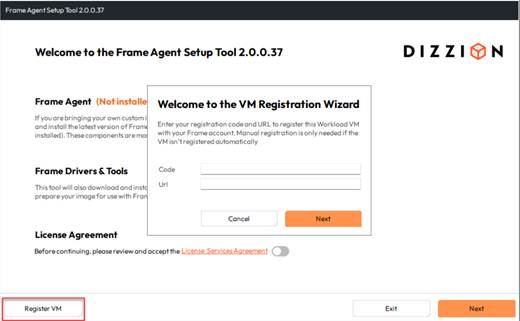
Use <code> and <url> with the values generated in Step 2 of the Workflow.
Unattended Installation
For larger environments, the Frame Agent Setup Tool (FAST) can be deployed automatically using standard management tools.
Recommended Methods
- PowerShell Script: Run locally or remotely or distribute via GPO.
- Intune / Endpoint Manager: Package FAST as a Win32 app and assign to devices.
- Cloud Startup Scripts: Add the command to Azure Custom Script, AWS User Data, or GCP startup metadata for automatic registration at boot.
- Use any third-party deployment tool of your choice.
Tips
- Always use the latest installer.
- Test with one VM before broad rollout.
- Ensure outbound connectivity to the registration URL.
Step 4 - Automatic Registration
After running the command, the Frame Guest Agent automatically registers the workload. Each workload then appears in the Persistent Desktop Production Pool as an unassigned persistent desktop.
Step 5 - Manual Assignment
Once the workloads are visible on the VMs page, manually assign each imported persistent desktop to the corresponding user through the Frame Console.
Step 6 – Create a Launchpad
Set up a desktop Launchpad for end users to access these VMs, if it doesn’t already exist and configure SAML2 permissions.