Storage
Storage, Expand Drive Size, Personal Drives, User Profiles, Default User Profile, Enterprise Profiles, Cloud Integration, DropBox, Google Drive, OneDrive, Box
- Default User Profiles (Windows)
- Enterprise Profiles
- Personal Drives
- Expand Drive Size
- Dropbox
- Google Drive
- Microsoft OneDrive
- Box Drive
Default User Profiles (Windows)
Frame administrators may need to customize their users' Windows application and/or desktop experience by configuring the Windows default user profile. Updating the default user profile allows administrators to:
- customize the Windows Start menu and task bar
- set registry key values
- configure "run once" PowerShell scripts
- and/or pre-configure application settings and then provided them to each user when each user logs into their Frame session. If the user is accessing persistent desktop VMs or non-persistent VMs with enterprise profiles enabled, then the default user profile is copied by Windows to the user's profile on the first Frame session.
With Frame, the location of the default Windows user profile for your users will depend on how the Frame account was created and configured. This page discusses how to configure a Windows default user profile based on one of the following Frame account configurations:
- Non-persistent, non-domain-joined Frame Account
- Non-persistent, domain-joined Frame Account
- Persistent, non-domain-joined Frame Account
- Persistent, domain-joined Frame Account
- Profile Customization
Non-persistent, non-domain-joined Frame Account
With a non-persistent, non-domain-joined Frame account, the Frame administrator is automatically logged into the Sandbox as the local Windows user Frame (a member of the local Windows Administrators group) to manage the image. When the Sandbox is published, the production VMs will be clones of the Sandbox. Since the production VMs are non-persistent, anything users do to their workload VMs during the session will be lost once their session is closed.
Enterprise Profiles Disabled (default)

With enterprise profiles disabled (default), users connecting to the production VMs using Frame Remoting Protocol will be automatically logged into the production VMs as the local Windows user Frame. As a result, if the Windows user profile must be customized, Frame administrators must customize the user profile located in the Sandbox under C:\Users\Frame.
Enterprise Profiles Enabled

When enterprise profiles are enabled, users connecting to the production VMs using Frame Remoting Protocol will be automatically logged into the production VMs as the local Windows user FrameUser. By default, FrameUser is not a member of the local Windows Administrators group. Frame administrators can choose to add this Windows user to the local Windows Administrators group, if desired. If the Windows user profile must be customized, Frame administrators must customize the Windows default user profile in the Sandbox under C:\Users\Default.
When a user connects into a production VM for that Frame account for the first time, Frame will create a profile disk for the user and mount that disk on the assigned production VM. Windows will then copy the default profile in C:\Users\Default to the user's profile disk before the user is automatically logged into production VM. Once the user has a profile disk, changes within the user profile (e.g., registry settings, credential manager entries, application settings, etc.) under %USERPROFILE% will persist between sessions.
The local Windows user `Frame` must still be a member of the local Windows Administrators group in the production VMs for running the Frame services.
Non-persistent, domain-joined Frame Account
With a non-persistent, domain-joined Frame account, the Frame administrator is automatically logged into the Sandbox as the local Windows user Frame (a member of the local Windows Administrators group) to manage the image. When the Sandbox is published, the copy of the Sandbox is created and sysprep is executed using the Unattend.xml located in C:\ProgramData\Nutanix\Frame\Sysprep\Unattend.xml for FGA 8.X. The generalized Sandbox image is then used to create the production VMs.
Customers are allowed to join their Sandbox to their domain. In that case, Frame administrators will login to the domain- joined Sandbox as a domain administrator and not the local Windows user `Frame`. Frame Administrators must remember that Frame will run sysprep to generalize a copy of the Sandbox image, as described previously, during the publish process.

With domain-joined production VMs where users are required to authenticate to a Windows domain, users will be logged into the production VMs as a domain user after authenticating to their Windows domain. If the default Windows user profile needs to be customized, Frame administrators can customize the default user profile in the Sandbox under C:\Users\Default. Alternatively, Frame Administrators can deploy customizations using local or domain policy objects (GPOs).
If the user does not login to the domain-joined VM, then the user will be auto-logged as local Windows user Frame in the Windows Administrators group, regardless of whether enterprise profiles are enabled or not.
When a user connects into a production VM for that Frame account for the first time, Frame will create a profile disk for the user and mount that disk on the assigned production VM. After the user is presented with the Windows login screen and authenticates to their Windows domain, Windows will then copy the default profile in C:\Users\Default to the user's profile disk. Once the user has a profile disk, changes within the user profile (e.g., registry settings, credential manager entries, application settings, etc.) under %APPDATA% will persist between sessions.
With domain-joined Frame accounts, the user always runs in the domain user context, regardless of whether enterprise profiles are disabled or enabled.
Persistent, non-domain-joined Frame Account

With a persistent, non-domain-joined Frame account, the Frame administrator is automatically logged into the Sandbox as the local Windows user Frame (a member of the local Windows Administrators group) to manage the image. When the Sandbox is published, the production VMs will be clones of the Sandbox. The user will also be auto-logged into their assigned persistent desktop as the local Windows user Frame. This user must be a member of the local Windows Administrators group in order for Frame server updates to be successfully executed, to extend the disk size, and other maintenance tasks the Frame Guest Agent performs. Every server customization script is run in Frame user context and some of the task may fail to execute because they requires administrative permissions. If the Windows user profile must be customized, Frame administrators must customize the user profile located in the Sandbox under C:\Users\Frame.
Persistent, domain-joined Frame Account

With a persistent, domain-joined Frame account, the Frame administrator is automatically logged into the Sandbox as the local Windows user Frame (a member of the local Windows Administrators group) to manage the image. When the Sandbox is published, the production VMs will be clones of the Sandbox.
Users will be logged into their domain-joined production VMs as a domain user after authenticating to their Windows domain. If the default Windows user profile needs to be customized, Frame administrators can customize the default user profile in the Sandbox under C:\Users\Default. Alternatively, Frame Administrators can deploy customizations using local or domain policy objects (GPOs).
If the user does not login to the domain-joined VM, then the user will be auto-logged as local Windows user `Frame` in the Windows Administrators group. Frame administrators must configure the user profile in the Sandbox under "C:\Users\Frame"
Profile Customization
Windows administrators may wish to customize different elements of the Windows user profile. The following subsections highlight the common areas of Windows that administrators often customize.
Start Menu
Administrators may want to change the Windows Start menu layout for their users, following Microsoft's document on customizing the Start layout. In order to make these changes, the Windows administrator needs to add a LayoutModification.xml file to the Sandbox in the appropriate default user profile (e.g., C:\Users\Default\AppData\Microsoft\Windows\Shell subdirectory). The XML file can be generated by exporting the existing Start Menu layout and then modified per Microsoft guidelines:
Export-StartLayout –path $yourPath exampleFile.xml
Task Bar
In order to modify the Windows Task Bar for all users, follow the Configure Windows 10 taskbar instructions.
Fonts
Adding fonts is straight-forward. Install fonts as usual but make sure to install the fonts for all users.
Background Wallpaper
For non-domain-joined production instances, Frame Administrators can change the background wallpaper by simply changing it in the sandbox and publishing.
Alternatively, admins can place their wallpaper files in a custom location on the Sandbox and update the wallpaper location by using gpedit.msc in the Sandbox to set a local group policy under User Configuration > Administrative Templates > Desktop > Desktop > Desktop Wallpaper.
For domain-joined instances, Frame Administrators can set the wallpaper through a GPO.
Depending on how the workload VMs are configured to show the custom wallpaper, changes to the wallpaper may or may not apply to users with existing enterprise profiles. Administrators may need to delete the existing enterprise profile disks and have the users start new Frame sessions. When a user starts a Frame session, Frame will provision a new enterprise profile disk and Windows will initialize the user's profile using the Windows default user profile, as defined in the Sandbox.
Enterprise Profiles
The Enterprise Profiles feature collects user profile data on session end and saves it to a secure disk associated with a specific Frame user (based on identity provider (IdP) address) and Frame Account. When that user logs in to a Frame session, their secure profile disk is automatically attached to the virtual machine and made available to their session. This feature allows Frame to provide seamless per-user customization without losing the management benefits of stateless instances. Furthermore, Frame Enterprise Profiles uniquely support both domain joined and non-domain joined instances using Dizzion’s patented technology (US Patent #11,861,388).
If your organization's use-case requires the same user's profile be accessible across multiple Frame accounts, third-party profile solutions such as FSLogix, Liquidware ProfileUnity, or Windows roaming profiles can be used. Organizations wishing to leverage one of these third party solutions will also need to configure Domain Joined Instances and ensure that the Enterprise Profiles button in the associated accounts' Dashboards (Dashboard> Settings> Profiles) is set to None.
1. An Enterprise Profile cannot be shared across multiple Frame Accounts.
2. Secure Anonymous Tokens may not be used in combination with Personal Drives and/or Enterprise Profiles.
3. If you plan to use Liquidware ProfileUnity and FlexApp, in addition to Enterprise Profiles, review the Liquidware KB article before enabling Enterprise Profiles.
Requirements
- Enterprise Profiles can be used in both Windows Domain Joined and non-Domain joined accounts. If an account is joined to a domain, users must log in to the Frame instance using their Active Directory credentials.
With Domain-joined Frame accounts, a single Frame user cannot log in to a Frame instance as more than one Active Directory users. Attempting to do so could result in corruption of the user profile stored in the Profile Disk. Each Frame end user is uniquely identified by the platform (a combination of the identity provider and email address). Frame end users must access their sessions using only one Active Directory user account.
-
The drive letters
U:andB:cannot be in use, as these drive letters are required for the backend implementation of Enterprise Profiles. -
Administrators must set capacity and successfully complete a publish before enabling Enterprise Profiles, regardless of whether the Frame account is configured to be domain-joined or not domain-joined.
Enabling Enterprise Profiles will increase the time required to establish a Frame session. When a user starts their first Frame session after Enterprise Profiles have been enabled, the time to get to that session may be increased by up to a minute; this is because their Enterprise Profile volume must be created, encrypted, and formatted on that session start. Subsequent sessions will be much faster, but still may be upwards of 10 seconds slower than sessions without Enterprise Profiles, due to timing constraints from the Cloud Provider for attaching volumes to virtual machines. This behavior is normal and expected.
Enable Enterprise Profiles
- First, start by enabling a single Availability Zone for the associated Frame account.
Enterprise Profile's backend implementation through Frame varies depending on the cloud service provider. The implementation used for AWS requires administrators to specify an AZ because the Elastic Block Storage (EBS) resources must be accessible from the same availability zone as the VM pool.
You may change the Availability Zone (AZ) by selecting a different AZ and clicking on the Save button. However, this operation should be performed during a scheduled maintenance period as Frame Platform will need to terminate the EC2 instances and recreate them in a new AZ. Additionally, all enterprise profile volumes will need to be backed up and restored in the new AZ. This will take some time depending on the number of enterprise profile volumes and users whose enterprise profile volume has not been moved to the new AZ will not be able to start a session.
- Now select the Profiles tab from the Settings page. Click on the Enterprise Profiles radio button. Set the desired Initial profile size for your users and click Save in the upper right corner.

- You have successfully enabled Enterprise Profiles for your Frame account. To view and manage your Enterprise Profiles in your Frame Account, go to the Volumes page on your Frame Account Dashboard.
Disable Enterprise Profiles
- You can stop using Enterprise Profiles at any time by going to Settings > Profiles and disabling the Enable Enterprise Profiles toggle.

- When you click Save, you will be asked whether you want to: (a) keep the existing profile backups or delete them and (b) create or do not create new backups of existing profiles.

- Once you click Confirm, you will be asked to verify that you wish to disable the Enterprise Profiles feature.

- When you click on Confirm, Frame will keep or delete the existing profile backups, optionally make new backups for the existing profiles, and delete the existing enterprise profiles. If you select Cancel, then the Enterprise Profiles feature will remain enabled.
If you are sure that you will not use Enterprise Profiles in the future, be sure to delete all of the volume backups and do not create new profile volume backups before disabling the Enterprise Profile feature. This will prevent you from retaining any profile volume backups and incurring unnecessary storage costs.
If you wish to re-enable Enterprise Profiles and have retained the profile backups, you can selectively restore the profile backups for specific users from Volumes > Backup.
Profile Disk Location
Enterprise Profiles will persist any items that are saved in the %USERPROFILE% location. Depending on how a Frame account is configured, the user name in the path could be one of the following:
-
Domain-joined instances with Windows user login: Domain User (e.g.
jsmith) -
Domain-joined instances with Windows user login disabled:
FrameUser, a local Windows user -
Non-domain-joined instances:
FrameUser, a local Windows user
Adjust Storage Capacity
Administrators can make changes to the storage capacity settings, adjust their Enterprise Profiles Autogrow Settings to increase Enterprise Profile volume sizes automatically based on usage, and manually increase the volume size of specific Enterprise Profile volumes.
Initial Disk Size
The initial Enterprise Profile disk can be defined at any time by navigating to the Settings page in your Dashboard and clicking on the Profiles tab.
Simply modify the value for Initial Profile size and click Save. When a user starts a session in this Frame account and does not have an existing Enterprise Profile disk, Frame will create an Enterprise Profile disk with the disk size specified by the updated Initial Profile size value. The setting will not be applied to any users who have an existing Enterprise Profile.
Autogrow Settings
If you anticipate that your users will need to regularly increase their Enterprise Profile disk storage capacity, you can set parameters for Frame to automatically scale up as needed. To do this, navigate to the Volumes page (which will appear in your Dashboard menu once you have enabled Enterprise Profiles or Personal Drives). Under the Volumes page, click on the kebab menu and select Autogrow settings. A new dialog box will appear:

Here, you can specify the threshold at which the disk size will automatically increase for established users. By default, the disk volume will automatically be increased by 1 GB when there is less than 0.25 GB of free space remaining. You can adjust these values as you see fit for your users.
You can enforce a maximum disk volume size by enabling the Limit maximum volume size slider and setting the Maximum volume size.
Be sure to click Confirm once you have adjusted the settings as desired.
You cannot shrink the size of a user's enterprise profile disk. You must delete the disk and recreate the disk again. All data on that deleted profile disk is lost unless the profile disk contents were copied to another persistent disk before the profile disk was deleted and copied back after the new profile disk was created.
Increase Disk Size
Administrators can manually increase Enterprise Profile volume sizes in two ways:
- To increase one or more volumes, select the checkbox(es) next to the volume(s) for which you would like to increase the disk size. Click on the checkbox for for all volumes, if desired. Click the Increase disk size button in the upper right corner of the page. A dialog window will appear prompting you to specify the new disk size. Click the Save button to increase the size of the disks or Close to cancel the request.
- Click on the kebab menu associated with a specific Enterprise Profile volume and then Increase disk size to increase the disk size for a specific Enterprise Profile volume.
Delete Volumes
Administrators can delete volumes at any time. Simply navigate to the Volumes page of your Frame Account Dashboard to manage your volumes. When an administrator deletes a volume for a user, a new volume will be provisioned for that user upon the next session start. The new volume configuration will depend on the initial disk size setting at the time the session was launched. For example, if you update your “Initial Drive Size” setting to 7 GB and then delete a profile disk for a user, the user will be provisioned a new profile disk with a max storage capacity of 7 GB when they start a new session.
Please ensure that the volume status is Detached before you attempt to delete it.
Delete a Single Volume
To delete a single volume, you can search for the volume by entering a search string in the Search volumes field. From there, click the ellipsis next to the volume you would like to delete. Click on the checkbox to delete all backups associated with the selected volume, if desired. Select Delete and confirm. You will be asked if you would like to delete all backups associated with the volume as well.

Alternatively, you can select the checkbox next to the volume you would like to delete. Click on the checkbox to delete all backups associated with the selected volume, if desired. Click on the Delete button in the upper right corner of the page and confirm.

Delete Multiple Volumes
To delete one or more volumes, you can search for the volumes by entering a search string in the Search volumes field or sort the list of volumes by Last Used date/time. Then, select the checkbox(es) next to the volume(s) you would like to delete. Click on the checkbox to delete all backups associated with the selected volumes, if desired. Click the Delete button in the upper right corner of the page and confirm. You will be asked if you wish to delete all backups associated with this volume as well.

If you want to delete all of the volumes listed on your Volumes web page, click on the checkbox next to the Name field to select all of the volumes listed.
Profile Disk Exclusions/Inclusions
You may need to specify inclusions or exclusions for various paths in your environment.
Profile Disk Exclusions
Frame account administrators can exclude folders from the user's enterprise profile disk. To implement exclusion rules, Frame administrators will need to implement the rules in the form of a PowerShell script using the Add-ProfileDiskExclusion cmdlet. This capability is supported in Frame Guest Agent 8.0 or greater.
Add-ProfileDiskExclusion -SourcePath $path_to_folder_to_exclude -TargetPath $path_to_temp_folder
-
$path_to_folder_to_excludewould be a folder which is in%USERPROFILE%. If you have multiple folders to exclude, you can invoke the cmdlet for each of the folders. -
$path_to_temp_folderwould be a path to an existing temporary folder.
Profile Disk Inclusions
Frame account administrators can include folders in the user's enterprise profile disk. To implement inclusion rules, Frame administrators will need to implement the rules in the form of a PowerShell script using the Add-ProfileDiskInclusion cmdlet. This capability is supported in Frame Guest Agent 8.0 or greater.
Add-ProfileDiskInclusion -SourcePath $path_to_folder_to_include
$path_to_folder_to_includewould be a folder that is not normally in%USERPROFILE%. If you have multiple folders to include, you can invoke the cmdlet for each of the folders
Refer to Exclusion/Inclusion Rules for Enterprise Profiles to read more about how a custom pre-session script can be implemented using the cmdlets.
Manage Backups
If you would like to implement backups for your volumes, check out the Backups section of our documentation.
Troubleshooting
We can't sign into your account error
If a user sees this Windows message after logging into their domain and the Frame account is enabled with enterprise profiles, verify the user has not logged into their Frame sessions with more than one Windows domain user account.

Troubleshooting FSLogix with Windows 11
For customers using FSLogix instead of Enterprise profiles, you may need to adjust certain registry settings in order to get some GPO's to apply extensions at login:
HKLM:\SOFTWARE\FSLogix\Profiles
GroupPolicyState 0You may also need to add this regsitry setting to force a refresh of user policies.
HKLM:\Software\Policies\FSLogix\ODFC
RefreshUserPolicy 1Before applying these, please check with Frame support if you have any questions.
Personal Drives
Frame has built and integrated a variety of storage options into our platform to fit a multitude of unique use cases. This article covers the Personal Drive feature which provides persistent storage on a per-user basis. This storage space can be used as a cache to store frequently used files that will persist between a user's sessions.
Overview
Frame's Personal Drive is a storage solution that provides each authenticated user with individually allocated storage space. The capacity of this storage space is specified by the administrator of the account and can be scaled as needed. The drive is accessible from “My Computer” within the session and appears as the “P” drive letter. Drives are automatically provisioned as new users are added to the account. When users return to their accounts and launch sessions, their stateless instances mount their unique drive. When a user's session ends, the Personal Drive is disconnected from the stateless instance. The Personal Drive is only available to the authenticated user and is not shared with any other user.
Secure Anonymous Tokens (platform/identity-and-access/secure-anonymous-tokens) may not be used in combination with Personal Drives and/or Enterprise Profiles.
Enable Personal Drives
Setting up Personal Drives for your users is simple and can be done with only a few clicks.
- First, start by enabling a single Availability Zone for the associated Frame account.
Personal Drive's backend implementation through Frame varies depending on the cloud service provider. The implementation used for AWS requires administrators to specify an AZ because the Elastic Block Storage (EBS) resources must be accessible from the same availability zone as the VM pool.
- Now select the “Personal Drives” tab from the Settings page. Click on the toggle to “Enable personal drives for all users.” Set the desired drive size for your users next to “Initial personal drive size” and click “Save” in the upper right corner.

That's it! Your users will now be able to see an additional drive labeled “PersonalDisk (P:)” from their file explorer. This drive can be used and accessed just like any other drive.

Disable Personal Drives
- You can stop using Personal Drives at any time by going to Settings > Personal Drives and disabling the Enable Personal Drives for all users toggle.

- When you click Save, you will be asked whether you want to: (a) keep the existing personal drive backups or delete them and (b) create or do not create new backups of existing personal drives.

- Once you click Confirm, you will be asked to verify that you wish to disable the Personal Drives feature.

- When you click on Confirm, Frame will keep or delete the existing personal drive backups, optionally make new backups for the existing personal drives, and delete the existing personal drives. If you select Cancel, then the Personal Drives feature will remain enabled.
If you are sure that you will not use Personal Drives in the future, be sure to delete all of the volume backups and do not create new volume backups before disabling the Personal Drives feature. This will prevent you from retaining any volume backups and incurring unnecessary storage costs.
If you wish to re-enable Personal Drives and have retained the profile backups, you can selectively restore the volume backups for specific users from Volumes > Backup.
Delete Personal Drives
Administrators can delete volumes at any time. Simply navigate to the “Volumes” tab on the “Settings” page of your Dashboard and click the ellipsis next to the volume you would like to delete. Click on the checkbox to delete all backups associated with the selected volumes, if desired. Select “Delete.”
Please ensure that the volume status is “Detached” before you attempt to delete it.

When you delete a volume for a user, a new volume will be provisioned for that user upon the next session start. The new volume configuration will depend on the initial disk size setting at the time the session was launched. For example, if you update your “Initial Drive Size” setting to 7 GB and then delete a Personal Drive for a user, the user will be provisioned a new Personal Drive with a max storage capacity of 7 GB when they start a new session.
Adjust Storage Capacity
Administrators can make changes to the storage capacity settings, adjust their Personal Drives Autogrow Settings to increase Personal Drive sizes automatically based on usage, and manually increase the volume size of specific Personal Drives.
Initial Disk Size
The initial Personal Drive can be defined at any time by navigating to the “Settings” page in your Dashboard and clicking on the Personal Drives tab.
Simply modify the value for Initial Personal Drive Size and click Save. When a user starts a session in this Frame account and does not have an existing Personal Drive, Frame will create a Personal Drive with the disk size specified by the updated Initial Personal Drive Size value. The setting will not be applied to any users who have an existing Personal Drive.
Autogrow Settings
If you anticipate that your users will need to regularly increase their Personal Drive storage capacity, you can set parameters for Frame to automatically scale up as needed. To do this, navigate to the Volumes page (which will appear in your Dashboard menu once you have enabled Enterprise Profiles or Personal Drives). Under the Volumes page, click on the kebab menu and select Autogrow settings. A new dialog box will appear:
Here, you can specify the threshold at which the disk size will automatically increase for established users. By default, the disk volume will automatically be increased by 1 GB when there is less than 0.25 GB of free space remaining. You can adjust these values as you see fit for your users. The autogrow disk size value can be configured in increments of 0.25 GB.
You can enforce a maximum disk volume size by enabling the Limit maximum volume size slider and setting the Maximum volume size.
Be sure to click Confirm once you have adjusted the settings as desired.
You cannot shrink the size of a user's Personal Drive. You must delete the disk and recreate the disk again. All data on that deleted Personal Drive is lost unless the Personal Drive contents were copied to another persistent disk before the Personal Drive was deleted and copied back after the new Personal Drive was created.
Increase Disk Size
Administrators can manually increase Personal Drive volume sizes in two ways:
- To increase one or more volumes, select the checkbox(es) next to the volume(s) for which you would like to increase the disk size. Click on the checkbox for for all volumes, if desired. Click the Increase disk size button in the upper right corner of the page. A dialog window will appear prompting you to specify the new disk size. Click the Save button to increase the size of the disks or Close to cancel the request.
- Click on the kebab menu associated with a specific Personal Drive volume and then Increase disk size to increase the disk size for a specific Personal Drive volume.
Manage Backups
If you would like to implement backups for your volumes, check out the Backups section of our documentation.
Expand Drive Size
The Frame platform gives admins the ability to expand the drive size of their Sandbox or Utility server as necessary from the Dashboard console.
- Once you start the drive size increase process, you cannot roll back to a smaller volume size.
- Customers using Azure infrastructure must adhere to their standardized disk sizes, as discussed in their official documentation.
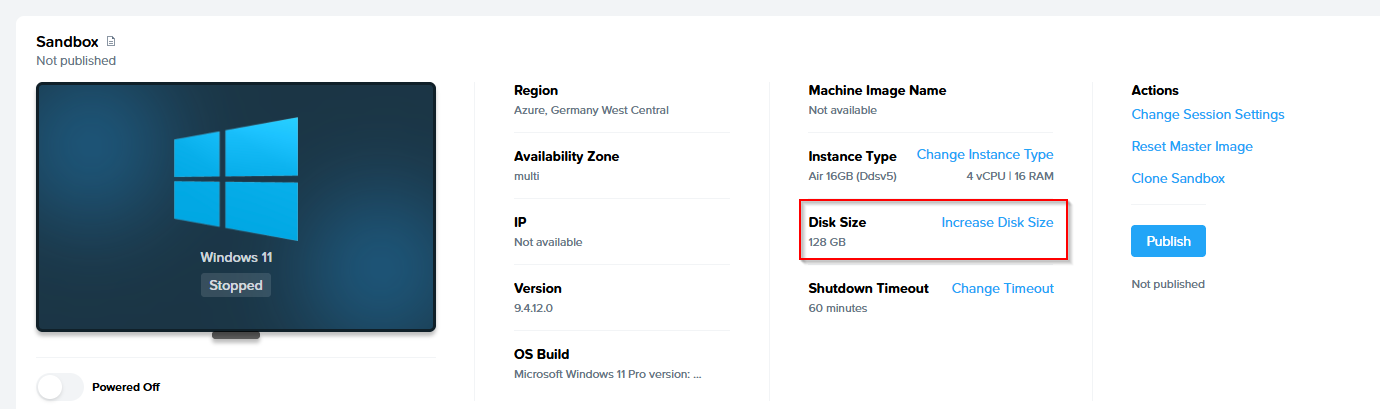
- A dialog box will appear giving you a few options. Select the drive size increase you wish to implement.
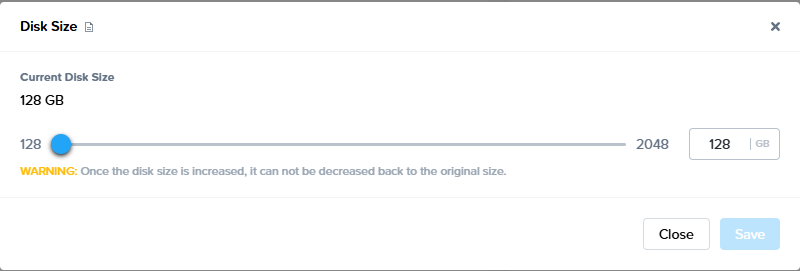
- Click Save to start the drive size increase.
Dropbox
Dropbox is a well-known file hosting service which offers cloud storage, personal cloud, and file synchronization services. Integrating Frame accounts with Dropbox is simple and can be done in a matter of minutes. This guide provides detailed instructions for installing, configuring, and using Dropbox with your Frame account.
Requirements
- A Frame account
- Enterprise Profiles, Persistent Desktops, or another 3rd party method for user profile persistence must be utilized in order for the end user's Dropbox credentials to persist between sessions.
Dropbox Authentication
By default, this configuration will require users to log on to Dropbox each time they start a Frame session. Enterprise Profiles can be configured to avoid this issue. Once Enterprise Profiles has been enabled for the account, the end user needs only to log in to Dropbox once within the session. From that point forward, Dropbox will automatically stay logged in using the credentials stored on the user's profile disk.
Setup
During installation, Frame will automatically detect the installation of a new application and prompt you to “Onboard to Frame”. If you plan to deliver only virtual desktops, or would prefer this app not appear as an icon on your users' application Launchpad, skip the onboarding workflow by clicking the Cancel button. You can always onboard the Dropbox at a later time.
-
Once the installation is complete, the Dropbox login window will appear, simply close the window. Do not log in.
-
Next, right-click on the Dropbox icon in your system tray, click the gear icon, and select Quit to completely close Dropbox.


Starting Dropbox again will recreate the %LOCALAPPDATA%\Dropbox folder in the Frame user context. This ensures Dropbox will recognize that it has not been run in the end user's context and will create the first run version of %LOCALAPPDATA%\Dropbox for the end user.
-
Then empty your Recycle Bin and close your Sandbox session.
-
Lastly, power down the Sandbox and publish your changes.
That's it! After your publish is complete, your users will now have Dropbox accessible to them to login during their next session. If you've setup persistence for their credentials, they'll automatically login to Dropbox for their subsequent sessions.
Google Drive
The Google Drive for Desktop (GDFD) service, formerly known as “Google File Stream”, is a desktop solution created by Google which allows users to quickly access all of their files from their Google Drive account. Google Drive files are directly accessible from Google's servers from the user's Frame session.
Requirements
- A Frame account
- Enterprise Profiles, Persistent Desktops, or another 3rd party method for user profile persistence must be utilized in order for the end user's GDFD credentials to persist between sessions.
GDFD Authentication
By default, this configuration will require users to log on to GDFD each time they start a Frame session. Enterprise Profiles can be configured to avoid this issue. Once Enterprise Profiles has been enabled for the account, the end user needs only to log in to GDFD once within the session. From that point forward, GDFD will automatically stay logged in using the credentials stored on the user's profile disk.
Setup

- A new prompt will appear asking you if you would like to install Google for Desktop. Uncheck both boxes pertaining to shortcuts and click Install.

- When prompted to log in to your Google Drive account, simply close the window. Do not log in.
During installation, Frame will automatically detect the installation of a new application and prompt you to “Onboard to Frame”. If you plan to deliver only virtual desktops, or would prefer this app not appear as an icon on your users' application Launchpad, skip the onboarding workflow by clicking the Cancel button. You can always onboard Google Drive's icon at a later time.
- Lastly, you'll be informed that that Google Drive for Desktop has successfully been installed. Click Close.


C:\Users\Frame\AppData\Local\Google\DriveFS
-
Then empty your Recycle Bin, close your Sandbox session, and shut down your Sandbox from your Dashboard.
-
Navigate back to your Sandbox and start your Sandbox session. Confirm that Google Drive for Desktop has not started automatically and if it has started, great! We're on the right track and now it's time to configure Google Drive.
Customizing Google Drive for Desktop
Google Drive for Desktop can be customized through registry configuration in the Sandbox registry or through GPOs, as described in https://support.google.com/a/answer/7644837?hl=en.
-
For an optimal user experience, the default browser should be configured. This will be used the first time the user signs in to Google Drive. To do so, create the following registry key:
HKEY_LOCAL_MACHINE\Software\Google\DriveFS\ -
Create a String named:
DefaultWebBrowser -
Set the String Value to the path of your desired browser. For instance:
C:\Program Files\Google\Chrome\Application\chrome.exe
Disable Automatic Updates
You may need to disable the auto update feature for Google Drive for Desktop, so you can control when Google for Desktop is updated in the Sandbox and then published to your users. Disabling auto updates is simple. Follow the steps as they are described below:
-
If you have not already done so, start and launch your Sandbox session. Navigate to
http://dl.google.com/update2/enterprise/googleupdateadmx.zipin your web browser. -
Open the GoogleUpdateAdmx folder.
-
Copy
google.admxandGoogleUpdate.admxand put them in your Policy Definitions folder. (Example:C:\Windows\PolicyDefinitions) -
In the GoogleUpdateAdmx/en-US folder, copy the google.adml and GoogleUpdate.adml files and put them in the en-US folder in Policy Definitions. (Example:
C:\Windows\PolicyDefinitions\en-US). -
Navigate to “Edit group policy” and go to Computer Configuration > Policies > Administrative Template > Google > Google Update to verify that the template loaded correctly.

-
Next, go to Google > Google Update > Applications
-
Enable the "Update policy override default policy.”
-
Under “Options,” select Updates disabled from the drop-down menu.
That's it! Once you've finished installing and configuring Google Drive for Desktop, it's now time to publish! After a publish completes, your users will now have Google Drive for Desktop accessible to log in. During installation, Frame will automatically detect the installation of a new application and prompt you to “Onboard to Frame”. If you plan to deliver only virtual desktops, or would prefer this app not appear as an icon on your users' application Launchpad, skip the onboarding workflow by clicking the Cancel button. You can always onboard Google Drive's icon at a later time.
Microsoft OneDrive
The official Microsoft OneDrive storage solution allows users to quickly access all of their files from their OneDrive account. Integrating Frame accounts with OneDrive is simple and can be done in a matter of minutes. This guide provides detailed instructions for installing, configuring, and using OneDrive with your Frame account.
Requirements
- A Frame account
- Enterprise Profiles, Persistent Desktops, or another 3rd party method for user profile persistence must be utilized in order for the end user's OneDrive credentials to persist between sessions.
One Drive Authentication
By default, this configuration will require users to log on to OneDrive each time they start a Frame session. Enterprise Profiles can be configured to avoid this issue. Once Enterprise Profiles has been enabled for the account, the end user needs only to log in to OneDrive once within the session. From that point forward, OneDrive will automatically stay logged in using the credentials stored on the user's profile disk.
Setup
In general, you would install OneDrive in your Frame account Sandbox and then publish your changes once configured.
For Windows 10, OneDrive installer is bundled with Windows 10 and is located at %WINDIR%\syswow64\onedrivesetup.exe. By default, upon each Windows user's first login, the installer for OneDrive will execute for that user, installing OneDrive in a per-user context. Therefore, identify which type of OneDrive is currently installed on your system. If OneDrive was installed as a per-user application, then uninstall OneDrive and re-install OneDrive as a per-machine application.
For Windows Server 2016/2019/2022, you may need to download OneDrive installer from Microsoft and install OneDrive as a per-machine application.
Identifying the OneDrive Install Type
The list of applications installed in an OS can be viewed through the Programs and Features applet (appwiz.cpl), but this doesn't always tell you whether or not an application is installed per-user or per-machine. Luckily there are registry locations that help you to determine more information about the application installs. There are multiple locations in the registry that help you identify not only ALL the installed applications (even those not shown in Programs and Features), but also help you identify machine vs. user installations as well as 32-bit vs 64-bit installations. These registry locations are:
| Registry Path | Discernable OneDrive version |
|---|---|
HKLM:\SOFTWARE\Microsoft\Windows\CurrentVersion\Uninstall |
64-bit per-machine installation |
HKLM:\SOFTWARE\WOW6432Node\Windows\CurrentVersion\Uninstall |
32-bit per-machine installation |
HKCU:\SOFTWARE\Microsoft\Windows\CurrentVersion\Uninstall |
64-bit & 32-bit per-user installation |
Using the above information, if you look at HKCU:\SOFTWARE\Microsoft\Windows\CurrentVersion\Uninstall and see a subkey called OneDriveSetup.exe, then your OneDrive installation is per-user.

If you look at HKLM:\SOFTWARE\WOW6432Node\Microsoft\Windows\CurrentVersion\Uninstall and see a subkey called OneDriveSetup.exe, then your OneDrive installation is per-machine.

Remove per-user in favor of per-machine:
- Open an elevated PowerShell.
- Go to
C:\Windows\SysWOW64(cd $env:windir\syswow64). - Run
.\onedrivesetup.exe /uninstall. This command will have no output. Verify uninstallation is complete via the Programs and Features applet (appwiz.cpl). - Run
.\onedrivesetup.exe /allusers. This command will also have no output in PowerShell, but the OneDrive installer window will be visible during the installation.


- Open regedit.
- Browse to
HKLM:\Software\Microsoft\OneDrive. If the OneDrive key doesn't exist, you will need to create aDWORDregistry value calledAllUsersInstallwith a value of1.
Customizing OneDrive
Microsoft OneDrive can be customized for a specific end user experience. In scenarios where group policies aren't available, the customizations described below can be implemented in the Sandbox.
-
If you want the OneDrive application to start for all users, after the user has logged in, execute in the Sandbox:
Set-ItemProperty -Path "HKLM:\SOFTWARE\Microsoft\Windows\CurrentVersion\Run" -Name "OneDrive" -Value '"C:\Program Files (x86)\Microsoft OneDrive\OneDrive.exe /background"' -
For non-persistent Frame accounts, best practice is to configure OneDrive for Files On-Demand:
Set-ItemProperty -Path "HKLM:\Software\Policies\Microsoft\OneDrive" -Name "FilesOnDemandEnabled" -Type DWord -Value 1 -
To redirect “Windows Known Folders” to OneDrive using the Known Folders Move capability. This command supersedes the specific folders denoted further below:
Set-ItemProperty -Path "HKLM:\Software\Policies\Microsoft\OneDrive" -Name "KFMSilentOptIn" -Type String -Value "<your-AzureAdTenantID>" -
If you want to redirect only the user’s Desktop folder to OneDrive:
Set-ItemProperty -Path "HKLM:\Software\Policies\Microsoft\OneDrive" -Name "KFMSilentOptInDesktop" -Type DWord -Value 1 -
If you want to redirect only the user’s Documents folder to OneDrive:
Set-ItemProperty -Path "HKLM:\Software\Policies\Microsoft\OneDrive" -Name "KFMSilentOptInDocuments" -Type DWord -Value 1 -
If you want to redirect only the user’s Pictures folder to OneDrive:
Set-ItemProperty -Path "HKLM:\Software\Policies\Microsoft\OneDrive" -Name "KFMSilentOptInPictures" -Type DWord -Value 1 -
To Disable the Tutorial that appears at the end of the OneDrive setup process:
Set-ItemProperty -Path "HKLM:\Software\Policies\Microsoft\OneDrive" -Name “DisableTutorial” -Type DWORD -Value “1”
For further information regarding Microsoft OneDrive in a VDI context, refer to Install Office on a master VHD image.
Looking for more? Read our comprehensive Microsoft OneDrive solutions guide.
Box Drive
Box is a popular cloud storage platform with a variety of features such as content management, collaboration, and file sharing tools. Integrating Frame accounts with Box Cloud Storage is simple and can be done in a matter of minutes. This guide provides detailed instructions for installing, configuring, and using Box Cloud Storage with your Frame account.
Requirements
- A Frame account
- Enterprise Profiles, Persistent Desktops, or another 3rd party method for user profile persistence must be utilized in order for the end user's Box credentials to persist between sessions.
Box Authentication
By default, this configuration will require users to log on to Box each time they start a Frame session. Enterprise Profiles can be configured to avoid this issue. Once Enterprise Profiles has been enabled for the account, the end user needs only to log in to Box once within the session. From that point forward, Box will automatically stay logged in using the credentials stored on the user's profile disk.
Setup

- Run the Box Drive installer within the Sandbox session.
During installation, Frame will automatically detect the installation of a new application and prompt you to “Onboard to Frame”. If you plan to deliver only virtual desktops, or would prefer this app not appear as an icon on your users' application Launchpad, skip the onboarding workflow by clicking the Cancel button. You can always onboard the Box executable at a later time.
- The Box Drive login window will appear, simply close the window. Do not log in.


- Lastly, power down the Sandbox and publish your changes.
That's it! After your publish is complete, your users will now have Box Drive accessible to them during their next session. If you've set up persistence for their credentials, they'll automatically log in to Box for their subsequent sessions.
During installation, Frame will automatically detect the installation of a new application and prompt you to “Onboard to Frame”. If you plan to deliver only virtual desktops, or would prefer this app not appear as an icon on your users' application Launchpad, skip the onboarding workflow by clicking the Cancel button. You can always onboard the Box executable at a later time.