# Identity and Access Management

Roles, RBAC, Dizzion C3, Basic IdP, General SAML2 Integration, Duo, Google Workspace, Microsoft EntraID, ADFS, Okta

# Available Roles

<h2>Role Permissions</h2>

<table class="table table-bordered">
  <thead>
    <tr>
      <th>Hierarchy</th>
      <th>Role</th>
      <th>Permissions</th>
    </tr>
  </thead>
  <tbody>
    <tr>
      <td>Customer</td>
      <td>Customer Administrator</td>
      <td>Highest level of access. Customer administrators are able to create and manage multiple organizations and accounts. Customer administrators can also modify permissions for any of the user roles listed below.</td>
    </tr>
    <tr>
      <td>Customer</td>
      <td>Customer Analytics</td>
      <td>Customer Analytics users can only access the Analytics graphs at the customer level.</td>
    </tr>
    <tr>
      <td>Customer</td>
      <td>Customer Auditor</td>
      <td>Customer Auditor users have read only access to functionality at the customer, organizations, and account levels.</td>
    </tr>
    <tr>
      <td>Customer</td>
      <td>Customer Security Administrator</td>
      <td>Customer Security Administrator users can only access Audit Trail and Users functions at the customer level to manage all auth providers (Basic (username/password), Google, SAML2, API, SAT), configures SAML2 providers, manage SAML2 permissions, and manages users (if Frame IdP is enabled) for all organizations and accounts.</td>
    </tr>
    <tr>
      <td>Customer</td>
      <td>Customer Support</td>
      <td>Customer Support users can only access the Summary, Analytics, Audit Trail, and Status pages for Accounts under the customer level to review activity and research user sessions. They can reboot, terminate VMs, and close sessions. They can detach personal drives and enterprise profile disks (if the disks do not detach after session closing) and backup, restore, and delete personal drive and profile disk volumes.</td>
    </tr>
    <tr>
      <td>Customer</td>
      <td>Limited Customer Administrator</td>
      <td>Limited Customer administrators possess the same permissions as Customer administrators for managing organizations and accounts. However, they do not have the ability to create organizations or accounts, manage users, or start sessions.</td>
    </tr>
    <tr>
      <td>Organization</td>
      <td>Organization Administrator</td>
      <td>Organization administrators can manage any organizations assigned to them by the Customer or Limited Customer administrator and those organizations' accounts. Organization administrators can only be created by Customer or Limited Customer administrators.</td>
    </tr>
    <tr>
      <td>Organization</td>
      <td>Limited Organization Administrator</td>
      <td>Limited Organization administrators can manage organizations assigned to them by Customer or Organization administrators and those organizations' accounts. However, they do not have the ability to create accounts, manage users, or start sessions.</td>
    </tr>
    <tr>
      <td>Organization</td>
      <td>Organization Analytics</td>
      <td>Organization Analytics users can only access the Analytics graphs at the specified organization level.</td>
    </tr>
    <tr>
      <td>Organization</td>
      <td>Organization Auditor</td>
      <td>Organization Auditor users have read only access to the organization and accounts under the organization.</td>
    </tr>
    <tr>
      <td>Organization</td>
      <td>Organization Security Administrator</td>
      <td>Organization Security Administrator users can only access Audit Trail and Users functions at the specified organization level to manage all auth providers (Basic (username/password), Google, SAML2, API, SAT), configures SAML2 providers, manage SAML2 permissions, and add users (if Frame IdP is enabled) for all accounts under the specified organization.</td>
    </tr>
    <tr>
      <td>Organization</td>
      <td>Organization Support</td>
      <td>Organization Support users can only access the Summary, Analytics, Audit Trail, and Status pages for Accounts under the specified organization level to review activity and research user sessions. They can reboot, terminate VMs, and close sessions. They can detach personal drives and enterprise profile disks (if the disks do not detach after session closing) and backup, restore, and delete personal drive and profile disk volumes.</td>
    </tr>
    <tr>
      <td>Account</td>
      <td>Account Administrator</td>
      <td>Account administrators can access and manage any accounts assigned to them by the Organization, Limited Organization, Customer, or Limited Customer administrators.</td>
    </tr>
    <tr>
      <td>Account</td>
      <td>Limited Account Administrator</td>
      <td>Limited Account administrators possess the same permissions as Account administrators for managing accounts. However, they do not have the ability to manage users or start sessions.</td>
    </tr>
    <tr>
      <td>Account</td>
      <td>Account Analytics</td>
      <td>Account Analytics users can only access the Analytics page in the account Dashboard.</td>
    </tr>
    <tr>
      <td>Account</td>
      <td>Account Auditor</td>
      <td>Account Auditor users have read only access to the account Dashboard.</td>
    </tr>
    <tr>
      <td>Account</td>
      <td>Account Security Administrator</td>
      <td>Account Security Administrator users can only access the Users and Audit Trail pages in the account Dashboard to manage all auth providers (Basic (username/password), Google, SAML2, API, SAT), configures SAML2 providers, manage SAML2 permissions, and manage users (if Frame IdP is enabled) for the specified account. They are also able to access Audit Trail and Session Trail for the specified account.</td>
    </tr>
    <tr>
      <td>Account</td>
      <td>Account Support</td>
      <td>Account Support users can only access, at the Account level, the Summary, Analytics, Audit Trail, and Status pages to review activity and research user sessions. They can reboot, terminate VMs, shadow sessions, and close sessions. They can detach personal drives and enterprise profile disks (if the disks do not detach after session closing) and backup, restore, and delete personal drive and profile disk volumes.</td>
    </tr>
    <tr>
      <td>Account</td>
      <td>Sandbox Administrator</td>
      <td>Sandbox Administrator can only access the Sandbox page in the account Dashboard to manage the Sandbox (e.g., schedule a publish, power on/off VM, install and update applications, update the OS, backup Sandbox, restore from backup, change instance type, and clone to another Sandbox, if authorized).</td>
    </tr>
    <tr>
      <td>Account</td>
      <td>Utility Server Administrator</td>
      <td>Utility Server Administrator can only access the Utility Server page in the account Dashboard to add, manage, and terminate utility servers.</td>
    </tr>
    <tr>
      <td>Account</td>
      <td>Launchpad Administrator</td>
      <td>This account-level role can only add, delete, and change Launchpad definitions.</td>
    </tr>
    <tr>
      <td>End User</td>
      <td>Launchpad User</td>
      <td>End users or "Launchpad users" can only access Launchpads that are configured by the administrators. A Launchpad user can access multiple Launchpads from multiple accounts if configured this way by administrators.</td>
    </tr>
    <tr>
      <td>API</td>
      <td>API - Generate Anonymous Customer Token</td>
      <td>Authorizes the API requestor to obtain Secure Anonymous Tokens from Frame Admin API for starting Frame sessions in all Frame accounts under the specified Customer entity.</td>
    </tr>
    <tr>
      <td>API</td>
      <td>API - Generate Anonymous Organization Token</td>
      <td>Authorizes the API requestor to obtain Secure Anonymous Tokens from Frame Admin API for starting Frame sessions in all Frame accounts under the specified Organization entity.</td>
    </tr>
    <tr>
      <td>API</td>
      <td>API - Generate Anonymous Account Token</td>
      <td>Authorizes the API requestor to obtain Secure Anonymous Tokens from Frame Admin API for starting Frame sessions in the specified Frame account.</td>
    </tr>
  </tbody>
</table>

# Identity Provider Integrations

This section outlines the user authentication options for Frame customers. The following documentation will discuss how to choose the right authentication option and reviews the benefits, applicability, and requirements for each option.

The term “authentication” refers to how the system verifies the identity of a user. By requiring that only known users are allowed to use the system, a Frame customer can ensure that their applications and infrastructure are only used by the appropriate people and that the individual identities of those users are associated with their usage of the system.

<p class="callout info"> If you are attempting to set up an Identity Provider (IdP) integration, you must first navigate to the Customer entity level and unlock the Enforce settings slider.  
  
</p>

<figure id="bkmrk-">![Enforce Settings](https://docs.difr.com/uploads/images/gallery/2025-10/enforce-2025.png)

</figure>

# Authentication

A service that the Frame system can trust to verify the identity of a user is called an “Identity Provider” or IdP. This is a technical term that is commonly used in authentication standards and tools, so we will also use this term in this solution guide.

Broadly, integrating Frame with an Identity Provider means telling Frame which Identity Provider to trust to authenticate users and telling the Identity Provider how to respond to Frame.

## Authentication by tier

Auth integration options can be configured at any level within the Frame platform. While most use cases will likely only need authentication at the Customer level, there are scenarios where utilizing custom authentication at different tiers could be beneficial. We will outline some of these scenarios below, starting with the default Customer-level tier.

### Customer

Any integrations configured at this level will be used by all users/admins accessing the Platform. This is the default and most common configuration for the Frame platform.

### Organization

By setting up authentication at the organizational level, a Customer admin can configure unique integrations for different organizations.

For example, a company with multiple subsidiaries may want to allow those subsidiaries to bring their own authentication. In this case, the company (Customer tier) would allow each subsidiary (Organizational tier) to set up their own authentication.

### Account

Account level authentication can be configured by a Customer or Organization admin. While this isn't very common, there are some use cases that would benefit from this arrangement. For instance, a Managed Service Provider (MSP) would benefit from letting each of their customers (divided by Accounts) integrate with their own authentication provider.

## Choosing the Right Authentication Option

Choosing the right authentication option depends on the particular use case an organization would like to make of the Frame platform and what authentication options that organization already has in place. This can be determined by answering the following questions:

### Do you need to know who the users are?

It's not always necessary to know who is using the applications on Frame. An example might be a software vendor who wants to use Frame to provide a 15 minute demo of their product. Individual users will be arriving from a link in an email or promotional page and the goal may be to have them fill out a feedback form at the end of the demo so that a sales representative can contact them. In this case, the application doesn't need to know who the user is, even though the feedback form may ask for contact information. Anonymous Users would be a good option in this case.

On the other hand, an enterprise who needs to track individual user licensing for software tools used throughout the day by employees would want to each user to be authenticated. Likewise, if it's necessary to remember individual preferences and settings for each user, it's first necessary to know who the user is. Of course, if these users need to gain access to sensitive and confidential information, it's required to know who the user is. In these cases, user authentication would be necessary, but we need to ask another question before we know which one.

### Do you already keep track of all of these users somewhere?

Many organizations already have an Identity Provider in place. Therefore, it makes sense to extend that Identity Provider to work with Frame as well. This is often called a Single Sign-On (SSO) solution. SSO is another way to talk about authentication, and an SSO provider and an Identity Provider are different ways of talking about the same thing.

On the other hand, if an organization does not have an existing Identity Provider (SSO solution) in place, Frame has a built-in Identity Provider that the organization can use. This built-in Identity Provider would only be used to authenticate users to the Frame platform and cannot be used to provide an SSO solution across all platforms for an organization. The Frame Identity Provider only provides authentication using a username and password. It does not support 2-factor authentication, or user groups. Account administrators manage users and other account administrators in the Basic Authentication through the Frame Launchpad web application.

If the organization needs an SSO solution for all of its platforms, then a SAML2 Identity Provider is appropriate.

### Are you using a SAML2 identity provider already?

An organization with an existing Identity Provider may already be using a SAML2 Identity Provider. In that case, it makes sense to integrate (federate) that same provider with Frame rather than adopting a new IdP for only a single integration (to Frame).

An organization may, however, have an Identity Provider that is not SAML2-based and which is only visible within that organization's corporate network. An example might be an organization using Active Directory to manage users and provide SSO. Rather than exposing the Active Directory server to the public Internet using the Active Directory Federation Service (ADFS) and incur the cost and upkeep of managing and protecting that service from threats and downtime, it can make sense to connect the internal IdP to a SAML2 IdP using the plugins provided by all SAML2 providers. Then, the SAML2 IdP takes on the responsibilities for managing a service exposed on the public Internet. For our example, that Active Directory instance might be connected to Microsoft's Azure Active Directory (Azure AD) using Azure AD Connect. Then Azure AD becomes the SAML2 Identity Provider. Frame can integrate with Azure AD, and the organization can continue to manage all users, right in the same Active Directory that it already has in place.

After selecting a particular authentication option, the details of the next steps will differ, but each option is designed to provider a quick and easy setup for the most common cases. Special cases may require some help from a Frame Solution Architect.

## Authentication Option Quick Reference

<table id="bkmrk-%C2%A0-frame-idp-saml2-id"><thead><tr><th> </th><th>Frame IdP</th><th>SAML2 IdP</th></tr></thead><tbody><tr><td>Requires SSO Configuration</td><td>No</td><td>Yes</td></tr><tr><td>Granular control of Authentication Security</td><td>Yes</td><td>Yes</td></tr><tr><td>User Attribution</td><td>Yes</td><td>Yes</td></tr><tr><td>Custom Password Policies</td><td>No</td><td>Yes</td></tr><tr><td>2-Factor Authentication</td><td>No</td><td>Yes</td></tr><tr><td>Requires Launchpad</td><td>Yes</td><td>No</td></tr><tr><td>Works With Launchpad</td><td>Yes</td><td>Yes</td></tr><tr><td>Works with Frame Application API</td><td>No</td><td>Yes</td></tr></tbody></table>

## Frame Basic Authentication

By default, Frame provides an Identity Provider for authenticating Frame users. Users are listed in User Settings as part of Frame Dashboard, and can be invited, promoted to admins themselves or retired. Using this option, user names must be unique email addresses. Users are able to set and reset their own passwords.

<p class="callout info"> Basic Authentication should be used for proof of concept, development, and testing purposes \*\*only\*\*. Basic Authentication does not provide user/password management capabilities (password expiration, password complexity policies, or multi-factor authentication). Frame strongly recommends customers use a third-party SAML2 identity provider for user authentication.</p>

### Benefits

Frame's Basic Authentication is an easy way to manage users and it requires no special setup, integration or configuration. Users will be authenticated to Frame which provides the unique user identities required for optional features like persistent user profiles and end-user billing.

### Applicability

Basic Authentication can be a convenient authentication solution for a single classroom, small business or a single workgroup under 100 members. It can become cumbersome with more users or if there is a frequent need to add and remove users.

### Requirements

There are no special requirement for this option. All authentication options except Anonymous Users require that user identities (email addresses) be unique across all Frame accounts. This option requires the administrator to use the Frame Dashboard to manage the users.

### Limitations

The Frame Basic Authentication option can only provide a simple, username and password based, authentication. This option does not support 2-factor authentication, user groups, custom password strength policies or password expiration policies. For these reasons, Basic Authentication should be used for proof of concept, development, and testing purposes **only**.

## SAML2 Identity Provider

SAML2 Identity Providers assume the responsibility of maintaining and protecting a publicly visible web service while providing convenient ways to connect that service to on-premises directories and identity providers like Active Directory, Shibboleth, or LDAP servers.

### Benefits

SAML2 Identity Providers assume the responsibility of maintaining and protecting a publicly visible web service while providing convenient ways to connect that service to on-premises directories and identity providers like Active Directory, Shibboleth, or LDAP servers.

### Applicability

If your organization already manages users in a central place, then a SAML2 Identity Provider can be a convenient way to extend that control to external services like Frame.

### Requirements

SAML2 providers typically require access to your user information through a plug-in or adapter installed in your directory server. These are provided by SAML2 providers themselves. For instance, Microsoft provides Azure AD Connect which provides an easy way to setup Azure AD as a SAML2 Identity Provider using your existing Active Directory server as the single source or truth for all user authentication. Identity providers charge for their service, but many include a free tier which may be appropriate for many Frame integrations.

### Limitations

Using a SAML2 Identity Provider is the most flexible option for authentication. The only limitations are those shared with the other options described in this Solution Guide. Frame does not support fine-grained permissions, for instance allowing some authenticated users to launch an application while others cannot, based solely on groups or information in the user profile.

## Entity Endpoint URLs

When each Frame entity is being created, they're given a URL slug. Using these slugs, you can construct landing pages for your users for them to sign into Frame and get straight to their resources.

![url_hierarchy.png](https://docs.difr.com/uploads/images/gallery/2025-10/scaled-1680-/url-hierarchy.png)

Important: If you want to direct your users to your specific identity provider (and bypass the default login page), add this query string to your Frame URLs:

```
?idp=your-IdP-integration-name to your URL.
```

##### <span style="background-color: rgb(45, 194, 107);">IMPORTANT</span>

With the new iam integration (if your SAML2) integration has difr icon in front of the SAML2:

[![Screenshot 2026-05-12 at 13.14.16.png](https://docs.difr.com/uploads/images/gallery/2026-05/scaled-1680-/screenshot-2026-05-12-at-13-14-16.png)
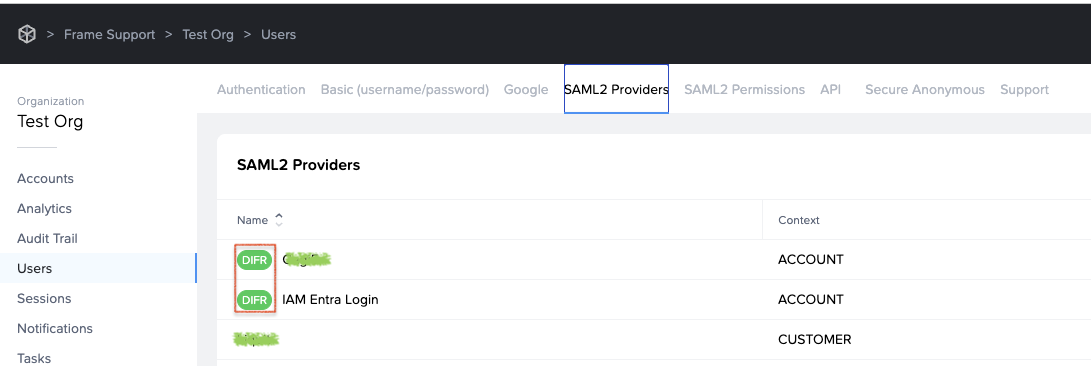
](https://docs.difr.com/uploads/images/gallery/2026-05/screenshot-2026-05-12-at-13-14-16.png)

the **?idp** part is different. You don't use the SAML2 name, but the SAML2 ID:

[![Screenshot 2026-05-12 at 13.25.30.png](https://docs.difr.com/uploads/images/gallery/2026-05/scaled-1680-/8O5screenshot-2026-05-12-at-13-25-30.png)
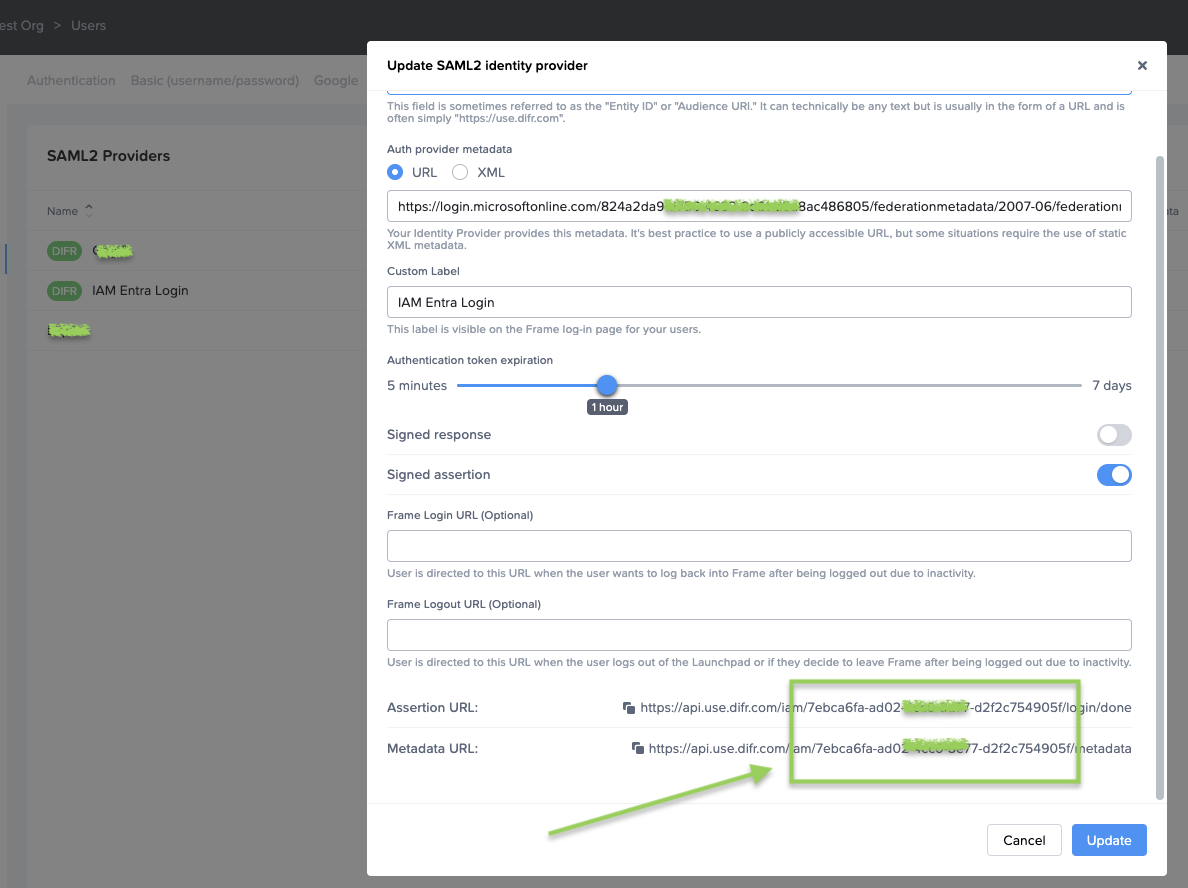
](https://docs.difr.com/uploads/images/gallery/2026-05/8O5screenshot-2026-05-12-at-13-25-30.png)

So the URL looks like this:

```
?idp=your-IdP-ID to your URL.
```

An example:

<table border="1" id="bkmrk-https%3A%2F%2Fuse.difr.com" style="border-collapse: collapse; width: 100%;"><colgroup><col style="width: 99.881%;"></col></colgroup><tbody><tr><td>https://use.difr.com/frame-support/testorg/test-2022-aws/launchpad/test-desktop-1/**?idp=7ebca6fa-ad02XXXXX77-d2f2c754905f**</td></tr></tbody></table>

### Endpoint-specific URLs

#### Launchpad

Launchpad URLs are usually provided to end-users, allowing them to access sessions. You can copy this URL when you navigate to your desired Launchpad.

```
----USE Backend----
https://use.difr.com/customer-slug/organization-slug/account-slug/launchpad/launchpad-slug

----DEU Backend----
https://deu.difr.com/customer-slug/organization-slug/account-slug/launchpad/launchpad-slug
```

#### Account Admin

Useful if you need to provide direct links to an account's Dashboard. Users that do not have Account Admin access will simply be redirected to a Launchpad they've acccess to. You can copy this URL when you navigate to an account's Dashboard.

```
----USE Backend----
https://use.difr.com/frame/customer-slug/organization-slug/account-slug/

----DEU Backend----
https://deu.difr.com/frame/customer-slug/organization-slug/account-slug/
```

#### Admin URL's

These URLs are perfect for your Admins. You can simply navigate to your customer or organization and copy the URL.

Customer Admin URL

```
----USE Backend----
https://use.difr.com/frame/customer-slug/

```

Org Admin URL

```
----USE Backend----
https://use.difr.com/customer-slug/organization-slug/

----DEU Backend----
https://deu.difr.com/customer-slug/organization-slug/

```

# Basic Authentication

Basic Authentication is a manual approach for providing access; admins need to manually invite users **via email**, and have them **set their own** passwords. You manually reset their passwords, manually delete the users, and give users various roles/permissions for Frame Accounts, Organizations, or Customers. If you are planning on using Frame's Basic Authentication for your user management, continue reading to learn how to manage your users. If you are planning on using a third-party provider, we recommend reading through the information in the [Identity Provider Integrations](https://docs.difr.com/books/platform-administrators-guide/page/identity-provider-integrations) section.

<p class="callout info"> Basic Authentication should be used for proof of concept, development, and testing purposes \*\*only\*\*. Basic Authentication does not provide user/password management capabilities (password expiration, password complexity policies, or multi-factor authentication). Frame strongly recommends customers use a third-party SAML2 identity provider for user authentication.</p>

## Invite Users

Once you have onboarded your apps, published your changes, and set up your Launchpad – you are ready to invite users. You can use the Frame Basic IdP by following the instructions below.

1. From the Dashboard, click on the **Users** page listed on the left. From there, go to the **Basic (username/password)** tab.

<figure id="bkmrk-">![Basic Authentication Users](https://docs.difr.com/uploads/images/gallery/2025-10/inviteusers1.png)

</figure>2. Click the **Invite User** button in the upper right corner of the screen. A new window will appear prompting you to enter the email address of the user you would like to invite.

<div class="callout callout-info" id="bkmrk-the-system-will-auto">The system will automatically check to see if the email address is already associated with the account.</div>![Invite Users Panel](https://docs.difr.com/uploads/images/gallery/2025-10/inviteusers2.png)

3. Once the email address has been entered, the **Roles** section will appear within the window. Select the role you would like to assign to your user. You can assign different roles for different accounts for this user by clicking the **Add** button. If you would like to learn more about user roles, check out our [documentation](https://docs.difr.com/books/platform-administrators-guide/page/available-roles).

![User Email Example](https://docs.difr.com/uploads/images/gallery/2025-10/inviteusers3.png)

4. Click **Invite** when ready. The window will close and your user's information will automatically populate under the **Users** list. An invite will be sent to your user where they will fill out their name and set their password.

## Reset a Deactivated User Account

Inevitably, some of your users will forget their passwords. User can reset their own password, as described in our [end user documentation](https://docs.difr.com/books/desktop-users-guide/page/introduction#password-management-1). However, if they fail to login successfully in 3 consecutive login attempts, Frame Basic IdP will deactivate their user account. Reactivating a Frame Basic IdP user account is simple and can be done with just a few clicks.

1. Depending on your assigned administrator role, go to the **Users** left-hand menu on the Customer or Organization Dashboard in your [Admin Console](https://docs.difr.com/link/93#bkmrk-page-title) or on the Account [Dashboard](https://docs.difr.com/link/93#bkmrk-navigating-your-fram).
2. Click on the **Basic (username/password)** tab.
    
    <figure>[![image.png](https://docs.difr.com/uploads/images/gallery/2025-12/scaled-1680-/Rzcimage.png)](https://docs.difr.com/uploads/images/gallery/2025-12/Rzcimage.png)
    
    </figure>
3. Locate your deactivated user from the Users list. You should see that their status has changed to "B" for **Blocked**.

<figure id="bkmrk--3">![Dashboard > Users (Blocked User)](https://docs.difr.com/uploads/images/gallery/2025-10/deactivated-blocked2.png)

</figure>4. Find and click on the ellipsis listed next to their name on the far right side of the screen. Select **Reset Password** as shown below:

<figure id="bkmrk--4">![Reset Password](https://docs.difr.com/uploads/images/gallery/2025-10/deactivated-2.png)

</figure>5. Your user will be sent an email with a link to reset their Frame Basic IdP user password.

Voilà! You have successfully reactivated your user's Frame account.

## Removing Users

Removing users from your account can be done with just a few clicks.

1. Depending on your assigned administrator role, go to the **Users** left-hand menu on the Customer or Organization page in your [Admin Console](https://docs.difr.com/link/93#bkmrk-page-title) or on the Account [Dashboard](https://docs.difr.com/link/93#bkmrk-navigating-your-fram).
2. Click on the **Basic (username/password)** tab.
3. Click on the ellipsis next to the user you wish to remove from the account and select **Revoke Invitation**.

<figure id="bkmrk--5">![Basic Authentication Tab - Revoke an invitation](https://docs.difr.com/uploads/images/gallery/2025-10/removeusers3.png)

</figure>4. A confirmation prompt will appear. Click **Revoke** in the bottom right corner of the dialog box.

<figure id="bkmrk--6">![Basic Authentication Tab - Revoke confirmation](https://docs.difr.com/uploads/images/gallery/2025-10/removeconfirm.png)

</figure>## Logging in

Once users have accepted their Basic Authentication invitation, they can sign in using email address and password on our Frame Basic IdP Login page as pictured below. Most Frame Basic IdP users can login at ; however, you can direct your users to go to a [specific Launchpad or Account Dashboard URL](https://docs.difr.com/books/platform-administrators-guide/page/authentication#entity-endpoint-urls).

<figure id="bkmrk--7">![Frame Basic IdP Login Page](https://docs.difr.com/uploads/images/gallery/2025-10/frame-basic-auth-login.png)

</figure>### Require Frame Basic IdP

If you require users to always authenticate using Frame Basic IdP (especially if you have more than one IdP configured for your Customer, Organization, and/or Account(s)), direct your users to a [specific Launchpad or Account Dashboard URL](https://docs.difr.com/books/platform-administrators-guide/page/authentication#entity-endpoint-urls) appended to the URL.

# Authorization

The Frame Platform provides administrators with a role-based access control (RBAC) capability to manage user and administrative access to their accounts. Through the Frame Admin user interface, administrators are able to assign roles which grant varying levels of access to their users. These same granular controls are available for all authentication types.

<p class="callout info"><span style="color: rgb(0, 0, 0);">  Customer and Organization administrators can manage users from the Admin page by clicking on the ellipsis next to the desired entity, selecting “Edit,” and clicking on the “Security” tab. Account administrators manage their users from the “Users” section of their Dashboard.</span></p>

## Roles

Roles allow administrators to easily manage the permissions and access levels of their users. Regardless of the authentication type, administrators must specify the role they wish to grant to their users before those users can be authorized to access Frame resources.

## Role Permissions

<table class="table table-bordered" id="bkmrk-hierarchy-role-permi"><thead><tr><th>Hierarchy</th><th>Role</th><th>Permissions</th></tr></thead><tbody><tr><td>Customer</td><td>Customer Administrator</td><td>Highest level of access. Customer administrators are able to create and manage multiple organizations and accounts. Customer administrators can also modify permissions for any of the user roles listed below.</td></tr><tr><td>Customer</td><td>Customer Analytics</td><td>Customer Analytics users can only access the Analytics graphs at the customer level.</td></tr><tr><td>Customer</td><td>Customer Auditor</td><td>Customer Auditor users have read only access to functionality at the customer, organizations, and account levels.</td></tr><tr><td>Customer</td><td>Customer Security Administrator</td><td>Customer Security Administrator users can only access Audit Trail and Users functions at the customer level to manage all auth providers (Basic (username/password), Google, SAML2, API, SAT), configures SAML2 providers, manage SAML2 permissions, and manages users (if Frame IdP is enabled) for all organizations and accounts.</td></tr><tr><td>Customer</td><td>Customer Support</td><td>Customer Support users can only access the Summary, Analytics, Audit Trail, and Status pages for Accounts under the customer level to review activity and research user sessions. They can reboot, terminate VMs, and close sessions. They can detach personal drives and enterprise profile disks (if the disks do not detach after session closing) and backup, restore, and delete personal drive and profile disk volumes.</td></tr><tr><td>Customer</td><td>Limited Customer Administrator</td><td>Limited Customer administrators possess the same permissions as Customer administrators for managing organizations and accounts. However, they do not have the ability to create organizations or accounts, manage users, or start sessions.</td></tr><tr><td>Organization</td><td>Organization Administrator</td><td>Organization administrators can manage any organizations assigned to them by the Customer or Limited Customer administrator and those organizations' accounts. Organization administrators can only be created by Customer or Limited Customer administrators.</td></tr><tr><td>Organization</td><td>Limited Organization Administrator</td><td>Limited Organization administrators can manage organizations assigned to them by Customer or Organization administrators and those organizations' accounts. However, they do not have the ability to create accounts, manage users, or start sessions.</td></tr><tr><td>Organization</td><td>Organization Analytics</td><td>Organization Analytics users can only access the Analytics graphs at the specified organization level.</td></tr><tr><td>Organization</td><td>Organization Auditor</td><td>Organization Auditor users have read only access to the organization and accounts under the organization.</td></tr><tr><td>Organization</td><td>Organization Security Administrator</td><td>Organization Security Administrator users can only access Audit Trail and Users functions at the specified organization level to manage all auth providers (Basic (username/password), Google, SAML2, API, SAT), configures SAML2 providers, manage SAML2 permissions, and add users (if Frame IdP is enabled) for all accounts under the specified organization.</td></tr><tr><td>Organization</td><td>Organization Support</td><td>Organization Support users can only access the Summary, Analytics, Audit Trail, and Status pages for Accounts under the specified organization level to review activity and research user sessions. They can reboot, terminate VMs, and close sessions. They can detach personal drives and enterprise profile disks (if the disks do not detach after session closing) and backup, restore, and delete personal drive and profile disk volumes.</td></tr><tr><td>Account</td><td>Account Administrator</td><td>Account administrators can access and manage any accounts assigned to them by the Organization, Limited Organization, Customer, or Limited Customer administrators.</td></tr><tr><td>Account</td><td>Limited Account Administrator</td><td>Limited Account administrators possess the same permissions as Account administrators for managing accounts. However, they do not have the ability to manage users or start sessions.</td></tr><tr><td>Account</td><td>Account Analytics</td><td>Account Analytics users can only access the Analytics page in the account Dashboard.</td></tr><tr><td>Account</td><td>Account Auditor</td><td>Account Auditor users have read only access to the account Dashboard.</td></tr><tr><td>Account</td><td>Account Security Administrator</td><td>Account Security Administrator users can only access the Users and Audit Trail pages in the account Dashboard to manage all auth providers (Basic (username/password), Google, SAML2, API, SAT), configures SAML2 providers, manage SAML2 permissions, and manage users (if Frame IdP is enabled) for the specified account. They are also able to access Audit Trail and Session Trail for the specified account.</td></tr><tr><td>Account</td><td>Account Support</td><td>Account Support users can only access, at the Account level, the Summary, Analytics, Audit Trail, and Status pages to review activity and research user sessions. They can reboot, terminate VMs, shadow sessions, and close sessions. They can detach personal drives and enterprise profile disks (if the disks do not detach after session closing) and backup, restore, and delete personal drive and profile disk volumes.</td></tr><tr><td>Account</td><td>Sandbox Administrator</td><td>Sandbox Administrator can only access the Sandbox page in the account Dashboard to manage the Sandbox (e.g., schedule a publish, power on/off VM, install and update applications, update the OS, backup Sandbox, restore from backup, change instance type, and clone to another Sandbox, if authorized).</td></tr><tr><td>Account</td><td>Utility Server Administrator</td><td>Utility Server Administrator can only access the Utility Server page in the account Dashboard to add, manage, and terminate utility servers.</td></tr><tr><td>Account</td><td>Launchpad Administrator</td><td>This account-level role can only add, delete, and change Launchpad definitions.</td></tr><tr><td>End User</td><td>Launchpad User</td><td>End users or "Launchpad users" can only access Launchpads that are configured by the administrators. A Launchpad user can access multiple Launchpads from multiple accounts if configured this way by administrators.</td></tr><tr><td>API</td><td>API - Generate Anonymous Customer Token</td><td>Authorizes the API requestor to obtain Secure Anonymous Tokens from Frame Admin API for starting Frame sessions in all Frame accounts under the specified Customer entity.</td></tr><tr><td>API</td><td>API - Generate Anonymous Organization Token</td><td>Authorizes the API requestor to obtain Secure Anonymous Tokens from Frame Admin API for starting Frame sessions in all Frame accounts under the specified Organization entity.</td></tr><tr><td>API</td><td>API - Generate Anonymous Account Token</td><td>Authorizes the API requestor to obtain Secure Anonymous Tokens from Frame Admin API for starting Frame sessions in the specified Frame account.</td></tr></tbody></table>

Administrators are able to grant permissions based on their own level of access. For instance, while a Customer admin can assign any role to any user, an Organization admin can only grant the Organization Admin role or below to another user.

You can read more about Frame account hierarchy in the [Platform Hierarchy](https://docs.difr.com/link/34#bkmrk-page-title) section. Administrators must assign roles when inviting users. They may also modify roles for existing users at any time. If you have not yet invited any users, please refer to the [Basic Authentication](https://docs.difr.com/link/82#bkmrk-page-title) or third-party [Identity Provider Integrations](https://docs.difr.com/link/84#bkmrk-page-title) sections of our documentation, depending on which platform you wish to use to add your users.

## User Permissions

### Google (OAuth2) IdP

If you have decided to use the [Google OAuth](https://docs.difr.com/link/88#bkmrk-configuring-google-w) integration through Frame, it's easy to manage users by domain/email.

From the Frame Console, navigate to your desired entity where you wish to set up your permissions integration (Customer/Organization/Account), and select **Users**.

<figure id="bkmrk-">[![image.png](https://docs.difr.com/uploads/images/gallery/2025-10/scaled-1680-/Dyfimage.png)](https://docs.difr.com/uploads/images/gallery/2025-10/Dyfimage.png)

</figure>Enable the **Google** toggle from the Authentication tab and then click **Save** in the upper right corner of the console.

<figure id="bkmrk--1">[![image.png](https://docs.difr.com/uploads/images/gallery/2025-10/scaled-1680-/5Utimage.png)](https://docs.difr.com/uploads/images/gallery/2025-10/5Utimage.png)

</figure>Click the new *Google* tab. Click **Add** at the top-right.

<figure id="bkmrk--2">[![image.png](https://docs.difr.com/uploads/images/gallery/2025-10/scaled-1680-/d1Fimage.png)](https://docs.difr.com/uploads/images/gallery/2025-10/d1Fimage.png)

</figure>A new window will appear prompting you to enter either an email address or a domain. For this example, we will add a domain and give anyone associated with that domain an *Account Administrator* role on the “Doc-Acct” Account.

<figure id="bkmrk--3">![](https://docs.difr.com/uploads/images/gallery/2025-10/google-oauth-example-1.png)

</figure>When specifying a Google Workspace domain, you must prefix the domain with the symbol, as shown above.

Admins can also add multiple domains and email addresses under the same role set. For example, using the **Add** button, we have added a single email address along with our domain. The user associated with that email address will be given the same role on the “Doc-Acct” Account.

<figure id="bkmrk--4">[![image.png](https://docs.difr.com/uploads/images/gallery/2025-10/scaled-1680-/G0kimage.png)](https://docs.difr.com/uploads/images/gallery/2025-10/G0kimage.png)

</figure>To add another level of granularity, our domain and single email address can be given additional roles by clicking **Add** below the *Roles* section.

<figure id="bkmrk--5">[![image.png](https://docs.difr.com/uploads/images/gallery/2025-10/scaled-1680-/1fVimage.png)](https://docs.difr.com/uploads/images/gallery/2025-10/1fVimage.png)

</figure>Now, once we click **Add** at the bottom of the window, the domain and single email address will be given *Launchpad User* access on the "Applications 2” Launchpad, and *Account Administrator* access on the “Persistent Desktops” account. Administrators can add many Google authorization role sets for multiple domains/email addresses.

### User Permissions with a SAML2 IdP

Once you have set up your [SAML2 provider integration](https://docs.difr.com/link/85#bkmrk-page-title) with Frame, you will need to designate permissions for your users. Navigate to the **SAML2 Permissions** tab to the right of the **SAML2 Providers** tab from the **Users** page of the desired entity. Click **Add Permission**.

<figure id="bkmrk--6">[![image.png](https://docs.difr.com/uploads/images/gallery/2025-10/scaled-1680-/tjZimage.png)](https://docs.difr.com/uploads/images/gallery/2025-10/tjZimage.png)

</figure>- **For provider**: Select the SAML2 Provider you are designating permissions for.
- Allow access:
- **Always**: Once the user is authenticated, they have access to the role you specify below – no conditions required.
- **When all conditions are satisfied**: The user must meet all conditions specified by the Admin to be granted access to the role specified.
- **When any condition is satisfied**: The user can meet any conditions specified by the Admin to be granted access to the role specified.
- **Conditions**: Specify your assertion claims and their values which will correspond with the roles you wish to grant. Reference the table below for our accepted assertion claims.
- **Grant roles**: Select the desired roles you wish to grant to your users. You can add multiple role sets by using the **Add** button. Reference the roles section above for more information.

<div display:="" id="bkmrk-assertion-claim-clai" justifycontent:=""><table><thead><tr><th>Assertion Claim</th><th>Claim Value</th><th>Example</th></tr></thead><tbody><tr><td>em</td><td>Email</td><td>johnsmith@mycompany.com</td></tr><tr><td>givenName</td><td>First Name</td><td>John</td></tr><tr><td>sn</td><td>Surname</td><td>Smith</td></tr></tbody></table>

</div>When qualifying users by domain, it is best practice to use “em ends with @yourcompany.com.”

During the IdP setup, you may have used to define the email attribute. While this is fine for the IdP, you must use to reference the email attribute when configuring SAML2 permissions on Frame.

Click **Save** when you are done. Administrators can add multiple permission sets under the *SAML2 Permissions* section.

### SAML2 Attributes

When creating SAML2 permissions on Frame, admins may use custom attributes from their IdP by setting specific permissions settings. For this example, we will use a very common custom attribute – “groups.” Most IdPs provide ways to “group” users and these groups can be passed to Frame via custom attribute mappings. Using additional attribute maps, you can build conditions for varying roles and access privileges. When creating any rules for SAML2 claims/attributes, use “contains” in the comparison operator field as shown below.

Here is an example of where you would set group statements in Okta:

<figure id="bkmrk--7">![](https://docs.difr.com/uploads/images/gallery/2025-10/user-permissions-okta-1.png)

</figure>Here is an example of a list of groups in Okta:

<figure id="bkmrk--8">![](https://docs.difr.com/uploads/images/gallery/2025-10/user-permissions-okta-2.png)

</figure>This is how we would pass one of the groups (“Okta-Contractors”) over to Frame, allowing administrators to create rules and roles to meet their needs.

<figure id="bkmrk--9">![](https://docs.difr.com/uploads/images/gallery/2025-10/user-permissions-okta-3.png)

</figure>With the configuration above, any users from the “Okta-Contractors” group signing into Frame will be given Account Administrator access to the “Contractor Account.”

All identity providers use different methods to manage user groups, please consult your IdP's documentation for more information about groups and group management.

## Troubleshooting

If users see the following Unauthorized page after successfully authenticating to their SAML2 identity provider, then there were no SAML2 Permission rules that were satisfied by the SAML2 attribute names and corresponding values provided by the identity provider.

<figure id="bkmrk--10">![](https://docs.difr.com/uploads/images/gallery/2025-10/saml2-unauthorized.png)

</figure>To address this issue, the Frame Administrator must:

1. Confirm the correct SAML2 attribute names and values are being provided in the SAML2 Authentication Response message after the user has successfully authenticated to the SAML2 identity provider.
2. Review the list of SAML2 attribute names (under the Field column) and corresponding SAML2 attribute values (under the Value column) on the Unauthorized page and determine which SAML2 attribute name and corresponding SAML2 attribute value should be used to define a SAML2 Permission authorization rule.

Authorization rules are defined in the SAML2 Permissions tab on the appropriate Frame Customer, Organization, or Account. Once the Frame Administrator confirms the right SAML2 attributes and values are listed on the Unauthorized page, they can then create a SAML2 Permission rule for the user (or group of users).

As an example, based on the information provided in Unauthorized page image, the Frame Administrator could replace with and with in the SAML2 Permission page below to create a SAML2 Permission rule specific to one individual's email address.

<figure id="bkmrk--11">![](https://docs.difr.com/uploads/images/gallery/2025-10/saml2-unauthorized-permission.png)

</figure>tip for group assertions

In general, use the operator as SAML2 identity providers typically provide SAML2 attribute values as a list/array of values.

# Dizzion C3

Dizzion Frame now supports Dizzion C3 as an authentication provider, allowing administrators to use the same credentials they already use for support.dizzion.com and c3.dizzion.com to access Frame. By enabling Dizzion C3 authentication, users can seamlessly log in without managing multiple credentials, improving security and streamlining access. This guide will walk you through the steps to enable Dizzion C3 as an authentication provider.

#### Prerequisites

Before enabling Dizzion C3 authentication for Frame, ensure the following:

- You have the **Frame Customer Admin role in Dizzion C3** (contact your [Dizzion Customer Success Manager](mailto:csm@dizzion.com) if needed)
- You have administrator access to the Frame Admin Console to configure authentication settings.
- Your Frame organization/account is set up and active.\\n- Users have valid **Dizzion C3 credentials** to authenticate.\\n\\n

<p class="callout info"> By default, any user with the **Frame Customer Admin role** assigned within Dizzion C3 will automatically be assigned the **Customer Administrator role** within Frame.</p>

#### Configuration

1. Log in to Frame and navigate to **Users &gt; Authentication** from either the Organization or Account level of the Frame Console. (More details around authentication based on tenant hierarchy can be found [here](https://docs.difr.com/books/platform-administrators-guide/page/authentication#authentication-by-tier).
2. Enable **Dizzon C3** on this page (under the **Authentication** tab). Click **Save** in the upper right corner of the page.

<figure id="bkmrk-">![Enable Dizzion C3](https://docs.difr.com/uploads/images/gallery/2025-10/enable-c3.png)</figure>3\. Once enabled, **Dizzion C3** will appear as a sign-in option on the Frame login page.

<figure id="bkmrk--1">![Log in with C3](https://docs.difr.com/uploads/images/gallery/2025-10/signin-c3.png)</figure>4\. Users can now simply click on the **Sign in with Dizzion C3** to be redirected to the Dizzion C3 authentication portal. If authentication is successful, you will be redirected back to Frame with access granted.

<figure id="bkmrk-users-with-the-appro">![C3 Authentication Portal](https://docs.difr.com/uploads/images/gallery/2025-10/c3-page.png)<figcaption>Users with the appropriate role can now log in using their Dizzion C3 credentials.</figcaption>  
</figure>#### Accessing Frame from the Dizzion C3 Portal

Administrators with the **Frame Customer Admin role** can also log in to Frame directly from the Dizzion C3 portal by following the steps below:

1. Navigate to the [Dizzion C3 Portal](https://c3.dizzion.com).
2. 2. Enter your email address and click **Next**.
3. 3. Enter your password and click **Sign In**.

<figure id="bkmrk--2">![C3 Password](https://docs.difr.com/uploads/images/gallery/2025-10/c3-pwd.png)</figure>4\. Click on "Click here to launch Frame" to be redirected.

<figure id="bkmrk--3">![Launch Frame](https://docs.difr.com/uploads/images/gallery/2025-10/c3-launch-frame.png)</figure>5\. A new browser tab will open, and you will be automatically redirected to Frame.

#### Additional Resources

Enabling this feature allows user access to be managed through Dizzion's C3 Platform. If you wish to modify user access to the platform, you must do so via C3. More detailed information around C3 user management can be found in our [C3 Administration documentation.](https://docs.difr.com/books/c3-control-center/page/getting-started)

# General SAML2 Integration

The administrative workflow for setting up a SAML2 identity provider (IdP) consists of the following steps:

1. Enable SAML2 Providers at the desired entity level (Customer, Organization, or Account).
2. Create a SAML2 identity provider in Frame.
3. Enter the necessary configuration information for your new SAML2 identity provider in Frame.
4. Enter the configuration information in your actual SAML2 identity provider.
5. Verify that both sides of the IdP integration are properly configured by attempting to login using your identity provider.
6. Add SAML2 Permissions (authorization rules) at the Customer, Organization, or Account entity level to authorize users to specific roles.

Depending on the specific SAML2 identity provider, you may need to perform Step 4 before Step 3.

Frame supports both IdP-initiated and SP-initiated authentication workflows. In general, most customers implement SP-initiated authentication workflows by directing users to a Frame URL and letting Frame redirect the user to the SAML2 identity provider.

## Getting started

<p class="callout info"> Before a SAML2 identity provider can be added, the administrator must enable SAML2 Providers at a given level by navigating to the Admin Console. From there, navigate to the **Customer** or **Organization** page (depending on where you wish to add the IdP). Select **Users** from the left-hand menu.</p>

Unless there is a specific reason to do otherwise, adding the SAML2 Provider at the Customer or Organization level is best practice.

2. Enable the **SAML2** toggle under the Authentication tab and click **Save**.
    
    [![image.png](https://docs.difr.com/uploads/images/gallery/2025-10/scaled-1680-/h0timage.png)
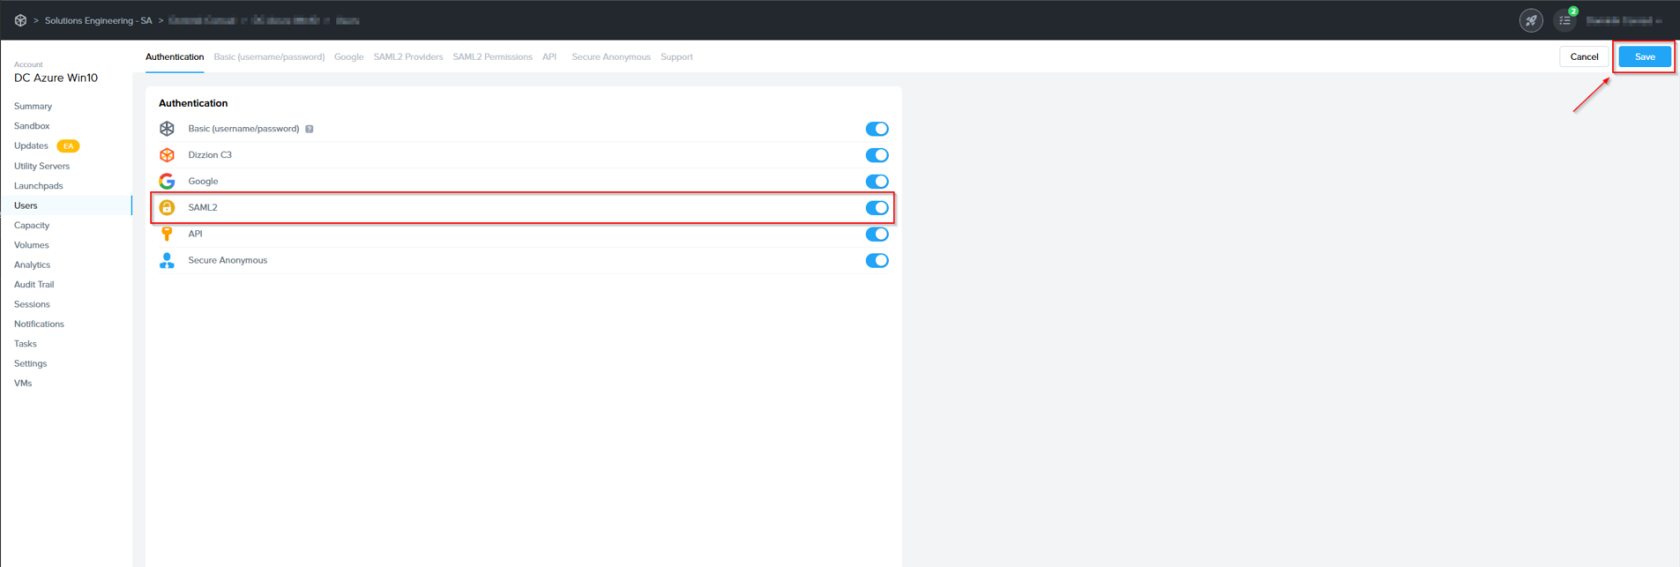
](https://docs.difr.com/uploads/images/gallery/2025-10/h0timage.png)
3. You'll see a new "SAML2 Providers" tab appear; click it and you'll see a **Add SAML2 provider** button.
    
    [![image.png](https://docs.difr.com/uploads/images/gallery/2025-10/scaled-1680-/qSTimage.png)
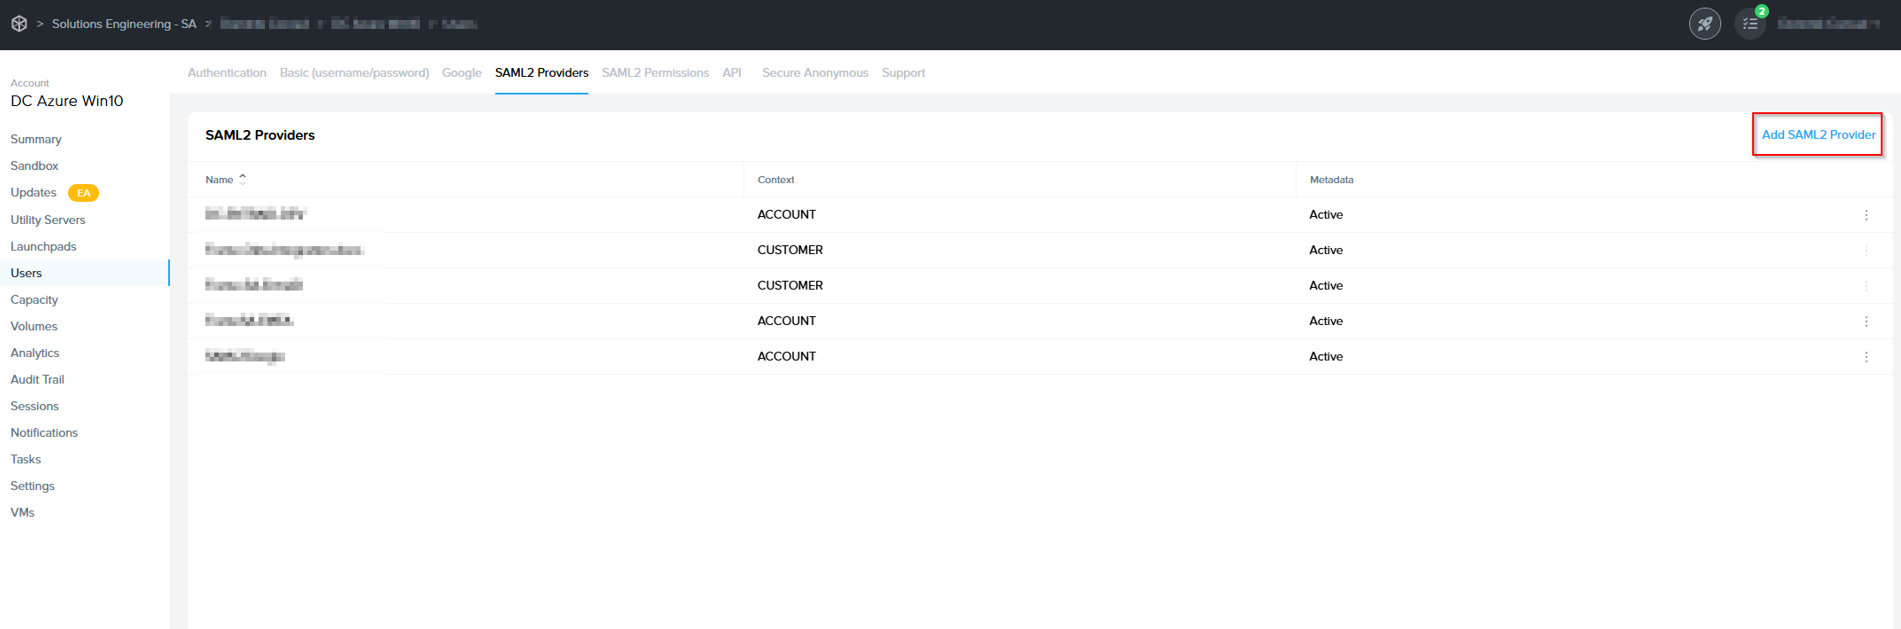
](https://docs.difr.com/uploads/images/gallery/2025-10/qSTimage.png)

## Creating a SAML2 Provider

1. In the SAML2 Providers tab, click **Add SAML2 Provider** at the top right. A dialog to add a SAML2 provider will appear.
    
    [![image.png](https://docs.difr.com/uploads/images/gallery/2025-10/scaled-1680-/nePimage.png)
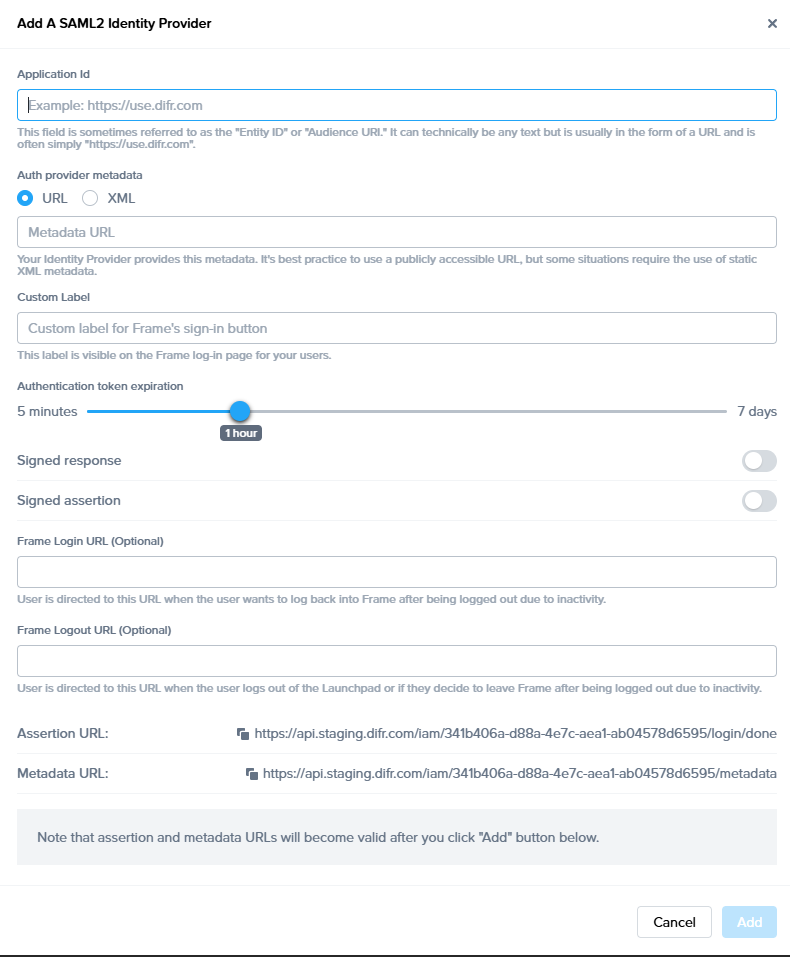
](https://docs.difr.com/uploads/images/gallery/2025-10/nePimage.png)
    
    
    - **Application Id**: This field is sometimes referred to as Service Provider (SP) "Entity ID" or "Audience URI". It can technically be any text but is usually in the form of a URL and is often simply [https://use.difr.com](https://use.difr.com). For successful authentication, it is important that value entered in this field matches at least one of the values within "Audience Restriction" list that is part of the SAML2 assertion created by Identity Provider (IdP).
    - **Auth provider metadata**: Check the "URL" option and paste the Identity Provider metadata URL from your SAML2 IdP. The metadata URL must be publicly accessible to Frame Platform on the Internet.
    - **Custom Label**: When specified, this value will be used in the login page as `Sign in with <Custom Label>`.
    - **Authentication token** expiration: Set the desired expiration time for the authentication token. This can range from 5 minutes to 7 days. If the user is inactive for the configured amount of time, Nutanix Console will logout the user from Nutanix Console. If the user is active within the console (e.g., clicks on hyperlinks, moves the mouse/cursor, scrolls, or presses keys), the token will be renewed just before the user token expires. If the user is in a Frame session, the token is automatically renewed so the user is not disconnected while in session.
    - **Signed response**: Disable or enable based on your SAML2 identity provider.
    - **Signed assertion**: Disable or enable based on your SAML2 identity provider.  
          
          
        **<span class="TextRun SCXW207479778 BCX0" data-contrast="none" lang="EN-US" xml:lang="EN-US"><span class="NormalTextRun SCXW207479778 BCX0">Service Provider URLs</span></span><span class="EOP SCXW207479778 BCX0" data-ccp-props="{"134233117":false,"134233118":false,"335551550":0,"335551620":0,"335557856":16777215,"335559685":1440,"335559738":0,"335559739":0}"> </span>**
        
        <span class="TextRun SCXW207479778 BCX0" data-contrast="auto" lang="EN-US" xml:lang="EN-US"><span class="NormalTextRun SCXW207479778 BCX0">Upon creating a new Integration, your Service Provider is assigned two important URLs:</span></span><span class="EOP SCXW207479778 BCX0" data-ccp-props="{"134233117":false,"134233118":false,"335559738":240,"335559739":240}"> </span>
    - **<span class="TextRun SCXW207479778 BCX0" data-contrast="auto" lang="EN-US" xml:lang="EN-US"><span class="NormalTextRun SCXW207479778 BCX0">Assertion Consumer Service (ACS) URL</span><span class="NormalTextRun ContextualSpellingAndGrammarErrorV2Themed SCXW207479778 BCX0">:</span></span>**<span class="TextRun SCXW207479778 BCX0" data-contrast="auto" lang="EN-US" xml:lang="EN-US"><span class="NormalTextRun ContextualSpellingAndGrammarErrorV2Themed SCXW207479778 BCX0">  The</span><span class="NormalTextRun SCXW207479778 BCX0"> endpoint where the Identity Provider (IdP) delivers SAML authentication responses after a successful login.</span></span><span class="EOP SCXW207479778 BCX0" data-ccp-props="{"134233117":false,"134233118":false,"335559738":240,"335559739":240}"> </span>
    - **<span class="TextRun SCXW207479778 BCX0" data-contrast="auto" lang="EN-US" xml:lang="EN-US"><span class="NormalTextRun SCXW207479778 BCX0">Metadata URL</span><span class="NormalTextRun ContextualSpellingAndGrammarErrorV2Themed SCXW207479778 BCX0">:</span></span>**<span class="TextRun SCXW207479778 BCX0" data-contrast="auto" lang="EN-US" xml:lang="EN-US"><span class="NormalTextRun ContextualSpellingAndGrammarErrorV2Themed SCXW207479778 BCX0">  A</span><span class="NormalTextRun SCXW207479778 BCX0"> publicly accessible URL providing your Service Provider's SAML metadata, used by Identity Providers to configure and </span><span class="NormalTextRun SCXW207479778 BCX0">establish</span><span class="NormalTextRun SCXW207479778 BCX0"> trust.  
          
        </span></span>**<span class="EOP SCXW207479778 BCX0" data-ccp-props="{"134233117":false,"134233118":false,"335559738":240,"335559739":240}">Optional</span>**
    - <span class="NormalTextRun SCXW15592334 BCX0">Frame Login URL</span><span class="NormalTextRun SCXW15592334 BCX0">: </span><span class="NormalTextRun ContextualSpellingAndGrammarErrorV2Themed SCXW15592334 BCX0">user</span><span class="NormalTextRun SCXW15592334 BCX0"> is directed to this URL when the user wants to log back into Frame after being logged out due to inactivity.  
          
        </span>
    - <span class="NormalTextRun SCXW15592334 BCX0"><span class="TextRun SCXW99947813 BCX0" data-contrast="none" lang="EN-US" xml:lang="EN-US"><span class="NormalTextRun SCXW99947813 BCX0">Frame Logout URL</span><span class="NormalTextRun SCXW99947813 BCX0">: </span><span class="NormalTextRun ContextualSpellingAndGrammarErrorV2Themed SCXW99947813 BCX0">user</span><span class="NormalTextRun SCXW99947813 BCX0"> is directed to this URL when the user logs out of the Launchpad or if they decide to leave Frame after being logged out due to inactivity.</span></span><span class="EOP SCXW99947813 BCX0" data-ccp-props="{"134233117":false,"134233118":false,"335551550":0,"335551620":0,"335557856":16777215,"335559738":0,"335559739":0}"> </span></span>

<p class="callout info"><span class="TextRun SCXW229806544 BCX0" data-contrast="none" lang="EN-US" xml:lang="EN-US"><span class="NormalTextRun SCXW229806544 BCX0"> The SAML2 identity provider is typically configured to sign the SAML2 Authentication Response </span><span class="NormalTextRun ContextualSpellingAndGrammarErrorV2Themed SCXW229806544 BCX0">message</span><span class="NormalTextRun SCXW229806544 BCX0"> or the SAML2 Assertion embedded within the Authentication Response message (and not both). The choice of what is signed by the SAML2 IdP must be the same choice in the Frame SAML2 IdP configuration. Otherwise, Frame will return </span><span class="NormalTextRun ContextualSpellingAndGrammarErrorV2Themed SCXW229806544 BCX0">a</span><span class="NormalTextRun SCXW229806544 BCX0"> identity </span><span class="NormalTextRun ContextualSpellingAndGrammarErrorV2Themed SCXW229806544 BCX0">provider</span><span class="NormalTextRun SCXW229806544 BCX0"> misconfiguration error when Frame processes the SAML2 Authentication Response from the SAML2 IdP.</span></span><span class="EOP SCXW229806544 BCX0" data-ccp-props="{"134233117":false,"134233118":false,"335551550":0,"335551620":0,"335557856":16711165,"335559738":0,"335559739":0}"> </span></p>

Click Add when ready to create the SAML2 Provider definition.

## Configure your SAML2 IdP

3. Each SAML2-compliant identity provider will have its own configuration requirements. However, there are some common configuration parameters used by SAML2 identity providers:
    
    
    - **Frame Metadata URL**: This URL is in the form:   
        [<span class="TextRun Underlined SCXW162496362 BCX0" data-contrast="none" lang="EN-US" xml:lang="EN-US"><span class="NormalTextRun SCXW162496362 BCX0" data-ccp-charstyle="Hyperlink">https://</span><span class="NormalTextRun SCXW162496362 BCX0" data-ccp-charstyle="Hyperlink">api.use.difr.com/iam/&lt;ID&gt;/metadata</span></span>](https://api.use.difr.com/iam/%3CID%3E/metadata).
    - **Single Sign-on URL** or **Assertion Consumer Service (ACS) URL:** This URL is in the form: [<span class="TextRun Underlined SCXW33980600 BCX0" data-contrast="none" lang="EN-US" xml:lang="EN-US"><span class="NormalTextRun SCXW33980600 BCX0" data-ccp-charstyle="Hyperlink">https://api.use.difr.com/iam/&lt;ID&gt;/login/done</span><span class="NormalTextRun SCXW33980600 BCX0" data-ccp-charstyle="Hyperlink">.</span></span>](https://api.use.difr.com/iam/%3CID%3E/login/done)  
         The SAML2 IdP will send the SAML2 Authentication Response to this URL.
    
    #### **Caution**
    
    <p class="callout warning"> Administrators choosing to cache or store the Frame public key certificates in their SAML2 IdP will need to update those public key certificates when Dizzion renews them.</p>
    
    **Note**
    
    <p class="callout info"> Frame does not support the SAML2 Single Logout Request.</p>

### Mandatory SAML2 Attributes

1. In order for Frame to display properly the user's first name, last name, and email address in the Dashboard and Launchpad, your SAML2 identity provider configuration must provide these four mandatory user attributes/values using the specified SAML2 attribute names, as described in the following table:
    
    <table><thead><tr><th>**User attribute**</th><th>**SAML2 attribute name**</th></tr></thead><tbody><tr><td>**First name**</td><td>**Use** `givenName`, `/urn:mace:dir:attribute-def:givenName/`, **or** `http://schemas.xmlsoap.org/ws/2005/05/identity/claims/givenname`   
      
    **SAML2 nameFormat:**  
    `urn:oasis:names:tc:SAML:2.0:attrname-format:basic`</td></tr><tr><td><span style="color: rgb(0, 0, 0);">**Last name**</span></td><td><span style="color: rgb(0, 0, 0);">**Use** </span>`sn`, `/urn:mace:dir:attribute-def:sn/`, **or** `http://schemas.xmlsoap.org/ws/2005/05/identity/claims/surname `   
      
    <span style="color: rgb(0, 0, 0);">**SAML2 nameFormat:**</span>  
    `urn:oasis:names:tc:SAML:2.0:attrname-format:basic`</td></tr><tr><td>**Email address**</td><td>**Use** `mail`, `/urn:mace:dir:attribute-def:mail/`, `http://schemas.xmlsoap.org/ws/2005/05/identity/claims/emailaddress`, **or** `http://schemas.xmlsoap.org/ws/2005/05/identity/claims/name`   
      
    **SAML2 nameFormat:**  
    `urn:oasis:names:tc:SAML:2.0:attrname-format:basic`</td></tr><tr><td><span style="color: rgb(0, 0, 0);">**Name ID**</span></td><td>`NameID`   
      
    <span style="color: rgb(0, 0, 0);">**SAML2 nameFormat:**</span>  
    `urn:oasis:names:tc:SAML:2.0:nameid-format:persistent`</td></tr></tbody></table>

### Optional SAML2 Attributes

Customers can configure their SAML2 IdP to include additional SAML2 attributes in the SAML2 Authentication Response messages to Frame Console. These SAML2 attributes and their user-specific values can then be referenced when configuring Frame SAML2 Permissions to enforce role-based access control (RBAC).

The most common SAML2 attribute included by administrators in SAML2 Authentication Response messages would be a SAML2 attribute that is associated with a list of groups, such as a list of Active Directory groups, that the user is a member of. This allows the administrator to the SAML2 Permissions based on groups (and not individual user email addresses) and then associate the users to those groups in their IdP (or Active Directory, if their SAML2 IdP is connected to their Active Directory).

Frame also supports two Frame-specific SAML2 attributes to customize the logout/login workflow:

- **frame\_logout\_url**: user is directed to this URL when the user logs out of the Launchpad or if they decide to leave Frame after being logged out due to inactivity.
- **frame\_login\_url**: user is directed to this URL when the user wants to log back into Frame after being logged out due to inactivity.

When adding additional SAML2 attributes, make sure to record the optional attribute name(s) to be used (and possible values). For example:

- `groups`
- `Department`
- `http://schemas.xmlsoap.org/claims/Group`
- `http://schemas.microsoft.com/ws/2008/06/identity/claims/groups`

as the exact attribute name must be referenced in the condition section with the appropriate values of a SAML2 Permissions authorization rule.

### Configuring SAML2 Permissions

Once the SAML2 Provider is successfully configured in the Nutanix Console, administrators will need to add authorization rules from the SAML2 Permissions tab listed to the right of the SAML2 Provider tab.  
  
Add roles/permissions for your users by following our [Roles](https://docs.difr.com/books/platform-administrators-guide/page/authorization) and [User Permissions with a SAML2 IdP](https://docs.difr.com/books/platform-administrators-guide/page/authorization) guides.

[![image.png](https://docs.difr.com/uploads/images/gallery/2025-10/scaled-1680-/33Mimage.png)](https://docs.difr.com/uploads/images/gallery/2025-10/33Mimage.png)

The Group claim, created in the prior section, must be referenced as `http://schemas.xmlsoap.org/claims/Group` when creating the SAML2 Permission authorization rule.

SAML2 Configuration Lock

Customer Administrators have the option to lock SAML2 IdP configurations at the Customer level of the Frame tenant. When the toggle pictured below is enabled, SAML2 IdP integrations cannot be added from the Organization or Account levels of the Frame tenant.

![Configuration Lock](https://docs.difr.com/uploads/images/gallery/2025-10/saml-lock.png)

## Signing into Frame with your SAML integration

Your SAML integration will now appear to your users as a sign in button on your specific [Frame Sign in Page](https://docs.difr.com/books/platform-administrators-guide/page/authentication#entity-endpoint-urlsentity-endpoint-urls).

# Duo

Integrating Duo Single Single-On (SSO) is a quick and easy process. Continue reading to learn how to configure your Duo Single Sign-On users with Frame.

## Prerequisites

- Administrator access to a Duo Account
- Duo Single Sign-On must be enabled in the Duo Admin Panel
- A configured authentication source such as Active Directory or a SAML IdP (Okta, OneLogin, Google, etc.)

## Getting started

Use the URL-friendly SAML2 **Integration Name** that you created in the previous section.


1. First, we will add a new Application in the Duo Admin Panel. Click Applications on the sidebar, then click Protect an Application.

   <figure>

   ![Protect an Application](https://docs.difr.com/uploads/images/gallery/2025-10/duo-add-app.png)

   </figure>

2. Next, type generic in the search field to filter applications. Look for “Generic Service Provider for Single Sign-On (hosted by Duo),” and click Protect.

   <figure>

   ![Generic Service Provider](https://docs.difr.com/uploads/images/gallery/2025-10/duo-generic-sp.png)

   </figure>

3. You should see the new Application page. You may see a dialog box requesting you activate Duo's Universal Prompt. This is optional but we recommend it for a better user experience.

   <figure>

   ![Activate Universal Prompt](https://docs.difr.com/uploads/images/gallery/2025-10/duo-activate-universal-prompt.png)

   </figure>

When the dialog disappears, you will be taken to your Application's settings page.

4.  Scroll down on the Application Page until you see the **Entity ID** form field under **Service Provider**.

5.  Now it's time to come up with an **Entity ID** and a URL-friendly **Integration Name** that we will use in the configuration forms between Duo's Application page and Nutanix Console.

    - **Entity ID**: This is typically a URL for the Service Provider, e.g. `https://console.nutanix.com/`. This value will need to match in both Duo and Nutanix Console.

    <figure>

    ![The Entity ID](https://docs.difr.com/uploads/images/gallery/2025-10/duo-sp-entity-id.png)

    </figure>

6.  In the Assertion Consumer Service (ACS) URL field, enter the ACS URL as defined in the [Getting Started](#getting-started) section of this page.

   
The forward slash at the end of the URL is required for the integration to work correctly.

    <figure>

    ![Assetion Consumer Service (ACS) URL](https://docs.difr.com/uploads/images/gallery/2025-10/duo-sp-acs-url.png)

    </figure>

7.  Leave the **Single Logout URL** and **Service Provider Login URL** blank.

8.  Enter `https://console.nutanix.com` in the **Default Relay State** field.

    <figure>

    ![Mapping SAML attributes](https://docs.difr.com/uploads/images/gallery/2025-10/duo-saml-relay-state.png)

    </figure>

9.  Under the **SAML Response** section, change the following:

    <figure>

    ![SAML Response Settings](https://docs.difr.com/uploads/images/gallery/2025-10/duo-saml-response-section.png)

    </figure>

    - **NameID format** to `urn:oasis:names:tc:SAML:2.0:nameid-format:persistent`.
    - **NameID attribute** you can skip, its default value is exactly what we're looking for (`<Email Address>`).
    - **Signature Algorithm** should be **SHA256**.
    - **Signing Options**, both checked.

10. Under the **Map attributes** subsection of **SAML Response**, we need to specify three custom attributes as follows:

    <figure>

    ![Default Relay State](https://docs.difr.com/uploads/images/gallery/2025-10/duo-saml-attribute-mapping.png)

    </figure>

    - IdP Attribute `<Email Address>` - SAML Response Attribute: `mail`.
    - IdP Attribute `<First Name>` - SAML Response Attribute: `givenName`.
    - IdP Attribute `<Last Name>` - SAML Response Attribute: `sn`.

11. Scroll down to the **Settings section**, enter `Nutanix Frame` in the **Name field**.

12. Feel free to customize the remaining settings as desired. When you're done, click **Save** at the bottom.

## Configure Duo in Frame Admin Console

Open a new browser tab and navigate to [https://console.nutanix.com](https://console.nutanix.com) to log in. We will be switching back to this Duo tab to grab a few values shortly.

10. Before a SAML2 identity provider can be added, the administrator must enable SAML2 Providers at a given level by opening a new tab and navigating to the Admin Console. From there, navigate to the **Customer** or **Organization** page (depending on where you wish to add the IdP). Select **Users** from the left-hand menu.

11. Under **Authentication**, enable the **SAML2** toggle and click **Save** in the upper right corner.

   <figure>

    ![Customers Example for Configuring User Access](https://docs.difr.com/uploads/images/gallery/2025-10/ohfadd-saml2-2025.png)

    </figure>

More options will appear next to the Authentication tab, click on the **SAML2 Providers** tab.

12. Click **Add SAML2 Provider**.

    <figure>

    ![Add a SAML2 Provider](https://docs.difr.com/uploads/images/gallery/2025-10/9Jtadd-saml2-provider2.png)

    </figure>

13. A new dialog box will appear. Enter the following values as shown below:

    <figure>

    ![SAML Provider settings](https://docs.difr.com/uploads/images/gallery/2025-10/duo-frame-provider.png)

    </figure>

    - **Application ID**: Paste the **Entity ID** value from Step 5 of the Duo section.
    - **Auth provider metadata**: paste in the metadata URL from our Duo Application page. Navigate to Duo in another tab and copy the metadata URL and paste it into here. This should look something like this: `https://sso-2e394ff8.sso.duosecurity.com/saml2/sp/EEFCL3C8EXAMPLEKA7DW/metadata`.
    - **Integration Name**: Enter the SAML2 Integration name defined in the [Getting Started](#getting-started) section of this page.
    - Custom Label: Set the label to "Duo" or your company name.
    - **Authentication Token Expiration**: Set the token expiration slider to a duration that makes sense for your users.
    - **Signed Response**: enabled.
    - **Signed assertion**: enabled.

When you're finished, click **Add**.

That's it! You have successfully created your Duo integration with Frame! Move on to the next section to learn more about configuring permissions.

note SAML2 Configuration Lock

Customer Administrators have the option to lock SAML2 IdP configurations at the Customer level of the Frame tenant. When the toggle pictured below is enabled, SAML2 IdP integrations cannot be added from the Organization or Account levels of the Frame tenant.

![Configuration Lock](https://docs.difr.com/uploads/images/gallery/2025-10/saml-lock.png)


## Accessing Frame with Duo

Your Duo integration will now appear to your users as a sign in button on your specific [Frame Sign in Page](/books/platform-administrators-guide/page/authentication#entity-endpoint-urlsentity-endpoint-urls).

# Google Workspace

Frame supports Single Sign-On (SSO) with Google authentication through both OAuth2 and SAML2 integration options. The OAuth2 option is the easiest to setup and can be done in under a minute. The SAML2 option is also relatively quick and easy, but does require a few more steps.

## Google Workspace OAuth2 SSO Integration

<p class="callout info"> Google Workspace OAuth2 SSO integration is supported only when users access Frame via a supported web browser. Google Workspace OAuth2 is not supported by Frame App (due to Google Sign-In not supporting Chromium Embedded Framework).</p>

### Configuring Google Workspace OAuth2

1. If you would like to enable Google Workspace OAuth2 integration with Frame, you will first need to following the procedure outlined in Google's guide to [Control which third-party &amp; internal apps access Google Workspace data](https://support.google.com/a/answer/7281227?hl=en#zippy=%2Cmanage-access-to-apps-trusted-limited-or-blocked).
2. On the Google Admin Console home page, go to **Security &gt; API controls**.
3. Under App access control, click on MANAGE THIRD-PARTY APP ACCESS.
4. Click on “Configure new app” drop down menu and select **OAuth App Name Or Client ID**.
5. Search for the Client ID `884836301137-76l5epasioe5sb3qvsp31obn45qk6t5i.apps.googleusercontent.com`.
6. Once you locate the Frame app in the search results, click **Select**.
7. Check the checkbox for the Frame app with the Client ID `884836301137-76l5epasioe5sb3qvsp31obn45qk6t5i.apps.googleusercontent.com` and then click **SELECT**.
8. For App access, specify that this Frame app is to be *TRUSTED* and click **CONFIGURE**.

### Configuring Google OAuth2 in Frame

1. Before Google OAuth2 can be added, the administrator must enable the Google toggle at a given level by navigating to the Admin Console. From there, navigate to the **Customer** or **Organization** page (depending on where you wish to add Google).
2. Select **Users** from the left-hand menu.
3. From there, navigate to the **Authentication** tab and enable the **OAuth2** toggle. Click **Save**.

<figure id="bkmrk-">![Enable Users Setting](https://docs.difr.com/uploads/images/gallery/2025-10/enable-oauth2-2025.png)

</figure>4. Click on the newly created **Google** tab. From there, click **Add**.

<figure id="bkmrk--1">![Google Tab](https://docs.difr.com/uploads/images/gallery/2025-10/add-oauth2.png)

</figure>5. The *Add Google authorization* dialog window will appear:

<figure id="bkmrk--2">![Add Google authorization](https://docs.difr.com/uploads/images/gallery/2025-10/google-oauth2-3.png)

</figure>6. From this window, you can specify individual email addresses or entire domains you wish to grant access to and their corresponding roles. For this example, we will give access to the domain mycompany.com. All users tied to this domain will be given “Launchpad User” access on the “Applications 2” Launchpad. Read more about permissions in the [Manage User Permissions](https://docs.difr.com/link/81#bkmrk-user-permissions-wit) section of Frame documentation.

<figure id="bkmrk--3">![Example role settings using a domain](https://docs.difr.com/uploads/images/gallery/2025-10/google-oauth2-4.png)

</figure><div class="callout callout-info" id="bkmrk-when-specifying-a-go">When specifying a Google Workspace domain, you must prefix the domain with the @ symbol, as shown above.</div>7. Click **Add** when you have finished specifying your emails/domains and roles.

### Signing in with Google Workspace via OAuth2

You can now instruct your users to select the *Sign in with Google* option when accessing their [Frame login page](https://docs.difr.com/books/platform-administrators-guide/page/authentication#bkmrk-entity-endpoint-urls) and enter their Google credentials.

<figure id="bkmrk--4">![Sign in with Google](https://docs.difr.com/uploads/images/gallery/2025-10/scaled-1680-/google-oauth2-5.png)

</figure>They will be prompted to allow Frame access to their Google Drive the first time they sign in.

<figure id="bkmrk--5">![Frame access prompt](https://docs.difr.com/uploads/images/gallery/2025-10/google-oauth2-access-2025.png)

</figure>That's it! Your users can now use Sign in with Google on your account via our OAuth2 integration option. If you prefer to set up your integration using SAML2, continue reading.

## Google Workspace SAML2 Integration

<p class="callout info"> Google Workspace SAML2 integration can only be set up by someone with a Super Admin role on a Google Workspace account. During this configuration process we will transition from the Google Workspace Admin console to the Frame console.</p>

### Getting Started

To begin, let's create a URL-friendly SAML2 Application ID (also referred to as Entity ID) that we'll use in a few places throughout our setup, as well as a Custom Label which will be displayed on the login page for users, for example.

Application ID: Frame  
Custom Label: Frame-Google\_SAML  
  
Also copy the Assertion URL  
  
Click add to save the changes for later

  
Follow the steps to create a SAML 2 Provider explained in the [General SAML2 Integration](https://docs.difr.com/link/85#bkmrk-page-title) section, until you see until you see the template with the missing configuration info, and copy the Assertion URL which will be needed later in the setup. From here leave the tab open, and continue with the configuration in the Google Admin console.

[![image.png](https://docs.difr.com/uploads/images/gallery/2025-11/scaled-1680-/07yimage.png)
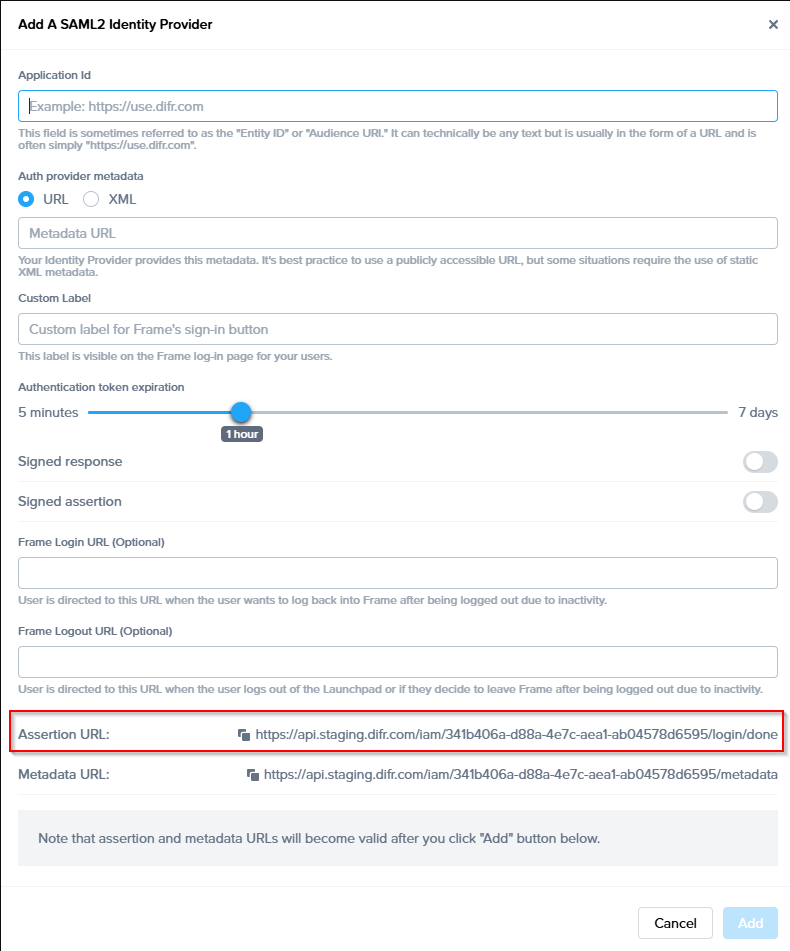
](https://docs.difr.com/uploads/images/gallery/2025-11/07yimage.png)

### Google Admin Console

1. Navigate and log in to to your [Google Admin Console](https://admin.google.com/). Click on **Apps** and then **Web and mobile apps**.
    
    <figure>![Web and mobile apps](https://docs.difr.com/uploads/images/gallery/2025-10/google-saml2-admin-1.png)
    
    </figure>
2. From the *Apps Settings* page, click **Add App** then **Add custom SAML app** from the drop-down.
    
    <figure>![Add custom SAML app](https://docs.difr.com/uploads/images/gallery/2025-10/google-saml2-admin-2.png)
    
    </figure>
3. Enter "Frame” for the App name and upload our logo icon below (right-click, save).
    
    <figure>[![image.png](https://docs.difr.com/uploads/images/gallery/2025-11/scaled-1680-/M1Qimage.png)](https://docs.difr.com/uploads/images/gallery/2025-11/M1Qimage.png)
    
    </figure> ***Frame Logo (right-click, save)*** ![Frame App Logo](https://docs.difr.com/uploads/images/gallery/2025-10/dizzion-logo-small.png)
4. Click **Continue** when ready.
5. Click the **Download Metadata** button. Save this somewhere accessible for a later step in the Frame Console; this metadata tells Frame how to communicate with Google on Frame's behalf.
    
    <figure>![Download metadata from Google](https://docs.difr.com/uploads/images/gallery/2025-10/google-saml2-admin-4.png)
    
    </figure>Click **Continue** when ready.
6. Next, we'll carefully enter values for **ACS URL** and **Entity ID** fields.
    
    
    - **ACS (Assertion Consumer Service) URL**: This is where Google will send assertions info (first name, last name, and email address) for authenticated users to Frame. Here, we'll enter the Frame ACS URL copied in the [Getting Started](https://docs.difr.com/link/88#bkmrk-getting-started) section.
    - **Entity ID**: This field is also arbitrary and must be a URI, URN, or URL; this value is **case-sensitive**. Entity IDs are attached to event logs for Admin purposes and are **required to match** in both Google and Frame Console's settings to verify and identify each other via SAML2.   
          
        Enter the Name that have been decided on in the [Getting started](https://docs.difr.com/link/88#bkmrk-getting-started) section. Copy the value you decide upon for use in later steps; Frame refers to the Entity ID in its SAML settings as “Application ID.”
7. Next, we have the **Start URL**.
    
    The Start URL allows users to authenticate and navigate directly to Frame from Google's Workspace portal. This is often referred to as a “Identity Provider initiated login”. For most cases, the value for Start URL is simply a [Launchpad or Account Dashboard URL](https://docs.difr.com/platform/identity-and-access/authentication#entity-endpoint-urlsentity-endpoint-urls) to the account the user will have access to. If this field is left blank, your users can still log in to Frame with this Google App from the Frame Console's sign in page(s).
    
    <p class="callout info"> Leaving this blank may be desired if you have many Frame Accounts for your users to access or "land on".</p>
8. Next, Ensure that the *Name ID format* field is set to **PERSISTENT** and the *Name ID field* is set to **Basic Information &gt; Primary email**. Click **Continue** when ready.
    
    <figure>[![image.png](https://docs.difr.com/uploads/images/gallery/2025-11/scaled-1680-/1xPimage.png)](https://docs.difr.com/uploads/images/gallery/2025-11/1xPimage.png)
    
    </figure>
9. Here, we need to configure mappings between user fields from Google to recognizable terms that Frame is expecting to receive when users sign in. Fill it out exactly as pictured below:
    
    <figure>![SAML Attribute mappings](https://docs.difr.com/uploads/images/gallery/2025-10/google-saml2-admin-6.png)
    
    </figure>Optional: Group Membership information can be set before finishing the setup, those can also be done afterwards at any time.
    
    [![image.png](https://docs.difr.com/uploads/images/gallery/2025-11/scaled-1680-/z6eimage.png)](https://docs.difr.com/uploads/images/gallery/2025-11/z6eimage.png)
    
    Click **Finish** when complete
10. You'll now be brought to the main page of your new Custom App. The last thing we need to do is **enable user access**, as the default setting for new Custom Apps is *OFF for everyone*. To enable access, click on your SAML App, and select User access, from there make sure that enable for everyone is selected.  
      
    [![image.png](https://docs.difr.com/uploads/images/gallery/2025-11/scaled-1680-/UKbimage.png)](https://docs.difr.com/uploads/images/gallery/2025-11/UKbimage.png)

Then, configure your user/group access and click **SAVE**. In our use-case, we wanted the service to be ON for everyone:

<figure id="bkmrk--7">[![image.png](https://docs.difr.com/uploads/images/gallery/2025-11/scaled-1680-/iJpimage.png)](https://docs.difr.com/uploads/images/gallery/2025-11/iJpimage.png)

</figure>That's it for the Google Admin portion of the setup – we're half way there! By this point you should have the following items needed to setup Frame Console as the SAML2 Service Provider:

- - [x] **Downloaded Metadata XML file**
    - [x] **SAML2 Integration Name**
    - [x] **Entity ID** (later referenced as Application ID)

### Configure SAML2 in Frame

11\. Navigate back to the Frame console which from the [Getting started section](https://docs.difr.com/link/88#bkmrk-getting-started) and continue with the SAML2 provider configuration by clicking on the menu and select Update.

[![image.png](https://docs.difr.com/uploads/images/gallery/2025-11/scaled-1680-/nVpimage.png)](https://docs.difr.com/uploads/images/gallery/2025-11/nVpimage.png)

12\. Enter the missing Information which has been collected during the steps above.

<figure id="bkmrk-under-authentication"><figure></figure>[![image.png](https://docs.difr.com/uploads/images/gallery/2025-11/scaled-1680-/469image.png)](https://docs.difr.com/uploads/images/gallery/2025-11/469image.png)

  
- **Application ID**: The value here **needs to match** the value set as the "Entity ID" from Step 5.
- **Auth provider metadata**: Click the “XML” option and paste the contents of the Metadata XML file from Step 4.
- **Custom Label**:. Allows Admins to customize Frame's Sign in page chiclets/buttons associated with this SAML2 integration.
- **Authentication token expiration**: Choose a token expiration duration that supports your end-user workflows and complies with your security policies.
- **Enable “Signed assertion”**
- **<span class="TextRun SCXW207479778 BCX0" data-contrast="auto" lang="EN-US" xml:lang="EN-US"><span class="NormalTextRun SCXW207479778 BCX0">Assertion Consumer Service (ACS) URL</span><span class="NormalTextRun ContextualSpellingAndGrammarErrorV2Themed SCXW207479778 BCX0">:</span></span>**<span class="TextRun SCXW207479778 BCX0" data-contrast="auto" lang="EN-US" xml:lang="EN-US"><span class="NormalTextRun ContextualSpellingAndGrammarErrorV2Themed SCXW207479778 BCX0">  The</span><span class="NormalTextRun SCXW207479778 BCX0"> endpoint where the Identity Provider (IdP) delivers SAML authentication responses after a successful login.</span></span><span class="EOP SCXW207479778 BCX0" data-ccp-props="{"134233117":false,"134233118":false,"335559738":240,"335559739":240}"> </span>
- **<span class="TextRun SCXW207479778 BCX0" data-contrast="auto" lang="EN-US" xml:lang="EN-US"><span class="NormalTextRun SCXW207479778 BCX0">Metadata URL</span><span class="NormalTextRun ContextualSpellingAndGrammarErrorV2Themed SCXW207479778 BCX0">:</span></span>**<span class="TextRun SCXW207479778 BCX0" data-contrast="auto" lang="EN-US" xml:lang="EN-US"><span class="NormalTextRun ContextualSpellingAndGrammarErrorV2Themed SCXW207479778 BCX0">  A</span><span class="NormalTextRun SCXW207479778 BCX0"> publicly accessible URL providing your Service Provider's SAML metadata, used by Identity Providers to configure and </span><span class="NormalTextRun SCXW207479778 BCX0">establish</span><span class="NormalTextRun SCXW207479778 BCX0"> trust.  
      
    </span></span>**<span class="EOP SCXW207479778 BCX0" data-ccp-props="{"134233117":false,"134233118":false,"335559738":240,"335559739":240}">Optional</span>**
- <span class="NormalTextRun SCXW15592334 BCX0">Frame Login URL</span><span class="NormalTextRun SCXW15592334 BCX0">: </span><span class="NormalTextRun ContextualSpellingAndGrammarErrorV2Themed SCXW15592334 BCX0">user</span><span class="NormalTextRun SCXW15592334 BCX0"> is directed to this URL when the user wants to log back into Frame after being logged out due to inactivity.  
    </span>
- <span class="NormalTextRun SCXW15592334 BCX0"><span class="TextRun SCXW99947813 BCX0" data-contrast="none" lang="EN-US" xml:lang="EN-US"><span class="NormalTextRun SCXW99947813 BCX0">Frame Logout URL</span><span class="NormalTextRun SCXW99947813 BCX0">: </span><span class="NormalTextRun ContextualSpellingAndGrammarErrorV2Themed SCXW99947813 BCX0">user</span><span class="NormalTextRun SCXW99947813 BCX0"> is directed to this URL when the user logs out of the Launchpad or if they decide to leave Frame after being logged out due to inactivity.</span></span><span class="EOP SCXW99947813 BCX0" data-ccp-props="{"134233117":false,"134233118":false,"335551550":0,"335551620":0,"335557856":16777215,"335559738":0,"335559739":0}"> </span></span>

Lastly, confirm that everything is entered correctly and click **Add**.

### Configuring SAML2 Permissions

### Accessing Frame with Google Workspace

Your SAML integration will now appear to your users as a sign in button on your specific Frame Sign in Page.

![Sign in with Google Workspace](https://docs.difr.com/uploads/images/gallery/2025-10/google-saml2-sign-in.png)

</figure>

# Microsoft Entra ID

<span class="TextRun SCXW95714165 BCX0" data-contrast="none" lang="EN-US" xml:lang="EN-US"><span class="NormalTextRun SCXW95714165 BCX0">Integrating Microsoft Entra ID Single Sign On (formerly </span></span>**[<span class="TextRun SCXW95714165 BCX0" data-contrast="none" lang="EN-US" xml:lang="EN-US"><span class="NormalTextRun SCXW95714165 BCX0" data-ccp-charstyle="Hyperlink">Azure </span><span class="NormalTextRun SCXW95714165 BCX0" data-ccp-charstyle="Hyperlink">AD SSO</span></span>](https://techcommunity.microsoft.com/t5/microsoft-entra-azure-ad-blog/azure-ad-is-becoming-microsoft-entra-id/ba-p/2520436)**<span class="TextRun SCXW95714165 BCX0" data-contrast="none" lang="EN-US" xml:lang="EN-US"><span class="NormalTextRun SCXW95714165 BCX0">) is a quic</span><span class="NormalTextRun SpellingErrorV2Themed SCXW95714165 BCX0">k a</span><span class="NormalTextRun SCXW95714165 BCX0">nd </span><span class="NormalTextRun SCXW95714165 BCX0">easy process</span><span class="NormalTextRun SCXW95714165 BCX0">. Before we get started, take note of five pieces of dat</span><span class="NormalTextRun ContextualSpellingAndGrammarErrorV2Themed SCXW95714165 BCX0">a that</span> <span class="NormalTextRun SCXW95714165 BCX0">you'll</span><span class="NormalTextRun SCXW95714165 BCX0"> be u</span><span class="NormalTextRun SCXW95714165 BCX0">sing t</span><span class="NormalTextRun SCXW95714165 BCX0">o </span><span class="NormalTextRun SCXW95714165 BCX0">set up</span><span class="NormalTextRun SCXW95714165 BCX0"> a proper SAML2 integration.</span></span><span class="EOP SCXW95714165 BCX0" data-ccp-props="{"134233117":false,"134233118":false,"335557856":16777215,"335559738":0,"335559739":300}"> </span>

<div class="SCXW95714165 BCX0" id="bkmrk-the-frame-saml2-inte"><div class="OutlineElement Ltr SCXW95714165 BCX0">  
</div><div class="ListContainerWrapper SCXW95714165 BCX0">- <span class="TextRun SCXW95714165 BCX0" data-contrast="none" lang="EN-US" xml:lang="EN-US"><span class="NormalTextRun SCXW95714165 BCX0">The Frame </span></span>**<span class="TextRun SCXW95714165 BCX0" data-contrast="none" lang="EN-US" xml:lang="EN-US"><span class="NormalTextRun SCXW95714165 BCX0">SAML2 Integration Name</span></span>**<span class="TextRun SCXW95714165 BCX0" data-contrast="none" lang="EN-US" xml:lang="EN-US"><span class="NormalTextRun SCXW95714165 BCX0">. This is an arbitrary name val</span><span class="NormalTextRun ContextualSpellingAndGrammarErrorV2Themed SCXW95714165 BCX0">ue </span><span class="NormalTextRun SCXW95714165 BCX0">t</span><span class="NormalTextRun ContextualSpellingAndGrammarErrorV2Themed SCXW95714165 BCX0">hat </span><span class="NormalTextRun ContextualSpellingAndGrammarErrorV2Themed SCXW95714165 BCX0">you'</span><span class="NormalTextRun SCXW95714165 BCX0">ll</span><span class="NormalTextRun SCXW95714165 BCX0"> need to </span><span class="NormalTextRun SCXW95714165 BCX0">come up with</span><span class="NormalTextRun SCXW95714165 BCX0">. This value is used to uniquely </span><span class="NormalTextRun SCXW95714165 BCX0">identify</span><span class="NormalTextRun SCXW95714165 BCX0"> your integration with Frame and used to craft the SAML2 URIs, as well as used as a search vector for </span><span class="NormalTextRun ContextualSpellingAndGrammarErrorV2Themed SCXW95714165 BCX0">troublesh</span><span class="NormalTextRun SCXW95714165 BCX0">ooting and logs.</span></span><span class="EOP SCXW95714165 BCX0" data-ccp-props="{"134233117":false,"134233118":false,"335557856":16777215,"335559738":0,"335559739":0}"> </span>

</div><div class="ListContainerWrapper SCXW95714165 BCX0">- <span class="TextRun SCXW95714165 BCX0" data-contrast="none" lang="EN-US" xml:lang="EN-US"><span class="NormalTextRun SCXW95714165 BCX0">The </span></span>**<span class="TextRun SCXW95714165 BCX0" data-contrast="none" lang="EN-US" xml:lang="EN-US"><span class="NormalTextRun SCXW95714165 BCX0">Entra ID Federation Metadata Document URL</span></span>**<span class="TextRun SCXW95714165 BCX0" data-contrast="none" lang="EN-US" xml:lang="EN-US"><span class="NormalTextRun SCXW95714165 BCX0">. This is the Entra ID-provided URL where Entra I</span><span class="NormalTextRun SCXW95714165 BCX0">D kee</span><span class="NormalTextRun SCXW95714165 BCX0">ps the SAML metadata for your Microsoft Entra ID application. </span><span class="NormalTextRun CommentStart SCXW95714165 BCX0">The metadata URL must be publicly accessible to </span><span class="NormalTextRun SCXW95714165 BCX0">the Frame</span><span class="NormalTextRun SCXW95714165 BCX0"> Platform on the Internet.</span></span><span class="EOP SCXW95714165 BCX0" data-ccp-props="{"134233117":false,"134233118":false,"335557856":16777215,"335559738":0,"335559739":0}"> </span>

</div><div class="ListContainerWrapper SCXW95714165 BCX0">- <span class="TextRun SCXW95714165 BCX0" data-contrast="none" lang="EN-US" xml:lang="EN-US"><span class="NormalTextRun CommentStart SCXW95714165 BCX0">The </span></span>**<span class="TextRun SCXW95714165 BCX0" data-contrast="none" lang="EN-US" xml:lang="EN-US"><span class="NormalTextRun SCXW95714165 BCX0">Entity</span><span class="NormalTextRun SCXW95714165 BCX0"> ID</span></span>**<span class="TextRun SCXW95714165 BCX0" data-contrast="none" lang="EN-US" xml:lang="EN-US"><span class="NormalTextRun SCXW95714165 BCX0"> from your Microsoft Entra ID application.</span></span><span class="EOP SCXW95714165 BCX0" data-ccp-props="{"134233117":false,"134233118":false,"335557856":16777215,"335559738":0,"335559739":0}"> </span>

</div><div class="ListContainerWrapper SCXW95714165 BCX0">- <span class="TextRun SCXW95714165 BCX0" data-contrast="none" lang="EN-US" xml:lang="EN-US"><span class="NormalTextRun SCXW95714165 BCX0">The </span></span>**<span class="TextRun SCXW95714165 BCX0" data-contrast="none" lang="EN-US" xml:lang="EN-US"><span class="NormalTextRun SCXW95714165 BCX0">Redirect URL</span></span>**<span class="TextRun SCXW95714165 BCX0" data-contrast="none" lang="EN-US" xml:lang="EN-US"><span class="NormalTextRun SCXW95714165 BCX0">. This is the Frame destination URL that will process the Entra ID-generated assertions/claims after users authenticate through Entra ID.</span></span><span class="EOP SCXW95714165 BCX0" data-ccp-props="{"134233117":false,"134233118":false,"335557856":16777215,"335559738":0,"335559739":0}"> </span>

</div><div class="ListContainerWrapper SCXW95714165 BCX0">- <span class="TextRun SCXW95714165 BCX0" data-contrast="none" lang="EN-US" xml:lang="EN-US"><span class="NormalTextRun SCXW95714165 BCX0">The </span></span>**<span class="TextRun SCXW95714165 BCX0" data-contrast="none" lang="EN-US" xml:lang="EN-US"><span class="NormalTextRun SCXW95714165 BCX0">Entity URL</span></span>**<span class="TextRun SCXW95714165 BCX0" data-contrast="none" lang="EN-US" xml:lang="EN-US"><span class="NormalTextRun SCXW95714165 BCX0"> that you will use as your landing page. Please see the </span></span>[<span class="TextRun Underlined SCXW95714165 BCX0" data-contrast="none" lang="EN-US" xml:lang="EN-US"><span class="NormalTextRun SCXW95714165 BCX0" data-ccp-charstyle="Hyperlink">Entit</span><span class="NormalTextRun SCXW95714165 BCX0" data-ccp-charstyle="Hyperlink">ie</span><span class="NormalTextRun SCXW95714165 BCX0" data-ccp-charstyle="Hyperlink">s and URLs</span></span>](https://docs.difr.com/books/platform-administrators-guide/page/authentication#bkmrk-entity-endpoint-urls)<span class="TextRun SCXW95714165 BCX0" data-contrast="none" lang="EN-US" xml:lang="EN-US"><span class="NormalTextRun SCXW95714165 BCX0"> section to help you decide/find the right URL.</span></span><span class="EOP SCXW95714165 BCX0" data-ccp-props="{"134233117":false,"134233118":false,"335557856":16777215,"335559738":0,"335559739":0}"> </span>

</div></div>### <span class="TextRun SCXW95714165 BCX0" data-contrast="none" lang="EN-US" xml:lang="EN-US"><span class="NormalTextRun SCXW95714165 BCX0" data-ccp-parastyle="heading 2">Getting Started</span></span>[<span class="TextRun SCXW95714165 BCX0" data-contrast="none" lang="EN-US" xml:lang="EN-US"><span class="NormalTextRun SCXW95714165 BCX0" data-ccp-charstyle="Hyperlink"> </span></span>](https://docs.dizzion.com/platform/identity-and-access/idp-integrations/entra-id#getting-started)<span class="EOP SCXW95714165 BCX0" data-ccp-props="{"134233117":false,"134233118":false,"134245418":true,"134245529":true,"335557856":16777215,"335559738":600,"335559739":300}"> </span>

To begin, let's create a URL-friendly SAML2 Application ID (also referred to as Entity ID) that we'll use in a few places throughout our setup, as well as a Custom Label which will be displayed on the login page for users, for example.

Application ID: Name of your EntraID Application  
**Example: DC-ENTRAID-DEV**  
  
Custom Label: Description which will be displayed for SAML IDP on login  
**Frame-Azure-EntraID**

Also copy the Assertion URL  
**Example: https://api.deu.difr.com/iam/fb999999-aaa9-999d-ad5f-999f0301a4b9/login/done**

Click "add" to save the changes for later

  
Follow the steps to create a SAML 2 Provider explained in the [General SAML2 Integration](https://docs.difr.com/books/platform-administrators-guide/page/general-saml2-integration) section, until you see until you see the template with the missing configuration info, and copy the Metadata URL which will be needed later in the setup. From here leave the tab open, and continue with the configuration in the Azure console.

[![image.png](https://docs.difr.com/uploads/images/gallery/2026-02/scaled-1680-/NDIimage.png)](https://docs.difr.com/uploads/images/gallery/2026-02/NDIimage.png)

### <span class="TextRun SCXW95714165 BCX0" data-contrast="none" lang="EN-US" xml:lang="EN-US"><span class="NormalTextRun SCXW95714165 BCX0" data-ccp-parastyle="heading 2">Configure Entra ID</span></span>[<span class="TextRun SCXW95714165 BCX0" data-contrast="none" lang="EN-US" xml:lang="EN-US"><span class="NormalTextRun SCXW95714165 BCX0" data-ccp-charstyle="Hyperlink"> </span></span>](https://docs.dizzion.com/platform/identity-and-access/idp-integrations/entra-id#configure-entra-id)<span class="EOP SCXW95714165 BCX0" data-ccp-props="{"134233117":false,"134233118":false,"134245418":true,"134245529":true,"335557856":16777215,"335559738":600,"335559739":300}"> </span>

<span class="TextRun SCXW95714165 BCX0" data-contrast="none" lang="EN-US" xml:lang="EN-US"><span class="NormalTextRun SCXW95714165 BCX0">Frame supports the ability for Entra administrators to use Entra ID </span></span>**[<span class="TextRun SCXW95714165 BCX0" data-contrast="none" lang="EN-US" xml:lang="EN-US"><span class="NormalTextRun SCXW95714165 BCX0" data-ccp-charstyle="Hyperlink">Enterprise Applications</span></span>](https://learn.microsoft.com/en-us/azure/active-directory/manage-apps/add-application-portal)<span class="TextRun SCXW95714165 BCX0" data-contrast="none" lang="EN-US" xml:lang="EN-US"><span class="NormalTextRun SCXW95714165 BCX0"> </span></span><span class="EOP SCXW95714165 BCX0" data-ccp-props="{"134233117":false,"134233118":false,"335557856":16777215,"335559738":0,"335559739":300}"> </span>**

<span class="TextRun SCXW95714165 BCX0" data-contrast="none" lang="EN-US" xml:lang="EN-US"><span class="NormalTextRun SCXW95714165 BCX0">With an Enterprise Application, you </span><span class="NormalTextRun SCXW95714165 BCX0">benefit</span><span class="NormalTextRun SCXW95714165 BCX0"> from be</span><span class="NormalTextRun SCXW95714165 BCX0">ing ab</span><span class="NormalTextRun SCXW95714165 BCX0">le to:</span></span><span class="EOP SCXW95714165 BCX0" data-ccp-props="{"134233117":false,"134233118":false,"335557856":16777215,"335559738":0,"335559739":300}"> </span>

<span class="TextRun SCXW95714165 BCX0" data-contrast="none" lang="EN-US" xml:lang="EN-US"><span class="NormalTextRun SCXW95714165 BCX0">1. Have Frame automatically </span><span class="NormalTextRun ContextualSpellingAndGrammarErrorV2Themed SCXW95714165 BCX0">logout</span><span class="NormalTextRun SCXW95714165 BCX0"> your users from Entra ID when they log out of Frame.</span></span><span class="EOP SCXW95714165 BCX0" data-ccp-props="{"134233117":false,"134233118":false,"335557856":16777215,"335559738":0,"335559739":0}">   
</span><span class="TextRun SCXW95714165 BCX0" data-contrast="none" lang="EN-US" xml:lang="EN-US"><span class="NormalTextRun SCXW95714165 BCX0">2. Enable Entra ID to redirect your users to a specific URL after the users are logged out of Frame and Entra ID.</span></span><span class="EOP SCXW95714165 BCX0" data-ccp-props="{"134233117":false,"134233118":false,"335557856":16777215,"335559738":0,"335559739":0}">   
</span><span class="TextRun SCXW95714165 BCX0" data-contrast="none" lang="EN-US" xml:lang="EN-US"><span class="NormalTextRun SCXW95714165 BCX0">3. Explicitly specify the users and groups who can access Frame.</span></span><span class="EOP SCXW95714165 BCX0" data-ccp-props="{"134233117":false,"134233118":false,"335557856":16777215,"335559738":0,"335559739":0}"> </span>

<span class="TextRun SCXW95714165 BCX0" data-contrast="none" lang="EN-US" xml:lang="EN-US"><span class="NormalTextRun SCXW95714165 BCX0">To create an Enterprise Application, you will need to have at least one of the following Entra ID permissions:</span></span><span class="EOP SCXW95714165 BCX0" data-ccp-props="{"134233117":false,"134233118":false,"335557856":16777215,"335559738":0,"335559739":300}"> </span>

<div class="SCXW95714165 BCX0" id="bkmrk-global-administrator"><div class="OutlineElement Ltr SCXW95714165 BCX0">  
</div><div class="ListContainerWrapper SCXW95714165 BCX0">1. **<span class="TextRun SCXW95714165 BCX0" data-contrast="none" lang="EN-US" xml:lang="EN-US"><span class="NormalTextRun SCXW95714165 BCX0">Global Administrator</span></span>**<span class="TextRun SCXW95714165 BCX0" data-contrast="none" lang="EN-US" xml:lang="EN-US"><span class="NormalTextRun SCXW95714165 BCX0">**:** This role has the highest level of access to an Entra ID tenant and can perform any action in Entra ID tenant and can perform any action in Entra ID, including creating enterprise applications.</span></span>
2. **<span class="TextRun SCXW95714165 BCX0" data-contrast="none" lang="EN-US" xml:lang="EN-US"><span class="NormalTextRun SCXW95714165 BCX0">Cloud Application Administrator</span></span>**<span class="TextRun SCXW95714165 BCX0" data-contrast="none" lang="EN-US" xml:lang="EN-US"><span class="NormalTextRun SCXW95714165 BCX0">**:** This role can create and manage enterprise applications in Entra ID but cannot manage the Entra ID tenant itself.</span></span>
3. **<span class="TextRun SCXW95714165 BCX0" data-contrast="none" lang="EN-US" xml:lang="EN-US"><span class="NormalTextRun SCXW95714165 BCX0">Application Administrator</span></span>**<span class="TextRun SCXW95714165 BCX0" data-contrast="none" lang="EN-US" xml:lang="EN-US"><span class="NormalTextRun SCXW95714165 BCX0">**:** This role can create and manage enterprise applications in Entra ID but only for a specific set of applications assigned to them by a Global Administrator or Cloud Application Administrator.</span></span><span class="EOP SCXW95714165 BCX0" data-ccp-props="{"134233117":false,"134233118":false,"335557856":16777215,"335559738":0,"335559739":0}"> </span>

</div><div class="OutlineElement Ltr SCXW95714165 BCX0">  
</div></div><span class="TextRun SCXW95714165 BCX0" data-contrast="none" lang="EN-US" xml:lang="EN-US"><span class="NormalTextRun SCXW95714165 BCX0">In case you do not have any of </span><span class="NormalTextRun ContextualSpellingAndGrammarErrorV2Themed SCXW95714165 BCX0">above</span><span class="NormalTextRun SCXW95714165 BCX0"> Entra ID Roles, you can </span></span>**[<span class="TextRun SCXW95714165 BCX0" data-contrast="none" lang="EN-US" xml:lang="EN-US"><span class="NormalTextRun SCXW95714165 BCX0" data-ccp-charstyle="Hyperlink">create an Entra ID App Registration</span></span>](https://docs.difr.com/books/platform-administrators-guide/page/microsoft-entra-id)**<span class="TextRun SCXW95714165 BCX0" data-contrast="none" lang="EN-US" xml:lang="EN-US"><span class="NormalTextRun SCXW95714165 BCX0">however, you will not have the Enterprise Application benefits described above.</span></span><span class="EOP SCXW95714165 BCX0" data-ccp-props="{"134233117":false,"134233118":false,"335557856":16777215,"335559738":0,"335559739":300}"> </span>

<span class="TextRun SCXW95714165 BCX0" data-contrast="none" lang="EN-US" xml:lang="EN-US"><span class="NormalTextRun SCXW95714165 BCX0">Considerations</span></span><span class="EOP SCXW95714165 BCX0" data-ccp-props="{"134233117":false,"134233118":false,"335559738":0,"335559739":72}"> </span>

<div class="SCXW95714165 BCX0" id="bkmrk-if-you-are-registeri"><div class="OutlineElement Ltr SCXW95714165 BCX0">  
</div><div class="ListContainerWrapper SCXW95714165 BCX0">- <span class="TextRun SCXW95714165 BCX0" data-contrast="none" lang="EN-US" xml:lang="EN-US"><span class="NormalTextRun SCXW95714165 BCX0">If you are registering your own Azure subscriptions, you might have already created </span><span class="NormalTextRun ContextualSpellingAndGrammarErrorV2Themed SCXW95714165 BCX0">app</span><span class="NormalTextRun SCXW95714165 BCX0"> registration by following our </span></span>**[<span class="TextRun Underlined SCXW95714165 BCX0" data-contrast="none" lang="EN-US" xml:lang="EN-US"><span class="NormalTextRun SCXW95714165 BCX0" data-ccp-charstyle="Hyperlink">BYO Azure Subscription</span></span>](https://docs.difr.com/books/platform-administrators-guide/page/microsoft-azure)**<span class="TextRun SCXW95714165 BCX0" data-contrast="none" lang="EN-US" xml:lang="EN-US"><span class="NormalTextRun SCXW95714165 BCX0"> process. For integrating Entra ID to Frame as a SAML2 identity provider, please create a new Enterprise Application for user authentication purposes.</span></span><span class="EOP SCXW95714165 BCX0" data-ccp-props="{"134233117":false,"134233118":false,"335559738":240,"335559739":240}"> </span>

</div><div class="ListContainerWrapper SCXW95714165 BCX0">- <span class="TextRun SCXW95714165 BCX0" data-contrast="none" lang="EN-US" xml:lang="EN-US"><span class="NormalTextRun CommentStart CommentHighlightPipeRest CommentHighlightRest SCXW95714165 BCX0">If you want Frame to redirect your users to log out of Entra ID and be redirected to a specific web page after they log out of Frame, please </span></span>**[<span class="TextRun Underlined SCXW95714165 BCX0" data-contrast="none" lang="EN-US" xml:lang="EN-US"><span class="NormalTextRun CommentHighlightRest SCXW95714165 BCX0" data-ccp-charstyle="Hyperlink">submit a support case</span></span>](https://docs.difr.com/books/dizzion-support/page/official-dizzion-support-guide)**<span class="TextRun SCXW95714165 BCX0" data-contrast="none" lang="EN-US" xml:lang="EN-US"><span class="NormalTextRun CommentHighlightRest SCXW95714165 BCX0"> describing where your SAML2 IdP Provider is registered (e.g., the Frame Customer or Organization entity), the </span></span>**<span class="TextRun SCXW95714165 BCX0" data-contrast="none" lang="EN-US" xml:lang="EN-US"><span class="NormalTextRun CommentHighlightRest SCXW95714165 BCX0">SAML2 Integration Name</span></span>**<span class="TextRun SCXW95714165 BCX0" data-contrast="none" lang="EN-US" xml:lang="EN-US"><span class="NormalTextRun CommentHighlightRest SCXW95714165 BCX0">, and the URL you wish Entra ID to redirect the users to after they are logged out of Entra ID.</span></span><span class="EOP CommentHighlightPipeRest SCXW95714165 BCX0" data-ccp-props="{"134233117":false,"134233118":false,"335559738":240,"335559739":240}"> </span>

</div><div class="OutlineElement Ltr SCXW95714165 BCX0">  
</div></div>### <span class="TextRun SCXW95714165 BCX0" data-contrast="none" lang="EN-US" xml:lang="EN-US"><span class="NormalTextRun SCXW95714165 BCX0" data-ccp-parastyle="heading 3">Configure Enterprise Application</span></span>[<span class="TextRun SCXW95714165 BCX0" data-contrast="none" lang="EN-US" xml:lang="EN-US"><span class="NormalTextRun SCXW95714165 BCX0" data-ccp-charstyle="Hyperlink"> </span></span>](https://docs.dizzion.com/platform/identity-and-access/idp-integrations/entra-id#configure-enterprise-application)<span class="EOP SCXW95714165 BCX0" data-ccp-props="{"134233117":false,"134233118":false,"134245418":true,"134245529":true,"335557856":16777215,"335559738":450,"335559739":300}"> </span>

<span class="TextRun SCXW95714165 BCX0" data-contrast="none" lang="EN-US" xml:lang="EN-US"><span class="NormalTextRun SCXW95714165 BCX0">To configure a Microsoft Entra ID Enterprise Application:</span></span><span class="EOP SCXW95714165 BCX0" data-ccp-props="{"134233117":false,"134233118":false,"335557856":16777215,"335559738":0,"335559739":300}"> </span>

<div class="SCXW95714165 BCX0" id="bkmrk-first%2C-go-to-your-az"><div class="ListContainerWrapper SCXW95714165 BCX0">1. <span class="TextRun SCXW95714165 BCX0" data-contrast="none" lang="EN-US" xml:lang="EN-US"><span class="NormalTextRun SCXW95714165 BCX0">First, go to </span><span class="NormalTextRun SCXW95714165 BCX0">your</span> </span>**[<span class="TextRun SCXW95714165 BCX0" data-contrast="none" lang="EN-US" xml:lang="EN-US"><span class="NormalTextRun SCXW95714165 BCX0" data-ccp-charstyle="Hyperlink">Azure portal</span></span>](https://portal.azure.com/)**<span class="TextRun SCXW95714165 BCX0" data-contrast="none" lang="EN-US" xml:lang="EN-US"><span class="NormalTextRun SCXW95714165 BCX0">**.** Search for "Enterprise Registrations" in the top search bar. Click </span><span class="NormalTextRun SCXW95714165 BCX0">on it</span><span class="NormalTextRun SCXW95714165 BCX0">,</span><span class="NormalTextRun SCXW95714165 BCX0"> in</span><span class="NormalTextRun SCXW95714165 BCX0"> the results list. You can also open </span></span>**<span class="TextRun SCXW95714165 BCX0" data-contrast="none" lang="EN-US" xml:lang="EN-US"><span class="NormalTextRun SCXW95714165 BCX0">Microsoft Entra ID</span></span>**<span class="TextRun SCXW95714165 BCX0" data-contrast="none" lang="EN-US" xml:lang="EN-US"><span class="NormalTextRun SCXW95714165 BCX0">, click</span><span class="NormalTextRun SCXW95714165 BCX0"> on </span></span>**<span class="TextRun SCXW95714165 BCX0" data-contrast="none" lang="EN-US" xml:lang="EN-US"><span class="NormalTextRun SCXW95714165 BCX0">+A</span><span class="NormalTextRun SCXW95714165 BCX0">dd</span></span>**<span class="TextRun SCXW95714165 BCX0" data-contrast="none" lang="EN-US" xml:lang="EN-US"><span class="NormalTextRun SCXW95714165 BCX0">, and select </span></span>**<span class="TextRun SCXW95714165 BCX0" data-contrast="none" lang="EN-US" xml:lang="EN-US"><span class="NormalTextRun SCXW95714165 BCX0">Enterprise Applications</span></span>**<span class="TextRun SCXW95714165 BCX0" data-contrast="none" lang="EN-US" xml:lang="EN-US"><span class="NormalTextRun SCXW95714165 BCX0">.</span></span><span class="EOP SCXW95714165 BCX0" data-ccp-props="{"134233117":false,"134233118":false,"335557856":16777215,"335559738":240,"335559739":240}"> </span>

</div><div class="OutlineElement Ltr SCXW95714165 BCX0">[![d31b8137-aa85-4ca9-946d-2da80ddf09cb.png](https://docs.difr.com/uploads/images/gallery/2025-10/scaled-1680-/d31b8137-aa85-4ca9-946d-2da80ddf09cb.png)](https://docs.difr.com/uploads/images/gallery/2025-10/d31b8137-aa85-4ca9-946d-2da80ddf09cb.png)</div></div><span class="EOP SCXW95714165 BCX0" data-ccp-props="{}"> </span>

<div class="SCXW95714165 BCX0" id="bkmrk-click-on-create-your"><div class="OutlineElement Ltr SCXW95714165 BCX0">  
</div><div class="ListContainerWrapper SCXW95714165 BCX0">2. <span class="TextRun SCXW95714165 BCX0" data-contrast="none" lang="EN-US" xml:lang="EN-US"><span class="NormalTextRun SCXW95714165 BCX0">Click on </span></span>**<span class="TextRun SCXW95714165 BCX0" data-contrast="none" lang="EN-US" xml:lang="EN-US"><span class="NormalTextRun SCXW95714165 BCX0">Create your own application</span></span>**<span class="TextRun SCXW95714165 BCX0" data-contrast="none" lang="EN-US" xml:lang="EN-US"><span class="NormalTextRun SCXW95714165 BCX0">**,** enter the name of your app (e.g., "</span><span class="NormalTextRun SpellingErrorV2Themed SCXW95714165 BCX0">Dizzion</span><span class="NormalTextRun SCXW95714165 BCX0"> Frame", for our demo we have chosen "</span><span class="NormalTextRun SCXW95714165 BCX0">DC-ENTRAID-DEV</span><span class="NormalTextRun SCXW95714165 BCX0">), select the option “Integrate any other application you don't find in the gallery (</span><span class="NormalTextRun SCXW95714165 BCX0">Non-gallery</span><span class="NormalTextRun SCXW95714165 BCX0">)” and click on </span></span>**<span class="TextRun SCXW95714165 BCX0" data-contrast="none" lang="EN-US" xml:lang="EN-US"><span class="NormalTextRun SCXW95714165 BCX0">Create</span></span>**<span class="TextRun SCXW95714165 BCX0" data-contrast="none" lang="EN-US" xml:lang="EN-US"><span class="NormalTextRun SCXW95714165 BCX0">.</span></span><span class="LineBreakBlob BlobObject DragDrop SCXW95714165 BCX0"><span class="SCXW95714165 BCX0">   
      
    </span> **We recommend to use the Application name also as Entity ID later on**  
    </span><span class="LineBreakBlob BlobObject DragDrop SCXW95714165 BCX0"><span class="SCXW95714165 BCX0"> </span>  
    </span><span class="EOP SCXW95714165 BCX0" data-ccp-props="{"134233117":false,"134233118":false,"335551550":1,"335551620":1,"335557856":16777215,"335559738":240,"335559739":300}"> [![f26d0407-a8c6-4662-974d-20064bd1396f.png](https://docs.difr.com/uploads/images/gallery/2025-10/scaled-1680-/f26d0407-a8c6-4662-974d-20064bd1396f.png)](https://docs.difr.com/uploads/images/gallery/2025-10/f26d0407-a8c6-4662-974d-20064bd1396f.png)</span>

</div></div><div class="SCXW95714165 BCX0" id="bkmrk-once-the-new-applica"><div class="ListContainerWrapper SCXW95714165 BCX0">3. <span class="TextRun SCXW95714165 BCX0" data-contrast="none" lang="EN-US" xml:lang="EN-US"><span class="NormalTextRun SCXW95714165 BCX0">Once the new application has been created, open the Properties configuration page.</span></span><span class="EOP SCXW95714165 BCX0" data-ccp-props="{"134233117":false,"134233118":false,"335551550":1,"335551620":1,"335557856":16777215,"335559738":240,"335559739":300}"> </span>

</div></div><span class="TextRun SCXW95714165 BCX0" data-contrast="none" lang="EN-US" xml:lang="EN-US"><span class="NormalTextRun SCXW95714165 BCX0">a. If you only want specific users or groups to be able to authenticate to this application, make sure that the </span></span><span class="TextRun SCXW95714165 BCX0" data-contrast="none" lang="EN-US" xml:lang="EN-US">**<span class="NormalTextRun SCXW95714165 BCX0">Assignment </span><span class="NormalTextRun SCXW95714165 BCX0">required</span>**<span class="NormalTextRun SCXW95714165 BCX0">?</span></span><span class="TextRun SCXW95714165 BCX0" data-contrast="none" lang="EN-US" xml:lang="EN-US"><span class="NormalTextRun SCXW95714165 BCX0"> slider is set to </span></span>**<span class="TextRun SCXW95714165 BCX0" data-contrast="none" lang="EN-US" xml:lang="EN-US"><span class="NormalTextRun SCXW95714165 BCX0">Yes</span></span>**<span class="TextRun SCXW95714165 BCX0" data-contrast="none" lang="EN-US" xml:lang="EN-US"><span class="NormalTextRun SCXW95714165 BCX0">. Click on </span></span>**<span class="TextRun SCXW95714165 BCX0" data-contrast="none" lang="EN-US" xml:lang="EN-US"><span class="NormalTextRun SCXW95714165 BCX0">Save</span></span>**<span class="TextRun SCXW95714165 BCX0" data-contrast="none" lang="EN-US" xml:lang="EN-US"><span class="NormalTextRun SCXW95714165 BCX0">. Then go to Users and groups, click </span></span>**<span class="TextRun SCXW95714165 BCX0" data-contrast="none" lang="EN-US" xml:lang="EN-US"><span class="NormalTextRun SCXW95714165 BCX0">Add user/group</span></span>**<span class="TextRun SCXW95714165 BCX0" data-contrast="none" lang="EN-US" xml:lang="EN-US"><span class="NormalTextRun SCXW95714165 BCX0"> and select desired users/groups who will be able to access Frame.</span></span><span class="EOP SCXW95714165 BCX0" data-ccp-props="{"134233117":false,"134233118":false,"335551550":1,"335551620":1,"335557856":16777215,"335559685":720,"335559738":240,"335559739":300}"> </span>

<span class="LineBreakBlob BlobObject DragDrop SCXW95714165 BCX0"><span class="SCXW95714165 BCX0"> [![0e17fdb3-0ab9-4468-b45d-b99d98142018.png](https://docs.difr.com/uploads/images/gallery/2025-10/scaled-1680-/0e17fdb3-0ab9-4468-b45d-b99d98142018.png)](https://docs.difr.com/uploads/images/gallery/2025-10/0e17fdb3-0ab9-4468-b45d-b99d98142018.png)</span>  
</span><span class="EOP SCXW95714165 BCX0" data-ccp-props="{"134233117":false,"134233118":false,"335551550":1,"335551620":1,"335557856":16777215,"335559685":720,"335559738":240,"335559739":300}"> </span>

<span class="TextRun SCXW95714165 BCX0" data-contrast="none" lang="EN-US" xml:lang="EN-US"><span class="NormalTextRun SCXW95714165 BCX0">b.</span><span class="NormalTextRun SCXW95714165 BCX0"> C</span><span class="NormalTextRun SCXW95714165 BCX0">lick</span><span class="NormalTextRun SCXW95714165 BCX0"> on “**application registration**" to set the **homepage URL**</span><span class="NormalTextRun SCXW95714165 BCX0"> and click save</span></span><span class="LineBreakBlob BlobObject DragDrop SCXW95714165 BCX0"><span class="SCXW95714165 BCX0">   
**Homepage URL:** When users navigate to Frame from their Azure Portal, this URL is where the users will initially land. This URL could point to a Launchpad but if you have admins using this same app registration, you may want to direct all users to the Customer or Organization URL and let Frame redirect the user based on their SAML2 Permissions</span>  
</span><span class="TextRun SCXW95714165 BCX0" data-contrast="none" lang="EN-US" xml:lang="EN-US"><span class="NormalTextRun SCXW95714165 BCX0">(optional upload a logo </span><span class="NormalTextRun SpellingErrorV2Themed SCXW95714165 BCX0">png</span><span class="NormalTextRun SCXW95714165 BCX0"> )</span></span><span class="EOP SCXW95714165 BCX0" data-ccp-props="{"134233117":false,"134233118":false,"335559738":240,"335559739":240}"> </span>

<span class="LineBreakBlob BlobObject DragDrop SCXW95714165 BCX0"><span class="SCXW95714165 BCX0"> [![7c15dcdb-c7b0-4671-840a-9e8fa6a4d5b6.png](https://docs.difr.com/uploads/images/gallery/2025-10/scaled-1680-/7c15dcdb-c7b0-4671-840a-9e8fa6a4d5b6.png)](https://docs.difr.com/uploads/images/gallery/2025-10/7c15dcdb-c7b0-4671-840a-9e8fa6a4d5b6.png)</span>  
</span><span class="EOP SCXW95714165 BCX0" data-ccp-props="{"134233117":false,"134233118":false,"335559738":240,"335559739":240}"> </span><span class="LineBreakBlob BlobObject DragDrop SCXW95714165 BCX0"><span class="SCXW95714165 BCX0"> </span>  
</span><span class="TextRun SCXW95714165 BCX0" data-contrast="none" lang="EN-US" xml:lang="EN-US"><span class="NormalTextRun SCXW95714165 BCX0">c. If you want anyone from your **Entra ID** tenant to be able to authenticate to this application, make sure that the </span></span><span class="TextRun SCXW95714165 BCX0" data-contrast="none" lang="EN-US" xml:lang="EN-US"><span class="NormalTextRun SCXW95714165 BCX0">Assignment </span><span class="NormalTextRun ContextualSpellingAndGrammarErrorV2Themed SCXW95714165 BCX0">required</span><span class="NormalTextRun SCXW95714165 BCX0">?</span></span><span class="TextRun SCXW95714165 BCX0" data-contrast="none" lang="EN-US" xml:lang="EN-US"><span class="NormalTextRun SCXW95714165 BCX0"> slider is set to </span></span><span class="TextRun SCXW95714165 BCX0" data-contrast="none" lang="EN-US" xml:lang="EN-US"><span class="NormalTextRun SCXW95714165 BCX0">No</span></span><span class="TextRun SCXW95714165 BCX0" data-contrast="none" lang="EN-US" xml:lang="EN-US"><span class="NormalTextRun SCXW95714165 BCX0">. Click on </span></span><span class="TextRun SCXW95714165 BCX0" data-contrast="none" lang="EN-US" xml:lang="EN-US"><span class="NormalTextRun SCXW95714165 BCX0">Save</span></span><span class="TextRun SCXW95714165 BCX0" data-contrast="none" lang="EN-US" xml:lang="EN-US"><span class="NormalTextRun SCXW95714165 BCX0">.</span></span><span class="EOP SCXW95714165 BCX0" data-ccp-props="{}"> </span>

<span class="EOP SCXW95714165 BCX0" data-ccp-props="{}"> </span>

<div class="SCXW95714165 BCX0" id="bkmrk-switch-to-single-sig"><div class="OutlineElement Ltr SCXW95714165 BCX0">  
</div><div class="ListContainerWrapper SCXW95714165 BCX0">4. <span class="TextRun SCXW95714165 BCX0" data-contrast="none" lang="EN-US" xml:lang="EN-US"><span class="NormalTextRun SCXW95714165 BCX0">Switch to </span><span class="NormalTextRun SCXW95714165 BCX0">**Single sign-on** and select </span>**<span class="NormalTextRun SCXW95714165 BCX0">SAML</span>** <span class="NormalTextRun SCXW95714165 BCX0">as config </span><span class="NormalTextRun SCXW95714165 BCX0">option</span></span><span class="EOP SCXW95714165 BCX0" data-ccp-props="{}"> </span>

</div><div class="OutlineElement Ltr SCXW95714165 BCX0">[![1c3e2a43-7ec4-4533-9181-3786f701bb52.png](https://docs.difr.com/uploads/images/gallery/2025-10/scaled-1680-/1c3e2a43-7ec4-4533-9181-3786f701bb52.png)](https://docs.difr.com/uploads/images/gallery/2025-10/1c3e2a43-7ec4-4533-9181-3786f701bb52.png)</div></div><span class="EOP SCXW95714165 BCX0" data-ccp-props="{"335559685":720}"> </span>

<span class="EOP SCXW95714165 BCX0" data-ccp-props="{"335559685":720}"> </span>

<div class="SCXW95714165 BCX0" id="bkmrk-for-basic-saml-confi"><div class="OutlineElement Ltr SCXW95714165 BCX0">  
</div><div class="ListContainerWrapper SCXW95714165 BCX0">5. <span class="TextRun SCXW95714165 BCX0" data-contrast="auto" lang="EN-US" xml:lang="EN-US"><span class="NormalTextRun CommentStart SCXW95714165 BCX0">For **Basic SAML** configuration, click edit and set the identifier (Entity ID) and the </span>**<span class="NormalTextRun ContextualSpellingAndGrammarErrorV2Themed SCXW95714165 BCX0">reply</span><span class="NormalTextRun SCXW95714165 BCX0"> URL</span>**<span class="NormalTextRun SCXW95714165 BCX0">**,** For the **Entity ID** use the Integration Name that has been set for the **Enterprise Application**</span></span>**<span class="EOP SCXW95714165 BCX0" data-ccp-props="{}"> </span>**

</div></div>[![Screenshot 2026-04-23 at 13.29.04.png](https://docs.difr.com/uploads/images/gallery/2026-05/scaled-1680-/screenshot-2026-04-23-at-13-29-04.png)](https://docs.difr.com/uploads/images/gallery/2026-05/screenshot-2026-04-23-at-13-29-04.png)

<span class="EOP SCXW95714165 BCX0" data-ccp-props="{}"> </span>

<div class="SCXW95714165 BCX0" id="bkmrk-move-to-attribute-%26-"><div class="ListContainerWrapper SCXW95714165 BCX0">6. <span class="TextRun SCXW95714165 BCX0" data-contrast="auto" lang="EN-US" xml:lang="EN-US"><span class="NormalTextRun SCXW95714165 BCX0">Move to **Attribute &amp; Claims**, go to </span><span class="NormalTextRun SCXW95714165 BCX0">edit</span><span class="NormalTextRun SCXW95714165 BCX0"> and create a new group claim</span></span><span class="LineBreakBlob BlobObject DragDrop SCXW95714165 BCX0"><span class="SCXW95714165 BCX0"> </span>  
    </span><span class="LineBreakBlob BlobObject DragDrop SCXW95714165 BCX0"><span class="SCXW95714165 BCX0"> </span>  
    </span><span class="EOP SCXW95714165 BCX0" data-ccp-props="{}"> [![d51fbea1-6f25-4065-914d-b62fc25c7942.png](https://docs.difr.com/uploads/images/gallery/2025-10/scaled-1680-/d51fbea1-6f25-4065-914d-b62fc25c7942.png)](https://docs.difr.com/uploads/images/gallery/2025-10/d51fbea1-6f25-4065-914d-b62fc25c7942.png)</span>

</div><div class="OutlineElement Ltr SCXW95714165 BCX0">  
</div></div><span class="TextRun SCXW95714165 BCX0" data-contrast="auto" lang="EN-US" xml:lang="EN-US"><span class="NormalTextRun CommentStart SCXW95714165 BCX0">Select **security group** and save.</span></span><span class="LineBreakBlob BlobObject DragDrop SCXW95714165 BCX0"><span class="SCXW95714165 BCX0"> </span>  
</span><span class="TextRun SCXW95714165 BCX0" data-contrast="auto" lang="EN-US" xml:lang="EN-US"><span class="NormalTextRun SCXW95714165 BCX0">Optional if users are </span><span class="NormalTextRun ContextualSpellingAndGrammarErrorV2Themed SCXW95714165 BCX0">member</span><span class="NormalTextRun SCXW95714165 BCX0"> of more </span><span class="NormalTextRun ContextualSpellingAndGrammarErrorV2Themed SCXW95714165 BCX0">then</span><span class="NormalTextRun SCXW95714165 BCX0"> **150 groups** you can filter for specific groups which will then be sent in the group claims.</span></span><span class="EOP SCXW95714165 BCX0" data-ccp-props="{}"> </span>

<span class="EOP SCXW95714165 BCX0" data-ccp-props="{}"> </span>

> <span class="TextRun SCXW95714165 BCX0" data-contrast="none" lang="EN-US" xml:lang="EN-US"><span class="NormalTextRun SCXW95714165 BCX0">**NOTE:**  
> If a user is a member of Group B, and Group B is a member of Group A, then the group claims for the user will </span><span class="NormalTextRun SCXW95714165 BCX0">contain</span><span class="NormalTextRun SCXW95714165 BCX0"> both Group A and Group B. When an organization's users have large numbers of group memberships, the number of groups listed in the token can grow the token size. Entra ID limits the number of groups that it will include in a token up to a maximum of 150 for SAML assertions and 200 for a JWT. If a user has more than 150 groups, the groups are omitted in the SAML assertion. A link to the Microsoft Graph endpoint to obtain group information is included instead. Further details are at Microsoft's </span></span>**[<span class="TextRun Underlined SCXW95714165 BCX0" data-contrast="none" lang="EN-US" xml:lang="EN-US"><span class="NormalTextRun SCXW95714165 BCX0" data-ccp-charstyle="Hyperlink">Entra ID documentation</span></span>](https://learn.microsoft.com/en-us/azure/active-directory/hybrid/how-to-connect-fed-group-claims)<span class="TextRun SCXW95714165 BCX0" data-contrast="none" lang="EN-US" xml:lang="EN-US"><span class="NormalTextRun SCXW95714165 BCX0">.</span></span><span class="EOP SCXW95714165 BCX0" data-ccp-props="{"134233117":false,"134233118":false,"335559738":0,"335559739":0}"> </span>**

<span class="EOP SCXW95714165 BCX0" data-ccp-props="{}"> </span>

<span class="TextRun SCXW95714165 BCX0" data-contrast="auto" lang="EN-US" xml:lang="EN-US"><span class="NormalTextRun SCXW95714165 BCX0">**Recommendation**: Create a unique group for all users which should have access to Frame via **ENTRA ID** and set the filter </span><span class="NormalTextRun SCXW95714165 BCX0">within </span><span class="NormalTextRun SCXW95714165 BCX0">the group claim to point at this group </span><span class="NormalTextRun SCXW95714165 BCX0">to</span><span class="NormalTextRun SCXW95714165 BCX0"> prevent any issues with group membership values.</span></span><span class="EOP SCXW95714165 BCX0" data-ccp-props="{}"> </span>

<span class="EOP SCXW95714165 BCX0" data-ccp-props="{}"> [![2025-10-15 15_59_08-Friends - Discord.png](https://docs.difr.com/uploads/images/gallery/2025-10/scaled-1680-/2025-10-15-15-59-08-friends-discord.png)](https://docs.difr.com/uploads/images/gallery/2025-10/2025-10-15-15-59-08-friends-discord.png)</span>

<span class="EOP SCXW95714165 BCX0" data-ccp-props="{}"> </span>

<div class="SCXW95714165 BCX0" id="bkmrk-go-back-to-the-singl"><div class="OutlineElement Ltr SCXW95714165 BCX0">  
</div><div class="ListContainerWrapper SCXW95714165 BCX0">7. <span class="TextRun SCXW95714165 BCX0" data-contrast="auto" lang="EN-US" xml:lang="EN-US"><span class="NormalTextRun SCXW95714165 BCX0">Go back to the **Single sig**</span><span class="NormalTextRun ContextualSpellingAndGrammarErrorV2Themed SCXW95714165 BCX0">**n-on** o</span><span class="NormalTextRun SCXW95714165 BCX0">verview and copy the **Entity ID** and the metadata </span><span class="NormalTextRun SCXW95714165 BCX0">URL</span></span><span class="EOP SCXW95714165 BCX0" data-ccp-props="{}"> </span>

</div><div class="OutlineElement Ltr SCXW95714165 BCX0">[![85c9b62b-274d-460e-9adf-7e4a3055fe1d.png](https://docs.difr.com/uploads/images/gallery/2025-10/scaled-1680-/85c9b62b-274d-460e-9adf-7e4a3055fe1d.png)](https://docs.difr.com/uploads/images/gallery/2025-10/85c9b62b-274d-460e-9adf-7e4a3055fe1d.png)</div></div><span class="EOP SCXW95714165 BCX0" data-ccp-props="{}"> </span>

<span class="EOP SCXW95714165 BCX0" data-ccp-props="{}"> </span>

### <span class="TextRun SCXW95714165 BCX0" data-contrast="none" lang="EN-US" xml:lang="EN-US"><span class="NormalTextRun SCXW95714165 BCX0" data-ccp-parastyle="heading 2">Configure the SAML2 Authentication Integration Provider in Frame</span></span>[<span class="TextRun SCXW95714165 BCX0" data-contrast="none" lang="EN-US" xml:lang="EN-US"><span class="NormalTextRun SCXW95714165 BCX0" data-ccp-charstyle="Hyperlink"> </span></span>](https://docs.dizzion.com/platform/identity-and-access/idp-integrations/entra-id#create-the-saml2-authentication-integration-provider-in-frame)<span class="EOP SCXW95714165 BCX0" data-ccp-props="{"134233117":false,"134233118":false,"134245418":true,"134245529":true,"335559738":600,"335559739":300}"> </span>

<div class="SCXW95714165 BCX0" id="bkmrk-open-up-a-new-tab-an"><div class="OutlineElement Ltr SCXW95714165 BCX0">  
</div><div class="ListContainerWrapper SCXW95714165 BCX0">1. Navigate back to the Frame console which from the [Getting started section](https://docs.difr.com/link/88#bkmrk-getting-started) and continue with the SAML2 provider configuration by clicking on the menu and select update

</div></div><span class="LineBreakBlob BlobObject DragDrop SCXW95714165 BCX0"><span class="SCXW95714165 BCX0"> </span></span>

[![image.png](https://docs.difr.com/uploads/images/gallery/2025-11/scaled-1680-/lAaimage.png)](https://docs.difr.com/uploads/images/gallery/2025-11/lAaimage.png)

<span class="LineBreakBlob BlobObject DragDrop SCXW95714165 BCX0">  
</span><span class="EOP SCXW95714165 BCX0" data-ccp-props="{}"> </span>

[![image.png](https://docs.difr.com/uploads/images/gallery/2025-11/scaled-1680-/Rrdimage.png)](https://docs.difr.com/uploads/images/gallery/2025-11/Rrdimage.png)

<div class="SCXW95714165 BCX0" id="bkmrk-application-id%3A-the-"><div class="ListContainerWrapper SCXW95714165 BCX0">- **Application ID**: The value here **needs to match** the value set as the "Entity ID" from Step 5.
- **Auth provider metadata**: Click the “XML” option and paste the contents of the Metadata XML file from Step 4.
- **Custom Label**:. Allows Admins to customize Frame's Sign in page chiclets/buttons associated with this SAML2 integration.
- **Authentication token expiration**: Choose a token expiration duration that supports your end-user workflows and complies with your security policies.
- **Enable “Signed assertion”**
- **<span class="TextRun SCXW207479778 BCX0" data-contrast="auto" lang="EN-US" xml:lang="EN-US"><span class="NormalTextRun SCXW207479778 BCX0">Assertion Consumer Service (ACS) URL</span><span class="NormalTextRun ContextualSpellingAndGrammarErrorV2Themed SCXW207479778 BCX0">:</span></span>**<span class="TextRun SCXW207479778 BCX0" data-contrast="auto" lang="EN-US" xml:lang="EN-US"><span class="NormalTextRun ContextualSpellingAndGrammarErrorV2Themed SCXW207479778 BCX0">  The</span><span class="NormalTextRun SCXW207479778 BCX0"> endpoint where the Identity Provider (IdP) delivers SAML authentication responses after a successful login.</span></span><span class="EOP SCXW207479778 BCX0" data-ccp-props="{"134233117":false,"134233118":false,"335559738":240,"335559739":240}"> </span>
- **<span class="TextRun SCXW207479778 BCX0" data-contrast="auto" lang="EN-US" xml:lang="EN-US"><span class="NormalTextRun SCXW207479778 BCX0">Metadata URL</span><span class="NormalTextRun ContextualSpellingAndGrammarErrorV2Themed SCXW207479778 BCX0">:</span></span>**<span class="TextRun SCXW207479778 BCX0" data-contrast="auto" lang="EN-US" xml:lang="EN-US"><span class="NormalTextRun ContextualSpellingAndGrammarErrorV2Themed SCXW207479778 BCX0">  A</span><span class="NormalTextRun SCXW207479778 BCX0"> publicly accessible URL providing your Service Provider's SAML metadata, used by Identity Providers to configure and </span><span class="NormalTextRun SCXW207479778 BCX0">establish</span><span class="NormalTextRun SCXW207479778 BCX0"> trust.  
      
    </span></span>**<span class="EOP SCXW207479778 BCX0" data-ccp-props="{"134233117":false,"134233118":false,"335559738":240,"335559739":240}">Optional</span>**
- <span class="NormalTextRun SCXW15592334 BCX0">Frame Login URL</span><span class="NormalTextRun SCXW15592334 BCX0">: </span><span class="NormalTextRun ContextualSpellingAndGrammarErrorV2Themed SCXW15592334 BCX0">user</span><span class="NormalTextRun SCXW15592334 BCX0"> is directed to this URL when the user wants to log back into Frame after being logged out due to inactivity.  
    </span>
- <span class="NormalTextRun SCXW15592334 BCX0"><span class="TextRun SCXW99947813 BCX0" data-contrast="none" lang="EN-US" xml:lang="EN-US"><span class="NormalTextRun SCXW99947813 BCX0">Frame Logout URL</span><span class="NormalTextRun SCXW99947813 BCX0">: </span><span class="NormalTextRun ContextualSpellingAndGrammarErrorV2Themed SCXW99947813 BCX0">user</span><span class="NormalTextRun SCXW99947813 BCX0"> is directed to this URL when the user logs out of the Launchpad or if they decide to leave Frame after being logged out due to inactivity.</span></span><span class="EOP SCXW99947813 BCX0" data-ccp-props="{"134233117":false,"134233118":false,"335551550":0,"335551620":0,"335557856":16777215,"335559738":0,"335559739":0}"> </span></span>

</div></div>Lastly, confirm that everything is entered correctly and click **Add**.

<span class="TextRun SCXW95714165 BCX0" data-contrast="none" lang="EN-US" xml:lang="EN-US"><span class="NormalTextRun SCXW95714165 BCX0">After filling out the required fields, click </span></span><span class="TextRun SCXW95714165 BCX0" data-contrast="none" lang="EN-US" xml:lang="EN-US"><span class="NormalTextRun SCXW95714165 BCX0">Add</span></span><span class="TextRun SCXW95714165 BCX0" data-contrast="none" lang="EN-US" xml:lang="EN-US"><span class="NormalTextRun SCXW95714165 BCX0">. Next, </span><span class="NormalTextRun SCXW95714165 BCX0">it's</span><span class="NormalTextRun SCXW95714165 BCX0"> time to set up **permissions** for our users based on their email address or passed group claims if you configured groups in your **Entra ID App Registration.**</span></span><span class="EOP SCXW95714165 BCX0" data-ccp-props="{"134233117":false,"134233118":false,"335551550":1,"335551620":1,"335557856":16777215,"335559738":240,"335559739":300}"> </span>

<span class="EOP SCXW95714165 BCX0" data-ccp-props="{"134233117":false,"134233118":false,"335551550":1,"335551620":1,"335557856":16777215,"335559738":240,"335559739":300}"> </span>

### <span class="TextRun SCXW95714165 BCX0" data-contrast="none" lang="EN-US" xml:lang="EN-US"><span class="NormalTextRun SCXW95714165 BCX0" data-ccp-parastyle="heading 3">Configuring SAML2 Permissions</span></span>[<span class="TextRun SCXW95714165 BCX0" data-contrast="none" lang="EN-US" xml:lang="EN-US"><span class="NormalTextRun SCXW95714165 BCX0" data-ccp-charstyle="Hyperlink"> </span></span>](https://docs.dizzion.com/platform/identity-and-access/idp-integrations/entra-id#configuring-saml2-permissions)<span class="EOP SCXW95714165 BCX0" data-ccp-props="{"134233117":false,"134233118":false,"134245418":true,"134245529":true,"335551550":1,"335551620":1,"335557856":16777215,"335559738":450,"335559739":300}"> </span>

<span class="TextRun SCXW95714165 BCX0" data-contrast="none" lang="EN-US" xml:lang="EN-US"><span class="NormalTextRun SCXW95714165 BCX0">Once the **SAML2 Provider** is successfully configured in the Frame Console, administrators will need to add **authorization** rules from the </span></span>**<span class="TextRun SCXW95714165 BCX0" data-contrast="none" lang="EN-US" xml:lang="EN-US"><span class="NormalTextRun SCXW95714165 BCX0">SAML2 Permissions</span></span>**<span class="TextRun SCXW95714165 BCX0" data-contrast="none" lang="EN-US" xml:lang="EN-US"><span class="NormalTextRun SCXW95714165 BCX0"> tab listed to the right of the </span></span><span class="TextRun SCXW95714165 BCX0" data-contrast="none" lang="EN-US" xml:lang="EN-US"><span class="NormalTextRun SCXW95714165 BCX0">SAML2 Provider</span></span><span class="TextRun SCXW95714165 BCX0" data-contrast="none" lang="EN-US" xml:lang="EN-US"><span class="NormalTextRun SCXW95714165 BCX0"> tab.</span></span><span class="EOP SCXW95714165 BCX0" data-ccp-props="{"134233117":false,"134233118":false,"335551550":1,"335551620":1,"335557856":16777215,"335559738":0,"335559739":300}"> </span>

<span class="LineBreakBlob BlobObject DragDrop SCXW95714165 BCX0"><span class="SCXW95714165 BCX0"> [![780a1a58-2386-40fb-aa7b-9514c753b084.png](https://docs.difr.com/uploads/images/gallery/2025-10/scaled-1680-/780a1a58-2386-40fb-aa7b-9514c753b084.png)](https://docs.difr.com/uploads/images/gallery/2025-10/780a1a58-2386-40fb-aa7b-9514c753b084.png)</span>  
</span><span class="TextRun SCXW95714165 BCX0" data-contrast="none" lang="EN-US" xml:lang="EN-US"><span class="NormalTextRun SCXW95714165 BCX0">Add **roles/permissions** for your users by following our </span></span>**[<span class="TextRun SCXW95714165 BCX0" data-contrast="none" lang="EN-US" xml:lang="EN-US"><span class="NormalTextRun SCXW95714165 BCX0" data-ccp-charstyle="Hyperlink">Roles</span></span>](https://docs.difr.com/link/81#bkmrk-user-permissions-wit)**<span class="TextRun SCXW95714165 BCX0" data-contrast="none" lang="EN-US" xml:lang="EN-US"><span class="NormalTextRun SCXW95714165 BCX0"> and </span></span>**[<span class="TextRun SCXW95714165 BCX0" data-contrast="none" lang="EN-US" xml:lang="EN-US"><span class="NormalTextRun SCXW95714165 BCX0" data-ccp-charstyle="Hyperlink">User Permissions with a SAML2 IdP</span></span>](https://docs.difr.com/link/81#bkmrk-user-permissions-wit)**<span class="TextRun SCXW95714165 BCX0" data-contrast="none" lang="EN-US" xml:lang="EN-US"><span class="NormalTextRun SCXW95714165 BCX0"> guides.</span></span><span class="EOP SCXW95714165 BCX0" data-ccp-props="{"134233117":false,"134233118":false,"335551550":1,"335551620":1,"335557856":16777215,"335559738":0,"335559739":300}"> </span>

<span class="TextRun SCXW95714165 BCX0" data-contrast="none" lang="EN-US" xml:lang="EN-US"><span class="NormalTextRun SCXW95714165 BCX0">Once </span><span class="NormalTextRun SCXW95714165 BCX0">you've</span><span class="NormalTextRun SCXW95714165 BCX0"> configured permissions for your users, </span><span class="NormalTextRun SCXW95714165 BCX0">that's</span><span class="NormalTextRun SCXW95714165 BCX0"> it! </span><span class="NormalTextRun SCXW95714165 BCX0">You're</span><span class="NormalTextRun SCXW95714165 BCX0"> ready to test signing into Frame at your </span></span>**[<span class="TextRun SCXW95714165 BCX0" data-contrast="none" lang="EN-US" xml:lang="EN-US"><span class="NormalTextRun SCXW95714165 BCX0" data-ccp-charstyle="Hyperlink">Entity URLs</span></span>](https://docs.difr.com/books/platform-administrators-guide/page/authentication#bkmrk-entity-endpoint-urls)**<span class="TextRun SCXW95714165 BCX0" data-contrast="none" lang="EN-US" xml:lang="EN-US"><span class="NormalTextRun SCXW95714165 BCX0"> (Launchpad, Account Dashboard, </span><span class="NormalTextRun ContextualSpellingAndGrammarErrorV2Themed SCXW95714165 BCX0">etc.)!</span></span><span class="EOP SCXW95714165 BCX0" data-ccp-props="{"134233117":false,"134233118":false,"335551550":1,"335551620":1,"335557856":16777215,"335559738":0,"335559739":300}"> </span>

### <span class="TextRun SCXW95714165 BCX0" data-contrast="none" lang="EN-US" xml:lang="EN-US"><span class="NormalTextRun SCXW95714165 BCX0" data-ccp-parastyle="heading 3">Configuring SAML2 Group Permissions</span></span>[<span class="TextRun SCXW95714165 BCX0" data-contrast="none" lang="EN-US" xml:lang="EN-US"><span class="NormalTextRun SCXW95714165 BCX0" data-ccp-charstyle="Hyperlink"> </span></span>](https://docs.dizzion.com/platform/identity-and-access/idp-integrations/entra-id#configuring-saml2-group-permissions)<span class="EOP SCXW95714165 BCX0" data-ccp-props="{"134233117":false,"134233118":false,"134245418":true,"134245529":true,"335551550":1,"335551620":1,"335557856":16777215,"335559738":450,"335559739":300}"> </span>

<div class="SCXW95714165 BCX0" id="bkmrk-next%2C-get-the-object"><div class="OutlineElement Ltr SCXW95714165 BCX0">  
</div><div class="ListContainerWrapper SCXW95714165 BCX0">1. <span class="TextRun SCXW95714165 BCX0" data-contrast="none" lang="EN-US" xml:lang="EN-US"><span class="NormalTextRun SCXW95714165 BCX0">Next, get the </span></span>**<span class="TextRun SCXW95714165 BCX0" data-contrast="none" lang="EN-US" xml:lang="EN-US"><span class="NormalTextRun SCXW95714165 BCX0">Object ID</span></span>**<span class="TextRun SCXW95714165 BCX0" data-contrast="none" lang="EN-US" xml:lang="EN-US"><span class="NormalTextRun SCXW95714165 BCX0"> of the group or groups you would like to use for assigning user permissions. You can obtain this from the Groups console in **Azure Active Directory**. Find the group you would like to use, click on it, and copy the **Object ID** as shown below:</span></span><span class="EOP SCXW95714165 BCX0" data-ccp-props="{"134233117":false,"134233118":false,"335551550":1,"335551620":1,"335557856":16777215,"335559738":240,"335559739":240}"> </span>

</div><div class="OutlineElement Ltr SCXW95714165 BCX0">  
</div></div><span class="EOP SCXW95714165 BCX0" data-ccp-props="{"134233117":false,"134233118":false,"335551550":1,"335551620":1,"335557856":16777215,"335559738":240,"335559739":300}"> [![3aa9d9c4-2a47-486e-9659-eab55edd7d27.png](https://docs.difr.com/uploads/images/gallery/2025-10/scaled-1680-/3aa9d9c4-2a47-486e-9659-eab55edd7d27.png)](https://docs.difr.com/uploads/images/gallery/2025-10/3aa9d9c4-2a47-486e-9659-eab55edd7d27.png)</span>

<div class="SCXW95714165 BCX0" id="bkmrk-from-here%2C-navigate-"><div class="OutlineElement Ltr SCXW95714165 BCX0">  
</div><div class="ListContainerWrapper SCXW95714165 BCX0">2. <span class="TextRun SCXW95714165 BCX0" data-contrast="none" lang="EN-US" xml:lang="EN-US"><span class="NormalTextRun SCXW95714165 BCX0">From here, navigate to the Users &gt; **SAML2 Permissions** section of your Frame Console, either through the account Dashboard or by clicking on the ellipsis next to the entity </span><span class="NormalTextRun SCXW95714165 BCX0">you're</span><span class="NormalTextRun SCXW95714165 BCX0"> configuring and selecting “**Users**.” Click </span></span><span class="TextRun SCXW95714165 BCX0" data-contrast="none" lang="EN-US" xml:lang="EN-US"><span class="NormalTextRun SCXW95714165 BCX0">Add Permission</span></span><span class="TextRun SCXW95714165 BCX0" data-contrast="none" lang="EN-US" xml:lang="EN-US"><span class="NormalTextRun SCXW95714165 BCX0"> at the </span><span class="NormalTextRun ContextualSpellingAndGrammarErrorV2Themed SCXW95714165 BCX0">top-right</span><span class="NormalTextRun SCXW95714165 BCX0">.</span></span><span class="LineBreakBlob BlobObject DragDrop SCXW95714165 BCX0"><span class="SCXW95714165 BCX0"> </span>  
    </span><span class="LineBreakBlob BlobObject DragDrop SCXW95714165 BCX0"><span class="SCXW95714165 BCX0"> </span></span><span class="EOP SCXW95714165 BCX0" data-ccp-props="{"134233117":false,"134233118":false,"335551550":1,"335551620":1,"335557856":16777215,"335559738":240,"335559739":300}"> </span>

</div><div class="ListContainerWrapper SCXW95714165 BCX0">3. <span class="TextRun SCXW95714165 BCX0" data-contrast="none" lang="EN-US" xml:lang="EN-US"><span class="NormalTextRun SCXW95714165 BCX0">Select your **Entra ID** integration from the drop-down menu under </span></span><span class="TextRun SCXW95714165 BCX0" data-contrast="none" lang="EN-US" xml:lang="EN-US"><span class="NormalTextRun ContextualSpellingAndGrammarErrorV2Themed SCXW95714165 BCX0">For</span> <span class="NormalTextRun ContextualSpellingAndGrammarErrorV2Themed SCXW95714165 BCX0">provider</span></span><span class="TextRun SCXW95714165 BCX0" data-contrast="none" lang="EN-US" xml:lang="EN-US"><span class="NormalTextRun SCXW95714165 BCX0">. Next, choose how </span><span class="NormalTextRun SCXW95714165 BCX0">you'd</span><span class="NormalTextRun SCXW95714165 BCX0"> like to allow access under the </span></span><span class="TextRun SCXW95714165 BCX0" data-contrast="none" lang="EN-US" xml:lang="EN-US"><span class="NormalTextRun SCXW95714165 BCX0">Allow access</span></span><span class="TextRun SCXW95714165 BCX0" data-contrast="none" lang="EN-US" xml:lang="EN-US"><span class="NormalTextRun SCXW95714165 BCX0"> section. If </span><span class="NormalTextRun SCXW95714165 BCX0">you're</span><span class="NormalTextRun SCXW95714165 BCX0"> doing some simple testing, “**Always**” is great. For more granular controls, you can apply roles when **ALL** or **ANY** conditions are matched. For simplicity, we </span><span class="NormalTextRun ContextualSpellingAndGrammarErrorV2Themed SCXW95714165 BCX0">chose</span><span class="NormalTextRun SCXW95714165 BCX0"> Click </span></span><span class="TextRun SCXW95714165 BCX0" data-contrast="none" lang="EN-US" xml:lang="EN-US"><span class="NormalTextRun SCXW95714165 BCX0">When any condition is satisfied</span></span><span class="TextRun SCXW95714165 BCX0" data-contrast="none" lang="EN-US" xml:lang="EN-US"><span class="NormalTextRun SCXW95714165 BCX0">. Under the </span></span><span class="TextRun SCXW95714165 BCX0" data-contrast="none" lang="EN-US" xml:lang="EN-US"><span class="NormalTextRun SCXW95714165 BCX0">Conditions</span></span><span class="TextRun SCXW95714165 BCX0" data-contrast="none" lang="EN-US" xml:lang="EN-US"><span class="NormalTextRun SCXW95714165 BCX0"> section, enter the URL to Microsoft's claims translation schema as the attribute type:</span></span><span class="LineBreakBlob BlobObject DragDrop SCXW95714165 BCX0"><span class="SCXW95714165 BCX0"> </span>  
    </span><span class="EOP SCXW95714165 BCX0" data-ccp-props="{"134233117":false,"134233118":false,"335551550":1,"335551620":1,"335557856":16777215,"335559738":240,"335559739":300}">   
    [![1bb84366-2480-4012-bd3f-309c15961829.png](https://docs.difr.com/uploads/images/gallery/2025-10/scaled-1680-/1bb84366-2480-4012-bd3f-309c15961829.png)](https://docs.difr.com/uploads/images/gallery/2025-10/1bb84366-2480-4012-bd3f-309c15961829.png)  
    </span>

</div></div><p class="callout info">**<span class="TextRun SCXW95714165 BCX0" data-contrast="auto" lang="EN-US" xml:lang="EN-US"><span class="NormalTextRun SCXW95714165 BCX0"> http://schemas.microsoft.com/ws/2008/06/identity/claims/groups</span></span><span class="EOP SCXW95714165 BCX0" data-ccp-props="{"134233117":false,"134233118":false,"335551550":1,"335551620":1,"335557856":16777215,"335559685":720,"335559738":240,"335559739":300}"> </span>**</p>

<span class="EOP SCXW95714165 BCX0" data-ccp-props="{"134233117":false,"134233118":false,"335551550":1,"335551620":1,"335557856":16777215,"335559685":720,"335559738":240,"335559739":300}"> </span>

<div class="SCXW95714165 BCX0" id="bkmrk-grant-whichever-role"><div class="OutlineElement Ltr SCXW95714165 BCX0">  
</div><div class="ListContainerWrapper SCXW95714165 BCX0">4. <span class="TextRun SCXW95714165 BCX0" data-contrast="none" lang="EN-US" xml:lang="EN-US"><span class="NormalTextRun SCXW95714165 BCX0">Grant</span><span class="NormalTextRun ContextualSpellingAndGrammarErrorV2Themed SCXW95714165 BCX0"> whichev</span><span class="NormalTextRun SCXW95714165 BCX0">er role you would like the specified group to have. For us, we assigned a simple role of L</span><span class="NormalTextRun SpellingErrorV2Themed SCXW95714165 BCX0">aun</span><span class="NormalTextRun SCXW95714165 BCX0">chpad User for on</span><span class="NormalTextRun SCXW95714165 BCX0">e of </span><span class="NormalTextRun ContextualSpellingAndGrammarErrorV2Themed SCXW95714165 BCX0">our</span> <span class="NormalTextRun ContextualSpellingAndGrammarErrorV2Themed SCXW95714165 BCX0">acco</span><span class="NormalTextRun SCXW95714165 BCX0">unts</span><span class="NormalTextRun SCXW95714165 BCX0"> Launchpads. Click “**Save**” once </span><span class="NormalTextRun SCXW95714165 BCX0">you've</span><span class="NormalTextRun SCXW95714165 BCX0"> completed all the fields as described above. The next time someone tries to sign into Frame Console, </span><span class="NormalTextRun SCXW95714165 BCX0">they'll</span><span class="NormalTextRun SCXW95714165 BCX0"> be assigned permissions as configured here if </span><span class="NormalTextRun SCXW95714165 BCX0">there's</span><span class="NormalTextRun SCXW95714165 BCX0"> a match.</span></span><span class="EOP SCXW95714165 BCX0" data-ccp-props="{"134233117":false,"134233118":false,"335551550":1,"335551620":1,"335557856":16777215,"335559738":240,"335559739":300}"> </span>

</div></div>### <span class="TextRun SCXW95714165 BCX0" data-contrast="none" lang="EN-US" xml:lang="EN-US"><span class="NormalTextRun SCXW95714165 BCX0" data-ccp-parastyle="heading 2">Test SAML2 login </span></span><span class="EOP SCXW95714165 BCX0" data-ccp-props="{"134233117":false,"134233118":false,"134245418":true,"134245529":true,"201341983":0,"335551550":1,"335551620":1,"335559685":0,"335559737":0,"335559738":600,"335559739":300,"335559740":279}"> </span>

<div class="SCXW95714165 BCX0" id="bkmrk-go-back-to-azure-con"><div class="OutlineElement Ltr SCXW95714165 BCX0">  
</div><div class="ListContainerWrapper SCXW95714165 BCX0">1. <span class="TextRun SCXW95714165 BCX0" data-contrast="auto" lang="EN-US" xml:lang="EN-US"><span class="NormalTextRun SCXW95714165 BCX0">Go back to **Azure** console Navigate to your **Enterprise Application** and select **Single sign-on**</span></span>**<span class="EOP SCXW95714165 BCX0" data-ccp-props="{}"> </span>**

</div><div class="ListContainerWrapper SCXW95714165 BCX0">2. <span class="TextRun SCXW95714165 BCX0" data-contrast="auto" lang="EN-US" xml:lang="EN-US"><span class="NormalTextRun SCXW95714165 BCX0">At the bottom of the </span><span class="NormalTextRun SCXW95714165 BCX0">page there</span><span class="NormalTextRun SCXW95714165 BCX0"> is </span><span class="NormalTextRun SCXW95714165 BCX0">an</span> <span class="NormalTextRun SCXW95714165 BCX0">option</span><span class="NormalTextRun SCXW95714165 BCX0"> to **test s**</span>**<span class="NormalTextRun ContextualSpellingAndGrammarErrorV2Themed SCXW95714165 BCX0">in</span><span class="NormalTextRun SCXW95714165 BCX0">gle sign-on </span>**</span><span class="EOP SCXW95714165 BCX0" data-ccp-props="{}">   
      
      
    [![b22e125e-55ed-40c6-93cd-d77296c93e63.png](https://docs.difr.com/uploads/images/gallery/2025-10/scaled-1680-/b22e125e-55ed-40c6-93cd-d77296c93e63.png)](https://docs.difr.com/uploads/images/gallery/2025-10/b22e125e-55ed-40c6-93cd-d77296c93e63.png)  
    </span>

</div><div class="OutlineElement Ltr SCXW95714165 BCX0">  
</div></div><span class="EOP SCXW95714165 BCX0" data-ccp-props="{"335559685":720}"> </span>

<div class="SCXW95714165 BCX0" id="bkmrk-on-the-left-hand-sid"><div class="OutlineElement Ltr SCXW95714165 BCX0">  
</div><div class="ListContainerWrapper SCXW95714165 BCX0">3. <span class="TextRun SCXW95714165 BCX0" data-contrast="auto" lang="EN-US" xml:lang="EN-US"><span class="NormalTextRun SCXW95714165 BCX0">On the </span><span class="NormalTextRun SCXW95714165 BCX0">left-hand</span><span class="NormalTextRun SCXW95714165 BCX0"> side click on **Test sign** </span><span class="NormalTextRun SCXW95714165 BCX0">**in,** a n</span><span class="NormalTextRun SCXW95714165 BCX0">ew browser window will pop up with the Microsoft login prompt, enter </span><span class="NormalTextRun SCXW95714165 BCX0">the user and password </span></span><span class="LineBreakBlob BlobObject DragDrop SCXW95714165 BCX0"><span class="SCXW95714165 BCX0"> </span>  
    </span><span class="LineBreakBlob BlobObject DragDrop SCXW95714165 BCX0"><span class="SCXW95714165 BCX0"> </span>  
    </span><span class="EOP SCXW95714165 BCX0" data-ccp-props="{"134233117":false,"134233118":false,"335551550":1,"335551620":1,"335557856":16777215,"335559738":240,"335559739":300}"> [![e4bdcf08-876a-47d2-b1d4-cb58094f5adf.png](https://docs.difr.com/uploads/images/gallery/2025-10/scaled-1680-/e4bdcf08-876a-47d2-b1d4-cb58094f5adf.png)](https://docs.difr.com/uploads/images/gallery/2025-10/e4bdcf08-876a-47d2-b1d4-cb58094f5adf.png)</span>

</div></div><span class="EOP SCXW95714165 BCX0" data-ccp-props="{"134233117":false,"134233118":false,"335551550":1,"335551620":1,"335557856":16777215,"335559685":720,"335559738":240,"335559739":300}"> </span>

<div class="SCXW95714165 BCX0" id="bkmrk-you-will-then-be-log"><div class="OutlineElement Ltr SCXW95714165 BCX0">  
</div><div class="ListContainerWrapper SCXW95714165 BCX0">4. <span class="TextRun SCXW95714165 BCX0" data-contrast="auto" lang="EN-US" xml:lang="EN-US"><span class="NormalTextRun SCXW95714165 BCX0">You will then be logged </span><span class="NormalTextRun SCXW95714165 BCX0">into</span><span class="NormalTextRun SCXW95714165 BCX0"> your Frame environment according to the **perm**</span>**<span class="NormalTextRun SpellingErrorV2Themed SCXW95714165 BCX0">issions</span>**<span class="NormalTextRun SCXW95714165 BCX0"> that have been set.</span></span><span class="EOP SCXW95714165 BCX0" data-ccp-props="{"134233117":false,"134233118":false,"335551550":1,"335551620":1,"335557856":16777215,"335559738":240,"335559739":300}">   
      
    [![35512857-6ed7-49f9-8602-797ed59ab73a.png](https://docs.difr.com/uploads/images/gallery/2025-10/scaled-1680-/35512857-6ed7-49f9-8602-797ed59ab73a.png)](https://docs.difr.com/uploads/images/gallery/2025-10/35512857-6ed7-49f9-8602-797ed59ab73a.png)  
      
    </span>
    
    ## Accessing Frame with Entra ID
    
    Your **Entra ID** integration will now appear to your users as a sign in button on the Frame **[Entity URL](https://docs.difr.com/books/platform-administrators-guide/page/authentication#bkmrk-entity-endpoint-urls)'s** sign in page. Reference the above Frame **Entity URLs** section to provide the right URLs to your users.
    
    If the **SAML2 Provider** was configured for a Customer, Organization, or Account entity URLs, you should now see a new sign in button when viewing the entity's URL as shown below:
    
    <span class="EOP SCXW95714165 BCX0" data-ccp-props="{"134233117":false,"134233118":false,"335551550":1,"335551620":1,"335557856":16777215,"335559738":240,"335559739":300}">  
    </span>
    
    [![image.png](https://docs.difr.com/uploads/images/gallery/2025-10/scaled-1680-/vfWimage.png)](https://docs.difr.com/uploads/images/gallery/2025-10/vfWimage.png)
    
    <span class="EOP SCXW95714165 BCX0" data-ccp-props="{"134233117":false,"134233118":false,"335551550":1,"335551620":1,"335557856":16777215,"335559738":240,"335559739":300}">  
    </span>

</div></div>

# ADFS

Integrating Microsoft Active Directory Federation Services (ADFS) is straightforward. We start by creating an SAML2 Provider from within Frame. Using information from those steps, we to continue our SAML2 integration from within ADFS. We also cover passing and parsing of other claims/assertions for groups and how you can use that information to dynamically allocate Frame resources to your users.

## Getting Started

Use the URL-friendly SAML2 Integration Name that you created in the previous section. We'll create and gather these details to configure proper communication between ADFS and Frame.

1. Before a SAML2 identity provider can be added, the administrator must enable SAML2 Providers at a given level by navigating to the Admin Console. From there, navigate to the **Customer** or **Organization** page (depending on where you wish to add the IdP). Select **Users** from the left-hand menu.
2. From there, navigate to the **Authentication** tab and enable the **SAML2** toggle. Click **Save**.
    
    <figure>![Customers Example for Configuring User Access](https://docs.difr.com/uploads/images/gallery/2025-10/ohfadd-saml2-2025.png)
    
    </figure>More options will appear next to the Authentication tab, click on the **SAML2 Providers** tab.
3. Click **Add SAML2 Provider**.
    
    <figure>![Add a SAML2 Provider](https://docs.difr.com/uploads/images/gallery/2025-10/gwuadd-saml2-provider2.png)
    
    </figure>
4. The **Add a SAML2 identity provider** dialog will appear. Enter the information as described below:
    
    
    - **Application ID**: The Application ID identifies a partner across federation interactions and can be set to any DNS-compliant string such as urn:companyframe:adfs.
    - **Auth provider metadata**: Typically, all Microsoft ADFS metadata URLs will be in the following format:
        
        `https://[your-ADFS-domain]/FederationMetadata/2007-06/FederationMetadata.xml`

[![Screenshot 2026-05-07 at 13.54.07.png](https://docs.difr.com/uploads/images/gallery/2026-05/scaled-1680-/screenshot-2026-05-07-at-13-54-07.png)](https://docs.difr.com/uploads/images/gallery/2026-05/screenshot-2026-05-07-at-13-54-07.png)

If you would like to verify your metadata URL, navigate back to the ADFS management console and open the “Service” folder. Click “Endpoints.” On the “Endpoints” page, scroll down to the “Metadata” section. Find the URL with the “Federation Metadata” type listed next to it. The ADFS metadata URL must be publicly accessible to Frame Platform on the Internet.

```
- **Integration Name**: Enter your unique SAML Integration name here. The name is unique across Frame Platform and should have only letters, numbers, and the dash symbol; no spaces or punctuation are allowed. It is also case-sensitive and will be embedded in URLs. We'll use the SAML integration name docs-auth-adfs for the rest of the instructions. Please do not use this name for your own integration.
- **Custom Label**: When specified, this value will be used in the login page as `Sign in with <Custom Label>`.
- **Authentication token expiration**: Set the desired expiration time for the authentication token. This can range from 5 minutes to 7 days.
- **Signed response**: Leave this toggle disabled. If you wish to use Signed SAML2 Responses, please contact Frame Support or your Account Manager for further instructions.
- **Signed assertion**: Enable this toggle.

After filling out each field carefully, click **Add**.

```

## Configuring ADFS

### Add Relying Party and Trusts to ADFS

Next you must perform some setup tasks in your Microsoft ADFS environment to integrate with your new Custom Authentication setup on Frame. You will need to ensure that your ADFS infrastructure is using a valid SSL certificate that can be verified.

1\. First, navigate to your AD FS Management Console. We will start by adding a new Relying Party Trust.

<figure id="bkmrk--1">![Adding a Relying Party Trust](https://docs.difr.com/uploads/images/gallery/2025-10/adfs-navigate-add-trust.png)

</figure>2\. Let's walk through the “Add Relying Party Trust Wizard.” On the “Welcome” screen, select “Claims aware”, then click “Start.”

<figure id="bkmrk--2">![Add Relying Party Trust Wizard](https://docs.difr.com/uploads/images/gallery/2025-10/adfs-add-trust-1.png)

</figure>3\. Select “Import data about the relying party published online or on a local network.” Enter the SAML2 Integration Name from the Getting Started section at the beginning of this page.

For example:

<figure id="bkmrk--3">[![adfs-add-trust-2.png](https://docs.difr.com/uploads/images/gallery/2026-05/scaled-1680-/adfs-add-trust-2.png)](https://docs.difr.com/uploads/images/gallery/2026-05/adfs-add-trust-2.png)

</figure><details id="bkmrk-note-if-adfs-has-no-"><summary>Note</summary>

If ADFS has no access to the Internet or the specific ADFS deployment does not support TLS 1.2, ADFS will not be able to directly use the Frame metadata URL for its configuration. In this case, you will need to download the XML file from the Frame metadata URL and manually upload the metadata XML file when creating the relying party in ADFS

</details><details id="bkmrk-caution-administrato"><summary>CAUTION</summary>

Administrators choosing to cache or store the Frame public key certificates in their SAML2 IdP will need to update those public key certificates when Dizzion renews them.

</details>4\. Ensure there are no errors, and then click “Next.”

5\. Enter a display name on the next screen and click “Next.”

<figure id="bkmrk--6">![Add Relying Party Trust Wizard](https://docs.difr.com/uploads/images/gallery/2025-10/adfs-add-trust-3.png)

</figure>6\. Now choose which Access Control Policy is appropriate for your organization. For example, to ensure that Frame works for all users in your organization, regardless of their location on your network or the Internet, you should choose “Permit everyone.” Click “Next.”

<details id="bkmrk-note-frame-recommend"><summary>Note</summary>

Frame recommends starting with “Permit Everyone” and testing authentication with your new SAML2 authentication integration. If your configuration works successfully, you can move on to a more restrictive Access Control Policy.

</details><figure id="bkmrk--9">![Add Relying Party Trust Wizard](https://docs.difr.com/uploads/images/gallery/2025-10/adfs-add-trust-4.png)

</figure>7\. Now review the details in the various tabs of the summary portion of the wizard titled “Ready to Add Trust”. Click “Next”, when ready to finalize your Relying Party Trust configuration.

<figure id="bkmrk--10">[![adfs-add-trust-5.png](https://docs.difr.com/uploads/images/gallery/2026-05/scaled-1680-/NEeadfs-add-trust-5.png)](https://docs.difr.com/uploads/images/gallery/2026-05/NEeadfs-add-trust-5.png)

</figure>8\. The “Finish” screen should confirm that you have added the Relying Party Trust successfully. Leave the checkbox checked for “Configure claims issuance policy for this application,” so that we can easily proceed to the next steps.

### Edit Claim Issuance Policy

9\. The Edit Claims window will appear. If you don't see it, it may be hidden behind other windows on your screen. Click “Add Rule…” toward the bottom of the window.

<figure id="bkmrk--11">![Edit Claim Issuance Policy](https://docs.difr.com/uploads/images/gallery/2025-10/adfs-claim-issuance-policy.png)

</figure>10\. On the “Choose Rule Type” screen, select “Send LDAP Attributes as Claims,” then click “Next.”

<figure id="bkmrk--12">![Adding a Relying Party Trust](https://docs.difr.com/uploads/images/gallery/2025-10/adfs-transform-claim-1.png)

</figure>11\. Name your “Claim rule name” and then select “Active Directory” from the drop-down menu listed under “Attribute Store.” Add three LDAP attributes to outgoing claim types as shown below. Click “Finish” once completed.

<figure id="bkmrk--13">![Adding a Relying Party Trust](https://docs.difr.com/uploads/images/gallery/2025-10/adfs-transform-claim-2.png)

</figure><div display:="" id="bkmrk-ldap-attribute-outgo" justifycontent:=""><table><thead><tr><th>LDAP Attribute</th><th>Outgoing Claim Type</th></tr></thead><tbody><tr><td>User-Principal-Name</td><td>mail</td></tr><tr><td>Surname</td><td>sn</td></tr><tr><td>Given-Name</td><td>givenName</td></tr></tbody></table>

</div>12\. You'll see your new Rule added to the Issuance Transform Rules screen. We're going to add one more Rule, so click **Add Rule** again.

<figure id="bkmrk--14">![Adding a Relying Party Trust](https://docs.difr.com/uploads/images/gallery/2025-10/adfs-transform-claim-3.png)

</figure>Select Transform an Incoming Claim for this Claim rule template.

<figure id="bkmrk--15">![Adding a Relying Party Trust](https://docs.difr.com/uploads/images/gallery/2025-10/adfs-transform-claim-4.png)

</figure>On the Configure Claim Rule screen, enter a Claim rule name and enter the following info.

<div display:="" id="bkmrk-name-value-incoming-" justifycontent:=""><table><thead><tr><th>Name</th><th>Value</th></tr></thead><tbody><tr><td>Incoming claim type</td><td>mail</td></tr><tr><td>Outgoing claim type</td><td>Name ID</td></tr><tr><td>Outgoing name ID format</td><td>Persistent Identifier</td></tr></tbody></table>

</div><figure id="bkmrk--16">![Adding a Relying Party Trust](https://docs.difr.com/uploads/images/gallery/2025-10/adfs-transform-claim-5.png)

</figure>Select Pass through all claim values, then click **Finish**.

You'll see both of your Rules listed. Optionally, you can choose to send group membership as part of the claim. To do this, continue to the next step, otherwise, click OK to complete your ADFS configuration and continue to the Configure Authorization Rules section.

<figure id="bkmrk--17">![Adding a Relying Party Trust](https://docs.difr.com/uploads/images/gallery/2025-10/adfs-transform-claim-6.png)

</figure>To send group membership as a claim, click Add Rule again and continue reading.

### Configure Group Claims

13\. Select Send Group Membership as a Claim for this Claim rule template

<figure id="bkmrk--18">![Adding a Relying Party Trust](https://docs.difr.com/uploads/images/gallery/2025-10/adfs-transform-claim-7.png)

</figure>On the *Configure Claim Rule* screen, enter a Claim rule name and enter the following info.

<div display:="" id="bkmrk-name-value-user%27s-gr" justifycontent:=""><table><thead><tr><th>Name</th><th>Value</th></tr></thead><tbody><tr><td>User's group</td><td>Browse to and select the desired Active Directory group</td></tr><tr><td>Outgoing claim type</td><td>Group</td></tr><tr><td>Outgoing claim value</td><td>Value of your choice to send when a user is a member of the selected group</td></tr></tbody></table>

</div><figure id="bkmrk--19">![Adding a Relying Party Trust](https://docs.difr.com/uploads/images/gallery/2025-10/adfs-transform-claim-7.png)

</figure><figure id="bkmrk--20">![Adding a Relying Party Trust](https://docs.difr.com/uploads/images/gallery/2025-10/adfs-transform-claim-8.png)

</figure>Click Finish when done.

<details id="bkmrk-note-saml2-configura"><summary>Note</summary>

**SAML2 Configuration Lock**

Customer Administrators have the option to lock SAML2 IdP configurations at the Customer level of the Frame tenant. When the toggle pictured below is enabled, SAML2 IdP integrations cannot be added from the Organization or Account levels of the Frame tenant.

</details>![Configuration Lock](https://docs.difr.com/uploads/images/gallery/2025-10/saml-lock.png)

### Configuring SAML2 Permissions

The Group claim, created in the prior section, must be referenced as `http://schemas.xmlsoap.org/claims/Group` when creating the SAML2 Permission authorization rule.

## Accessing Frame with ADFS

Your ADFS integration will now appear to your users as a sign in button on your specific [Frame Sign in Page](https://docs.difr.com/books/platform-administrators-guide/page/authentication#entity-endpoint-urlsentity-endpoint-urls).

## Troubleshooting

<details id="bkmrk-i-need-to-update-the"><summary>**I need to update the Frame public key certificates for ADFS. What do I do?** </summary>

If you are running into issues with your ADFS SAML2 integration and need to update the Frame public key certificates, please reference [ this knowledge base article](https://support.dizzion.com/hc/en-us/articles/23915708725261-How-to-refresh-Frame-certificates-metadata-in-Microsoft-ADFS) for further information (requires login). Microsoft also outlines these details in their [official documentation](https://learn.microsoft.com/en-us/archive/msdn-technet-forums/79fda425-afd4-4ec6-ad10-a73c06503b8e).

</details>

# Okta

Okta provides a flexible yet simple Identity Provider solution that integrates easily with the Frame platform. Following the steps below, you simply need to locate, copy, and paste certain values between platforms. This process should take less than fifteen minutes. Refer to Okta documentation for additional information on how to configure Okta.

<p class="callout warning"> **Attention**  Please be aware that while Okta does have a pre-built Frame app, this app does not yet support group attributes. In order to use group attributes, you must configure the application manually as described below.</p>

## Getting Started

To begin, let's create a URL-friendly SAML2 Application ID (also referred to as Entity ID) that we'll use in a few places throughout our setup, as well as a Custom Label which will be displayed on the login page for users, for example.

Application ID: DC-OKTA-DEV  
Custom Label: Frame-OKTA

Also copy the Assertion URL

Click "add" to save the changes for later

  
Follow the steps to create a SAML 2 Provider explained in the [General SAML2 Integration](https://docs.difr.com/books/platform-administrators-guide/page/general-saml2-integration) section, until you see until you see the template with the missing configuration info, and copy the Metadata URL which will be needed later in the setup. From here leave the tab open, and continue with the configuration in the Azure console.

[![image.png](https://docs.difr.com/uploads/images/gallery/2025-11/scaled-1680-/Z8nimage.png)
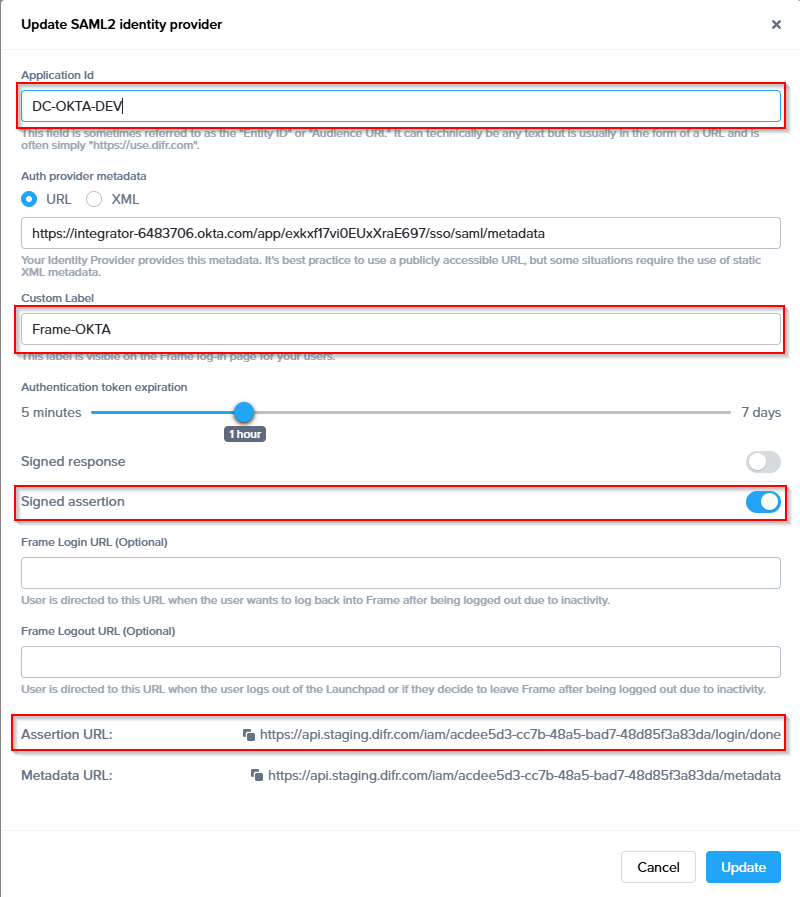
](https://docs.difr.com/uploads/images/gallery/2025-11/Z8nimage.png)

1. In a *separate/new tab*, log in to your Okta account as an Admin and open the Dashboard. Select **SSO Apps**.[![image.png](https://docs.difr.com/uploads/images/gallery/2025-11/scaled-1680-/2w8image.png)
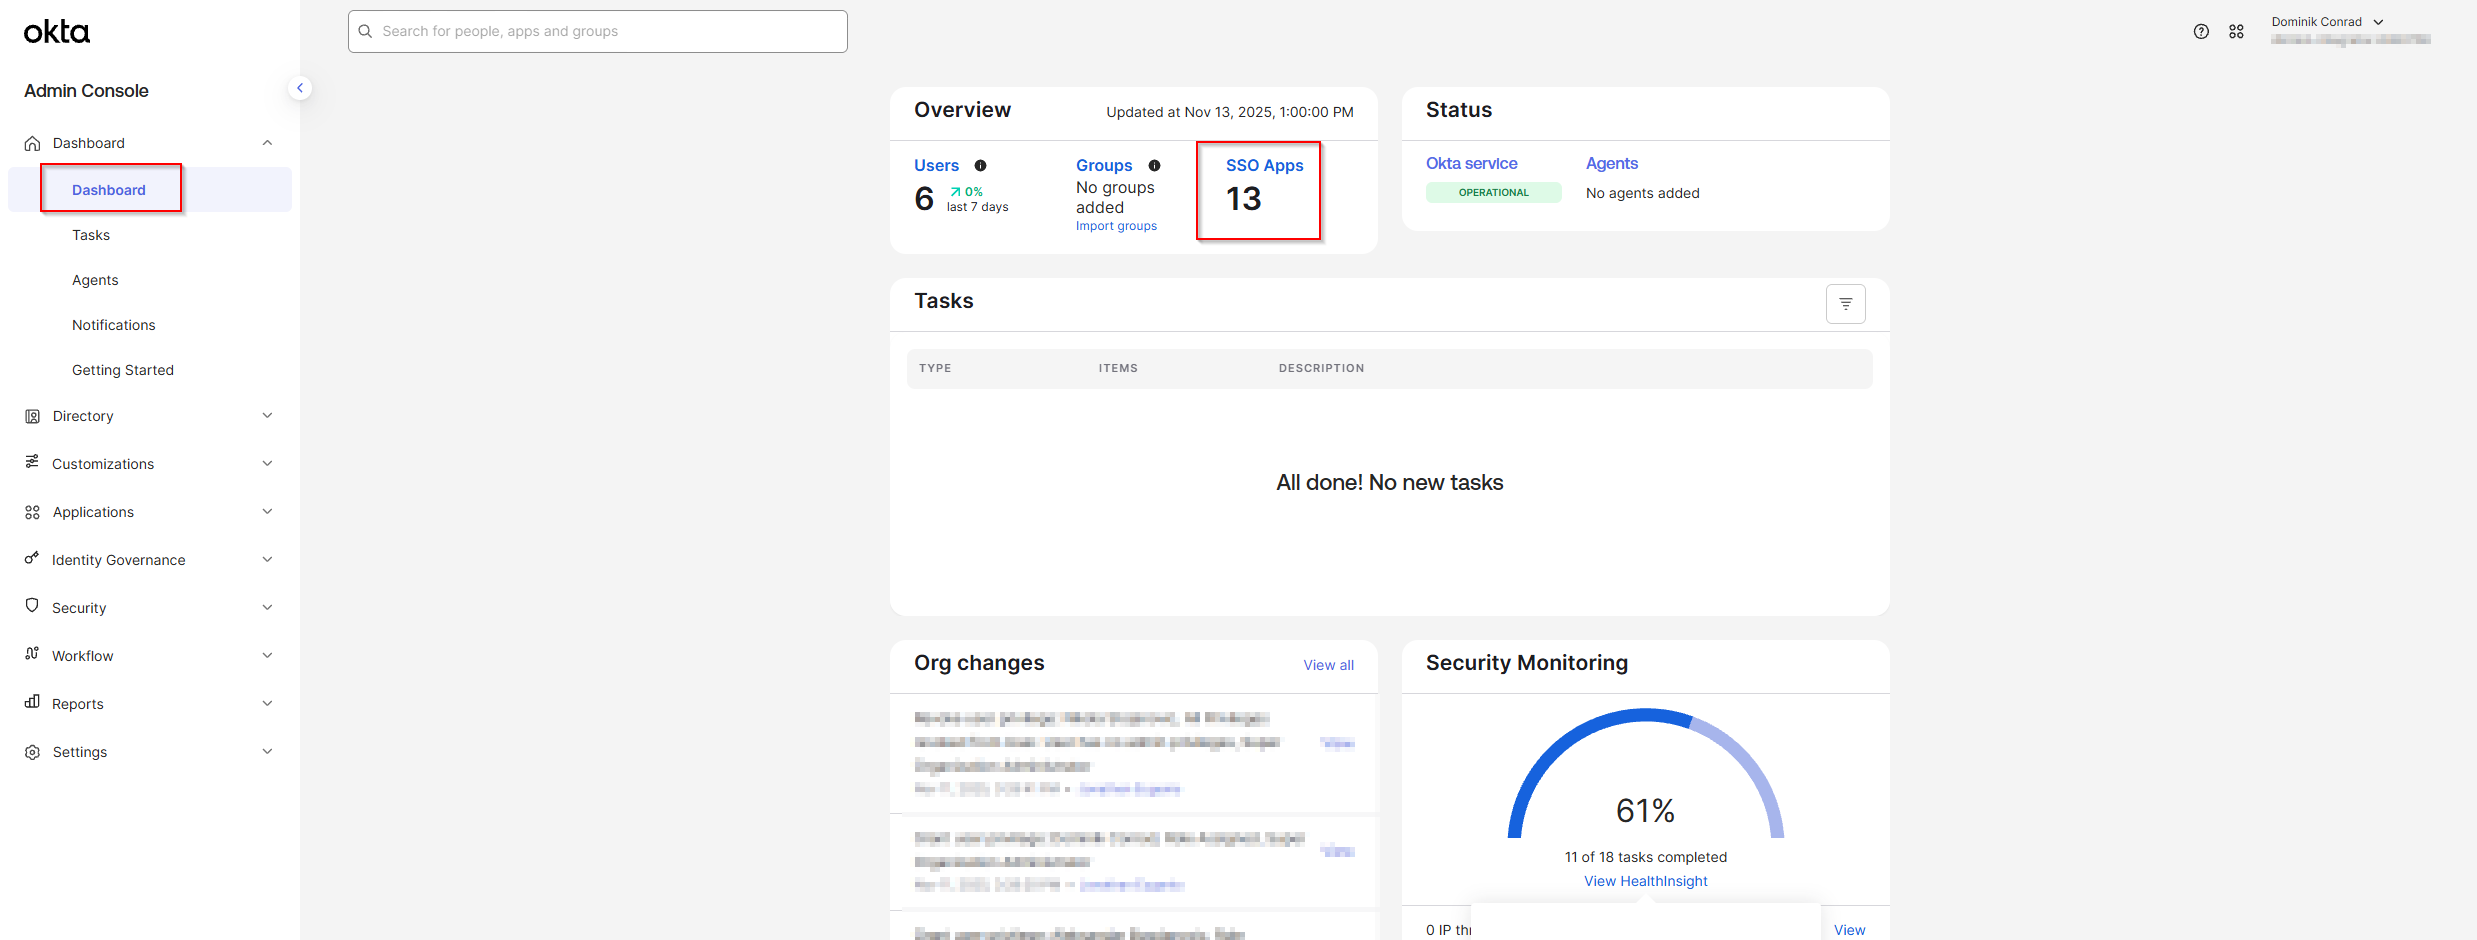
](https://docs.difr.com/uploads/images/gallery/2025-11/2w8image.png)
2. Click **Create App Integration** in the top-left corner of the page.[![image.png](https://docs.difr.com/uploads/images/gallery/2025-11/scaled-1680-/ALdimage.png)
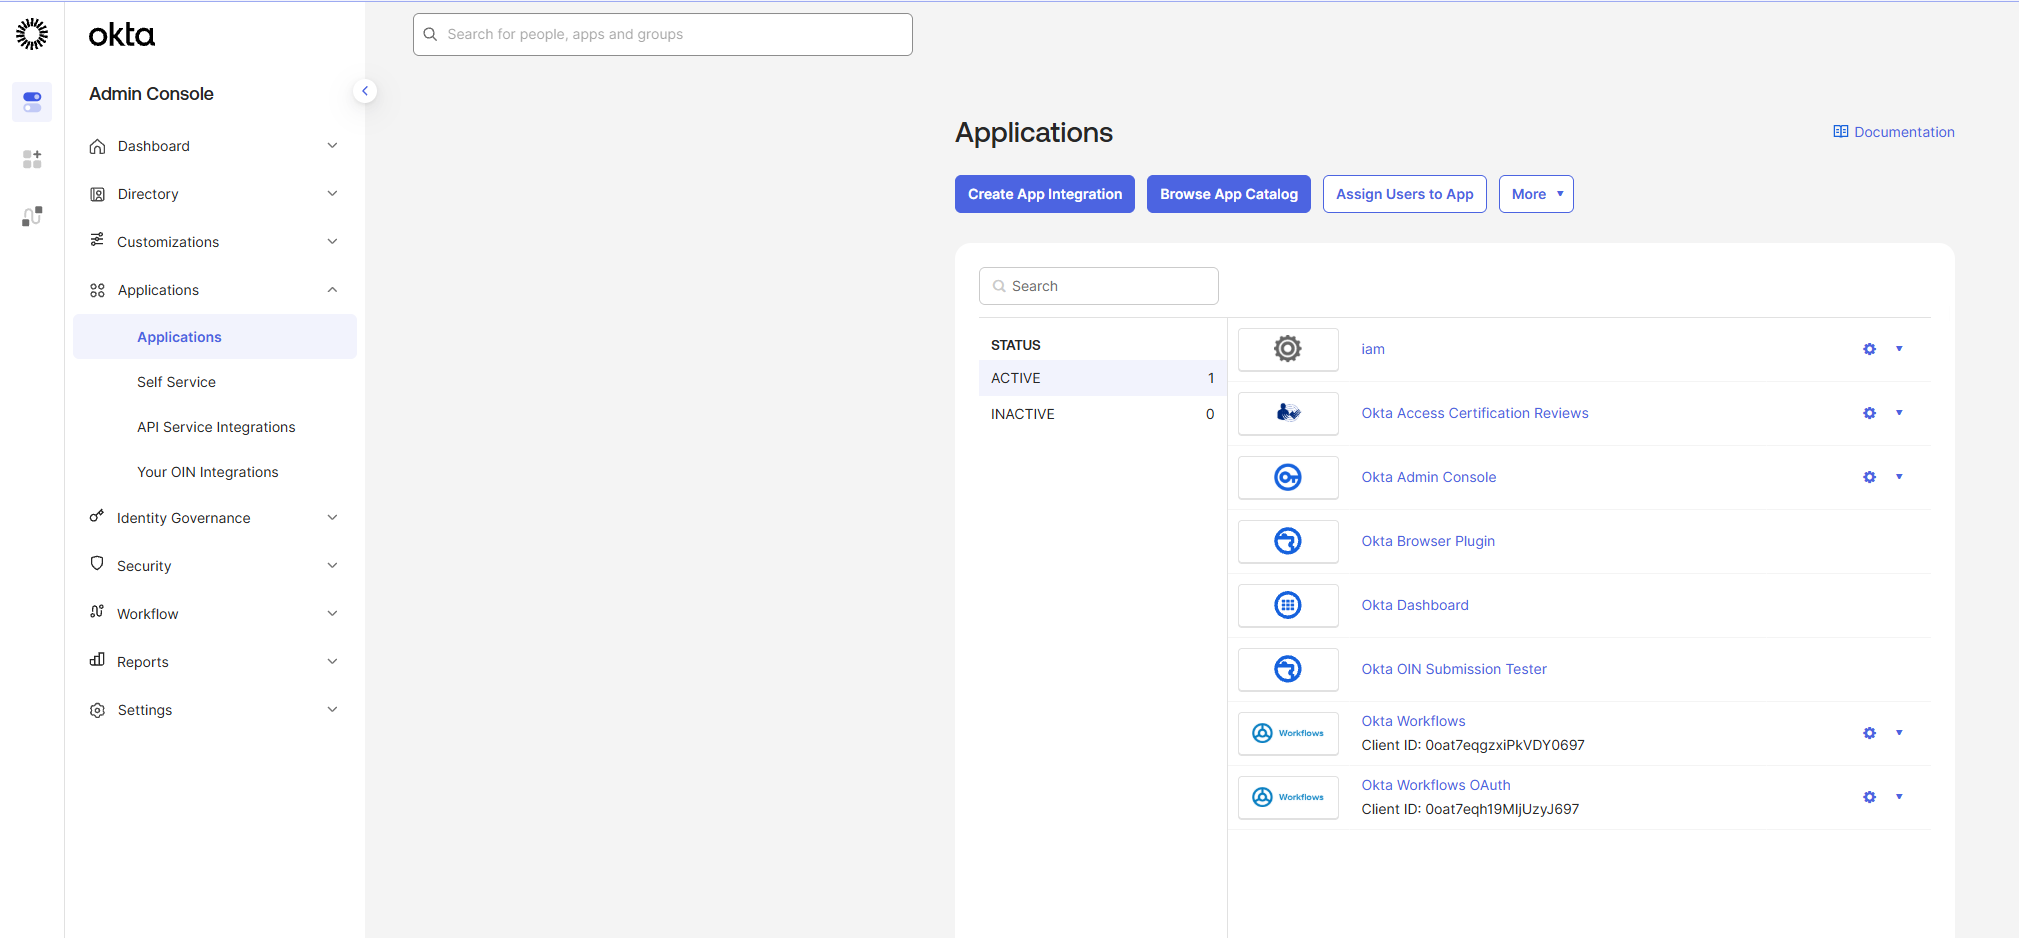
](https://docs.difr.com/uploads/images/gallery/2025-11/ALdimage.png)
3. 2. Select **SAML 2.0** and click **Next**.![Select SAML 2.0](https://docs.difr.com/uploads/images/gallery/2025-10/okta-saml2.png)
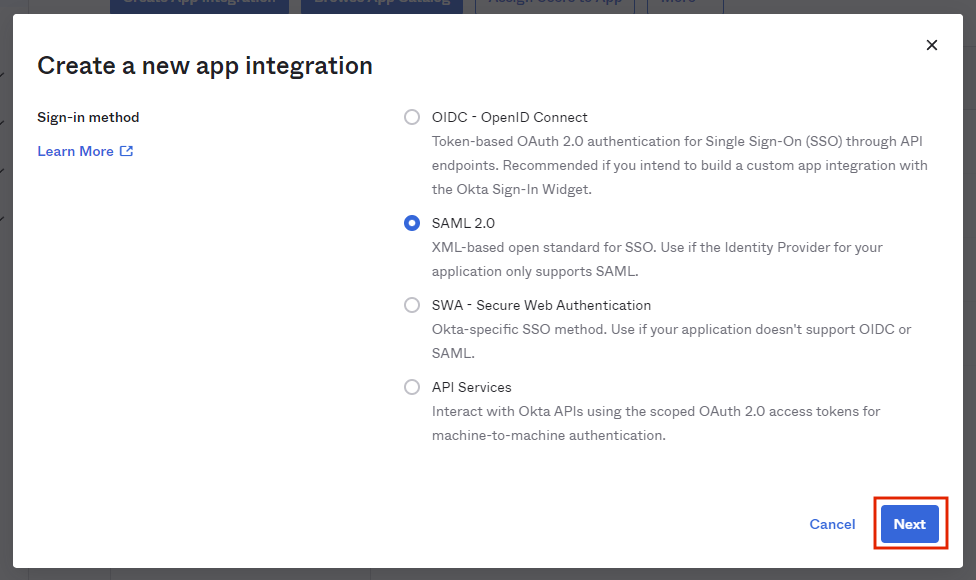
4. Provide an app **name** and **icon**. We've provided a Frame icon below for convenience:![Frame App Logo](https://docs.difr.com/uploads/images/gallery/2025-10/dizzion-logo-small.png)[![image.png](https://docs.difr.com/uploads/images/gallery/2025-11/scaled-1680-/M7Zimage.png)
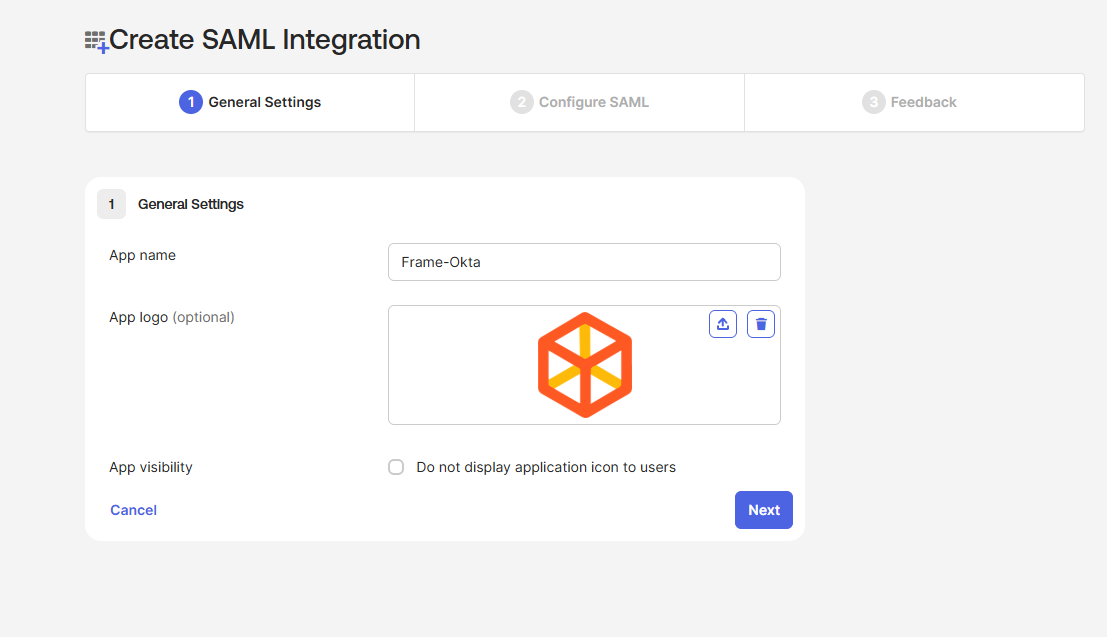
](https://docs.difr.com/uploads/images/gallery/2025-11/M7Zimage.png)
5. From there, you will be taken to the **SAML Settings** page.[![image.png](https://docs.difr.com/uploads/images/gallery/2025-11/scaled-1680-/ID4image.png)
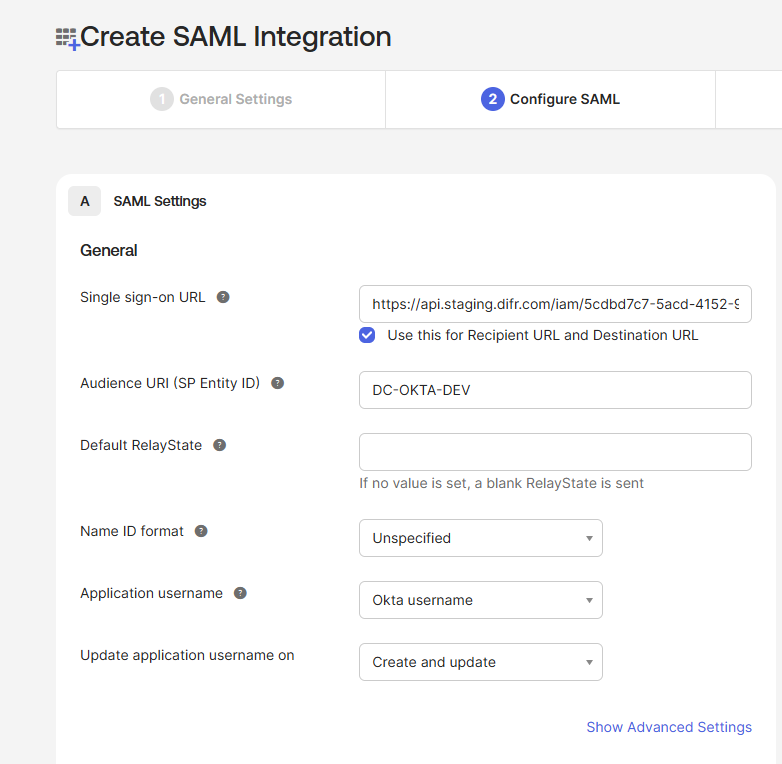
](https://docs.difr.com/uploads/images/gallery/2025-11/ID4image.png)
6. Next, it's time to paste our **AsserationURL** from the [Getting Started](https://docs.difr.com/link/86#bkmrk-getting-started) section of this page.
7. Next, we'll enter the following information:**Audience URI**: A DNS-compliant string. For this example, we will use `DC-OKTA-DEV`. This customer-defined string will be entered on the Frame side as our **Application ID** later on. You must use a unique Audience URI for your own IdP integration.
8. **Default RelayState**: This field can be left blank for SP-initiated SSO scenario. For IdP-initated SSO scenarios, you will need to specify the URL your IdP will redirect the user to once the user has authenticated to Okta. The value can be a [custom entity endpoint URL](https://docs.difr.com/books/platform-administrators-guide/page/authentication#entity-endpoint-urls) or a Launch Link URL.
9. Configure how Okta will specify the Subject for the SAML2 assertion.  
      
    ![SAML Settings - Name ID format, Application username](https://docs.difr.com/uploads/images/gallery/2025-10/okta-saml2-3b.png)**
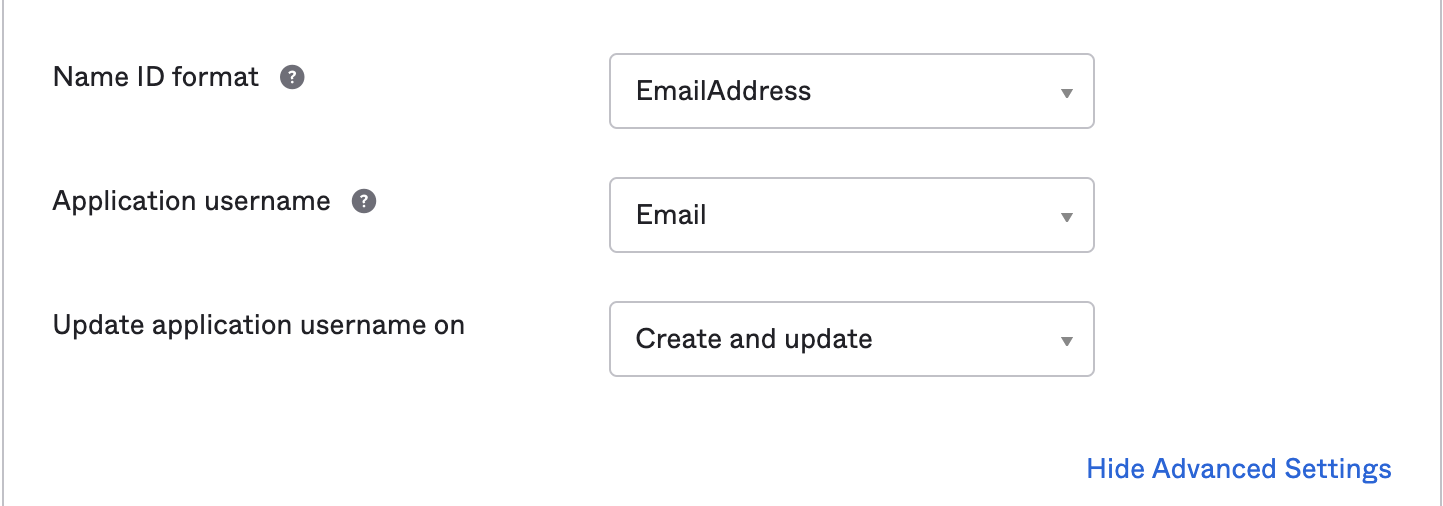
Name ID format**: Use value of **EmailAddress Application username**: Use value of **Email**
10. Select **Show Advanced Settings** in the bottom right corner and the Okta fields shown in the following screen will be visible.![SAML Advanced Settings](https://docs.difr.com/uploads/images/gallery/2025-10/okta-saml2-4.png)
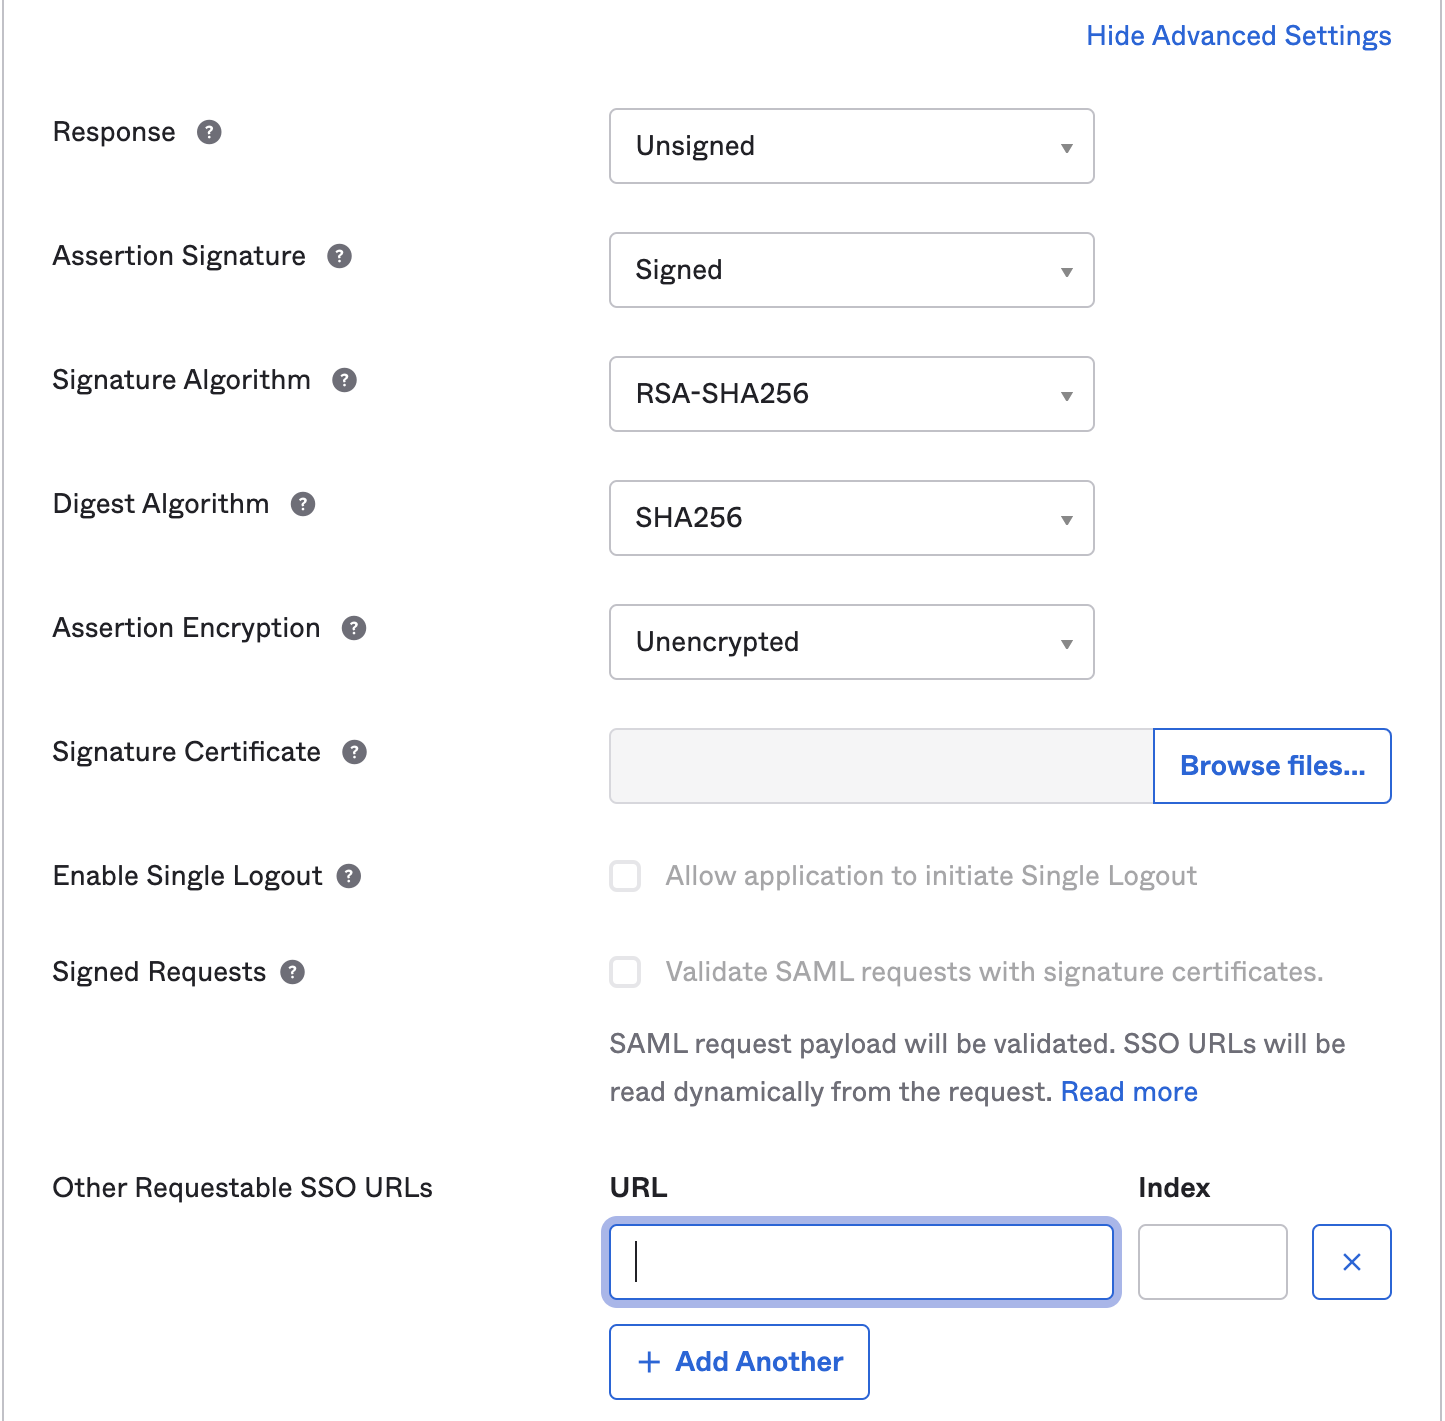
Update the following fields:  
    **Response**: Use value of **Unsigned Assertion Signature**: Use value of **Signed Other Requestable SSO URLs**: If you plan to use the Frame Login Page, add a second **Single sign-on URL** with the FQDN **api.difr.com.com** with an index of `1`. For example, [`https://img.frame.nutanix.com/saml2/done/docs-frame-okta/`](https://api.staging.difr.com/iam/5cdbd7c7-5acd-4152-9b11-d1e4cfe3ea53/login/done) for the above example.
11. **Add three Attribute Statements**. They must be exactly as shown here, including capitalization. Additionally, you can add “Group Attribute Statements” if you wish. We go into detail for passing group attributes/claims in later steps.  
      
    ![SAML2 Attribute Mappings](https://docs.difr.com/uploads/images/gallery/2025-10/okta-saml2-5.png)
12. Click **Next** and fill out the feedback page as desired.  
      
    ![Okta Feedback](https://docs.difr.com/uploads/images/gallery/2025-10/okta-saml2-6.png)
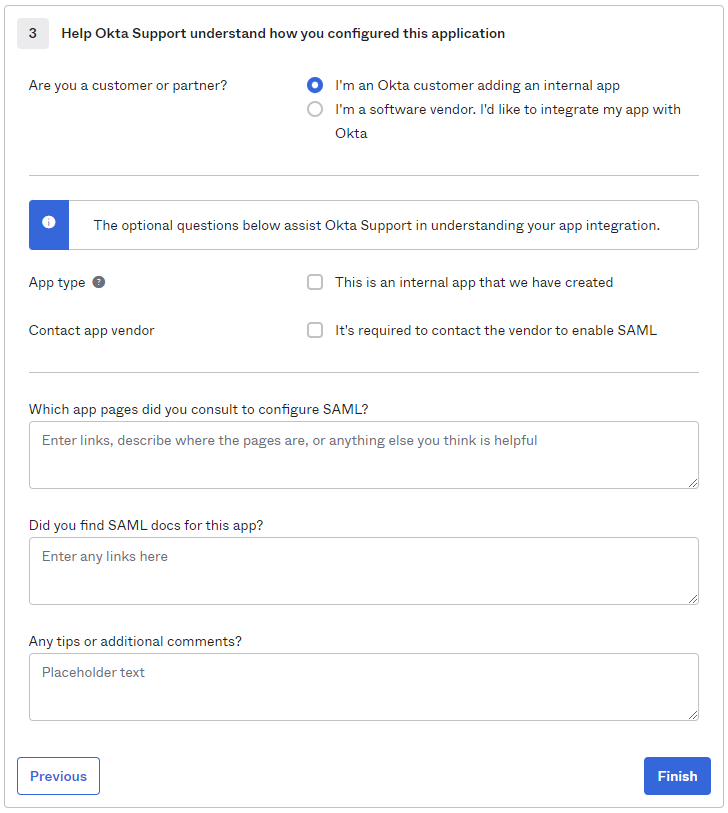
13. Click **Finish**.
14. You will automatically be taken to the **Sign On** page/tab where we'll obtain the final piece of information. Scroll down to the bottom box under the *Sign On Methods* section and right-click on the blue **Identity Provider metadata** link. Copy the link URL and save it somewhere to reference in later steps.  
      
    [![image.png](https://docs.difr.com/uploads/images/gallery/2025-11/scaled-1680-/IOOimage.png)
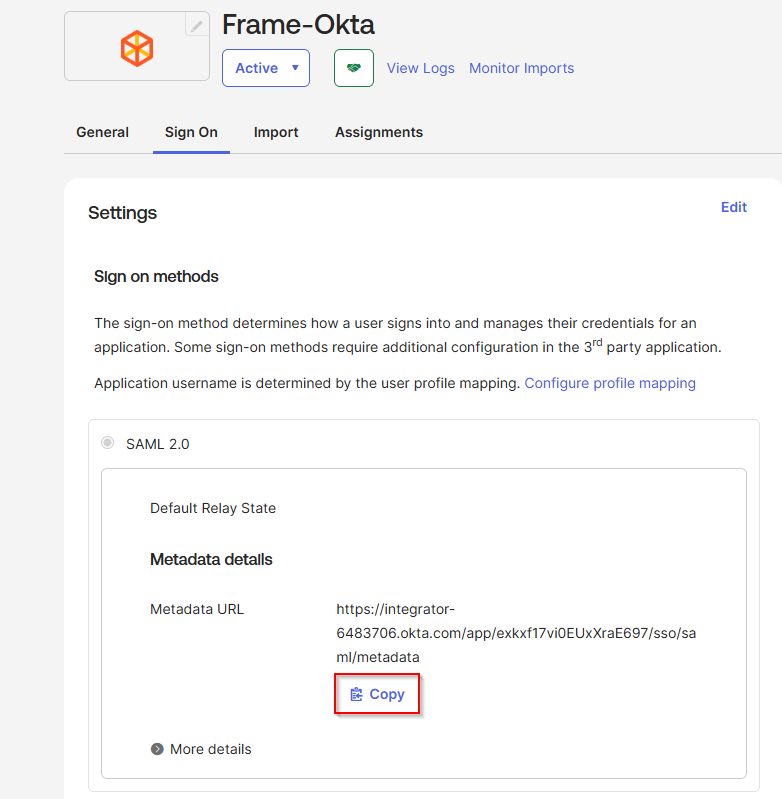
](https://docs.difr.com/uploads/images/gallery/2025-11/IOOimage.png)
15. The Okta side of the setup is now complete. Next, we'll configure the Frame side of the integration using the the values we've copied from these steps in the Okta Dashboard.
16. Final Steps

### <span class="TextRun SCXW95714165 BCX0" data-contrast="none" lang="EN-US" xml:lang="EN-US"><span class="NormalTextRun SCXW95714165 BCX0" data-ccp-parastyle="heading 2">Configure the SAML2 Authentication Integration Provider in Frame</span></span>[<span class="TextRun SCXW95714165 BCX0" data-contrast="none" lang="EN-US" xml:lang="EN-US"><span class="NormalTextRun SCXW95714165 BCX0" data-ccp-charstyle="Hyperlink"> </span></span>](https://docs.dizzion.com/platform/identity-and-access/idp-integrations/entra-id#create-the-saml2-authentication-integration-provider-in-frame)<span class="EOP SCXW95714165 BCX0" data-ccp-props="{"134233117":false,"134233118":false,"134245418":true,"134245529":true,"335559738":600,"335559739":300}"> </span>

<div class="SCXW95714165 BCX0" id="bkmrk-open-up-a-new-tab-an"></div>1. Navigate back to your Frame tab and enter the following data into our **Add a SAML2 Identity Provider** form:
    
    <figure>[![image.png](https://docs.difr.com/uploads/images/gallery/2025-11/scaled-1680-/V7Mimage.png)](https://docs.difr.com/uploads/images/gallery/2025-11/V7Mimage.png)
    
    </figure>
    - **Application ID**: The value here **needs to match** the value set as the "Entity ID" from Step 5.
    - **Auth provider metadata**: Click the “XML” option and paste the contents of the Metadata XML file from Step 4.
    - **Custom Label**:. Allows Admins to customize Frame's Sign in page chiclets/buttons associated with this SAML2 integration.
    - **Authentication token expiration**: Choose a token expiration duration that supports your end-user workflows and complies with your security policies.
    - **Enable “Signed assertion”**
    - **<span class="TextRun SCXW207479778 BCX0" data-contrast="auto" lang="EN-US" xml:lang="EN-US"><span class="NormalTextRun SCXW207479778 BCX0">Assertion Consumer Service (ACS) URL</span><span class="NormalTextRun ContextualSpellingAndGrammarErrorV2Themed SCXW207479778 BCX0">:</span></span>**<span class="TextRun SCXW207479778 BCX0" data-contrast="auto" lang="EN-US" xml:lang="EN-US"><span class="NormalTextRun ContextualSpellingAndGrammarErrorV2Themed SCXW207479778 BCX0">  The</span><span class="NormalTextRun SCXW207479778 BCX0"> endpoint where the Identity Provider (IdP) delivers SAML authentication responses after a successful login.</span></span><span class="EOP SCXW207479778 BCX0" data-ccp-props="{"134233117":false,"134233118":false,"335559738":240,"335559739":240}"> </span>
    - **<span class="TextRun SCXW207479778 BCX0" data-contrast="auto" lang="EN-US" xml:lang="EN-US"><span class="NormalTextRun SCXW207479778 BCX0">Metadata URL</span><span class="NormalTextRun ContextualSpellingAndGrammarErrorV2Themed SCXW207479778 BCX0">:</span></span>**<span class="TextRun SCXW207479778 BCX0" data-contrast="auto" lang="EN-US" xml:lang="EN-US"><span class="NormalTextRun ContextualSpellingAndGrammarErrorV2Themed SCXW207479778 BCX0">  A</span><span class="NormalTextRun SCXW207479778 BCX0"> publicly accessible URL providing your Service Provider's SAML metadata, used by Identity Providers to configure and </span><span class="NormalTextRun SCXW207479778 BCX0">establish</span><span class="NormalTextRun SCXW207479778 BCX0"> trust.  
          
        </span></span>**<span class="EOP SCXW207479778 BCX0" data-ccp-props="{"134233117":false,"134233118":false,"335559738":240,"335559739":240}">Optional</span>**
    - <span class="NormalTextRun SCXW15592334 BCX0">Frame Login URL</span><span class="NormalTextRun SCXW15592334 BCX0">: </span><span class="NormalTextRun ContextualSpellingAndGrammarErrorV2Themed SCXW15592334 BCX0">user</span><span class="NormalTextRun SCXW15592334 BCX0"> is directed to this URL when the user wants to log back into Frame after being logged out due to inactivity.  
        </span>
    - <span class="NormalTextRun SCXW15592334 BCX0"><span class="TextRun SCXW99947813 BCX0" data-contrast="none" lang="EN-US" xml:lang="EN-US"><span class="NormalTextRun SCXW99947813 BCX0">Frame Logout URL</span><span class="NormalTextRun SCXW99947813 BCX0">: </span><span class="NormalTextRun ContextualSpellingAndGrammarErrorV2Themed SCXW99947813 BCX0">user</span><span class="NormalTextRun SCXW99947813 BCX0"> is directed to this URL when the user logs out of the Launchpad or if they decide to leave Frame after being logged out due to inactivity.</span></span><span class="EOP SCXW99947813 BCX0" data-ccp-props="{"134233117":false,"134233118":false,"335551550":0,"335551620":0,"335557856":16777215,"335559738":0,"335559739":0}">   
        </span></span>
    
    Click **Add**.
    
    You have successfully created your Okta integration with the Frame platform! Move on to the next section for configuring roles and permissions for your users, as well as information for passing Group attributes to Frame.

### <span class="TextRun SCXW95714165 BCX0" data-contrast="none" lang="EN-US" xml:lang="EN-US"><span class="NormalTextRun SCXW95714165 BCX0" data-ccp-parastyle="heading 3">Configuring SAML2 Permissions</span></span>[<span class="TextRun SCXW95714165 BCX0" data-contrast="none" lang="EN-US" xml:lang="EN-US"><span class="NormalTextRun SCXW95714165 BCX0" data-ccp-charstyle="Hyperlink"> </span></span>](https://docs.dizzion.com/platform/identity-and-access/idp-integrations/entra-id#configuring-saml2-permissions)<span class="EOP SCXW95714165 BCX0" data-ccp-props="{"134233117":false,"134233118":false,"134245418":true,"134245529":true,"335551550":1,"335551620":1,"335557856":16777215,"335559738":450,"335559739":300}"> </span>

1. Once the IdP is successfully configured on Frame, administrators will need to configure the authorization rules for the account from the **SAML2 Permissions** tab listed to the right of the **SAML2 Provider** tab, as discussed in our [Roles](https://docs.difr.com/link/81#bkmrk-roles) and [User Permissions with a SAML2 IdP](https://docs.difr.com/link/85#bkmrk-configuring-saml2-pe) sections.
2. Passing Group Attributes
3. You can authorize any groups of users you want to allow to use the Frame platform based on the user-group assignments you have configured in Okta. We recommend following the guidance of Okta's support team provided [in this link](https://support.okta.com/help/s/question/0D50Z00008G7UrC/can-you-pass-group-membership-as-part-of-the-saml-assertion-to-the-sp-) regarding group attribute statements with custom SAML applications.
4. Groups attribute and the associated set of Okta groups to insert in the SAML2 Response can be defined in Okta. In this example, enter `groups` for the group name attribute and define the group name inclusion filter.  
      
    ![Group Attribute Statements](https://docs.difr.com/uploads/images/gallery/2025-10/okta-group1.png)
5. Here's an example of a list of groups in Okta:  
      
    [![image.png](https://docs.difr.com/uploads/images/gallery/2025-11/scaled-1680-/Lq7image.png)](https://docs.difr.com/uploads/images/gallery/2025-11/Lq7image.png)
6. Assuming that one of the Okta groups that is passed to Frame is **Okta-Contractors**, the Frame administrator would specify a SAML2 permission where any user's SAML2 response contains a value of `Okta-contractors` in the `groups` SAML2 attribute will be granted Account Administrator role on Frame account Contractor Account.  
      
    ![Groups in Okta](https://docs.difr.com/uploads/images/gallery/2025-10/okta-group3.png)
7. Signing into Frame with Okta
8. Your new SAML2 auth integration will appear as button on your Frame login page. The URL for navigating to your Frame login page will vary depending on which level the SAML2 integration was configured. See our section about [Entities and URLs](https://docs.difr.com/books/platform-administrators-guide/page/authentication#entity-endpoint-urlsentity-endpoint-urls) to help pick the right one for you and your end-users and/or staff.
9. When landing on a URL configured for your Okta SAML2 Integration, your end-users should see an option like this:  
      
    [![image.png](https://docs.difr.com/uploads/images/gallery/2025-11/scaled-1680-/FoFimage.png)](https://docs.difr.com/uploads/images/gallery/2025-11/FoFimage.png)