# Domain Integration
Domain Controller prep, AWS IAM Permissions, Azure DNS Configuration, Domain Join Setup, Frame SSO, Stale AD Objects CleanUp, Linux with Windows AD LDAP
# Domain
Many enterprises and organizations rely on Microsoft Active Directory (AD) for provisioning user accounts, applying security policies to operating systems, and enabling access to applications. In classic on-premises environments, Windows operating systems are “joined to the (AD) domain” in order to enable these functions. Frame allows administrators to join their workload VMs to their Active Directory domain. This allows their users to log in to a Windows machine using their own AD credentials. Since the Windows operating system is joined to the customer's domain, the user can use Windows applications that rely on AD for access, authentication and authorization, such as SAP apps. If the IT managers joins the Sandbox to the domain, they can use their existing app packages, app tools, and deployment processes to install, run, and manage their organization's applications on Frame.
Microsoft also supports the ability for customers to register their devices with [Microsoft Entra](https://learn.microsoft.com/en-us/entra/identity/devices/concept-directory-join), formerly known as Azure Active Directory. With Microsoft Entra joined devices, the devices do not use an on-premises or "classic" Active Directory (AD) environment. Instead, they are joined to the company's Microsoft Entra ID tenant. This option is primarily designed for Windows 10 and Windows 11 devices.
Lastly, Microsoft provides customers with the ability to join their devices to Microsoft Entra and have their devices joined to a classic AD environment. This is known as a [Microsoft Entra hybrid](https://learn.microsoft.com/en-us/entra/identity/devices/concept-hybrid-join) joined device environment. Frame currently does not support Microsoft Entra hybrid joined devices.
# Domain Joined Instances
Frame supports classic AD joined devices with the *Classic* option of the *Domain Join Instances (DJI)* feature. Use of the *Domain Join* feature requires the use of your own public cloud account or AHV cluster ("Bring Your Own (BYO) Infrastructure"). Before configuring your AD Domain for use with Frame, you will need to set up your BYO infrastructure as described in the [BYO Infrastructure](https://docs.difr.com/platform/infrastructure/byo) section of our documentation.
To learn more about the prerequisites and how to prepare, configure, and manage your Frame Account for *Classic Domain Join Instances*, begin with the [Domain Preparation guide](https://docs.difr.com/books/platform-administrators-guide/page/domain-controller-prep).
# Entra Joined Devices
Frame supports Microsoft Entra joined devices with the *Entra ID* option of the *Domain Join Instances (DJI)* feature.
To learn more about the prerequisites and how to prepare, configure, and manage your Frame Account for *Entra Joined Devices*, review the [Entra Joined Devices guide](https://docs.difr.com/books/platform-administrators-guide/page/entra-id-joined-devices).
# Domain Controller Prep
The Frame platform supports the ability for your workload VMs to join your on-premises or cloud-based Microsoft Active Directory (AD) environment.
## Requirements
- Frame Account with **Windows 10**, **Windows 11**, **Windows Server 2019**, or **Windows Server 2022-based image**.
- The Domain Join feature requires customers use **Windows Server 2008 R2** and **[Domain Functional Level](https://docs.microsoft.com/en-us/windows-server/identity/ad-ds/active-directory-functional-levels)** 2008 R2 or higher.
- The Frame account workloads must reside in a VPC/VNET/VLAN with a non-overlapping CIDR with the rest of your network, including where your Windows domain controllers reside. Frame supports subnet masks between `/16` and `/24`.
- The workload VMs to be joined to the domain must be able to reach the domain controller(s).
- Customers using AWS infrastructure must update their AWS IAM role before enabling DJI (as described in the guide listed below).
- Customers using Azure infrastructure must configure their Azure DNS before enabling DJI (as described in the guide listed below).
## Considerations
Please consider the following before continuing with this Domain Controller Preparation guide and setup process:
- The Frame user created by Frame must be a local Windows administrator. Any GPO settings that take effect on workload instances must not remove this user from the “Local administrators” group.
- Autologin must be allowed for a local Frame user session to initiate successfully. Any GPO settings that disable this function will prevent domain joined instances from working properly.
- Interactive Logon message must be disabled in GPO settings for successful initiation of a Frame session.
- The domain join feature does not join the Sandbox or any utility servers to the domain. Frame strongly advises that administrators do not manually join the Sandbox or the utility server to the domain unless there is a specific requirement for an application to function. If either of these two VM types must be joined to the domain, the Frame administrator should enable RDP and create another local Windows admin user in that server. Before the server is joined to the domain, the administrator should verify that they can reach the server using RDP.
- Do not modify the Frame user local admin account password. Modifying the password will cause autologon to fail. For password security options like LAPS, there is a need to exclude the local Frame user.
- Static DNS IPs are not supported and should not be entered in the Sandbox or workload VMs.
- Restricting remote RPC connections to the Windows Security Account Manager (SAM) on a domain controller to Administrators only may introduce issues with renaming computer objects in Active Directory. Delegated rights to the service account will be ignored if this policy is configured
- The local Frame user password is stored in LSA (Local Security Authority) portion of the machine registry that is accessible only to SYSTEM account processes. Some of these secrets are credentials that must persist after reboot and they are stored in encrypted form on the hard disk drive. Credentials stored as LSA secrets might include:
- Local Frame user password
- Service account name and password for web proxy
## Supported Deployment Models and Systems
To use the Domain Join feature, the workload VMs must have network access to your domain controllers. There are a few architectural models to use for connecting your Frame workloads to your AD domain controllers:
1. If your workloads are in one of the supported public cloud infrastructures, your domain controllers (DCs) can be located in the public cloud or on-premises.
- If the DCs are on-premises, then an always-on connection from the workload VMs in the public cloud to your on-premises DCs is required. This can be accomplished through a site-to-site VPN, direct connection, or SD-WAN connection. You must bring your own AWS, Azure, or GCP cloud account to establish these types of private network connections since these network connections are setup within the public cloud provider's console. A software client VPN on the workload VMs that require users to authenticate to your on-premises firewall will not satisfy the networking requirements for domain-joined instances.
- If the DCs are in the public cloud, then you can configure a route from your workload VMs to your DCs. This is typically done with a peering connection between the VPC/VNET containing your workload VMs and the VPC/VNET containing your Domain Controllers.
2. If your workloads are on Nutanix AHV in your on-premises network, then make sure that the workload VMs can route from the workload VLAN to your domain controllers.
In the above architectural models, you will need to configure your networking and firewall rules to enable all ports and protocols corresponding to Active Directory traffic. Such a list can be found online in [Microsoft documentation](https://support.microsoft.com/en-us/help/179442/how-to-configure-a-firewall-for-domains-and-trusts). Please read through this guide thoroughly before beginning the process of connecting your AD environment with your Frame workloads.
When Frame workload VMs are provisioned, the VMs rely on the DHCP service within your network to obtain their IP addresses and DNS server IP address(es). For customer-managed networking, make sure that you have configured your DHCP service to return the IP addresses of your DNS servers. Otherwise, if no DNS server IP address is provided to the newly provisioned VMs, the VMs may not be able to resolve your domain controller or the Frame Platform FQDNs.
## Requirements
- Organizational Unit (OU) should not have spaces in it (e.g., `FrameAzure1`, not `Frame Azure 1`).
- Service account must own the OU using “Delegate control."
- Service Account must be in UPN format (e.g., `frameserviceaccount@mycompany.com`)
## Best Practices
- Customers are responsible for tracking their service account password expiration date and updating the new password in the Domain Settings for the Frame account before the password expires. If the service account password expires, the Frame account publish will fail since the workload VMs will be unable to join to the domain. Alternatively, customers can configure their service account password to not expire.
- During installation and initial configuration, inheritance should be blocked on the Frame OUs. When making policy changes, Nutanix recommends customers create a Development/Staging account to test your policies (in a separate OU) before implementing the policies in the OU for the Production Frame accounts.
- As a best practice, Frame **does not recommend** restricting remote RPC connections to the Windows Security Account Manager (SAM) on a domain controller to Administrators only. Doing so may introduce issues with renaming computer objects in Active Directory. Delegated rights to the service account will be ignored if this policy is configured.
## Domain Controller Preparation Procedure
1. Log into your domain controller and open up “Active Directory Users and Computers."
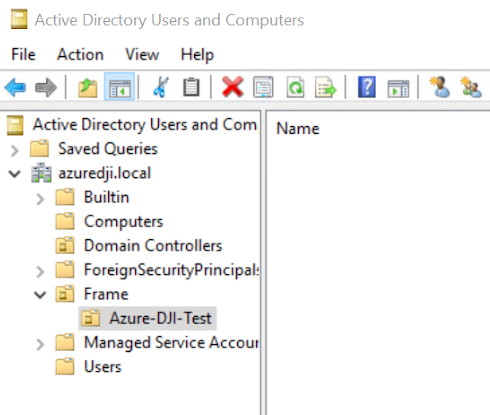
2. Navigate to the “Computers" Organizational Unit (OU), right-click and select “Create a New OU". We recommend that you give this OU a unique name that will help you identify the Frame account that it is tied to. In this example, we have named the OU `Frame-DJI-Test`.
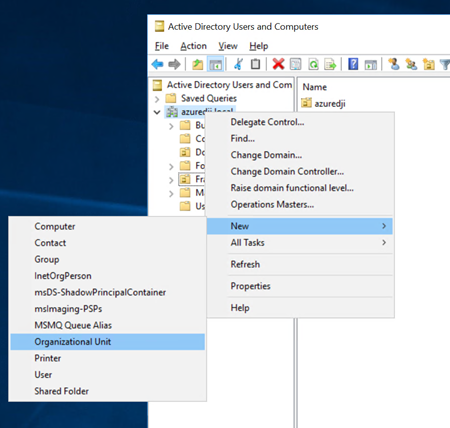
3. In our example, we created a new OU for Frame. Inside of that OU, we created another sub OU with the account name we will be using. This is **strongly recommended** to prevent confusion for situations where multiple Frame accounts are joined to the same domain.
### Create Service Account
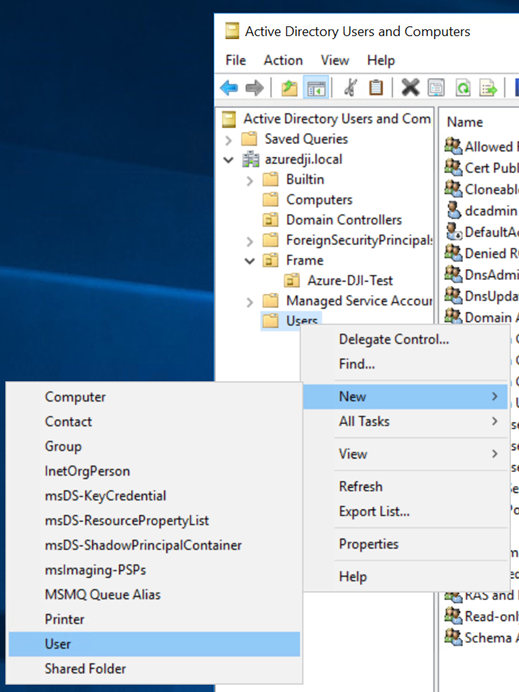
4. Next, we will create a service account to manage the necessary Frame resources. To start this process, we will need to add a new user. It is recommended you create this user where your organization keeps other service accounts. In our example, we will add them directly into the “Users" OU by right-clicking “Users". Select “New" and click “User."
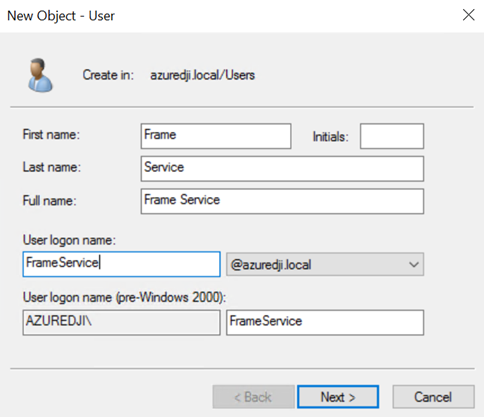
5. Add the necessary information to help you identify what this service account will be used for. Click "Next."
6. Set the desired password for the service account. If your organization allows it, it is recommended to set your service account password to "never expire." Make sure to uncheck "User must change password at next logon" and click "Next" and then "Finish."
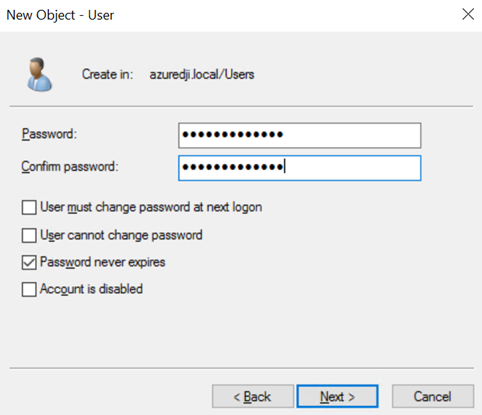
:::info Service Account Password Requirements
The service account password must contain 16 characters, with at least one character out of each category:
- Uppercase characters A-Z (Latin alphabet)
- Lowercase characters a-z (Latin alphabet)
- Digits 0-9
- Special characters (!, #, %, etc.)
Characters allowed:
- A – Z
- a - z
- 0 – 9
- `@ # % ^ & \ - _ ! + = [ ] { } | : ‘ , . ? / ` ~ ( ) ; < >`
Characters NOT allowed:
- blank space
- `\` backslash
- `$` symbol
- `"` (double quotes)
- Unicode characters
:::
If the service account password expires, the account will not function until the password is updated. The updated password will then need to be set in the Frame Dashboard as well. If an admin attempts to publish from their Frame account with expired domain join credentials, the publish will fail.
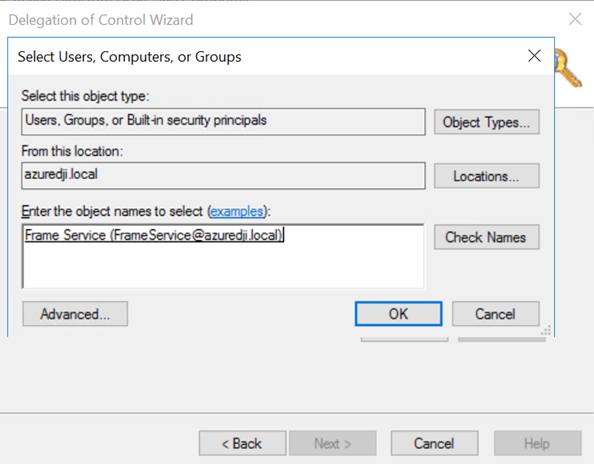
7. Right-click on the newly-created OU and select “Delegate Control…" to open the Delegation of Control Wizard.

8. Select your Frame service account.
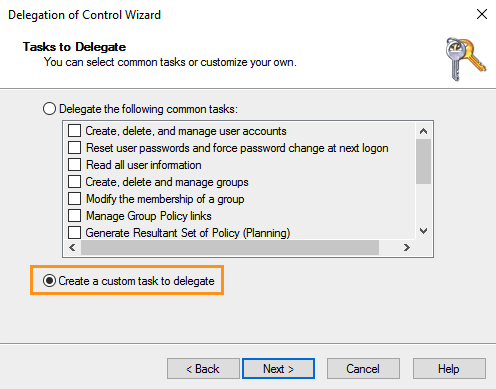
9. On the "Tasks to Delegate" page, select “Create a custom task to delegate" and click “Next."
10. On the “Active Directory Object Type” page, select “Only the following objects in this folder” and check “Computer objects.” Then, check “Create selected objects in this folder” and “Delete selected objects in this folder” as shown below.

The "Delete selected objects in this folder" checkbox \*\*must be checked\*\* in order for Frame to be able to \[automatically clean up stale computer objects\](ad-cleanup.md) from your domain.
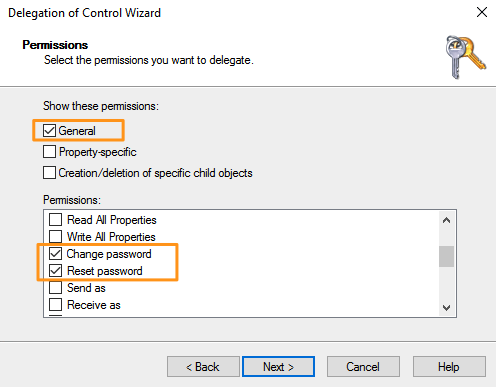
11. On the “Permissions” page of the wizard, with the “General” toggle checked, select both “Change password” and “Reset password.” Complete the wizard by clicking “Next” and then “Finish.”
In some circumstances, you may wish to create separate Frame Service accounts for each OU for greater security, scalability, or convenience. This is also supported. To do so, create a Frame service account for each OU and delegate the same permissions as above.
We recommend setting Loopback Processing Mode on the Frame OU to 'Replace' to help ensure unnecessary and potentially conflicting GPOs (applied to users) are not applied inadvertently. Since your organization may have specific security lockdowns and GPOs, you will need to work with our Support or Solutions Architect teams to ensure that these GPOs do no cause adverse effects to the Frame environment.
### Obtain OU Details
Now we will obtain the necessary OU information needed to integrate with Frame. You will be entering this information into your Dashboard in later steps.
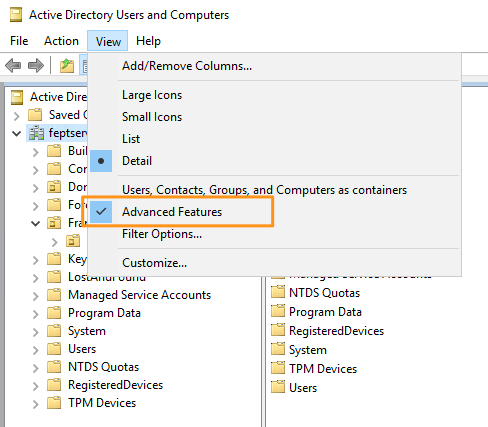
12. In your “Active Directory Users and Computers” console, make sure that “Advanced Features” is checked as shown below. This will enable us to easily retrieve the needed information.
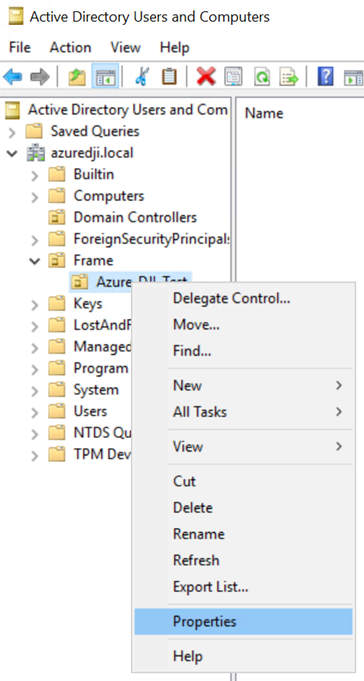
13. Next, right-click on the OU and select “Properties.”
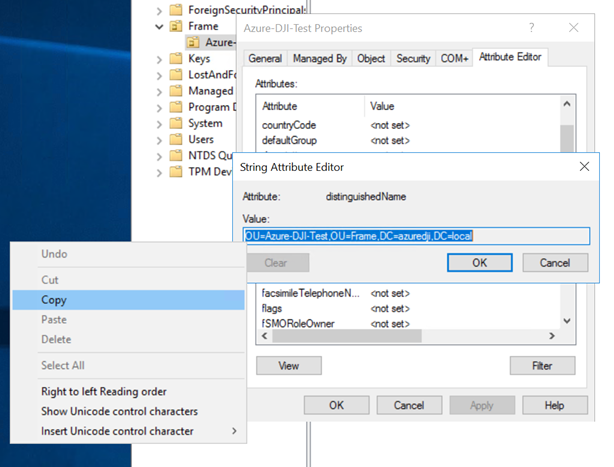
14. Under the “Attribute Editor” tab, double-click “distinguishedName.”

15. Copy this attribute's value to your clipboard and have it ready, as we will need it in order to add your Frame account to your domain in the next guide.
**Note**
Additional Networking, Firewall, and Routing ConsiderationsAs mentioned at the start of this guide, you will need to ensure that all applicable Active Directory ports and protocols are open along this new network path. More information can be found in Microsoft's [official documentation](https://learn.microsoft.com/en-US/troubleshoot/windows-server/identity/config-firewall-for-ad-domains-and-trusts).
# AWS IAM Permissions
AWS-based Frame accounts will need to prepare their AWS account by adjusting the permissions as listed below before setting up Domain Joined Instances. This process takes about 5 minutes.
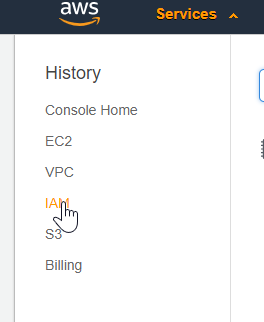
1. First, login to the AWS Console for the account you will be using to Domain Join with Frame. From the AWS Console, click on “IAM.”
2. From the IAM page, click “Roles.”
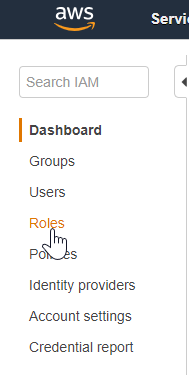
3. Search for the role “FrameGatewayWorkload” and and click on the link when it populates.

4. From the Roles page, navigate to the “Permissions” tab and click on the arrow next to the “FrameGatewayWorkloadPolicy” policy.
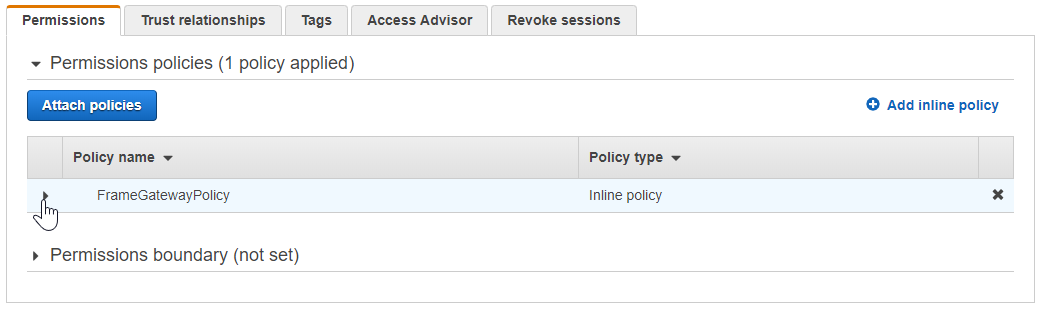
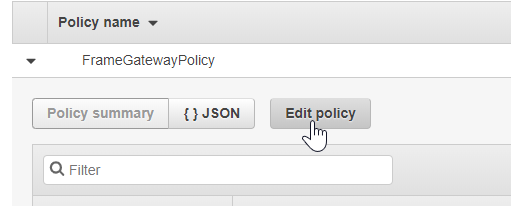
5. Click “Edit policy.”
6. Next, under the “Visual editor” tab, expand the “EC2” section by clicking on the arrow listed next to it.
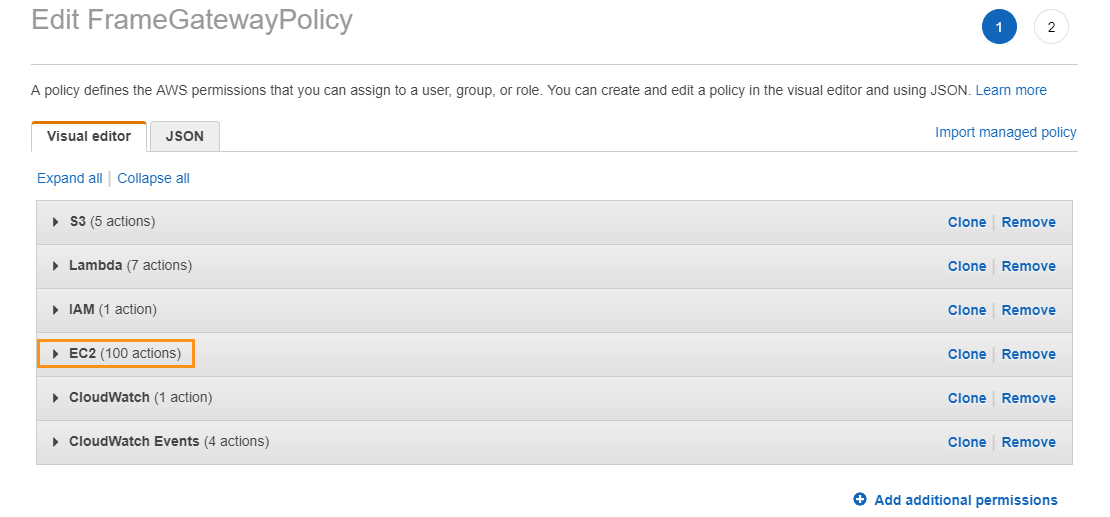
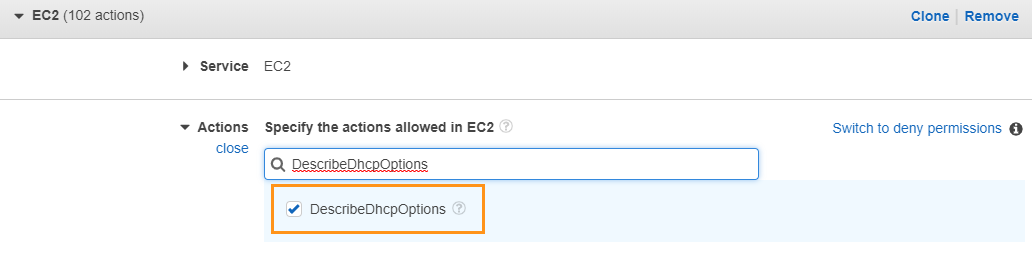
7. Click on the “Actions” section to expand it. Search for “DescribeDhcpOptions” in the filter search. Ensure the box is checked.
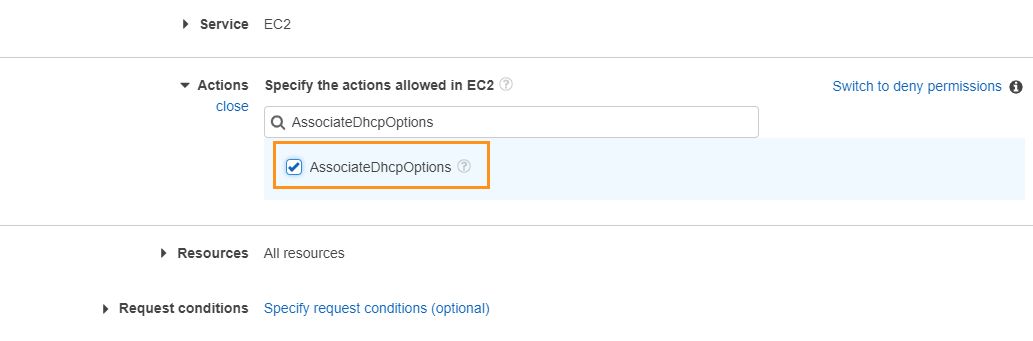
8. In the same filter search field, search for “AssociateDhcpOptions.” Ensure the associated box is checked.
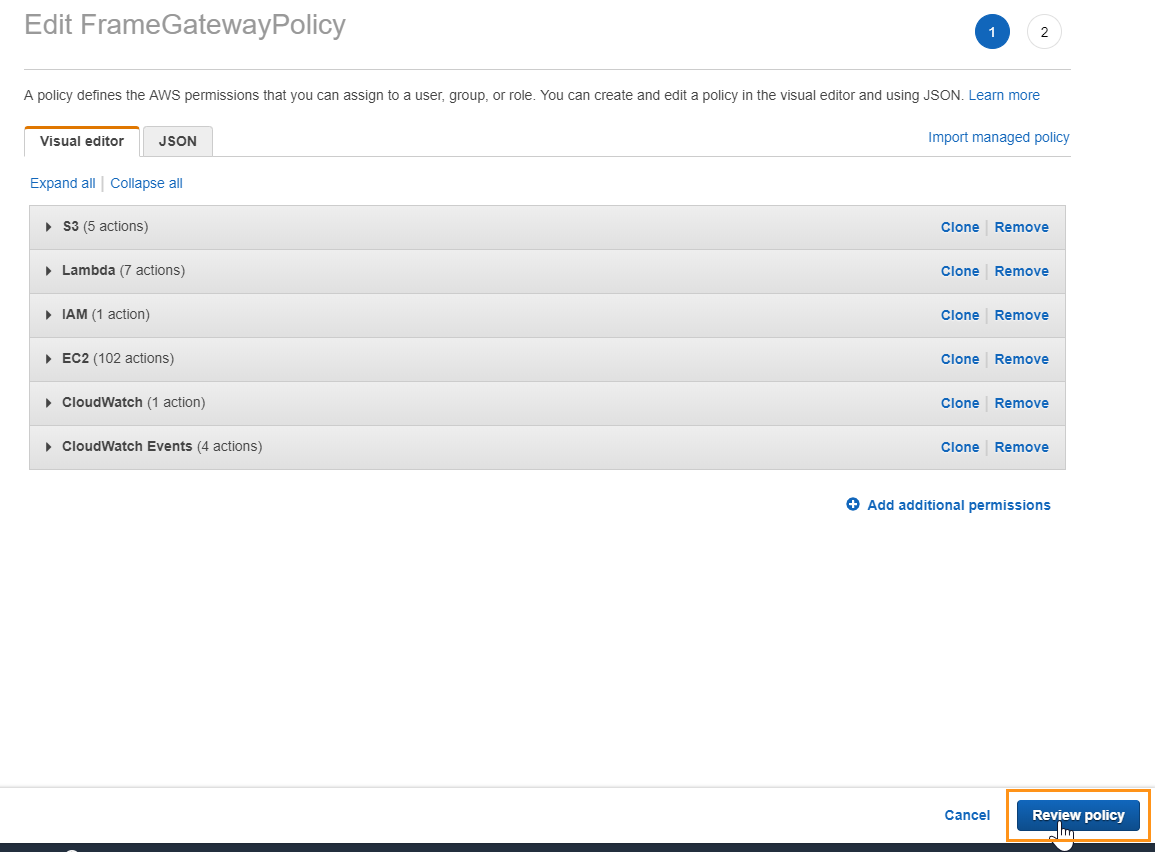
9. At the bottom of the “Edit FrameGatewayPolicy” page, click “Review policy.”
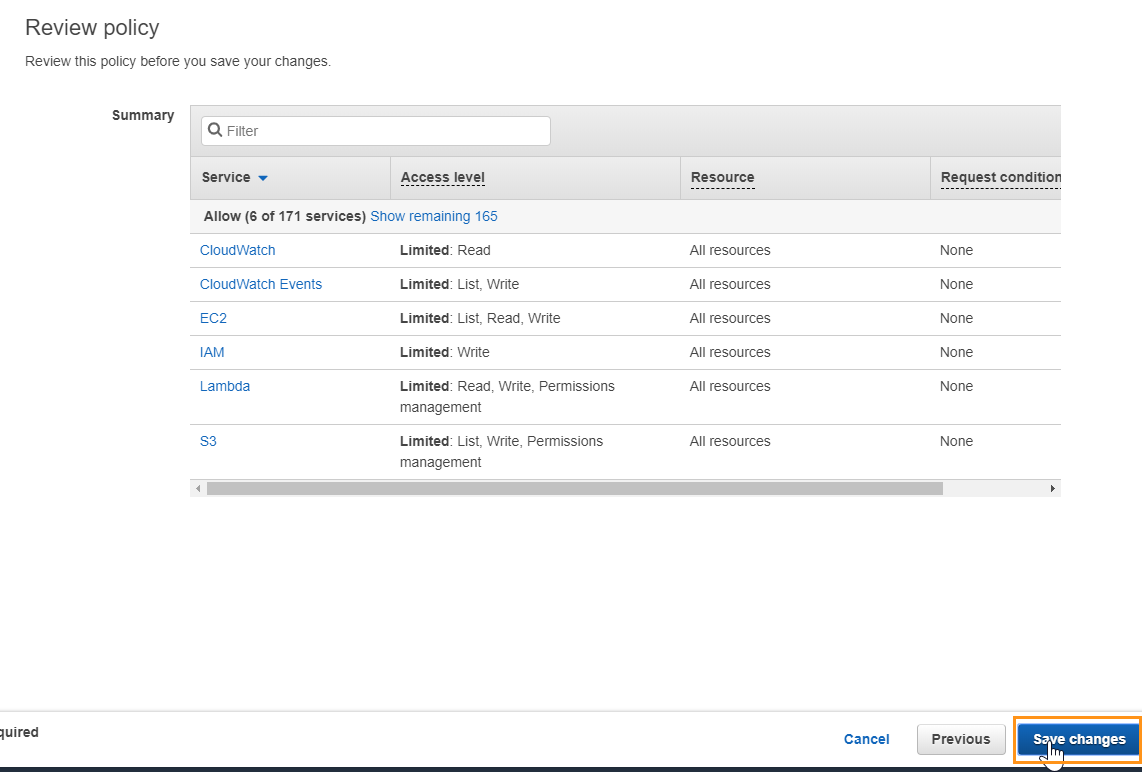
10. Click “Save changes” at the bottom right corner of the review policy page.
You have completed the steps necessary to prep your AWS account for Domain Join. You are now ready to set up Domain Joined Instances for your Frame account.
# Azure DNS Configuration
By default, Azure defines its own default DNS settings for each VNet. Using the Frame Domain Join feature requires additional configuration for Azure-based cloud accounts. Using the default Azure DNS settings will result in communication problems between your Frame instances and domain controller. We will outline how to properly configure your Azure DNS settings to communicate with the Frame platform.
## Requirements
- Administrative access to your Azure Portal
- A Frame account configured with [BYO Azure Infrastructure](https://docs.difr.com/link/75#bkmrk-page-title)
- An established Frame account configured on your BYO Azure
## Configuration
1. First, log in to your [Azure Portal](https://portal.azure.com/) and select the "Virtual networks" option from the menu on the left.

2. Select the virtual network you will be configuring the DNS for.

3. In the next menu that appears, select "DNS servers" listed under "Settings."
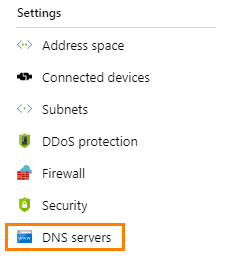
4. Two options will appear, select "Custom."
5. Under the "Custom" option, the first IP should be the IP of the DNS server that this VNet will be using. In some cases, this may be your domain controller. If you have a secondary DNS, enter it under the first IP.

As noted at the top of the Azure console, virtual machines within this virtual network must be restarted to utilize updated DNS server settings.
6. Click the "Save" icon at the top of the page once you have configured the settings in step 5.

Your instances should now be able to communicate properly inside of your VNet.
# Domain Join Setup
Before moving on to the Domain Join setup phase, please ensure you have:
- reviewed and met the requirements outlined on the Domain Join landing page
- completed the steps in the Domain Controller Preparation guide
- adjusted the appropriate AWS account permissions using the AWS IAM Permissions guide (if applicable)
- configured your DNS settings on Azure (if applicable)
You can join your Sandbox or Utility server to your domain by logging into either machine and following the \[standard process\](https://learn.microsoft.com/en-us/windows-server/identity/ad-fs/deployment/join-a-computer-to-a-domain) of joining a Windows machine to a domain. If you domain-join your Sandbox and/or Utility servers, we recommend you configure these servers for RDP and add a local Windows administrator user. This allows you to access the Sandbox and/or Utility servers in the event you are unable to login to the servers using your domain user credentials (e.g., loss of domain trust).
## Validate Connections
Firstly, we will start by verifying that our Frame account Sandbox can communicate with the domain controller (DC). Log in to the Sandbox of the Frame account you would like to join to the domain. We will use the Frame AD Helper to validate the domain configuration parameter values you will specify in the Domain Settings page.
### Frame AD Helper
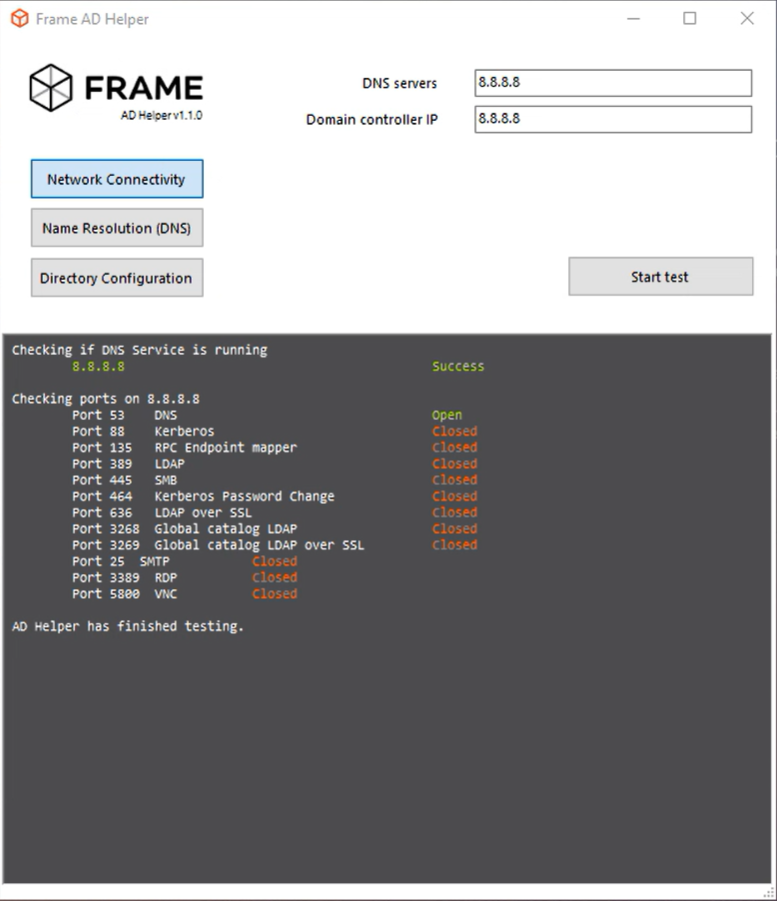
Frame AD Helper is a standalone tool built for testing network configuration, name resolution (DNS), and directory credentials/permissions. Frame AD Helper can assist in ensuring that all prerequisites for DJI are met successfully. It is part of the Frame Agent installation and located in the Frame Tools directory `C:\\ProgramData\\Nutanix\\Frame\\Tools\\` as `FrameADHelper.exe`.
**Network Connectivity Test**The Network Connectivity test verifies that DNS and AD services are reachable. Tests will automatically fail if network connectivity has not been established between the Frame account's VPC and AD/DNS resources. This test performs the following actions:
- DNS Service Test
- AD Service Test
- Custom Ports Test (Optional) - verify that specific ports are reachable. To invoke the Custom Ports Test, place the `customports.txt` file in `C:\\ProgramData\\Nutanix\\Frame\\Tools\\` and modify the file prior to launching Frame AD Helper (v1.1 or newer). The file must contain a separate line for each port tested, in the following format: `Port Number`, `"Port Description"`.

You will see in the output that these additional ports are now being tested:
**Name Resolution (DNS) Test**The Name Resolution test confirms that the Active Directory Domain Name can be resolved using the DNS server of your choice. This test performs the following actions:
- Resolves a record for the Domain Name
- Resolves SRV record for the Domain Name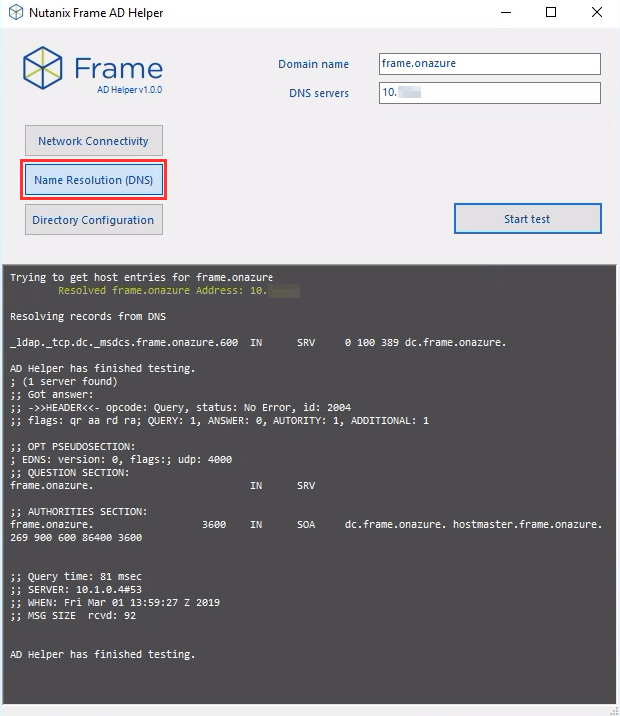
**Directory Configuration Test**The Directory Configuration test verifies that the Active Directory service account and permissions are configured properly for DJI. This test performs the following actions:
- Connects to Active Directory using the provided credentials
- Creates a test computer object (GUID-Frame)
- Deletes the test computer object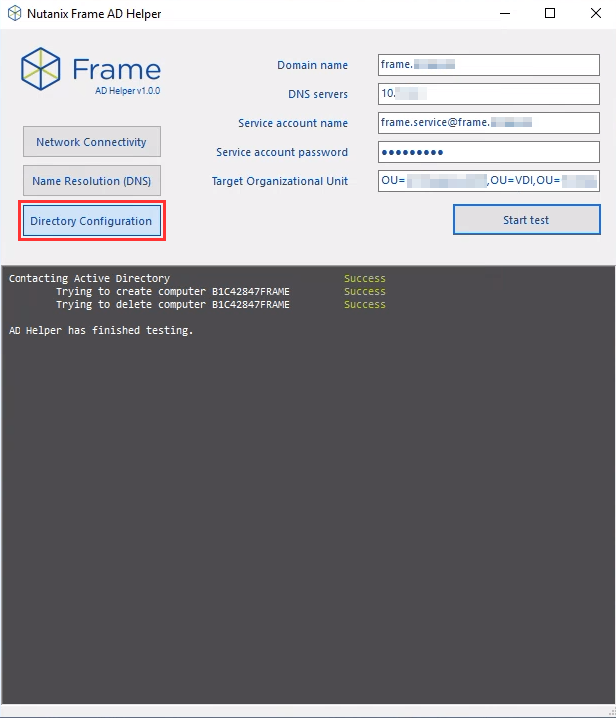
Once you have completed all of the tests above, you can begin configuring your domain with Frame.
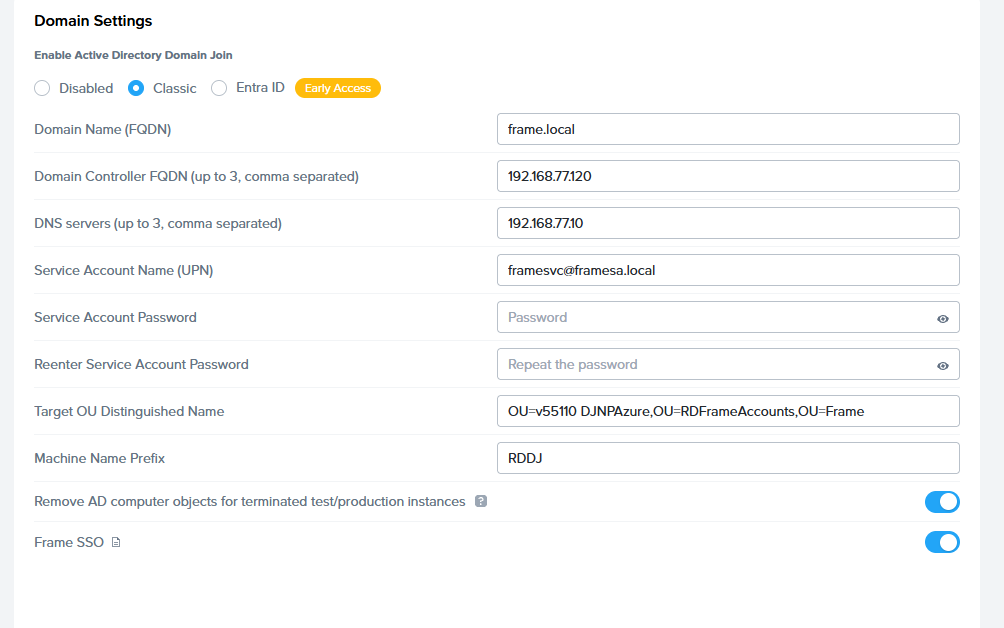
## Configure your Domain in Frame Console
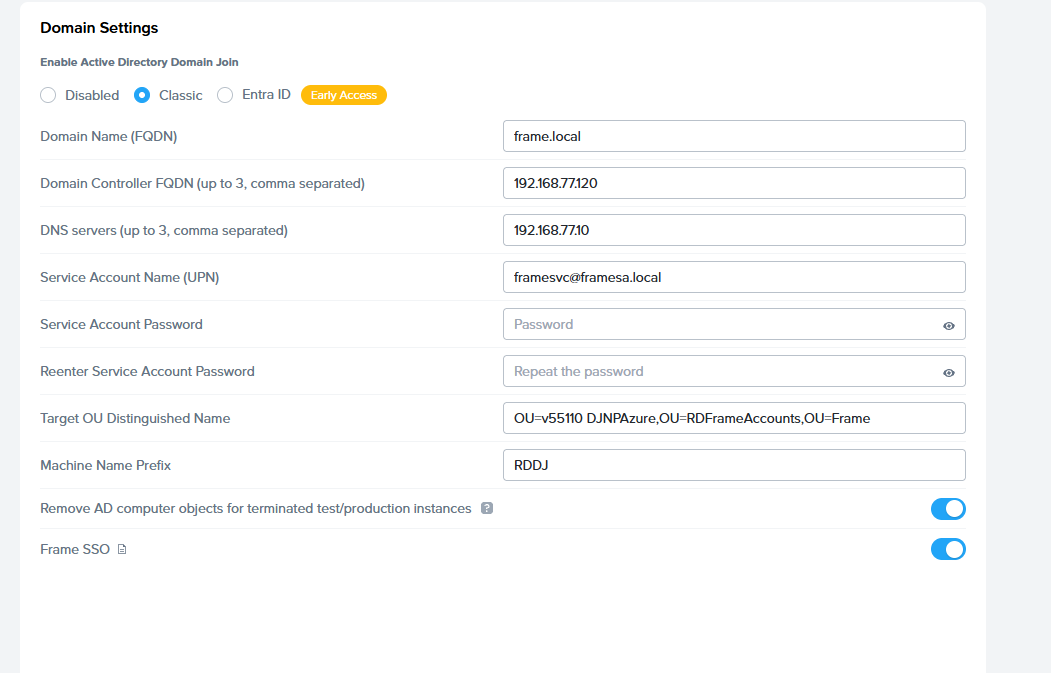
1. Click on Settings in the Dashboard and then the "Domain Settings" tab. Click on the "Enable Domain Settings" toggle to enable. You will need to populate the configuration parameters as described below.
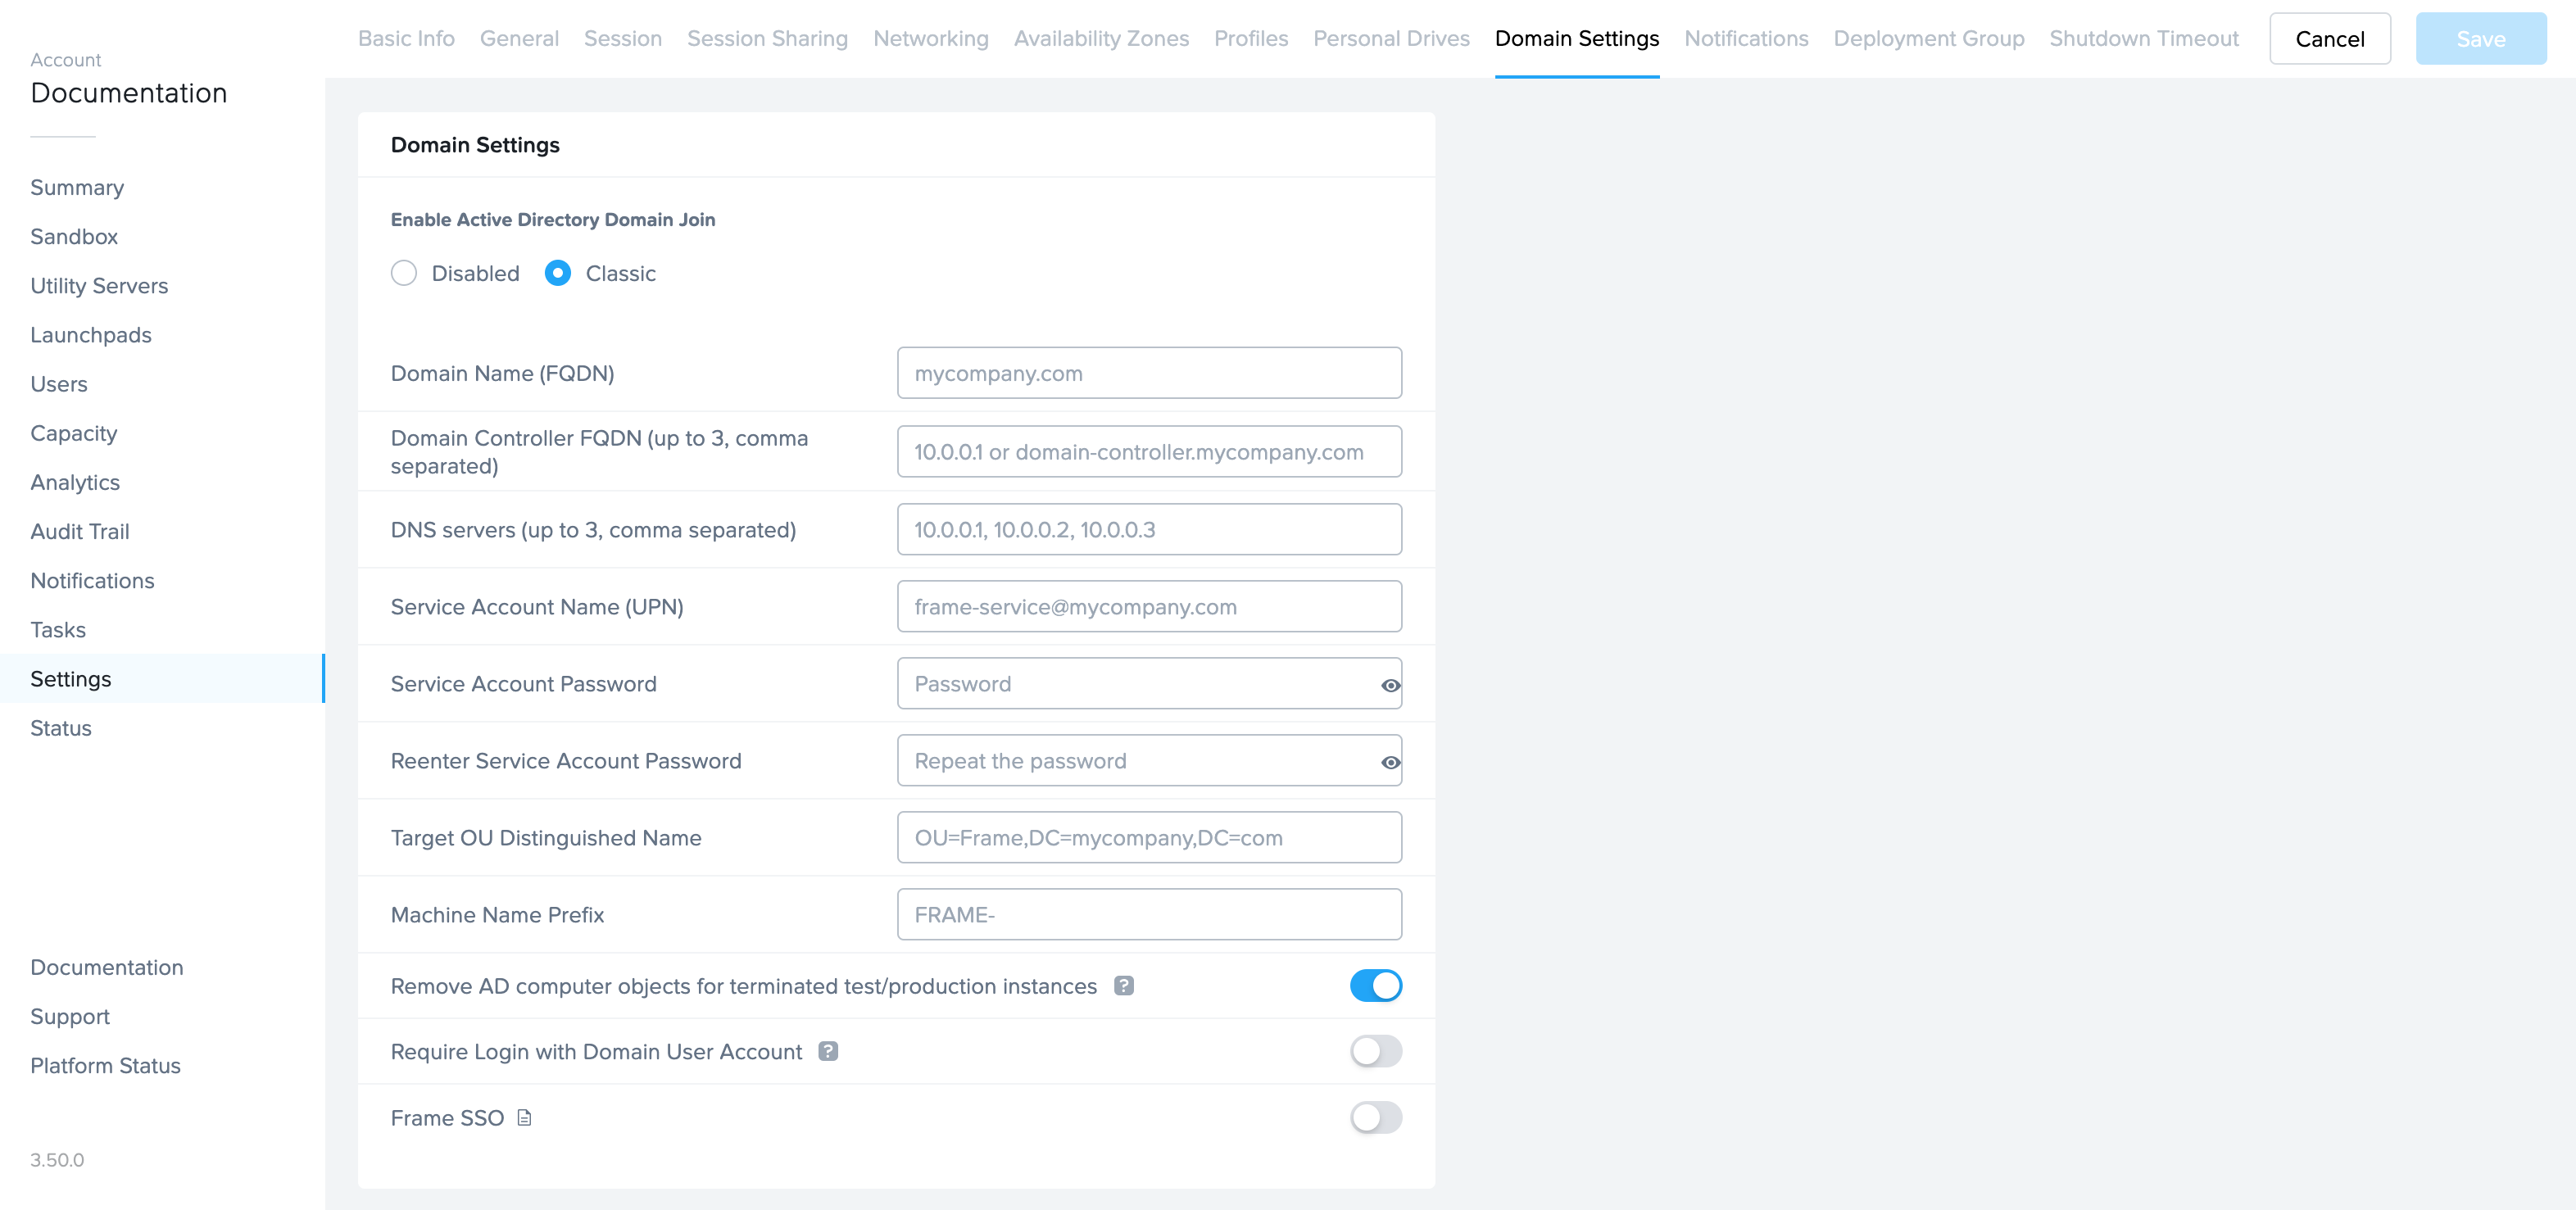
- **Domain Name (FQDN):** Domain Name (FQDN), such as `azuredji.local`. This field is mandatory. For Frame Guest Agent 2.X (Server 9.X), if **Domain Controller FQDN (or IP)** field is empty, the domain name (FQDN) value will be used in conjunction with your DNS and Active Directory (AD) Sites and Services to determine the domain controller(s) to use. If the **Domain Controller FQDN (or IP)** field has 1 or more FQDNs or IP addresses, then Frame Guest Agent 2.X will attempt to join the test and production pool VMs to one of the specified domain controllers.
- **Domain Controller FQDN (or IP) (Frame Guest Agent 2.X only):** If you are using AD Sites and Services, you can leave this field blank. If you wish to use specific domain controllers, enter those domain controllers, comma separated, either as:
- Domain Controller FDQN `supportdc.azuredji.local`
- Domain Controller IP address `10.0.0.5`
- Domain name `nutanix.local` (in situations where multiple Domain Controllers are used).
- **Service Account Name (UPN):** This is the service account we created in the Domain Controller Preparation guide. This must be in UPN format – `frameservice@azuredji.local`. Do not use the down-level logon name format `DOMAIN\\UserName`.
- **Service Account Password:** The password for the service account mentioned above.
- **Reenter Service Account Password:** Re-type the password from above.
- **Target OU Distinguished Name:** This is the distinguished name of the OU which we copied during the Domain Controller preparation – `OU=Azure-DJI-Test,OU=Frame,DC=azuredji,DC=local`
- **Machine Name Prefix:** Specify (up to 6 characters) a string that will be prepended to the machine name generated by Frame for the domain-joined VMs.
- **Remove AD computer objects for terminated test/production instances:** If enabled, AD computer objects will be deleted in your domain when test/production instances are terminated. For additional details, review the page on [Stale AD Object Cleanup](https://docs.difr.com/books/platform-administrators-guide/page/stale-ad-object-cleanup).
- **Frame SSO:** Refer to the [Frame SSO documentation](https://docs.difr.com/books/platform-administrators-guide/page/frame-single-sign-on) for details.
- **Promote domain user to local admin (Persistent Desktop Frame accounts only):** If enabled, the persistent desktop user will be added to the local Windows Administrators group of their assigned persistent desktop VM. This allows the user to install applications or adjust Windows settings. This configuration setting will only be visible after the persistent desktop Frame account has been joined to a Windows domain.
The domain-joined workload VMs must be able to reach at least 1 DNS server that can resolve public FQDNs (either provided by DHCP or the domain controller). Otherwise, the workload VMs will not be able to register themselves with the Frame control plane.
2. Once you have correctly entered all of the required information, click "Save" in the upper right corner of the page. A notification will appear displaying the pending request to enable Domain Join.
3. The pending request notification will disappear once the process is complete and your Domain Join tab will now display the option to change the service account password.
4. Lastly, go back to your "Systems" page and publish your Sandbox. Once the publish is complete, you will be able to access your Domain Joined instances.
To ensure your production instances are joined to your domain correctly, it is recommended to adjust your first publish to a max of 1 (under your [capacity settings](https://docs.difr.com/books/platform-administrators-guide/page/capacity)) and verify changes before publishing to a larger pool.
## Troubleshooting
Frame recommends using the [Frame AD Helper tool](https://docs.difr.com/link/104#bkmrk-frame-ad-helper) as described above for scenarios where troubleshooting is required.
# Frame Single Sign-On
## Introduction
Frame Single Sign-On (SSO) allows users to access a domain-joined VM without requiring users to enter their domain user credentials every time they enter into a Frame session. This patented feature (US Patent #11,483,305) provides a more streamlined end-user experience in terms of Windows domain user authentication.
The first time a user starts a session to a domain-joined workload VM, Frame Terminal (running within the user’s browser or Frame App) prompts the user to enter their Active Directory domain user credentials. Frame Terminal encrypts the user credentials using a user-specific public key certificate generated by Frame Platform. The encrypted domain user credentials are stored locally within the user’s browser or Frame App cache, linked to the user’s identity within Frame (as provided by the identity provider) and specific Frame Account, and sent to the workload VM via Datagram Transport Layer Security (DTLS).
## Requirements
- A Frame account configured under Settings > Domain Settings so that test and production workload VMs are joined to Active Directory.
- The Sandbox has been published at least once with at least one domain-joined test/production workload VM for users.
- Frame Guest Agent 1.9.4.0 and higher
- Frame Server 8.6.8.0 and higher
- Frame Remoting Protocol 8
## Limitations
- If a user wishes to log in using a different domain user account to workloads in the same Frame account, they must clear their encrypted user credentials from the browser cache or completely clear the Frame App cache.
- Frame SSO is dependent on the cache file persisting across device power cycles. Currently, Frame SSO will not work with thin clients that do not have a persistent store to save the user’s encrypted domain user credentials.
## Enable Frame SSO
You enable Frame SSO, as an Admin, by going to **Settings > Domain Settings** in the Frame Account Dashboard and toggling on Frame SSO.
[](https://docs.difr.com/uploads/images/gallery/2025-12/eeyimage.png)
## Disable Frame SSO
To disable Frame SSO, turn off the Frame SSO feature in Domain Settings. Users will be required to authenticate to the Windows domain each time they start a Frame session, regardless of whether they used the Frame SSO feature in the past.
Disabling Frame SSO does not clear the users' encrypted domain user credentials in their browser or Frame App cache. Users will need to individually clear their browser/Frame App cache (see below).
## User Experience
This section discusses what your users will experience when Frame SSO is enabled on a domain-joined Frame account.
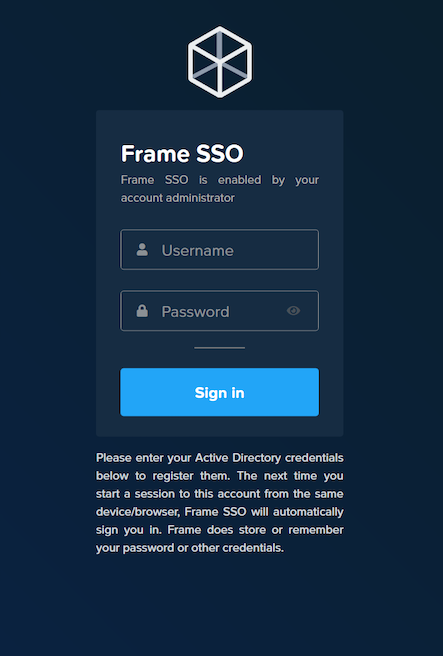
### First login
When Frame SSO is enabled and the user's browser (or Frame App) does not have the user's encrypted domain credentials in its cache, the user will be asked to enter their domain credentials.
[](https://docs.difr.com/uploads/images/gallery/2025-10/E63image.png)
The user must specify their username as UPN: username@domain.com or domain\\username
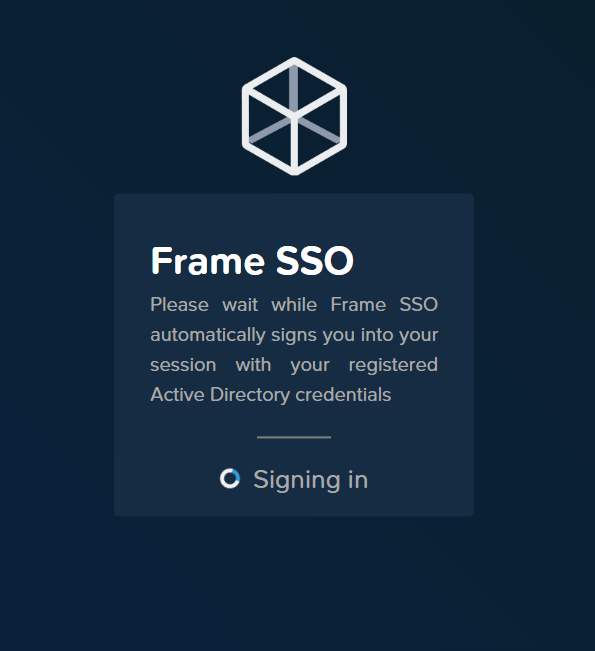
### Subsequent logins
Once the user's domain credentials are encrypted and stored in their browser or Frame App cache on the device, the user will see the following screen in subsequent logins when they start their sessions.
[](https://docs.difr.com/uploads/images/gallery/2025-10/uhzimage.png)
## Encrypted User Credential Storage
Once a user successfully logs into a domain-joined Frame session, the encrypted domain user credentials are saved in the browser or Frame App cache. If more than one domain user is using the browser, there will be more than one encrypted domain user credential record.
### Clearing User Credentials
#### Web browser
To clear the encrypted domain user credentials, the browser user must perform one of two operations:
1. The user can go to **Clear Browsing Data** in their Chrome browser and only clear **Cookies and Other Site Data**.
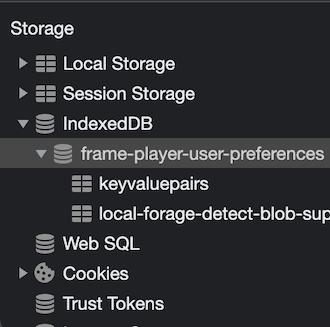
2. Alternatively, the user can go to the **Developer Console** and follow the path below to delete the user credential entry:
`dev.console > Application > Storage > IndexedDB > frame-player-user-preferences > keyvaluepairs > [user creds entry]`
#### Frame App
For Frame App, users must delete the cache folder by clearing the **User Cache** in Preferences.
## Troubleshooting
### Errors
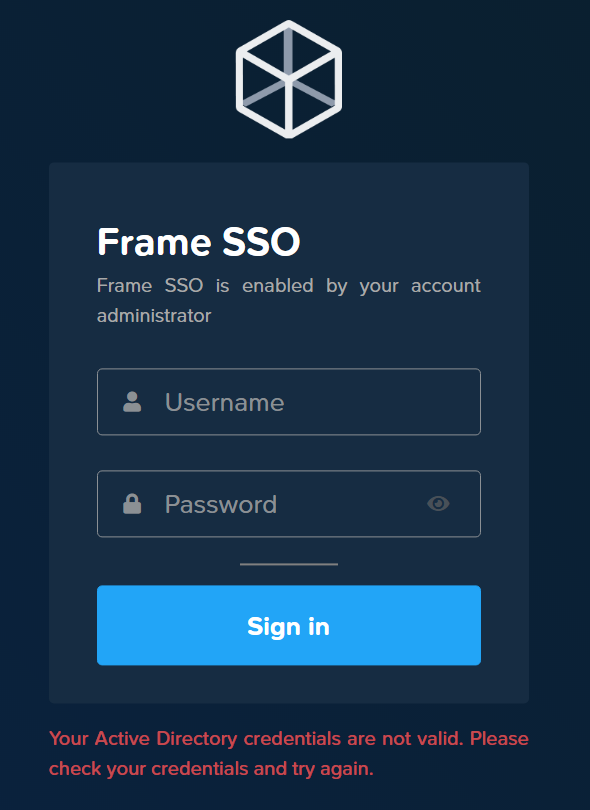
#### Incorrect Username or Password
If the user attempts to register a username or password that cannot be validated by their domain controller, Frame Terminal will display:
[](https://docs.difr.com/uploads/images/gallery/2025-10/svVimage.png)
The user will need to ensure they are entering the correct domain credentials.
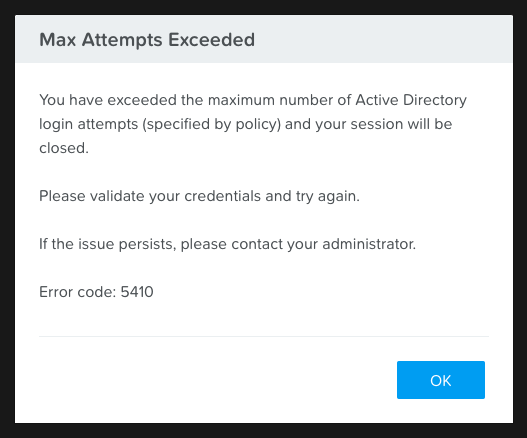
#### Maximum number of login attempts exceeded
If the user exceeds the maximum number of login attempts as defined by their administrator's domain policies, then Frame Terminal will return an error.
[](https://docs.difr.com/uploads/images/gallery/2025-10/lrWimage.png)
The user should revalidate their domain user credentials outside of Frame and may need to contact their Windows administrator to reset their domain password.
# Stale AD Object Cleanup
When workload VMs in a DJI Frame account are created (due to a publish or an increase in the max capacity of a test or production pool), the test or production workload VMs are added to the specified Windows Active Directory as computer objects. Each time there is a publish (for non-persistent DJI Frame accounts) or if the max capacity of a test or production pool is reduced, workload VMs are terminated. However, the corresponding AD computer objects are not automatically removed from the Windows domain. Administrators have the following options to clean up stale computer objects in their Active Directory environment.
## Manual
Domain administrators can periodically run the following PowerShell scripts to identify and remove stale computer objects in their domain, where stale computer objects are defined as computer objects that have not been logged in for a defined period of time. These scripts must be run with a Windows domain user with the proper Windows domain privileges to query the domain controller for the first PowerShell script and to delete computer objects from the domain for the second PowerShell script.
If the script detects any computers belonging to the Windows domain OU specified in `$OU` that have not logged into the domain for "x" days as defined by the variable `$DaysInactive`, the computer object will be listed.
```powershell
#Set OU and inactive days interval to match your organization requirements
$DaysInactive = 60
$OU = "OU=FRAME-AWS-QA-TEST-2,OU=VDI,OU=Computers,OU=Frame,DC=frame,DC=demo"
#Search for inactive computer objects and show results in a powershell table
$Time = (Get-Date).Adddays(-($DaysInactive))
Get-ADComputer -Filter {LastLogonTimeStamp -lt $time} -Properties LastLogonDate -SearchBase $OU | Ft Name,DistinguishedName,LastLogonDate -AutoSize
```
To find the computers belonging to the Windows domain OU specified in `$OU` that have not logged into the domain for "x" days as defined by the variable `$DaysInactive` and remove them from the Windows domain, the Windows administrator can execute (or setup a scheduled task to execute):
```powershell
#Set OU and inactive days interval to match your organization requirements
$DaysInactive = 60
$OU = "OU=FRAME-AWS-QA-TEST-2,OU=VDI,OU=Computers,OU=Frame,DC=frame,DC=demo"
#Search for inactive computer objects and delete them (confirmation needed)
$Time = (Get-Date).Adddays(-($DaysInactive))
Get-ADComputer -Filter {LastLogonTimeStamp -lt $time} -Properties LastLogonDate -SearchBase $OU | Remove-ADComputer -confirm:$false
```
## Automatic
Frame provides a feature for automatically deleting the Active Directory (AD) computer object associated with a **terminated** Frame instance. When the feature is enabled, AD computer objects will be marked for deletion when an instance is terminated because of:
1. A [Publish](https://docs.difr.com/link/101#bkmrk-page-title),
2. the reduction of the [Max Default Capacity](https://docs.difr.com/link/114#bkmrk-page-title) of an instance pool, or
3. the termination of a domain-joined persistent desktop or non-persistent VM under [Status](https://docs.difr.com/link/113#bkmrk-page-title) or via Frame Admin API.
Every 30 minutes, Frame Platform will determine the list of terminated Frame instances whose AD computer objects have not yet been deleted. Frame will then transmit the AD computer object list to one or more powered-on, domain-joined instances are in **Running** status (not in use by a user). The available instances will then contact the Windows domain controller to delete the AD computer objects. If domain-joined instances are not available to handle these requests, then Frame Platform will wait 30 minutes to try again.
Since customer administrators must manually configure Sandbox and Utility Servers to be joined to a Windows domain (if desired), customer administrators are responsible for removing these AD computer objects themselves.
### Prerequisites
- This automatic AD object cleanup feature applies only to non-persistent, domain-joined Frame accounts.
- The workload VMs must be running **Frame Server 8.7 or greater** for this AD computer object deletion feature.
- The service account specified within Account Dashboard > Settings > Domain Settings must have permissions to delete computer objects within the specified domain as mentioned in **step 10** of the [Domain Controller Prep document](https://docs.difr.com/link/103#bkmrk-page-title).
**Known Limitation**
This feature requires **at least one AD domain-joined instance** to be powered on and not in a Frame session within the Account in order to execute the computer object deletion. As a result, this feature is not triggered during the Account Termination process, in scenarios where the Max Instances setting is set to 0 across all available Instance Pools, or when all domain-joined instances are being used by users.
### Enable/Disable Automatic Removal of AD Computer Objects
This feature is automatically enabled for all new domain-joined accounts created after May 4, 2023.
If you wish to enable this feature on an older account or disable it, simply navigate to the **Account Dashboard** where the domain is configured. From there, navigate to **Settings > Domain Settings** and enable/disable the toggle, as shown below:
[](https://docs.difr.com/uploads/images/gallery/2025-12/oYCimage.png)
# Linux with Windows AD LDAP
Customers wishing to deliver Frame-managed Linux desktops to users can use this guide to configure their Linux desktops to authenticate using Windows Active Directory (AD) LDAP.
## Prerequisites
1. Active Directory Setup.
2. Frame Account settings as specified below.
### AD Domain Controller Setup
Before Linux VMs can be configured to use Windows AD LDAP, the Windows AD domain controller must be configured as described in the [Domain Controller Prep](https://docs.difr.com/link/103#bkmrk-page-title) guide.
### Frame Account Settings
During the creation of the Frame account, you must use Frame-provided images for accounts hosted on public cloud infrastructure or on AHV, installed the [Frame Workload Installer (Linux)](https://files.difr.com/) version 2.0.3 or greater in your BYO Ubuntu Server 20.04 template image.
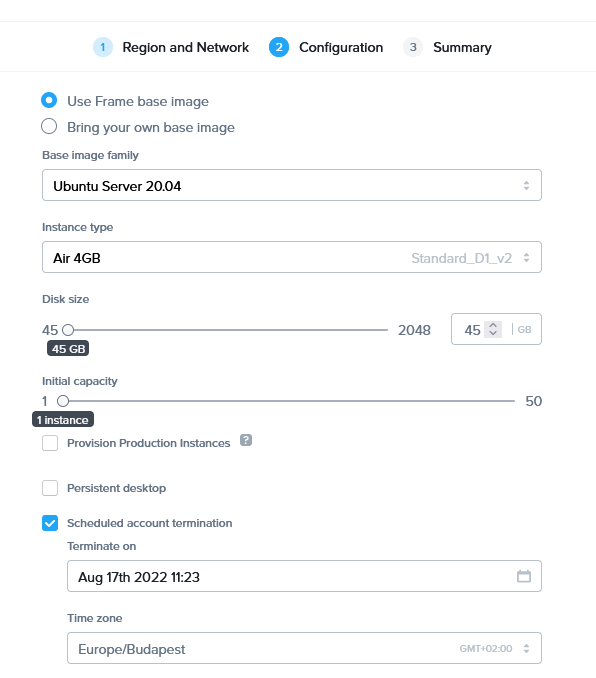
Account Creation - Use Frame Base ImageThe [Domain](https://docs.difr.com/link/102#bkmrk-page-title) settings within the Frame Account Settings for an Ubuntu Frame account are identical to the settings for a Windows Frame account with two notable exceptions:
1. The Domain settings field **Service Account Name (UPN)** needs to be entered with capital letters (e.g., `frame.service@DOMAIN.NAME.COM`).
2. The username for logging in to the domain-joined production instances needs to be in the following format: `username@domain.com`. **Do not use** just `username` or `domain.com\username`.
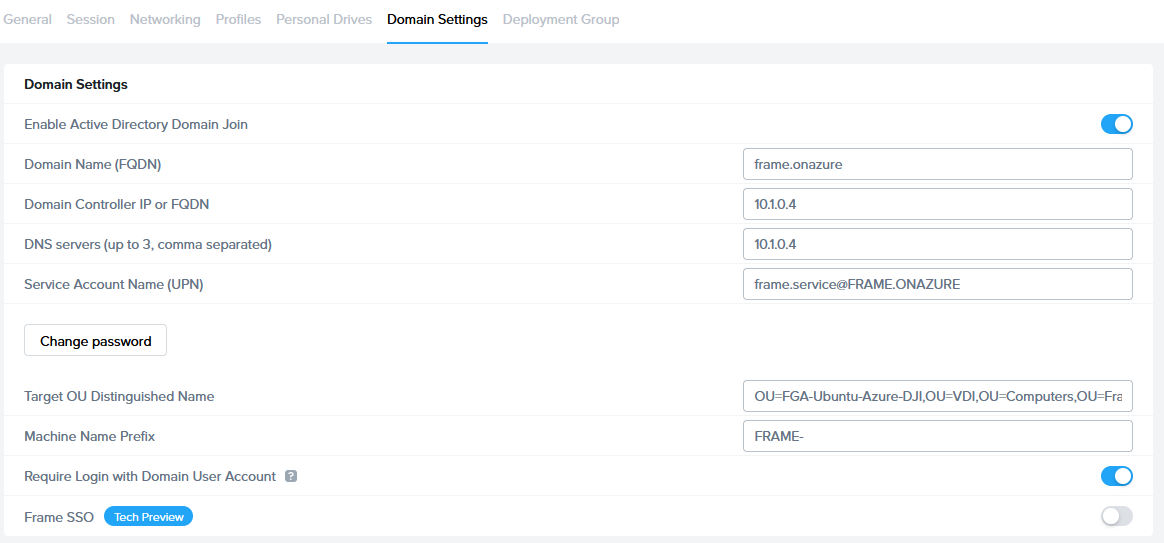
Account Settings - DomainOnce you have updated your Domain settings, reboot your Sandbox VM.
## Pre-publish Verification
Before publishing your Sandbox, power on the Sandbox VM and access the Sandbox. Open a Linux terminal and execute the following commands:
```bash
realm discover
dig
ping
```
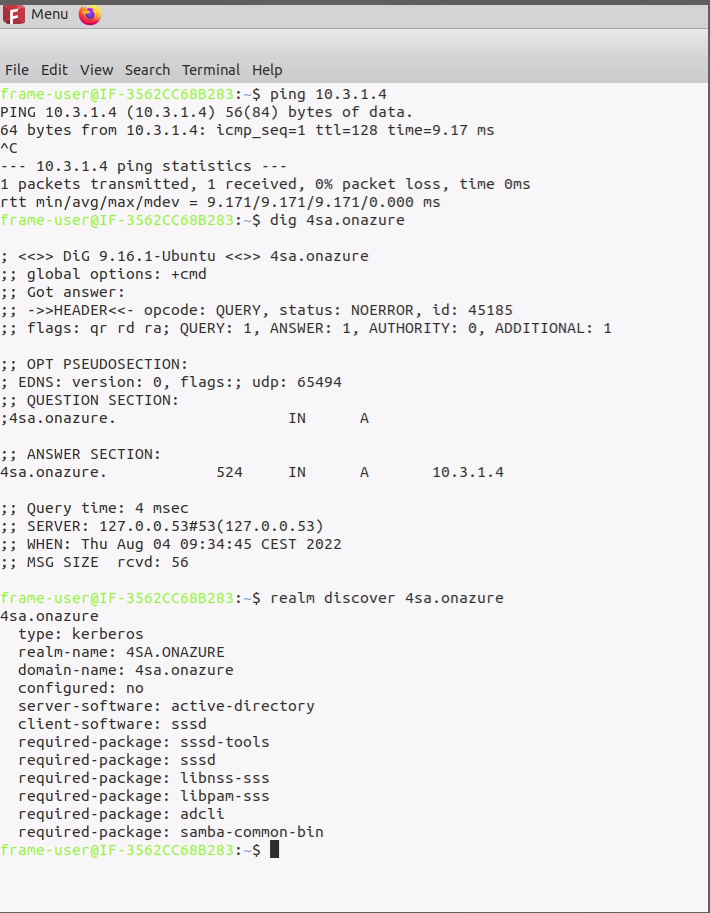
Sandbox - Pre-publishIf the commands return the expected results, then proceed with publishing the Frame account Sandbox.
## Post-publish Verification
Once you have published the Sandbox, you can launch a production VM. You should see the following login screen:
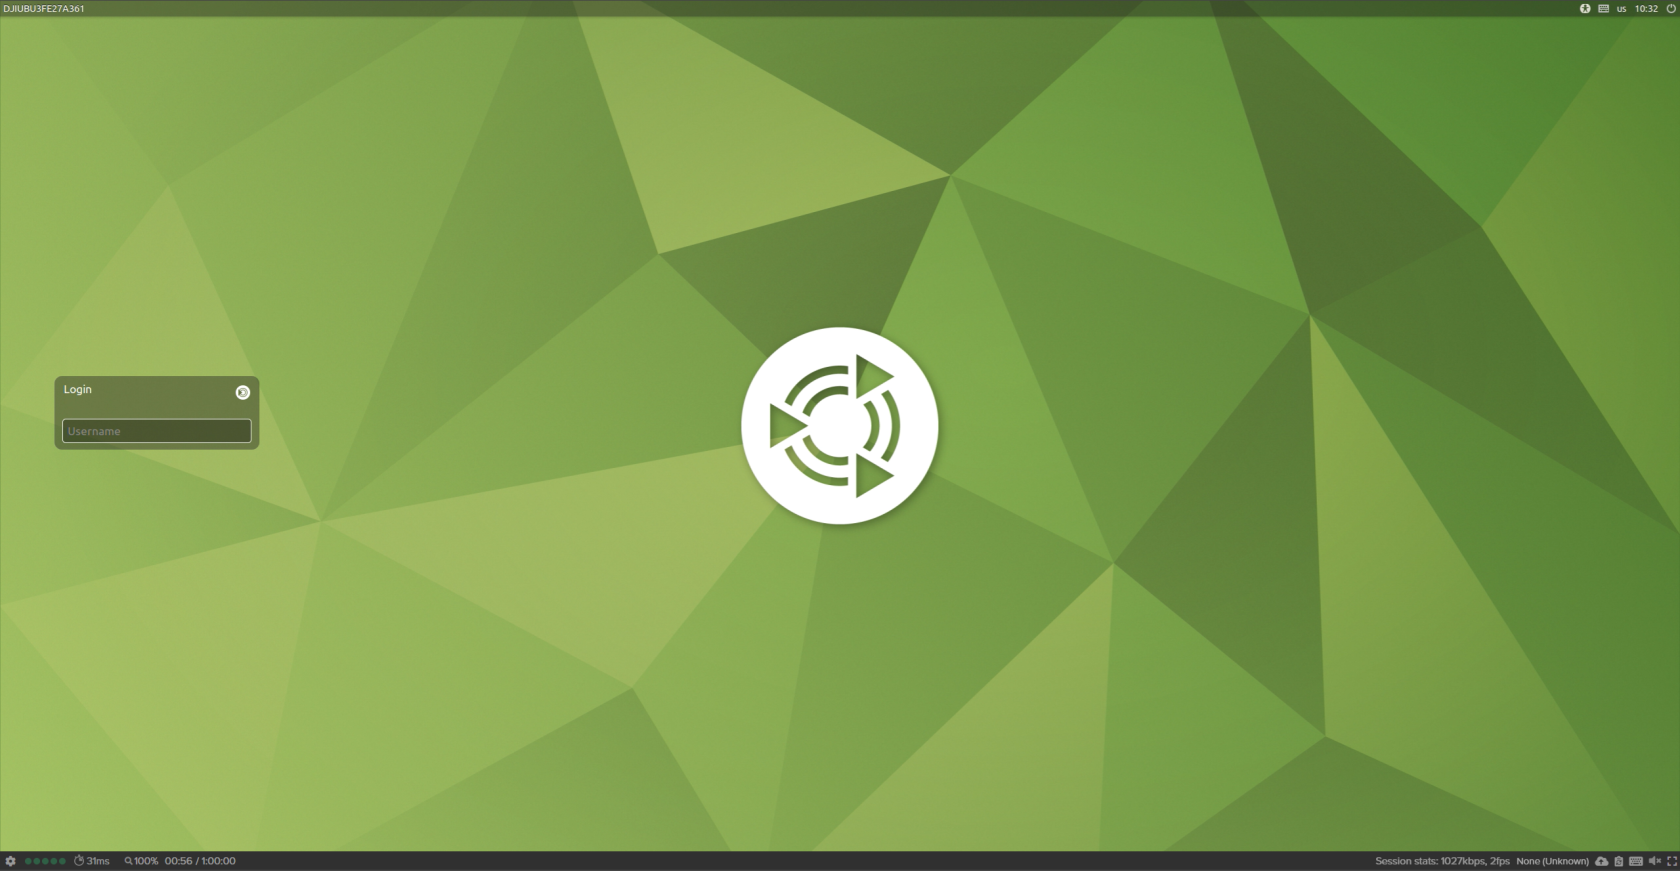
Ubuntu Login PageEnter a user's credentials in UPN format (`firstname.lastname@domain` and then the user's password).
Once Windows AD has authenticated your user credentials via LDAP, you will see your home directory:
[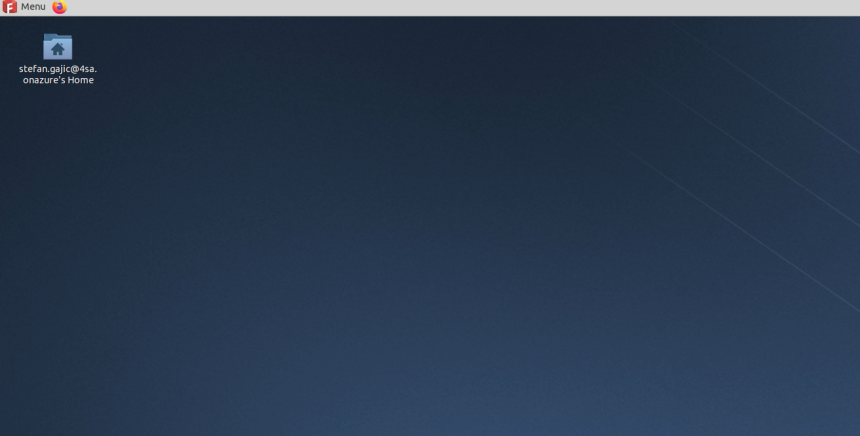](https://docs.difr.com/uploads/images/gallery/2026-01/qRyimage.png)
Home DirectoryAdditionally, by opening terminal in your Ubuntu desktop, you can type the `realm list` command to check the domain settings:
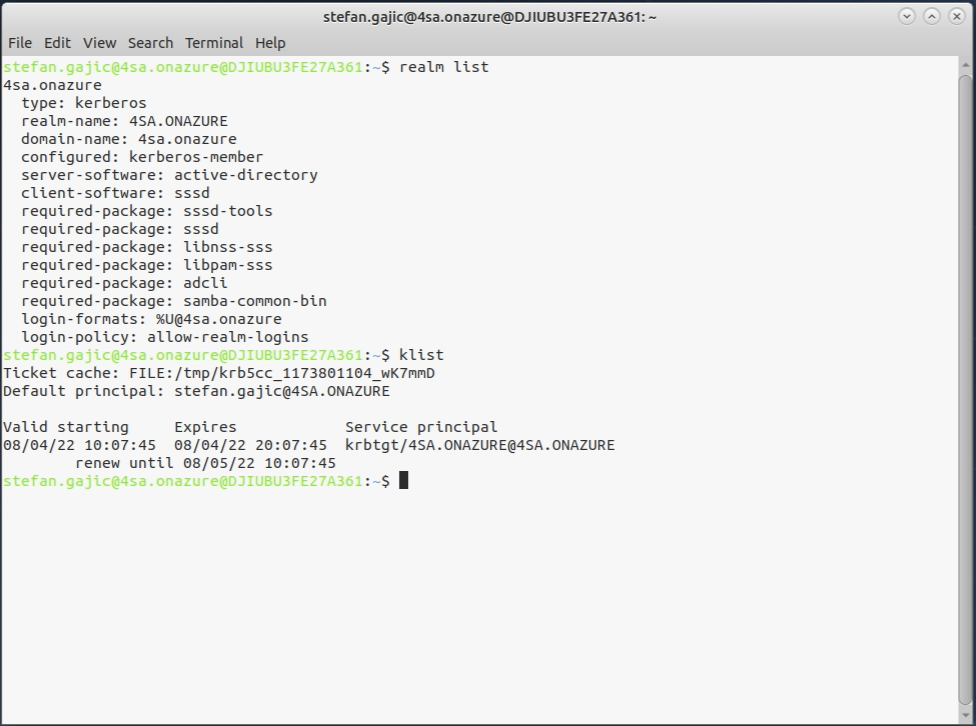
Ubuntu Login Page