Disaster Recovery
Backups, Disaster Recovery, Data Availability
Backups
Frame backup and recovery allows you to save the current state of your persistent resources (Sandbox, Utility Server, Persistent Desktop, User Volume). Backups can be scheduled or performed manually on demand. Once a resource is backed up, the Frame administrator can restore a backup for a specific resource.
When the Frame Disaster Recovery (DR) feature is enabled and configured, backups are replicated to a secondary AHV Cluster or cloud region.
Sandbox and Utility Servers
Backups for Sandboxes and Utility Servers is largely similar. Continue reading to learn how Sandbox backups are tied to publishes, and how Utility Servers backups can be managed just as easily as the Sandbox.
Publishing
When a Sandbox is published, Frame will automatically backup the Sandbox image. For domain-joined Frame accounts, the backup will be done after Frame has cloned the Sandbox disk image and generalized the image using sysprep. For non-domain-joined Frame accounts, publishing will trigger the backup immediately after Frame has cloned the Sandbox since the non-domain-joined Frame account Sandbox is not generalized.
Backups due to publishing will be listed as "P" under the Type column.

By default, Frame will retain a maximum of two Publish backups for a Frame account. If you want to change the maximum number of Publish backups to be retained, you can open a support case to increase/decrease this value.
Manual Backups
-
From an Account Dashboard, go to the Sandbox or Utility Servers page and navigate to the Backups panel listed under the desired system.

-
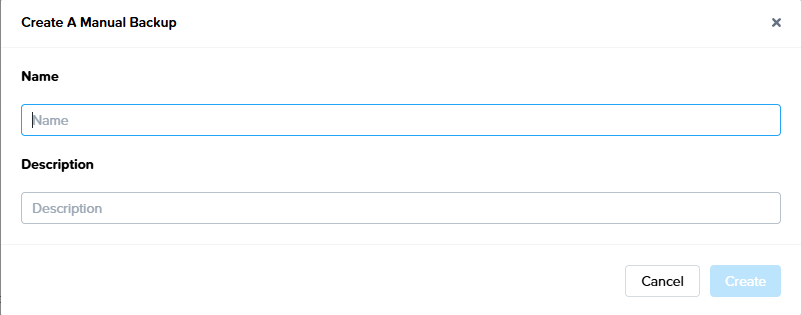
Click Create backup and assign it a name and Optional add a Description. Click Create and accept the prompt to power off your Sandbox when you're ready.

-
Once the backup has started, the instance will go into maintenance mode and you will not be able to access it until the task is complete.


The time to create a backup varies based on image size and operating state. Backing up a standard 45 GB image in a powered off state typically takes 5-10 minutes. If the instance is running or if the underlying cloud services are under heavy load, you will likely see longer wait times.
- Once your backup is completed, it will appear in the Backups list. At a glance, you can see the name of the backup, when it was created, and the type of backup (manual, scheduled, or publish).
If you would like to adjust the number of retained manual backups for your system, please continue to the "Scheduled Backups” section below.
Scheduled Backups
Administrators can enable scheduled backups for a Sandbox or Utility Server from the same area of Dashboard.
-
Navigate to the desired system page and find the “Backups” panel. Click on the kebab menu icon in the upper right corner of the panel and select Settings.
-
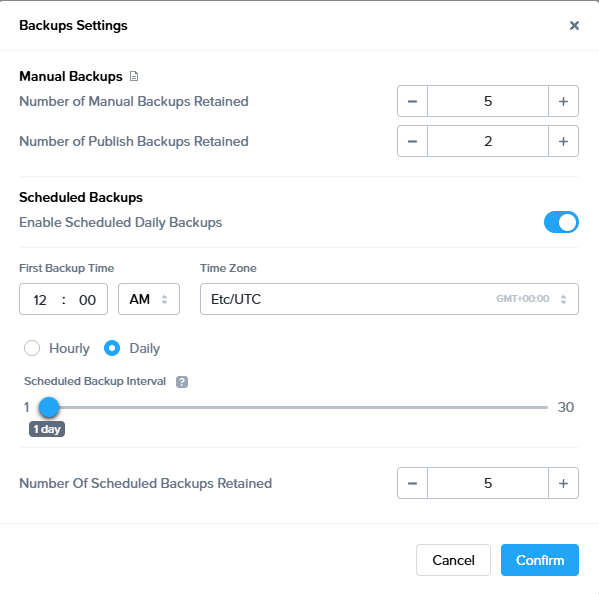
A new window will appear. Enable the “Schedule daily backups” toggle to reveal two new fields. Click “Confirm” in the bottom right corner of the window once you have specified your desired settings.

-
Backup time: Select the desired time of day you would like your automatic backup to be performed and which time zone this applies to. Backups will occur daily (including weekends) at the designated time.
Caution
We do not advise scheduling backups during operational hours for Utility Servers since they will be made briefly unavailable during the backup process. Scheduling backups for Sandbox instances does not affect production users and therefore can be scheduled at any time.
-
Number of scheduled backups retained: This value specifies the number of scheduled backups you would like to store.
-
Number of manual backups retained: This value specifies the maximum number of manual backups you can create. If the number of manual backups exceeds this value, the administrator must delete their manual backups until the number of manual backups remaining is less than this value before a new manual backup can be performed.
Please note that the maximum number of retained manual or scheduled backups is 100. Backups are stored as a standard machine image and will incur storage costs from your cloud provider.
-
Replicate Backups
When Frame DR is enabled, there is a new option to Replicate manually a backup to your secondary location. This option is associated with each backup and is beneficial in cases where replication failed or the Frame Administrator knows that the backup replica is corrupted.

You will be asked to confirm if you wish to make a replica of the backup in the primary location and send it to your secondary location.

Restore from a Backup
Restoring an image from a previous backup is simple. Restoring from a previous backup will replace your current Sandbox or Utility Server image with the backup image you select. Any changes made since the selected backup was created will be erased.
-
Click on the kebab menu located to the right of the backup you wish to restore and choose “Restore.”

-
A prompt will appear to confirm before the process starts. Click “Restore” to continue. If Frame DR is enabled, the Frame administrator will have the option to “Force restore from replica”. When this is selected, Frame will ignore the local snapshots for this VM and use the backup copy which had been replicated to the remote site.

After the backup has been restored, the instance will be returned to its previous operational state.
In scenarios where a Frame-created VM backup is used as a BYO Master Image in AHV environments, Frame will automatically create an additional backup of the VM so that the Master Image VM is preserved in the event the backup needs to be deleted (either manually or automatically by Frame).
Delete a Backup
To delete a backup, simply click on the kebab menu to the right of the backup you wish you delete and select Delete. Click Delete again when the dialog appears to confirm your choice.

When Frame DR is enabled and the Frame Administrator deletes a Sandbox/Utility Server backup for a Frame account, the replica is deleted in the remote site. In the case of AHV, the entire protection domain corresponding to that backup (VM clone) and the replica VM clone are deleted as well. For Azure, the backup VM is also deleted in the backup region.
Volumes
Persistent Desktops, Personal Drives, and Enterprise Profiles can be managed under the Volumes section of an Account's Dashboard.
Manual Backups
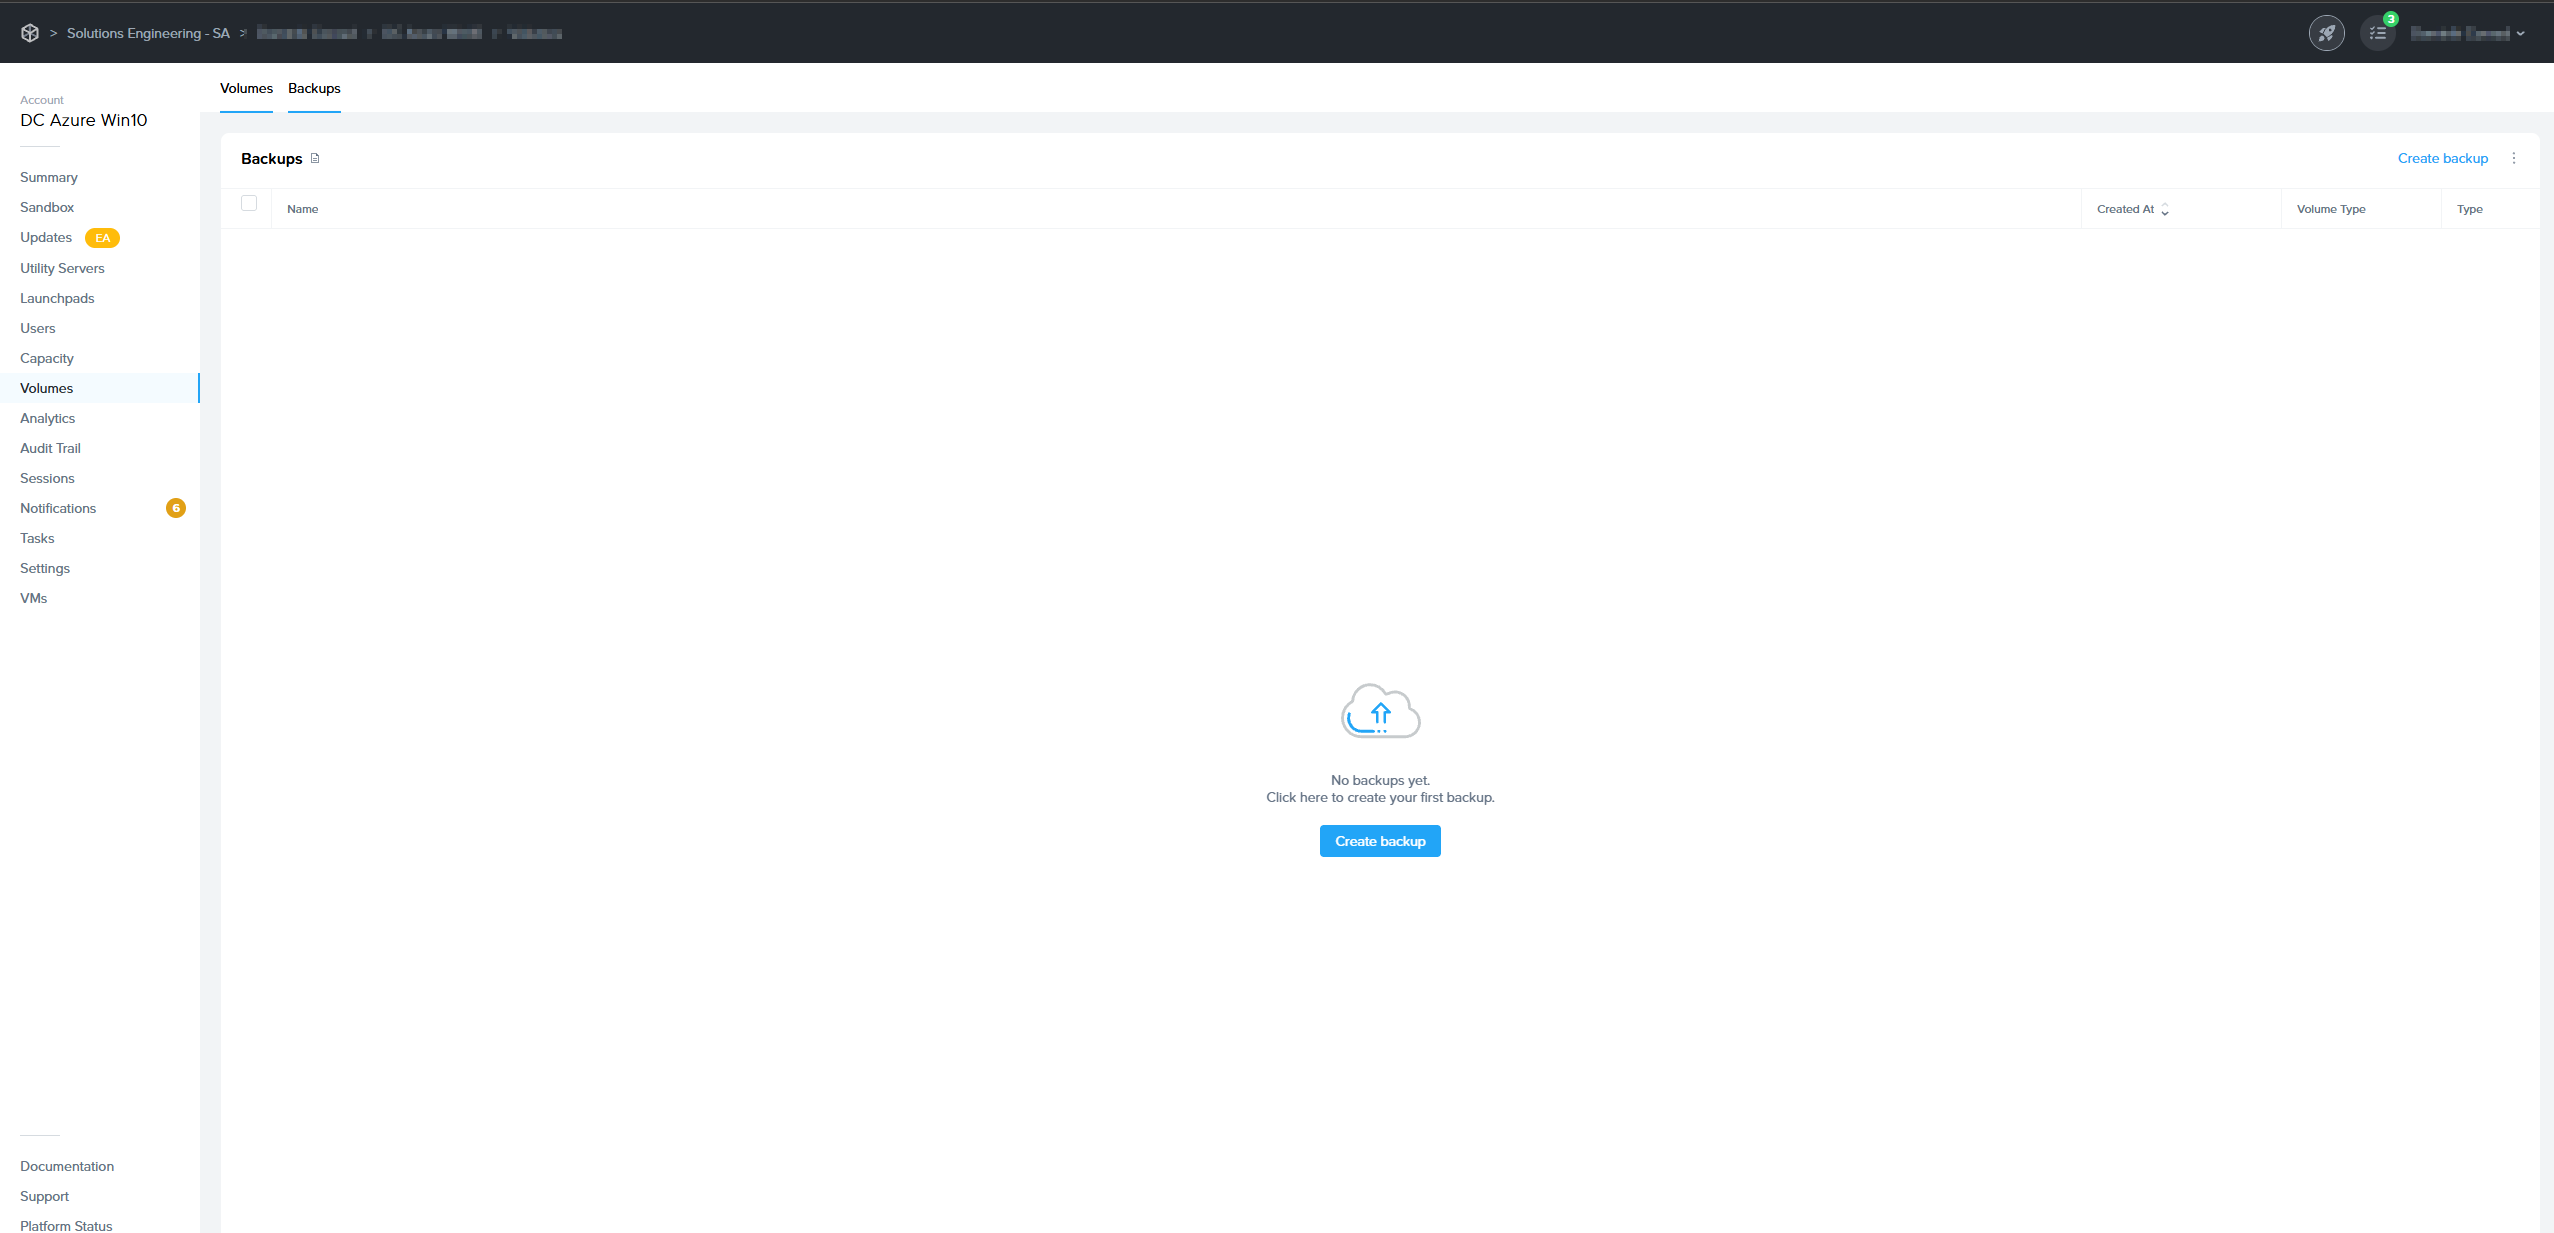
Administrators can create a backup of Persistent Desktops, Personal Drives, and Enterprise Profile volumes by navigating to the Volumes page from their Dashboard and clicking on the Backups tab. From there, click Create Backup.
Multiple User Volumes and Persistent Desktop backups can be initiated simultaneously by administrators with appropriate permissions.

Click “Create” when you're ready. A progress indicator will appear above the Backups section.

Alternatively, administrators can create a backup of a volume by navigating back to the Volumes tab, clicking on the kebab menu next to the desired volume, and selecting Backup. In the case of Persistent Desktops, administrators can go to the kebab menu in the upper-right corner and select Backup all persistent user volumes.
For Personal Drive and Enterprise Profile volumes, administrators can specify the number of retained manual backups by clicking on the kebab menu in the upper corner of the Backups section and selecting Settings. Click Confirm once the desired settings have been updated.
Please note that the maximum number of retained manual or scheduled backups is 100. Backups are stored as standard machine images and will incur storage costs from your cloud provider.
Scheduled Backups
To set up scheduled backups, navigate to the Volumes page from the Dashboard of your account and click on the Backups tab. Click on the kebab menu listed under the Backups section and select Settings. A new window will appear, enable the Schedule daily backups toggle.
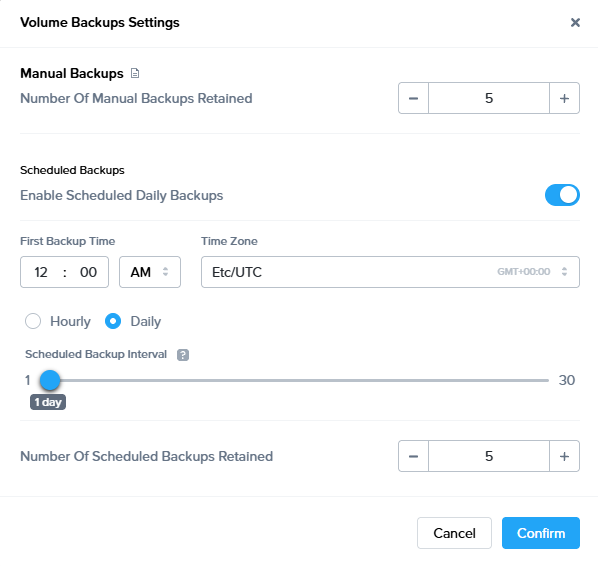
Specify the time of day you would like your backups to occur. Note that daily backups occur every day of the week, including weekends. You can also adjust how many automatic backups you would like Frame to store at a time by adjusting Number of scheduled backups retained. Click Confirm when you're done.
If you change the backup schedule (e.g., change of start time, change of the time between backups), the revised backup schedule takes effect on the first applicable time for the backup. For example, if the start time is changed for a daily backup, the new start time will be applied on the following day.
Restore from a Backup
To restore from a backup, simply click on the kebab menu next to the desired backup and select Restore.
Restoring from a previous backup will flash the volume with the backup image you select. Any changes made since the selected backup was created will be erased.
If Frame DR is enabled, the Frame administrator will have the option to Force restore from replica. When this is selected, Frame will ignore the local snapshots for this volume and use the backup copy which had been replicated to the remote site.
Delete a Backup
To delete a backup from the Backups tab on the Settings page of your Dashboard, simply click on the kebab menu to the right of the backup you wish you delete and select Delete.
If Frame DR is enabled, when a persistent desktop VM backup for a Frame account on AHV is deleted, the replica VM clone on the secondary AHV cluster is deleted. The protection domain is not deleted, even if all the backups are deleted as the VMs are still protected within the protection domain. For Azure, when a persistent desktop VM backup is deleted, the backup VM is deleted in the secondary cloud region.
Monitoring
Within the Volumes tab, the Frame Administrator can check if the most recent backup for user volume/persistent desktop succeeded or failed (with a detailed error message, if backup failed). Most recent backups for some users might have failed, for example in the last scheduled bulk backup of persistent desktops or user volumes. In that case, backup can be initiated manually for those users.
In the below example, two of the three user volumes had not yet been backed up.

A few minutes later, all three user volumes had been backed up.

For each persistent desktop and user volume backup, if Frame DR is enabled, replication status is displayed which shows if the backup was replicated successfully or not. For backups where replication failed, replication can be initiated from the context menu, the same as for Sandbox and Utility Server backups.
Possible values for the Replication Status column are:
- In-progress
- Done
- Failed
Volume Details

Administrators can view details for a given volume by hovering over the volume name in blue text. The details shown include the Volume name, type, and ID.
Disaster Recovery
The Frame Disaster Recovery (DR) feature provides Frame administrators with the ability to backup a Frame account on an AHV cluster or Azure public cloud region to a separate AHV cluster or Azure public cloud region, respectively.
| Primary Infrastructure | Secondary Infrastructure |
|---|---|
| Nutanix AHV cluster 1 | Nutanix AHV cluster 2 |
| Microsoft Azure region A | Microsoft Azure region B |
Currently, the Frame Disaster Recovery feature set consists of backup, replication, and restore functionality for AHV and Azure only. Support for AWS and GCP infrastructure and Failover to a secondary Frame account is in development.

All persistent resources of the primary Frame account are backed up in the primary location and replicated to the secondary location. Frame administrators can then either use the backups in the primary location or the replicas in the secondary location to recover the Frame account in the event of a disaster.

This document discusses how to configure AHV and Azure infrastructure with Frame to back up and recover a Frame account's persistent resources.
Prerequisites
When enabled, the DR backup and replication feature is triggered when any persistent resource is backed up. Frame administrators can manually trigger a backup, schedule backups on a regular interval, and have Frame back up the resource after a user has closed their session.
Considerations
Customers will need to consider several factors when deciding how often to perform these back ups:
-
Desired Recovery Point Objective (RPO)
-
Amount of backup data that must be replicated to the secondary location
-
Network bandwidth allowed between primary and secondary locations
-
Delay for end users waiting for their user volumes (Persistent Desktops, Enterprise Profile disks, Personal drives) to be backed up (if the “Enable post-session backup” and optionally “Stop server before post-session backup” are enabled).
-
Cost of data egress from the primary region to a different region (for public cloud infrastructure)
Return to Operation (RTO) will then depend on:
-
Amount of backup data that must be restored from either the primary or secondary location
-
Network bandwidth allowed between primary and secondary locations, if restoration is from replicas from the secondary location
Requirements
- The Backup and Recovery feature is only supported on Bring Your Own (BYO) infrastructure. This feature set is not available with Dizzion IaaS.
- For Frame accounts on AHV infrastructure, the backups must be on a second AHV cluster. The second AHV cluster must be registered on the customer's Frame Customer or Organization entity as a second AHV Cloud Account.
- For Frame accounts on public cloud infrastructure, the backups must be in the same public cloud account, registered on the customer's Frame Customer or Organization entity, and in a region different from the primary Frame account.
- The instance types that are used in the Primary AHV Cloud account must be configured with the same vCPU/Core and RAM values in the second AHV cluster for the Backup and Recovery feature. This prerequisite will be eliminated when the Failover feature is released with a user interface to map instance types from primary to secondary Frame accounts.
- For Frame accounts on AHV infrastructure, a user with Prism Element administrator privileges to both AHV clusters to setup protection domains is required.
- For Frame accounts on Azure, the Azure instance type must be supported in both the region of the Frame account and the region of the backups.
- To configure the Backup and Recovery feature for a Frame account, the Frame administrator must have the role of Customer Administrator or Organization Administrator, depending on where the Cloud Account is registered in the Frame Platform Hierarchy and the relative location of the Frame Account within the hierarchy. Account Administrators do not have permission to view the list of Cloud Accounts when setting up the Frame account's DR configuration.
Persistent Resources
The following Frame account resources are considered “persistent” for the purposes of backup, replication, and recovery for the Frame Backup and Recovery feature. These persistent resources are backed up and replicated to the backup AHV Cloud Account or public cloud region.
| Resource | Description |
|---|---|
| Sandbox | One disk per Sandbox (gold image, associated with the account) |
| Utility Server | One disk per Utility Server |
| Persistent Desktop | One disk per persistent workload VM that has been assigned to a user |
| Enterprise Profile | One profile disk per user |
| Personal Drive | One personal drive per user |
Template images are not backed up as they are not part of a Frame account. Customers are responsible for backing up template images separately.
The customer is responsible for backup and recovery of any data not explicitly defined in the table above. For example, the customer must have a backup and disaster recovery plan for data stored in third-party profile solutions, external file servers, and database servers.
Infrastructure
Select an supported infrastructure below for instructions on how to prepare your underlying infrastructure before configuring a Frame account for use with the Frame DR feature.
To use the Backup and Recovery feature, the AHV cluster hosting the Primary Frame Account must be configured with a Remote Site. This enables the primary AHV cluster to replicate to and recover from the secondary AHV cluster. Both the primary and secondary AHV Clusters must be added as AHV Cloud Accounts.
Refer to the Nutanix AHV Remote Site documentation for further details on the AHV Remote Site feature.
The following step-by-step procedure must be completed before the Frame account can be enabled for Frame DR.
- Login to Prism Element on your Primary AHV Cluster and go to Data Protection.

- Switch to table view. In the upper right corner, click + Remote Site and select Physical Cluster.

- Complete the form for the new Remote Site.

-
Remote Site Name: Select a Name for the Secondary Site (Remote Site)
-
Enable Proxy: Enable if a proxy server is required to communicate with the secondary site.
-
Capabilities: Select Disaster Recovery
-
Cluster Virtual IP: Enter the virtual IP of your Remote Site Cluster (can be found in Prism Element/Cluster details of your secondary cluster.
By default, tcp/2009 and tcp/2020 are used for AHV cluster to AHV cluster communication.
- After the above information has been added, click on Add Site.
- Next, under the Settings, configure the parameters for how the persistent data will be replicated.

-
Bandwidth Throttling: The bandwidth throttling policy provides you with an option to set the maximum limit of the network bandwidth. You can specify the policy depending on the usage of your network. For example, you can define a policy that a Nutanix cluster should replicate data from site A to site B at less than 10 MBps between 9 a.m. to 5 p.m. on weekdays because there might be other critical traffic between the two sites then
-
Compression: Enable this option to compress the replicated data on wire (network compression).
- Then, map the storage containers. Typically, there would be two storage containers:
-
Storage container #1 holds the template image(s) and the workload VMs created for the Frame accounts. This storage container is the same storage container where the original template image was stored when the primary AHV cluster was added to Frame.
-
Storage container #2 stores the Volume Groups containing profile disks and personal drives. During the initial Frame setup of the primary AHV cluster, this storage container gets selected in the CCA Wizard.
If the customer has multiple primary AHV cluster storage containers that have Frame template images and workload VMs, each storage container would need to be mapped.

Under vStore Name Mapping:
- Source vStore: the storage container where your Frame resources are located on the Primary AHV cluster.
- Destination vStore: the storage container where the replicates/backups will be stored on the remote (Secondary) AHV cluster.
It is possible to have both primary containers mapped to only one container on the Remote Site.
In the above figure, the first row defines the mapping of the Primary Site SelfServiceContainer to the Remote Site SelfServiceContainer. The SelfServiceContainer was specified to hold the Volume Groups of the Enterprise Profile and Personal Drive volumes. The second row defines the mapping of the Primary Site storage container default-container-77107 (containing the persistent Frame resources for all Frame Accounts on the AHV cluster) to the Remote Site storage-container-112133 (storing all the backup replicas).
When the Failover feature is added and the Frame Administrator configures Frame to do so, the Remote Site storage container will also store the persistent workload VMs provisioned from the replicas, at the point the replicas are copied to the secondary site. This will reduce the Return to Operation time as the VMs will not have to be provisioned the moment the Failover is enabled.
- Click on Save to finish the setup. You can now see your new Remote Site within the Data Protection section in Prism.

- To confirm that both clusters can communicate with each other, click on the “Test Connection” option to verify the settings and network response.

- To complete the preparation of the two AHV clusters, the AHV administrator must add the Primary Site as a Remote Site on your secondary AHV cluster. You do this by logging in to Prism Element on your second AHV Cluster and performing the same steps as described previously with the Primary Site as the Remote Site for your secondary AHV Cluster.
For Frame accounts on Azure infrastructure, no infrastructure configuration work is required. Frame administrators must use the same Azure Cloud Account when specifying the cloud account where the persistent resources of the Frame account are to be stored. Persistent resource backups must be stored in a different datacenter (region).
Monitor your Azure resource usage to ensure you do not exceed your Azure resource limits in your secondary region.
Configuration
Once the infrastructure is prepared, follow the step-by-step guide below to enable Frame DR on your Frame account.
-
Login to your Frame Account as a Customer or Organization Administrator
-
Navigate to the Account Settings tab, and select the Disaster recovery tab. Enable the Enable Frame DR option.

- The following configuration information needs to be provided.

- Backup cloud account: Select the cloud account that has been setup during the Remote Site configuration
- Backup data center: Select the region for the Cloud Account (only for public cloud infrastructure)
- Enable post-session backup: After a user session is closed, the resource is backed up. For Sandbox/utility/persistent desktop, Frame will create a backup of the respective server. The VM will stay powered on during the backup which will allow users to start new sessions faster, but also add a risk of inconsistency of the backup depending on the workload. If user volumes (enterprise profile disk, personal drive) are used, when the session closes, the user volume is detached and Frame will create a user volume backup.
- Stop server before post-session backup: If enabled, after a Frame session closes, the VM will be stopped before the backup task is executed to ensure the backup is in a consistent state. Enabling this option will increase the time for the VM to be available for the next session, since the VM must be powered on.
There is no option currently to set the post-session backup policy specifically for Sandbox or Utility Server(s).
- After all configuration parameter values are set, click Save to save the settings to complete the setup. You can go to the account Notification Center to confirm that Frame has completed the DR configuration for your account.

Backup and Restore
When the Frame DR is enabled, backups are replicated to the secondary AHV cluster or secondary cloud region. Refer to Backups for details on the different ways Frame administrators can backup the persistent resources and restore from backups on the primary site or from replicas on the secondary site.
Data Availability
Frame Account data in terms of analytics, logs, reports, and notifications is available in Frame Dashboard for a set period of time based on the table below. If customers need to preserve any data beyond the availability periods noted below, certain data can be saved by downloading and saving via the Download CSV or** Download Report** buttons in Dashboard or via our Admin API.
Customers wishing to leverage Frame Admin API to export their data can learn more by reading our official blog article.
| Account Data | Availability | Downloadable CSV/Report | Admin API |
|---|---|---|---|
| Session Reports | No Limit * | ✓ | ✓ |
| Audit Trail | 24 Months | ✓ | ✓ |
| Sessions | 12 Months * | ✓ | ✓ |
| Tasks | 12 Months | ||
| Usage | 12 Months * | ✓ | ✓ |
| User Activity | 12 Months | ✓ | ✓ |
| Disk Usage | 6 Months * | ✓ | ✓ |
| Elasticity | 3 Months | ✓ | ✓ |
| Notifications | 3 Months | ||
| Session Trail | 2 Months | ✓ | ✓ |
| Session Logs | 1 Month |
* Data will remain available until Frame Account is terminated.
The availability periods above are subject to change. Any data that needs to be preserved should be downloaded on a regular basis.