| Instance Configuration | 4k Support |
|---|---|
| GPU-enabled | Fully supported |
| 1-2 vCPU(s) | Not Recommended, Admin should test |
| 3+ vCPUs | Supported, Admin should test |
Frame App supports the Frame multi-monitor feature automatically. If an end user has more than one monitor attached to their device, Frame App prompts the user if they want to use all of their monitors. Frame Administrators do not have to enable explicitly multi-monitor support for Frame App users.
### Enhanced Multi-monitor Support Users accessing Frame from Chrome or Chromium-based Edge browser can use the Enhanced Multi-monitor experience with automatic physical monitor layout detection.The Enhanced Multi-monitor feature is only available to users accessing Frame from Chrome or Chromium-based Edge version 100 or greater.
When using Auto Layout or Add Monitor in a browser session, the customer administrator or user must add `https://use.difr.com` as one of the **Allowed to send pop-ups and use redirects** sites, under **Settings** > **Privacy and security** > **Site Settings** > **Pop-ups and redirects** of their Chrome or Chromium-based Edge browser. This is discussed further in the [Google Chrome Help article](https://support.google.com/chrome/answer/95472#zippy=%2Callow-pop-ups-and-redirects-from-a-site). Refer to our [Display Options documentation](https://docs.difr.com/books/desktop-users-guide/page/introduction#bkmrk-display-requirements) in our User Guide for details on how to use the Multi-monitor feature. # Advanced Integrations Access to Frame apps and desktops can be integrated several different ways within: - Websites - Internal portals or services - Operating systems - and custom workflows This section talks about integration tools that can be leveraged for custom integrations. The Advanced Integrations panel can be found under a Launchpad's settings menu in the Dashboard of an account. This panel allows administrators to choose: - Specific settings - An application or desktop - An identity provider - and instance type the administrator would like to use together. Combining these components results in copyable links that can be easily used, shared, or deployed just about anywhere that accepts hyperlinks.A single onboarded application or desktop can be used with multiple instance types. However, each instance type will have its own PWA link.
Step 3. Copy the PWA link for your app or desktop by clicking the **Copy PWA link** button.  That's it! You could test the links in a new tab to check for an install prompt and/or share it with a colleague or end user. Now that you have a PWA link, you've a few options for installation! #### Manual PWA installation To manually install a PWA (ideal for testing or smaller team sizes), open a PWA link on a device you would like to install it on. Once the page is loaded, look at Chrome's "omnibar" for a circular plus icon. Click it, then click **install**. 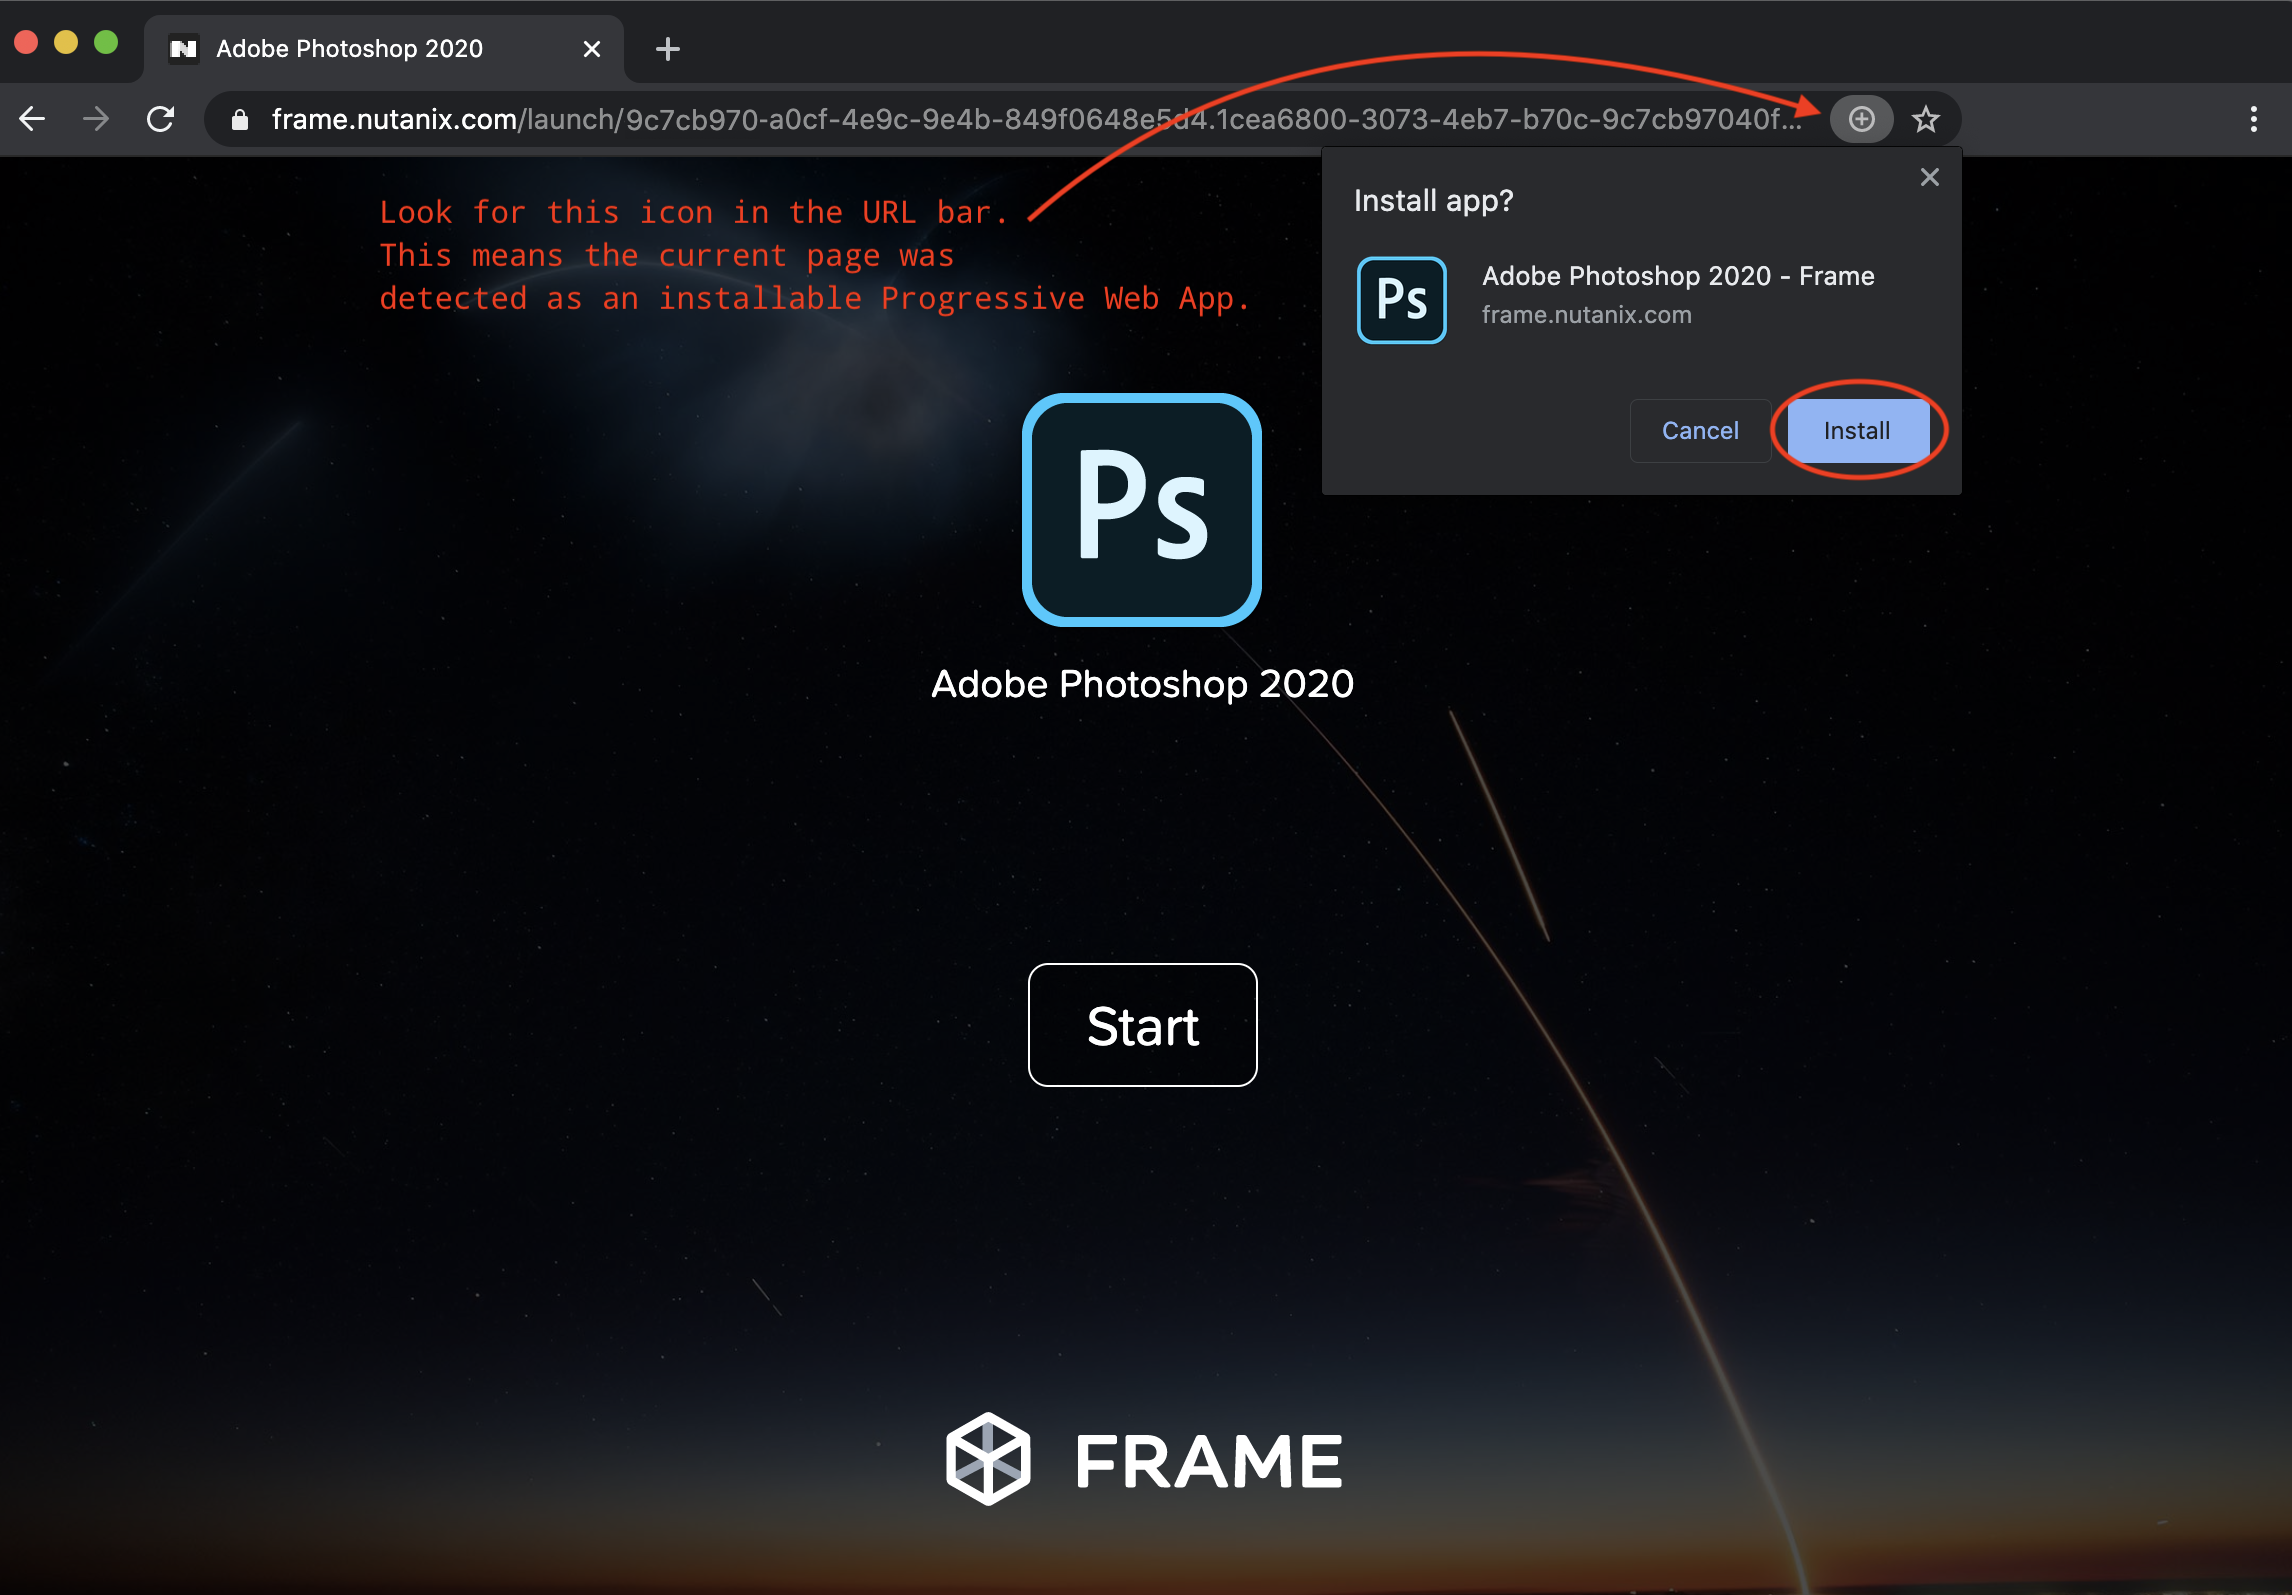Manual installation of PWAs is optional. Users can simply use the PWA link to launch the a session from within their browser (the option to install is still available).
### Automatically install PWA Links with Managed Chrome PWA links can be automatically deployed via Chrome to devices managed by administrative policies. There are two ways to manage Chrome: - Cloud-managed (Google Workspace) - Policies with on-premises tools**Be Careful** To ensure a great experience for your users, be sure your auth (identity provider and roles/permissions) and infrastructure capacity are properly configured before a large scale deployment of apps to your users.
#### Deployment with Google Workspace (formerly G Suite) deployment-with-google 1. Workspace Admins need to log in to their Admin console and navigate to **Device Management** > **Chrome** > **Apps & Extensions**. 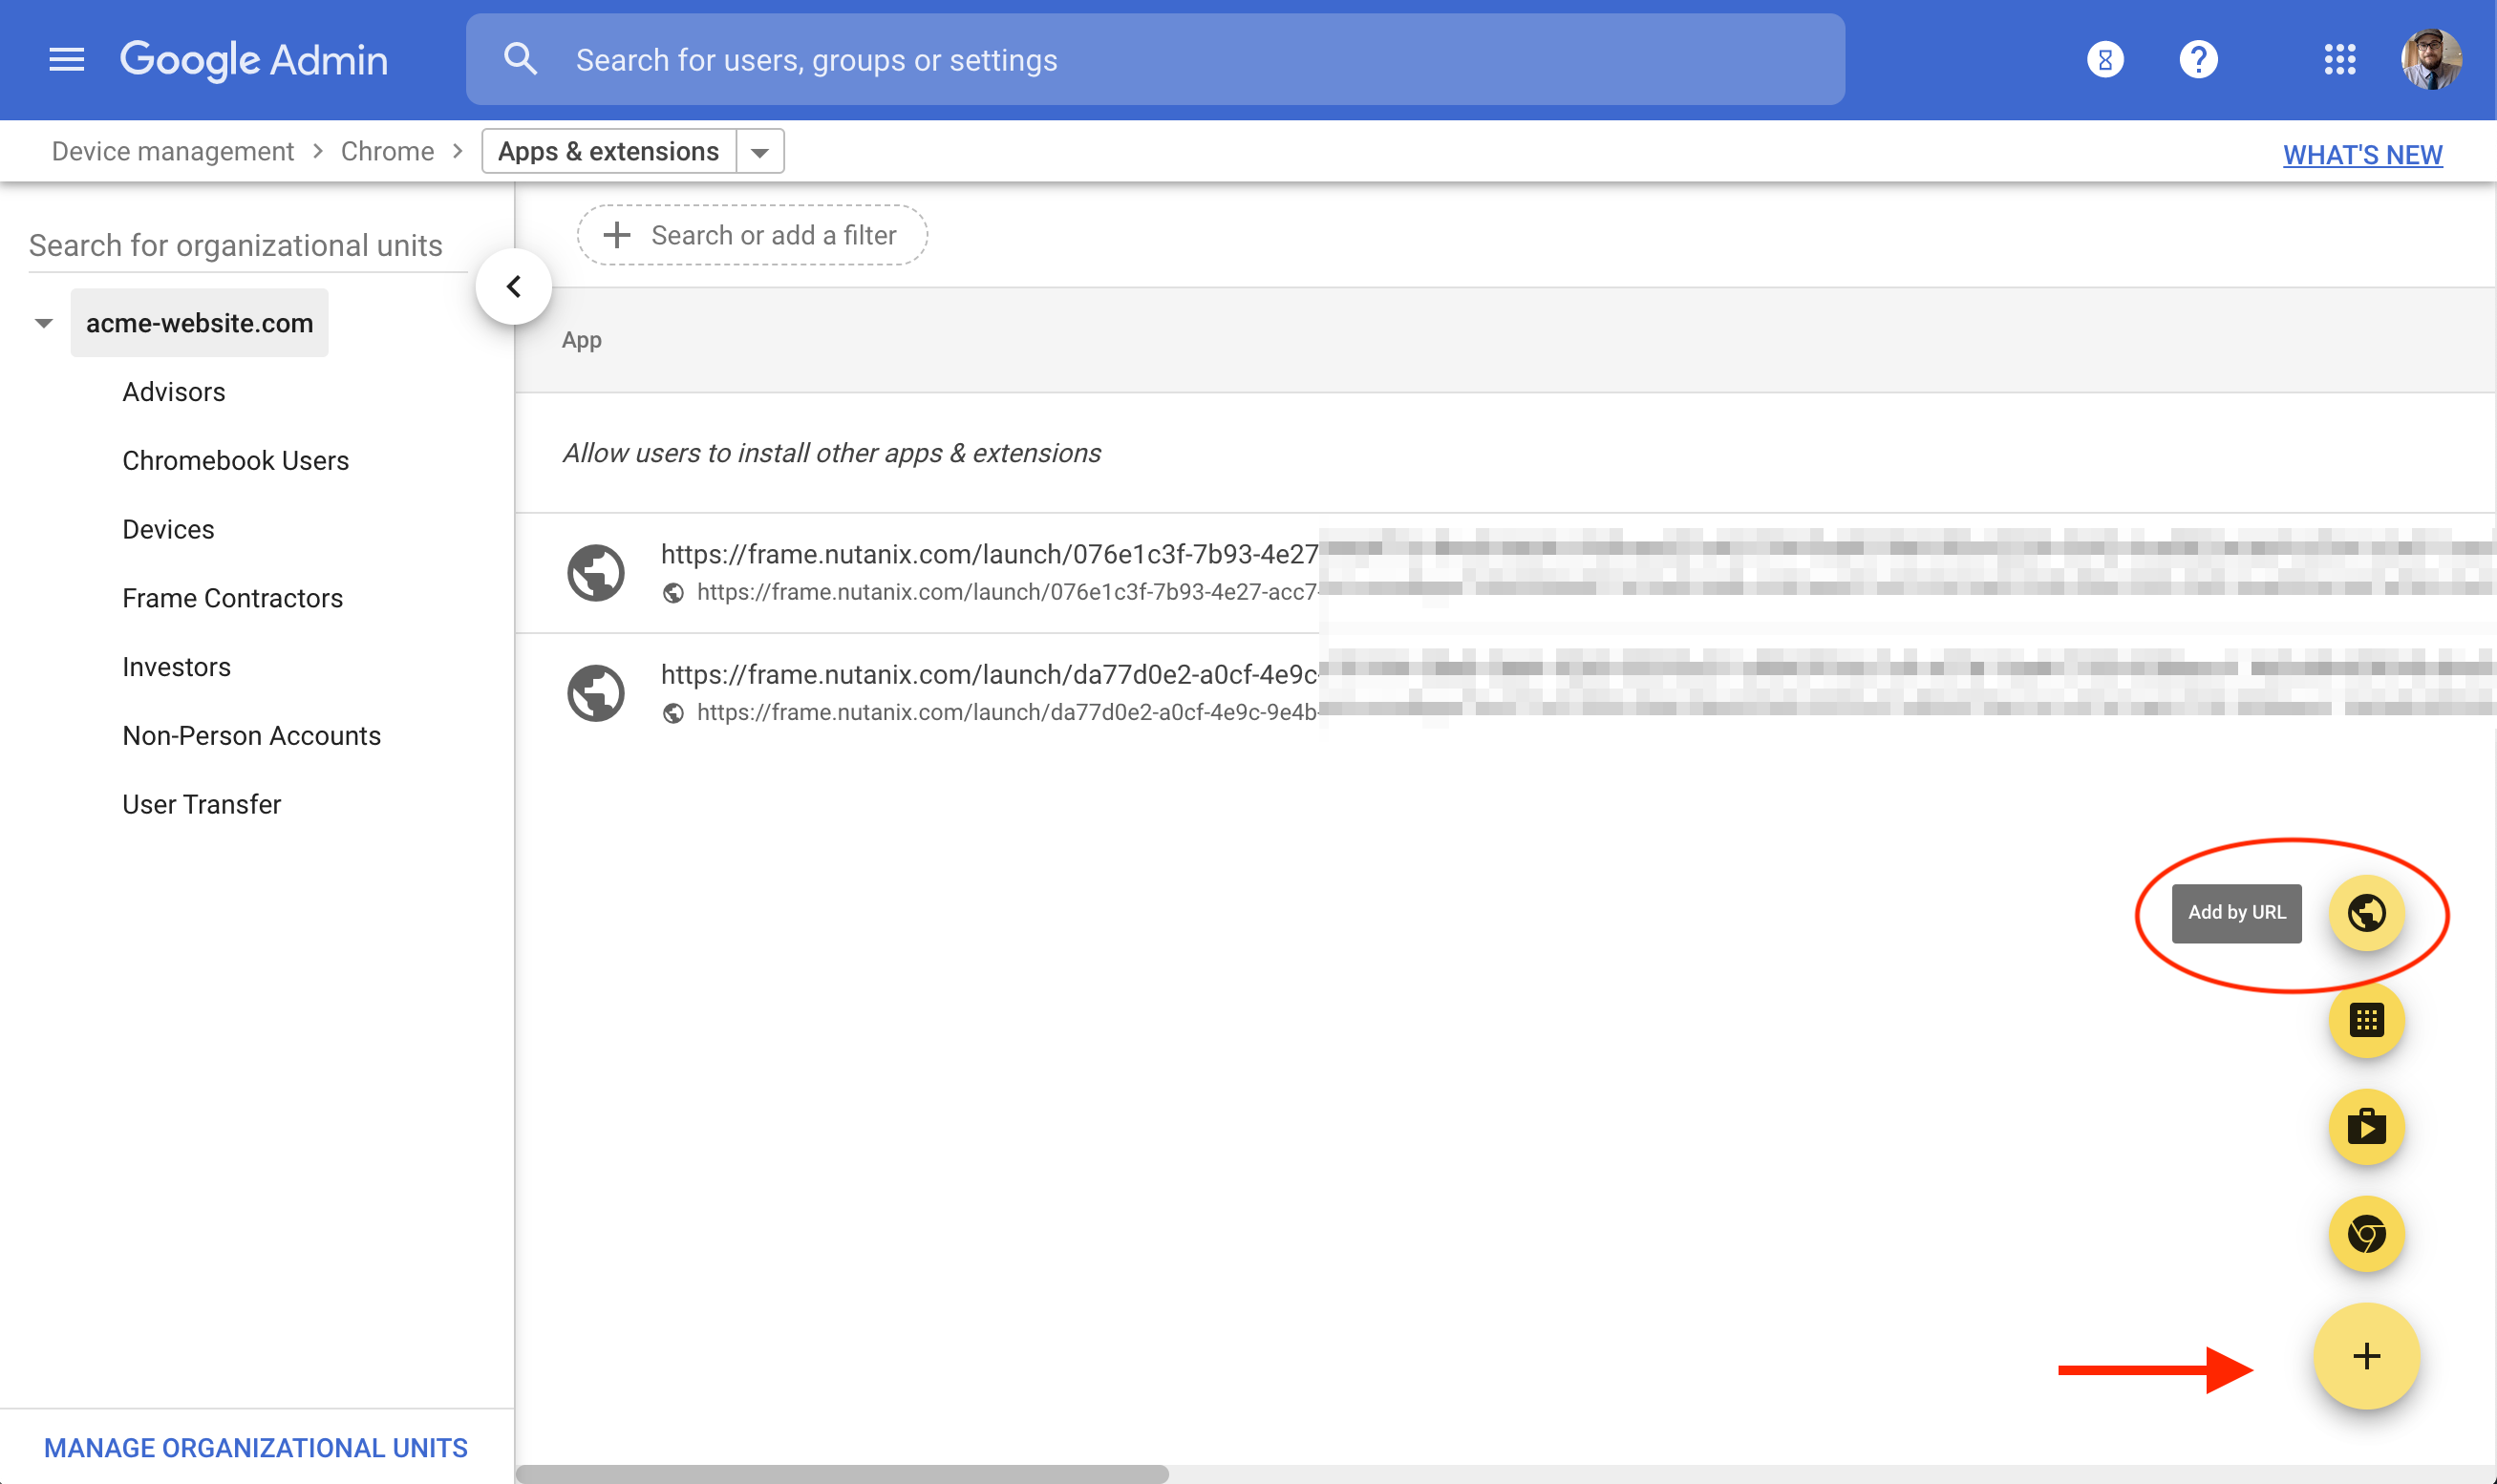 2. Click on the **Add** button at the bottom right of the page, and select **Add by URL** from the context menu. Paste your pre-configured Frame PWA link in the URL field and select “**Open website in Separate Window**, then click **save**. 3. Your PWA application should appear on signed-in Chrome devices within a few moments. 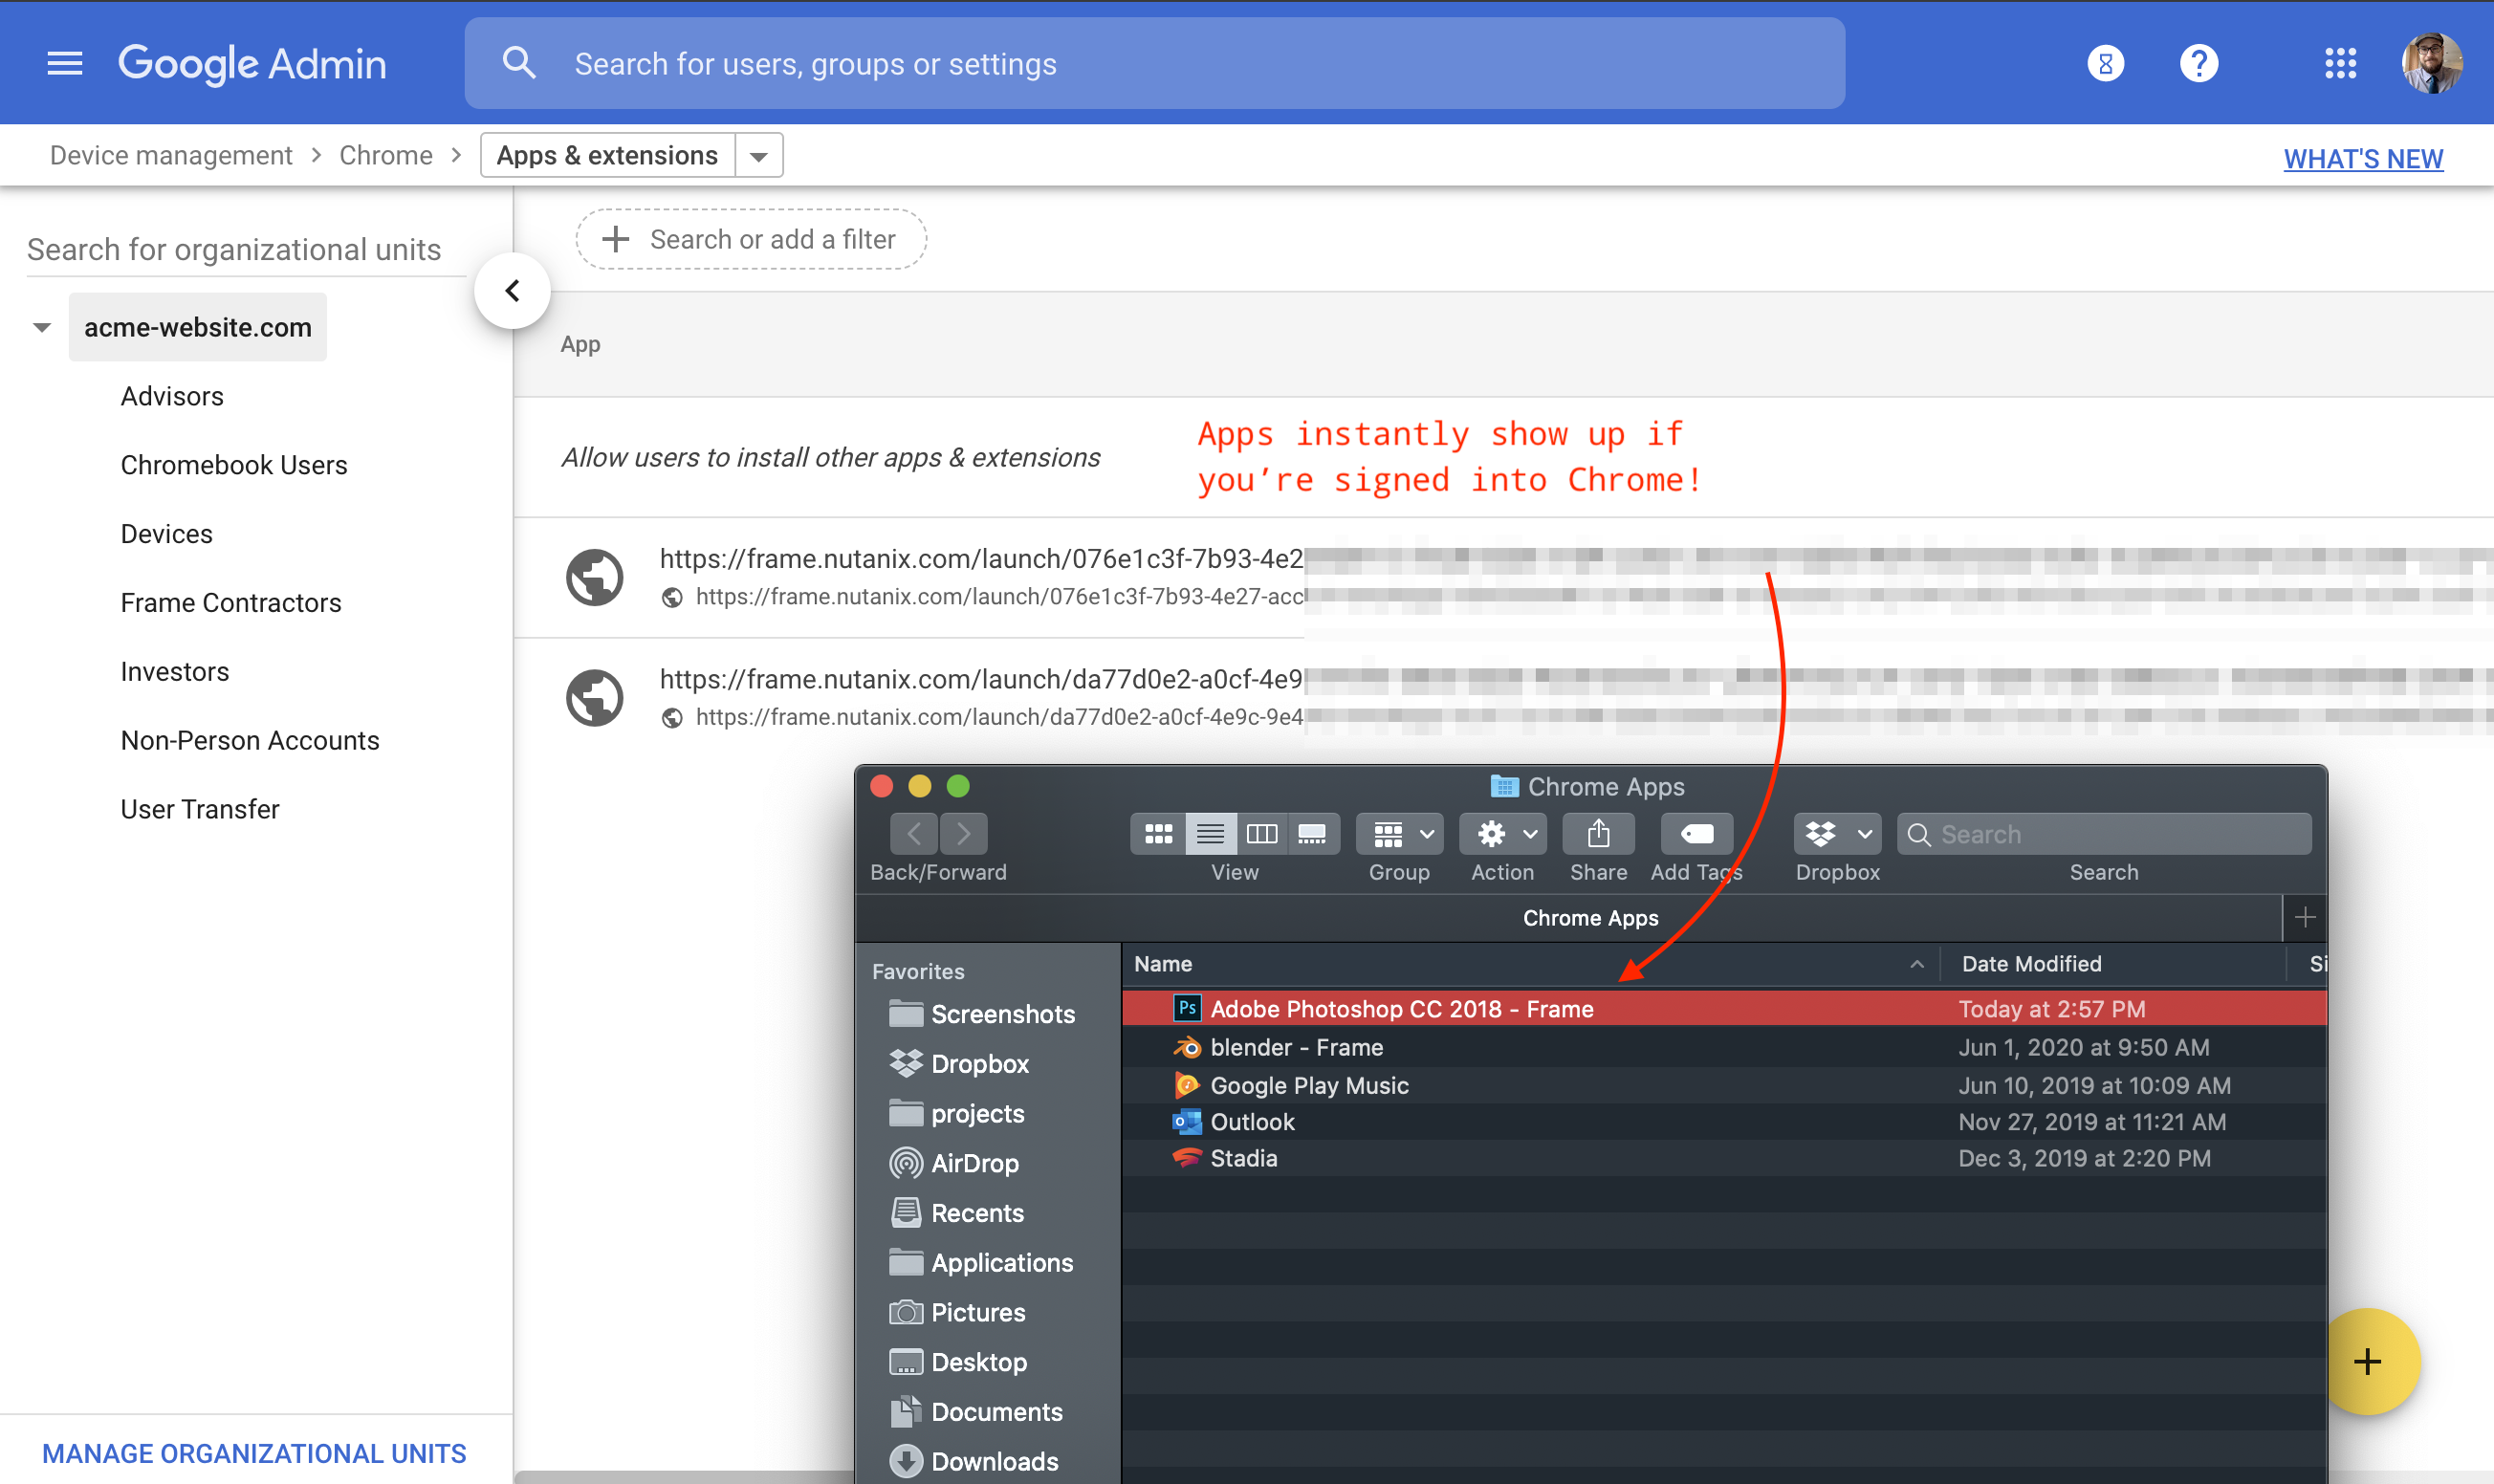. For more information, please read Google's documentation for [Adding Apps by URL](https://support.google.com/chrome/a/answer/6177447?hl=en). #### Deployment with On-premises policies Deploying PWA links with policies (Group Policies or otherwise) is pretty straight-forward. Please read Google's documentation on how to [Automatically install web apps](https://support.google.com/chrome/a/answer/9367354?hl=en). ### Uninstalling PWAs PWAs are easy to uninstall. Users can simply uninstall them from the options menu at the top-right corner of the application. If you'd like to uninstall applications that were installed via Admin policies, simply remove the policy and give a small amount of time for the policy change to be reflected on connected devices – apps should be removed promptly. ### Troubleshooting PWAs #### When my users visit a PWA link, there's no option to install This can happen for a few different reasons. **Troubleshooting tips:** - Make sure your browser is fully up-to-date. - Make sure your Browser and OS support PWAs. At the the time of writing, Firefox doesn't support Desktop PWAs but does Mozilla supports them on mobile. - Make sure your **application's icon is at least 144x144px**, though 512x512 is recommended. Modern apps are typically fine but older apps might need a fresh coat of paint. Admins can upload custom app icons in the Dashboard. - Try refreshing the page. Sometimes certain PWA assets take a while to download and the installation prompt isn't triggered. #### Will my Frame PWA applications work when offline? No. Frame requires an internet connection to work. #### PWAs on mobile devices While PWAs are cross-platform by nature, please be aware that some users may encounter different experiences with their apps due to smaller screen size and different input methods. Please be sure to test your apps on prospective devices/operating systems/browsers before recommending them to your users. ## Launch Links ### What are Launch links? Launch links are an easy way for you to provide your users with a direct link to a specific app or desktop. When a user visits a Launch link, your chosen identity provider handles authentication. Once authenticated, loading these links will immediately start a Frame session for that user.  You can easily copy a Launch Link from the Advanced Integrations panel after configuring your desired identity provider and instance type. 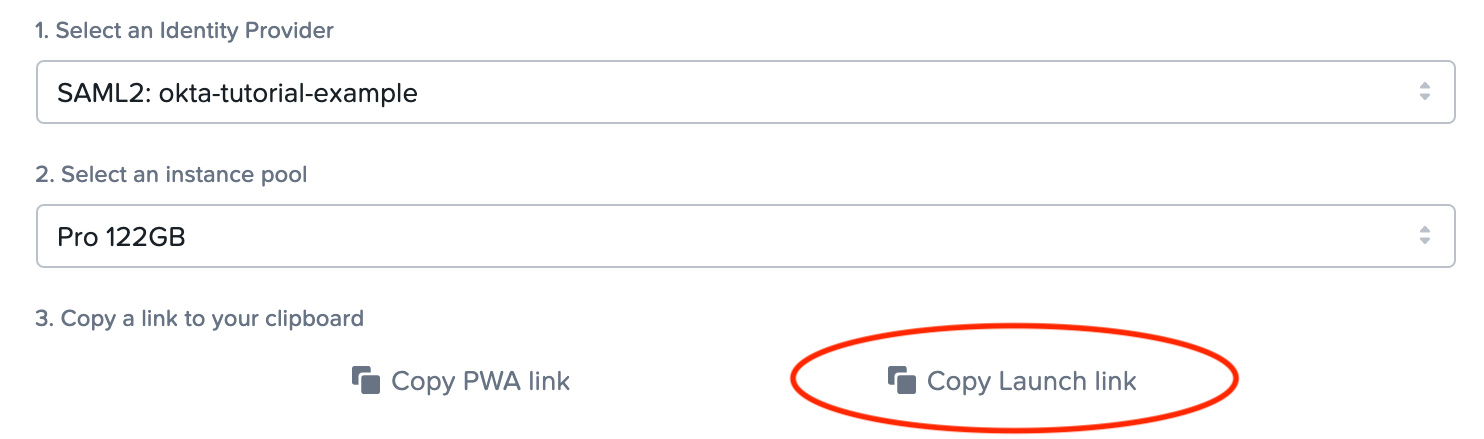 ### Add a link to your website Launch links are easy to tie to any website using standard HTML. For example: ```html A custom button ``` ### Okta Chiclets Already using Okta with Frame? Great! Launch links can be added as Okta Chiclets with the help of Okta's [**Bookmark App**](https://support.okta.com/help/s/article/How-do-you-create-a-bookmark-app?language=en_US). To get started, follow the steps below. 1. As an Okta Admin, let's add a new application. 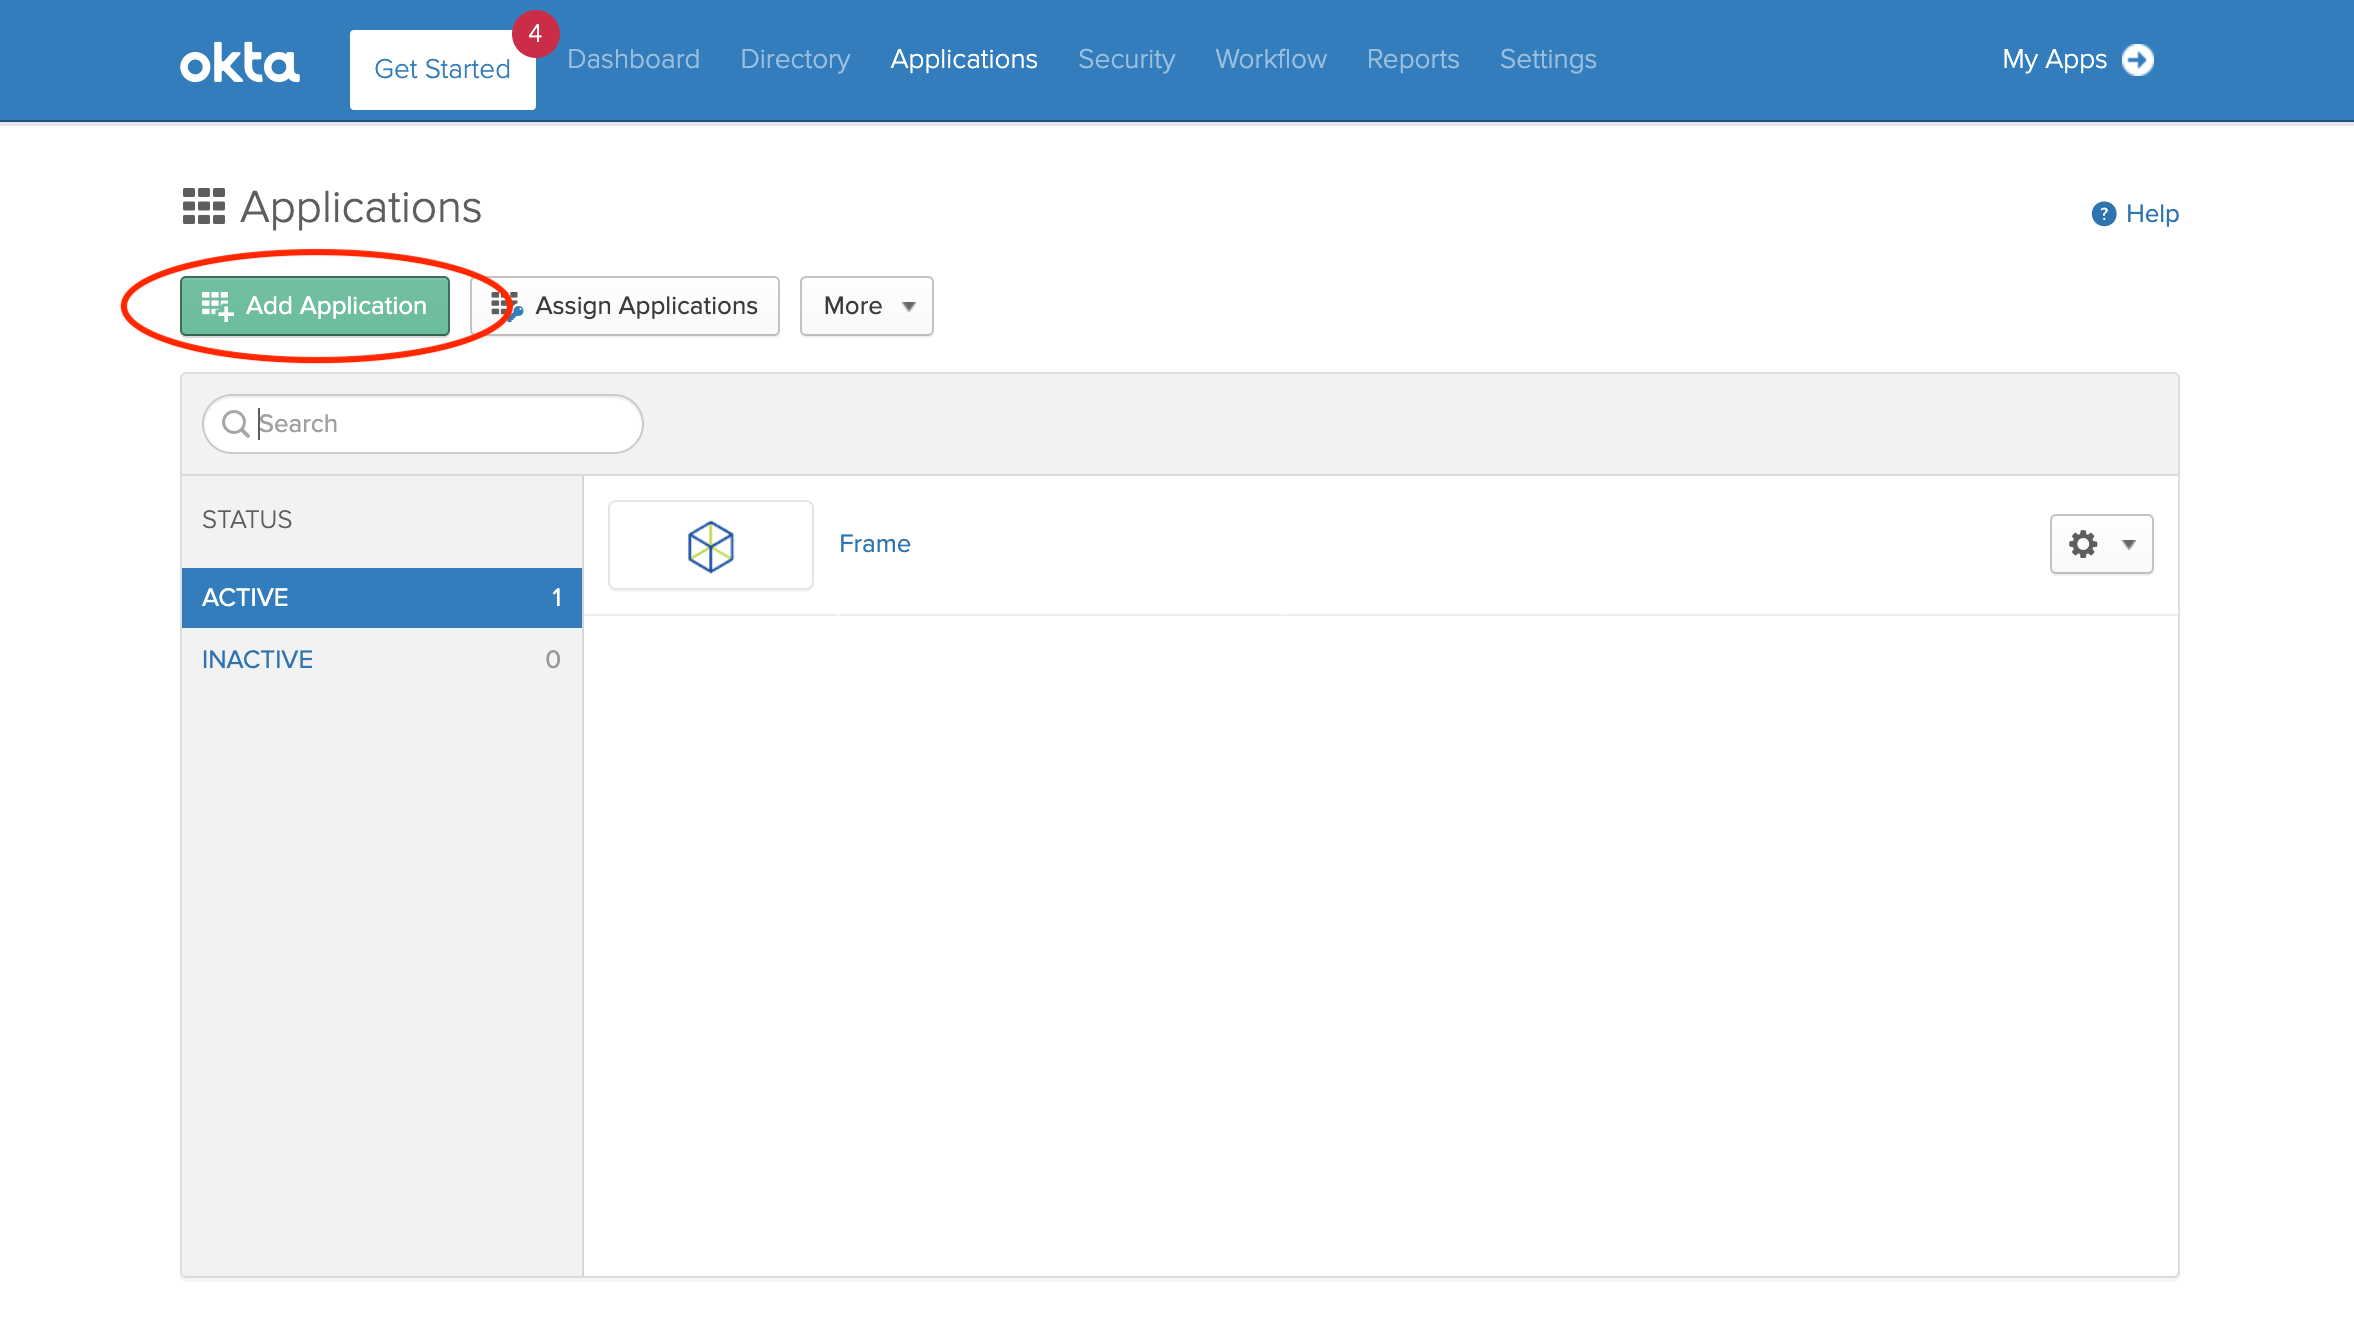 2. Search for **Bookmark App** and select it. 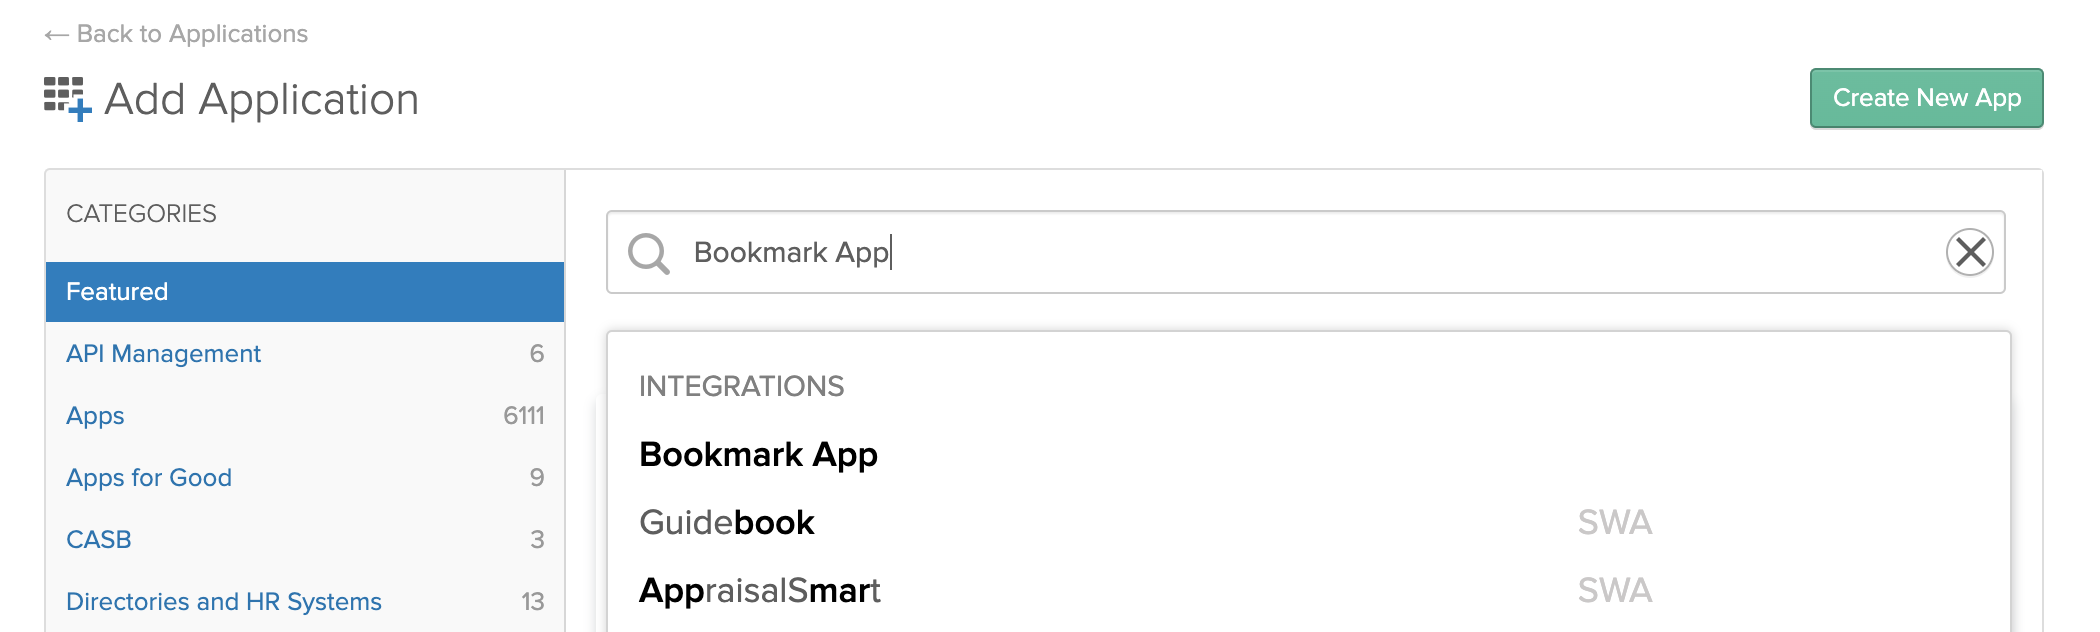 3. Click on **Add**. Begin by adding the name of your Application into the *Application label* field. 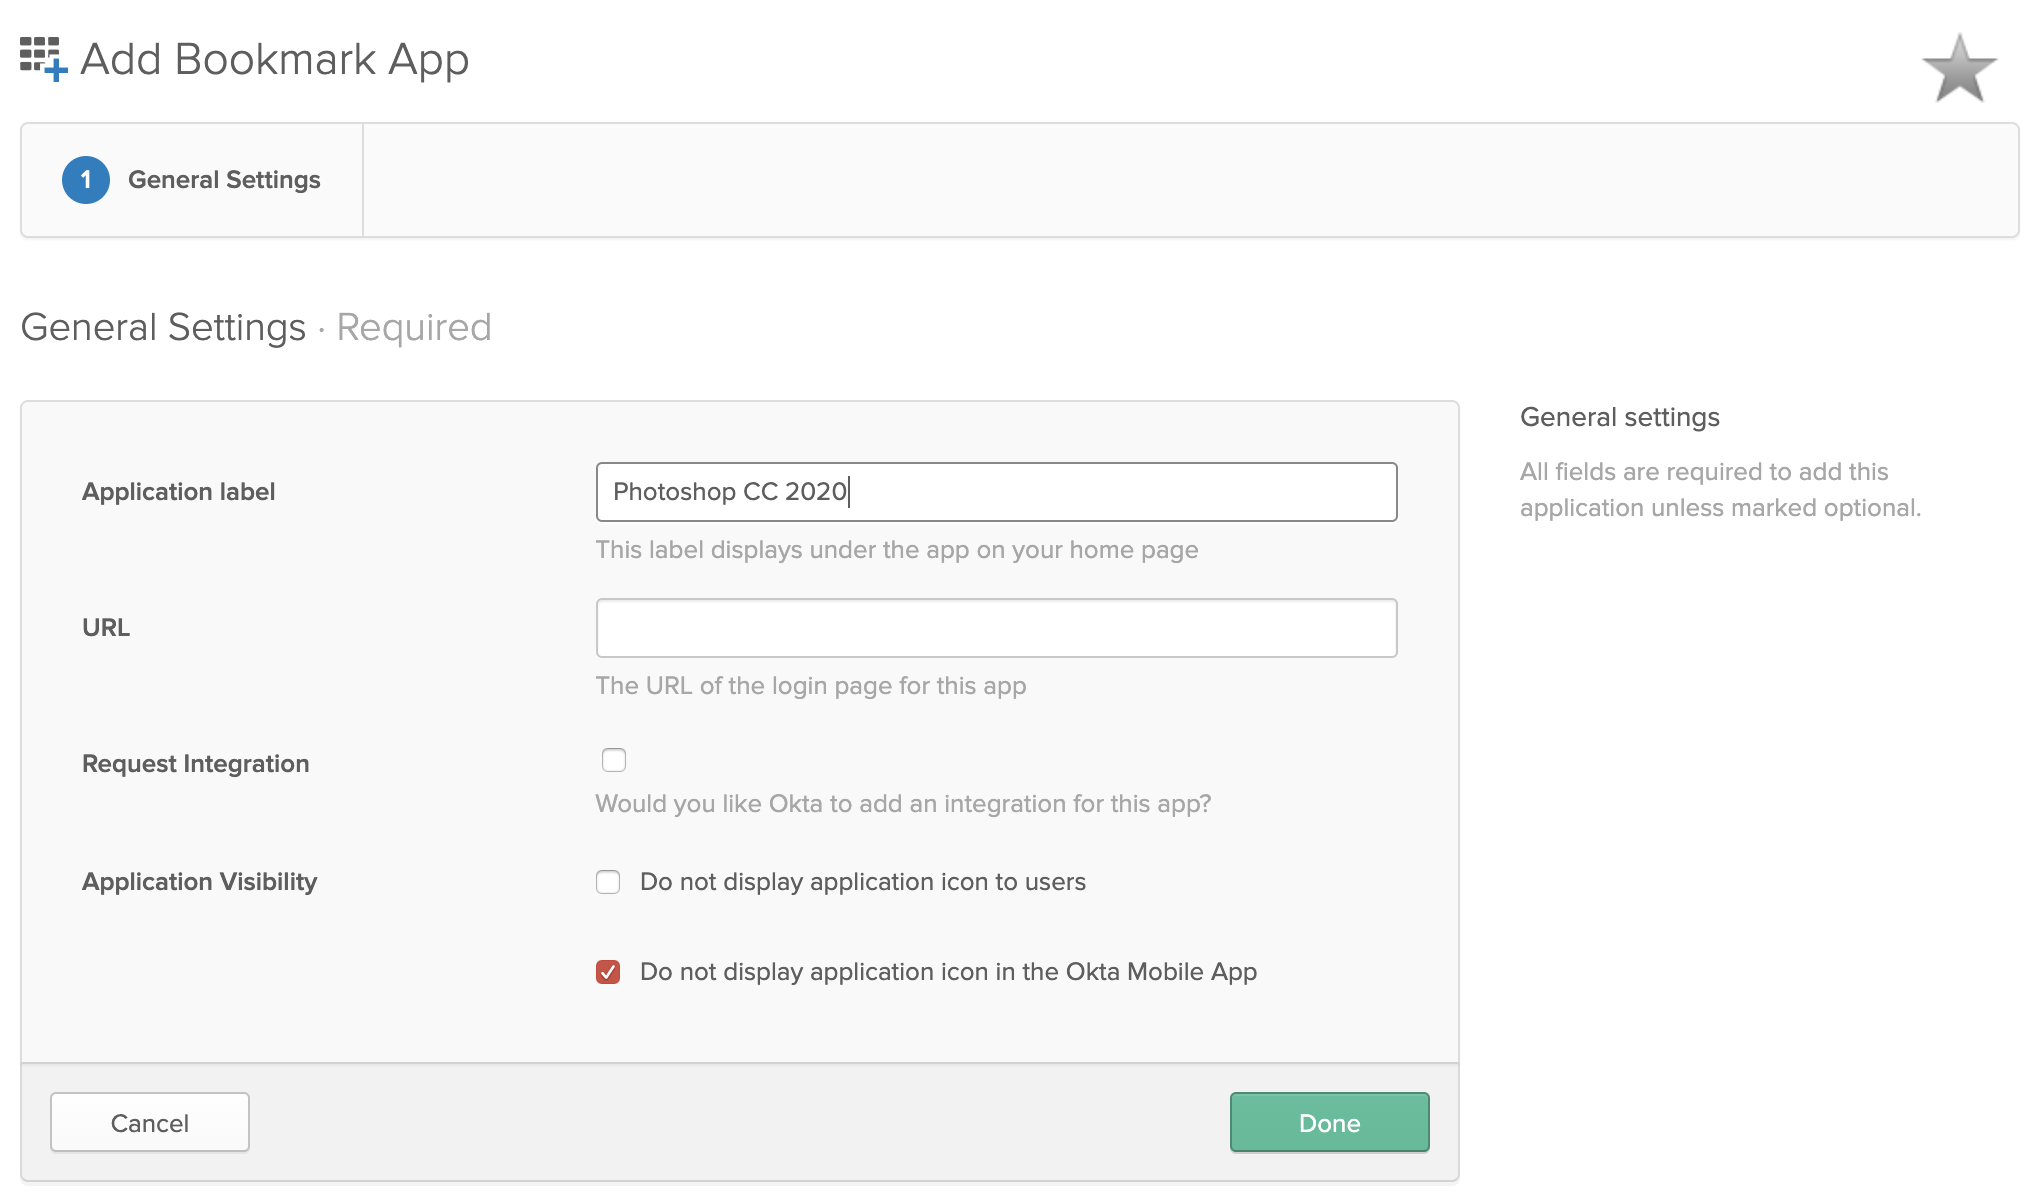 4. Paste your **Launch link** (copied from Frame's Advanced Integrations dialog) into the URL field (be sure you've selected the right Okta identity provider before copying the link). Apply application visibility settings and click **Done**. 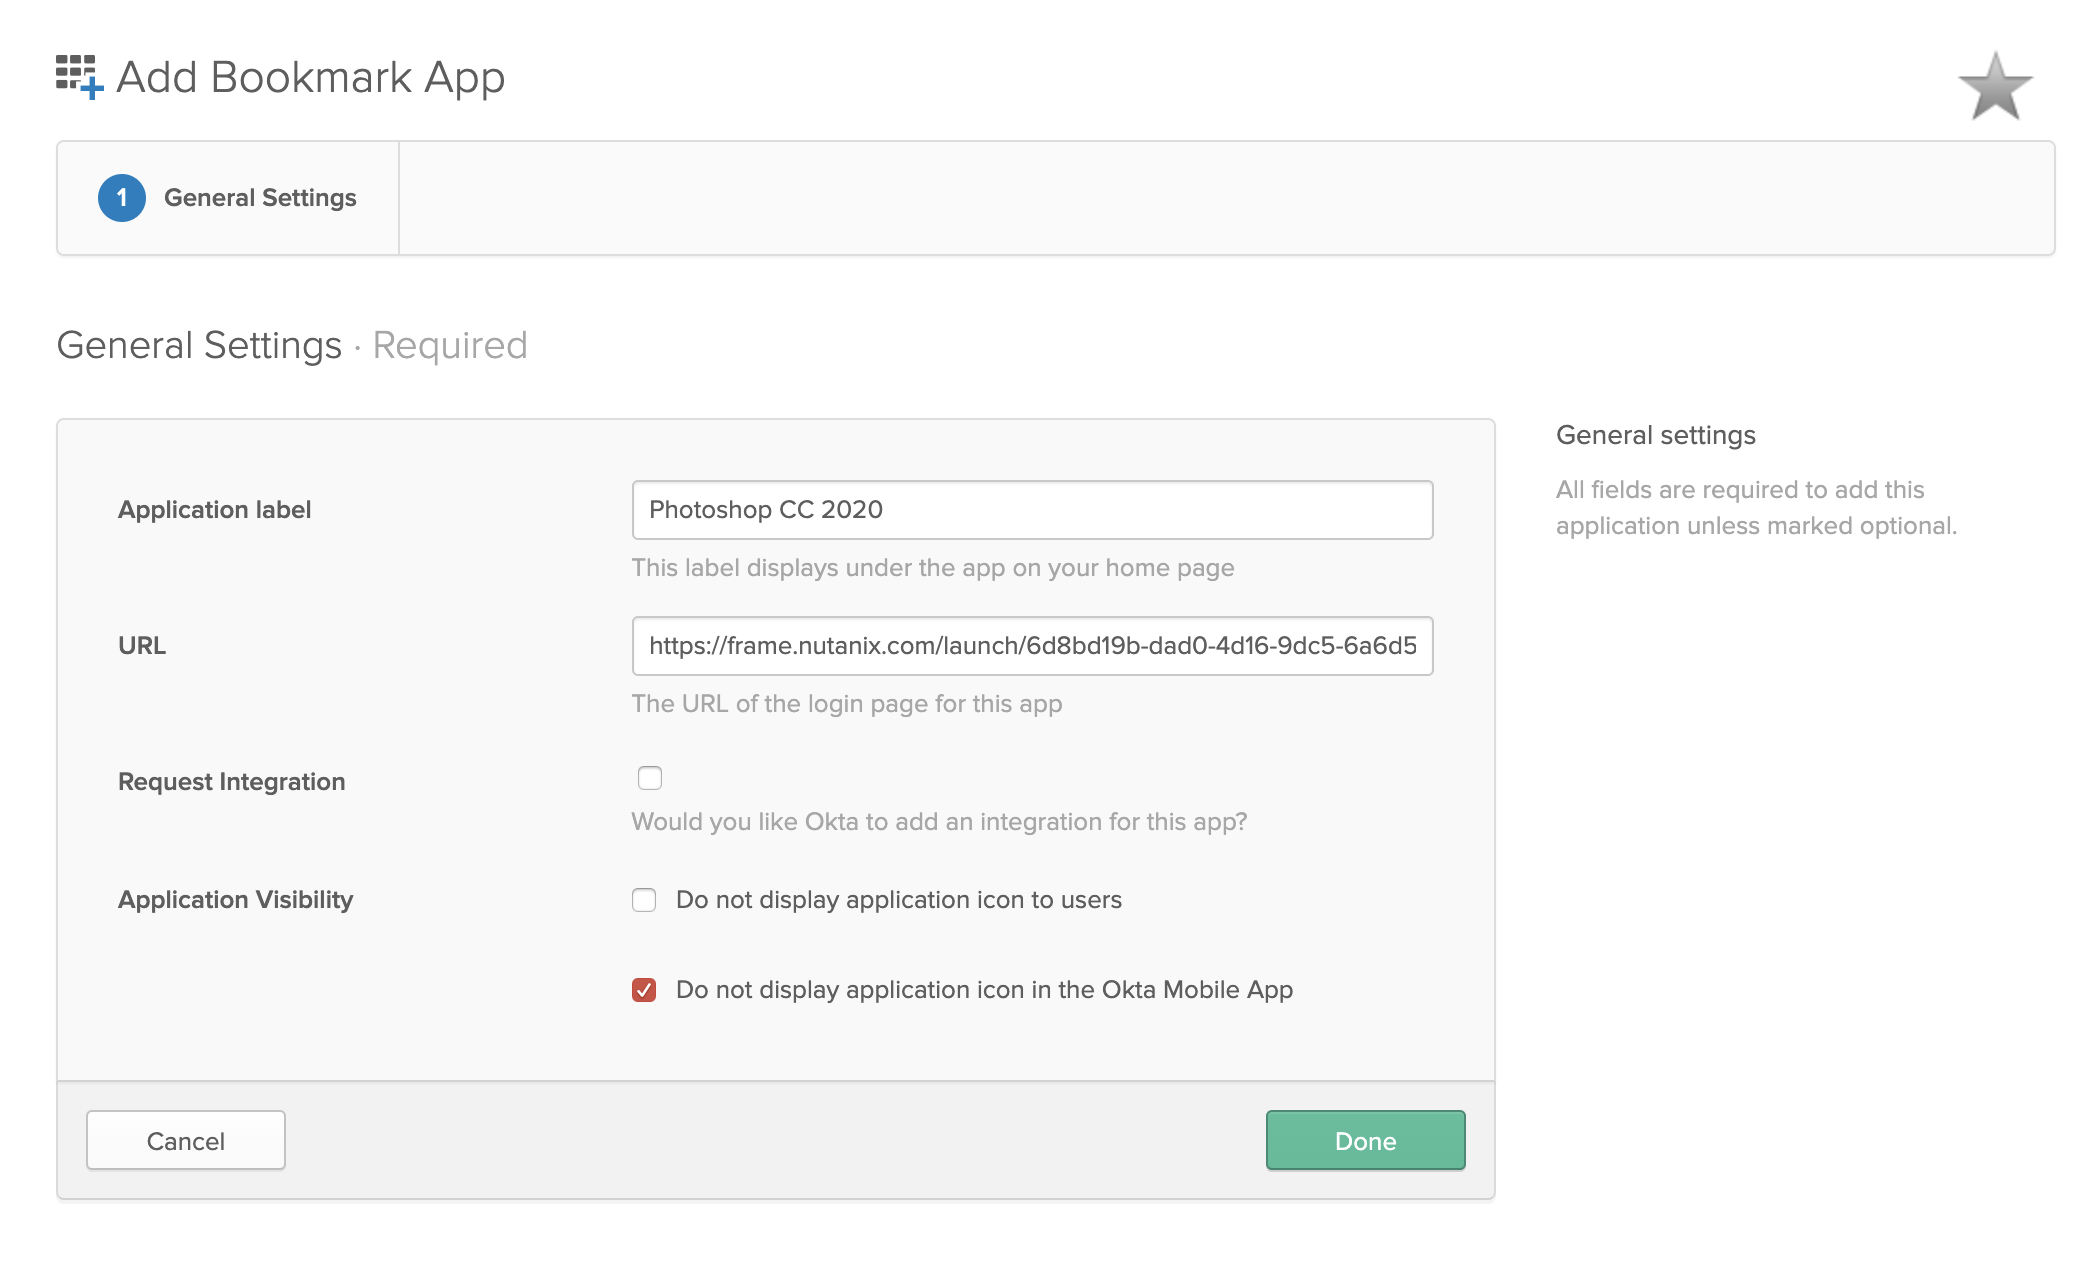As with PWA links above, a single onboarded application or desktop can be used with multiple instance types. However, each instance type will have its own Launch link.
5. Click on your newly added Bookmark. Click the icon at the top left to update it for a better user experience. 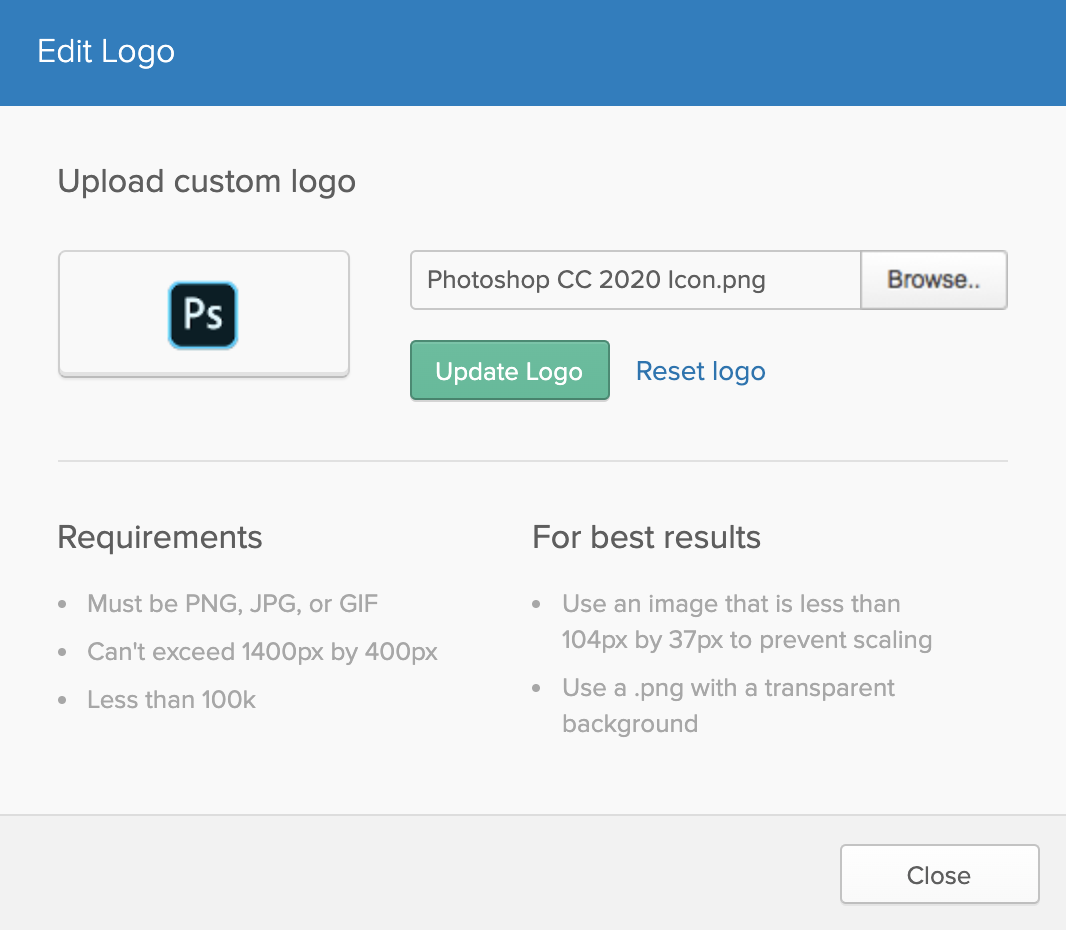 1. Repeat these steps to add as many Launch links as you'd like for your users. 2. Finally, assign your Frame-powered Bookmark app(s) to your users/groups. 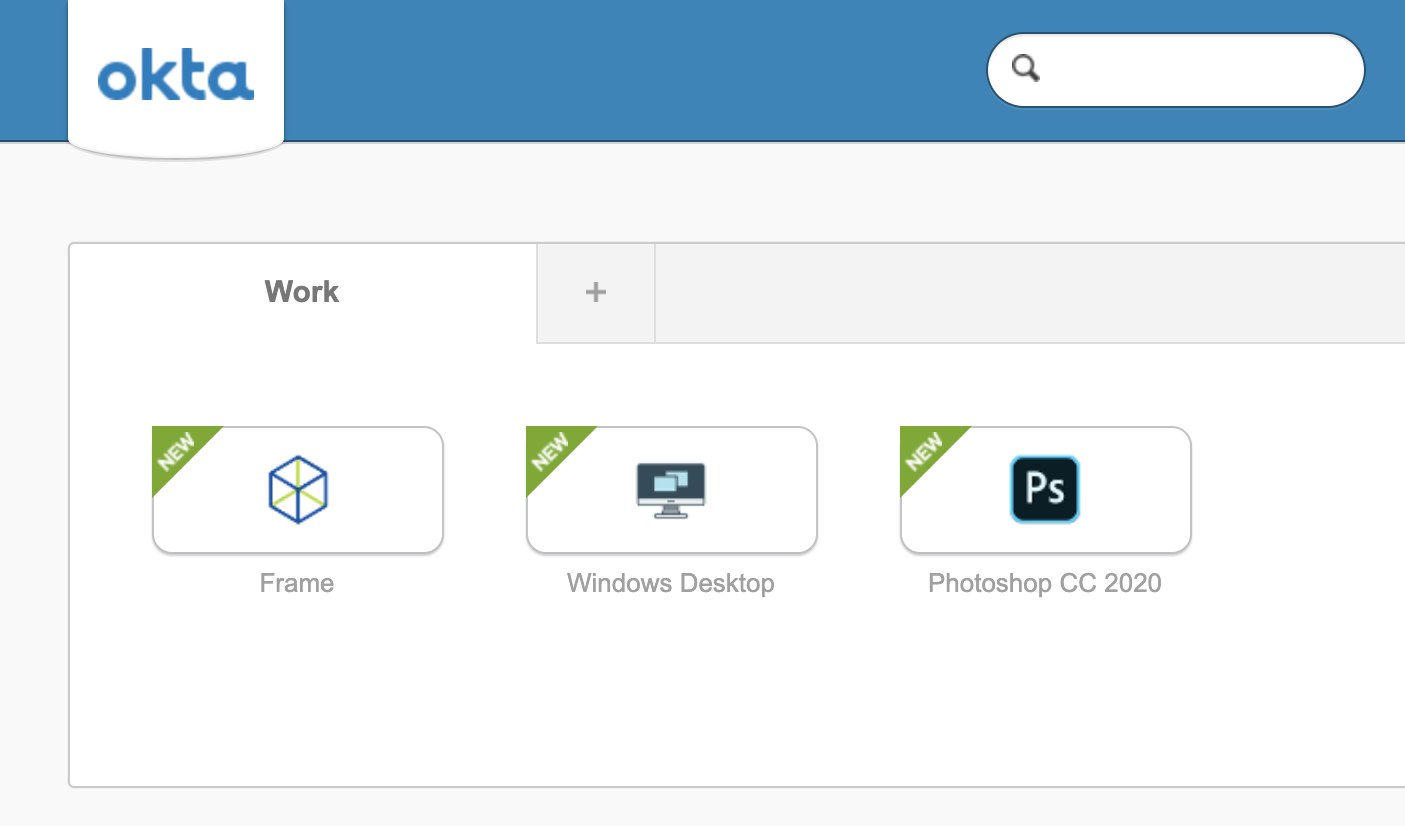 ## Passing Data into Session For customers who wish to pass data from the browser into the Frame session upon the user clicking on the onboarded application or desktop, these customers can add the `userData` name and corresponding value in the URL query string of the PWA or Launch URL. This mechanism can be used to pass user session context from a website into the workload VM for use by a custom script or application running within the workload VM. An example of a Launch URL with the `userData` name-value pair in the query string would be: ```html A custom button ```If the userData value is a binary value, then it must be converted to a base64-encoded value before adding it to the query string. Once the userData value is passed into the remote VM, a script can base64-decode the value for further use.
Since the userData value is embedded in the URL and could be modified by the end user, the custom script or application within the workload VM should validate the userData value before using it.
Details on how to obtain the `userData` value within the remote VM is discussed the section on [Retrieve userData from the remote system](https://docs.difr.com/link/176#bkmrk-retrieve-userdata-fr). ## Additional Query Parameters Both Launch links and PWA links support a handful of URL search query parameters that allow you to customize the behavior of the links. ### Supported Query Params - **`qlo`** - **true/false**. Forces a log out after a session closes. - **`start`** - **true/false**. If true, the page will load and and wait for a user to start the session themselves. When a PWA is installed, this value is set to **true**. - **`appName`** - Lets you customize the name of the application. Must be encoded as a URL-friendly search query *URI Component*. - **`iconUrl`** - URI-Encoded URL of an icon/image you'd like front-and-center of the Launch PWA/Launch link. - **`idp`** - Set when the URL is initially copied, but you can set it to your IdP of choice by its **integration name**. **Desktop Launch Link example:** ```bash https://use.difr.com/?terminalConfigId=$terminalConfigId&appId=desktop&appName=Acme%20Workspace&iconUrl=$UriEncodedIconUrl&start=true&qlo=true&idp=My-SAML-Provider ``` **Desktop PWA Example:** ```bash https://use.difr.com/?terminalConfigId=$terminalConfigId&appId=desktop&appName=Acme%20Workspace&iconUrl=$UriEncodedIconUrl&start=true&qlo=true&idp=My-SAML-Provider ``` # USB Human Interface Device Support This guide is intended for administrators wishing to integrate the use of USB Human Interface Device (HID) devices within their end user experience. Frame now supports up to 10 USB HID input devices, such as 3D mice, game controllers, and joysticks, connected to the local endpoint, in addition to mouse and keyboard.**Considerations:** - Frame Terminal running in a supported web browser only supports USB HID on Linux and macOS Chrome browser. - Frame App fully supports USB HID on Linux, macOS, and Windows endpoints.
## Requirements For end users to use USB HID, the administrator must verify that the Frame Virtual USB driver has been installed on the Sandbox and published. The Frame Virtual USB driver is included in the Frame Guest Agent Installer and can also be downloaded using the Frame Agent Setup Tool (FAST). Both the FGA and FAST installers are available for download from our [Downloads page](https://files.difr.com/). ## Frame Virtual USB Driver ### Verification Start by verifying you do have the Virtual USB driver installed in your Sandbox: 1. Power on the Sandbox if it is not already running. 2. Once you're in the Sandbox, verify that the Virtual USB driver has been installed by navigating to the Device Manager for your Sandbox. There will be a device named "Frame virtual devices". Selecting the Virtual USB Hub and examining the Driver Details will confirm that the Frame Virtual USB driver has been installed and operating correctly.Since the USB Redirection setting is in Session Settings, Frame Administrators can enable the USB Redirection policy at the Sandbox or for a specific Launchpad, instead of enabling the USB HID feature at the Frame account level.
## End User Configuration Depending on the combination of ways to access Frame, additional configuration may be required. The sections below detail additional setup instructions for your end users. ### Chrome on macOS or Linux For users on macOS or Linux endpoints, they must use Chrome on macOS or Linux-based operating systems in order to use USB Human Interface Devices. End users should follow the steps below to complete configuration of USB HID support. Chrome users must enable the “Experimental Web Platform features” within the Chrome browser, as Google still considers USB HID and WebUSB support to be an experimental feature. 1. In a new Chrome browser tab, enter the following in the address bar: ```powershell chrome://flags/#enable-experimental-web-platform-features ``` 2. At the top of the page you will see the "Experimental Web Platform features" option. Use the drop-down menu to enable this feature.The user running Frame application must be part of "plugdev" group.
## Troubleshooting - **Your device is not listed:**: If you find that your USB device is not showing up as an option in the device list, Frame is not recognizing your device. We recommend [creating a support case](https://docs.difr.com/books/dizzion-support/page/contact-support) for further evaluation. - **Tooltip message “Not supported”**: Server does not support USB functionality. Either the Frame Guest Agent needs to be updated or the virtual USB driver needs to be installed. Note that driver may be installed, but Frame Guest Agent may need to be upgraded to the newer version of driver in order for the USB functionality to work properly. - **Tooltip message “Cannot obtain devices from host”**: The application is having trouble accessing USB devices on the host machine (the machine where the application is installed and running). - **Error message “Cannot plug in device”**: You may see this message after clicking on a device in the USB device list. This means that the Frame platform was unable to communicate with the USB device. We recommend creating a support case for further evaluation. - **Error message "Cannot open connection to device: Access denied"**: When you click on your USB device in the list to "plug in" to your remote session, Frame could not open a connection to the device because the operating system is blocking the connection. - If Frame App is running on Linux, verify that the udev rules are applied to the local Linux endpoint. If udev rules are valid for Linux or the application is running on Windows or macOS, the operating system on your local endpoint is blocking the connection and will require further investigation. ### Testing your USB Device You can open up a browser within your Frame session and visit an online resource such as https://gamepad-tester.com/ to test your USB HID devices. While we have tested and validated many brands and types of USB HID devices, there may be USB devices that do not work yet with Frame. If you would like to submit feedback, please [create a support case](https://docs.difr.com/books/dizzion-support/page/official-dizzion-support-guide). # Clipboard Integration The Clipboard Integration feature allows users to copy and paste content between their local device and their Frame session. This feature can be enabled by a Frame administrator in the Account or Launchpad Session Settings. ## Overview Clipboard Integration in Frame enhances user productivity by providing seamless content transfer between local and remote environments. This feature is designed to support various use cases and accommodate different browser capabilities. Clipboard Integration in Frame offers two main functionalities: 1. **Clipboard Sync:** Automatically syncs clipboard content between local and Frame environments. 2. **Clipboard Manual Sync:** Provides a manual method for clipboard operations when automatic sync is not supported. ## Clipboard Sync The Clipboard Sync feature automatically syncs clipboard content between your local device and Frame session, allowing copy and paste functionality. However, this feature has some limitations depending on the browser and content type. #### Supported Content Types - **Rich Text:** Applications that use HTML format support rich text clipboard operations. Some applications (e.g., office applications) may support this, but others, such as certain RTF editors, may not. - **Images:** Only PNG images are supported for clipboard operations. Other image formats are not supported at this time. ### Limitations - Copying content from a Word document that includes images and rich text is **supported**, but only if the application supports HTML format for clipboard operations. - Clipboard Sync only works when clipboard sync is enabled by the user or administrator. - The clipboard size limit is 10MB. Content larger than this will not be transferred. - Bidirectional sync requires the use of `Ctrl+C` / `Ctrl+V` (Windows) or `Cmd+C` / `Cmd+V` (Mac). Rich text will not copy via mouse right-clicking alone. - Copy-pasting from certain rich text editors may not work if they do not support HTML-based clipboard formats.To use Ctrl+C and Ctrl+V (Cmd+C and Cmd+V) for macOS) for copying rich text or files **within** your Frame session, Clipboard Sync **must be disabled**. When Clipboard Sync is enabled, you can still copy/paste rich text or files within the session by right-clicking and using the context menu.
## Clipboard Manual Sync clipboard-manual-sync For browsers that don't support Clipboard Sync, Frame provides a manual sync option: 1. Click the clipboard icon in Frame Session controls. 2. Use the dialog box to copy/paste text between your local machine and Frame session.The operating systems in the tabs correlate with the user's \*\*endpoint operating system.\*\* For instance, if your users are accessing Frame/Frame App from Windows and macOS machines, you will want to specify your custom keyboard mapping under both the "Windows" and "macOS" tabs.
Default Keyboard ProfilesYou can edit your default keyboard profile for your account as desired; however, the default keyboard cannot be deleted from the account. If you would like to reset the default profile back to its original state, simply click on the adjacent kebab menu and select "Reset."
It is important to note that some key combinations will not work in Frame Terminal or Frame App simply because they are intercepted by the endpoint's operating system (OS) or browser.
For instance, CTRL + ALT + DEL on a Windows-based endpoint would not be passed into a Frame session because that key combination would be intercepted by the Windows OS. Similarly, CMD + P would be intercepted by the Safari browser on macOS as a print command and would not be passed into Frame browser-based session. For this reason, administrators should use the operating system tabs to apply their custom key mappings for **one or more of the four supported endpoint operating systems** their end users might use. 1. Start by adding/editing your keyboard profile (as shown in the sections above). Once you have opened the keyboard profile window, select the desired operating system tab and then click on the blue “Add New Keyboard Mapping” link. We will use macOS in this example.Any changes made to keyboard profiles will take effect after the next session start for end users. Administrators are not required to publish their Sandbox to see changes propagate to end user sessions.
## Edit a Keyboard Mapping 1. To edit a keyboard mapping, simply click on the component of the mapping you wish to change (the client shortcut or the remote shortcut/action) and modify as desired.Additional LanguagesNirSoft provides instructions and zip files for additional languages on their website. Dutch, French, German, Greek, Japanese, Portuguese, and many other languages are available for testing.
2. KeyboardStateView will display every key that you press in the application's UI, even when the application is not in focus. If you want to view the state of all keys, simply turn off the 'Show Only Keys Pressed In Last seconds' option under the "Options" menu. You can use this tool to provide more specific information to your Frame support personnel when creating a support case. # Mouse Modes Since Frame is accessible from any device with a modern web browser, we've set up multiple mouse modes to navigate a Frame session. While our standard mouse configuration works for most use cases, there are some scenarios where a different mouse mode could be helpful. We'll outline different mouse modes and their corresponding use cases below. ## Enable Mouse Mode Selection 1. Navigate to the "Settings" page in your Dashboard to enable the mouse mode selection option. Click on the "Session" tab and scroll down to the "Advanced options" dialog. Enter the following string in the "Advanced Terminal Arguments" field: ```powershell *features*mouseModes*isEnabled*=true ```Note about Keyboard Layouts and Certain Keyboard ShortcutsCertain keyboard shortcuts can conflict with the native Windows keyboard shortcut that switches the current keyboard layout. For example, on macOS device, you can use a keyboard shortcut CMD + SHIFT + 3 to take a screenshot. The key combination to do this sends ALT + SHIFT to the Frame session and will switch the system's keyboard layout to another keyboard layout that is available Conflicting shortcuts for OS X that may switch the keyboard layout include: - Screenshot tool: CMD + SHIFT + 3 - Screenshot snip tool: CMD + SHIFT + 4 - Go to next tab: CMD + SHIFT + - Go to previous tab: CMD + SHIFT +
## Using a Single Language The most common configuration would be to prepare your account's Sandbox with a default display language and a default keyboard layout other than US English. You only need to change these settings once within the Sandbox desktop environment to permanently apply the changes to your account. After these adjustments are made and published, all production sessions will use the updated display language and keyboard layout. ## Changing the Default Display Language The default display language setting can be configured in the "Language" section of the control panel on your Sandbox.The above explanation assumes that you have already installed all language keyboards/packs that you require for your applications on the OS.
## Change the Default Keyboard Layout The default keyboard layout setting can be configured in the "Typing" section of the control panel on your Sandbox.The above explanation assumes that you have already installed all language keyboards/packs that you require for your applications on the OS.
# Banners and Classification Labeling ## Custom Terminal Banner Terminal banners display custom messages across the top of a user's Frame session. Banners can be used as a reminder to the user that they are using a special type of environment. This feature is often used for high security environments such as government, medical, and finance organizations. Administrators can specify the color and text of the banner for their own classification purposes. 1. To enable this feature within your Frame Account, navigate to the **General** tab listed under the **Settings** section of your Dashboard.Custom banner definitions are \*\*not\*\* dynamically inherited from higher levels to lower levels of the Frame platform hierarchy. If you wish to leverage a custom banner at a lower level of the platform hierarchy, be sure to configure the custom banner first in the parent entity before creating the child entity.
# Scripting Frame Guest Agent (FGA) gives customers the ability to tailor the behavior of their workload VMs (e.g., Sandbox, shadow, production, utility server, etc.) to execute scripts at different event-points of a VM and/or user session. These events are defined as “lifecycle hooks.” Once a Frame account is created, the Frame administrator can place custom scripts (PowerShell for Windows, Bash scripts for Linux) in the Sandbox and then publish the Sandbox to make them available to the workload VMs. ### Custom Script LocationIn the context of scripts, spaces are not valid characters. For example `script1.ps1` is a valid script name, while `script 1.ps1` is \*not\* valid.
FGA scripts must be placed into a specific directory. The FGA Users Scripts directory for **Windows** VMs is: `C:\ProgramData\Nutanix\Frame\FGA\Scripts\User` Example valid script paths for **Windows**: - `C:\ProgramData\Nutanix\Frame\FGA\Scripts\User\powershell\my_custom_script.ps1` - `C:\ProgramData\Nutanix\Frame\FGA\Scripts\User\my_custom_script.ps1` - `C:\ProgramData\Nutanix\Frame\FGA\Scripts\User\a\b\c\d\my_custom_script.ps1` For **Linux** VMs, the FGA Users Scripts directory is: `/opt/nutanix/frame/fga/scripts/user` Example valid script paths for **Linux**: - `/opt/nutanix/frame/fga/scripts/user/powershell/my_custom_script.sh` - `/opt/nutanix/frame/fga/scripts/user/my_custom_script.sh` - `/opt/nutanix/frame/fga/scripts/user/a/b/c/d/my_custom_script.sh` ### Script Invocation Invoking or executing custom scripts requires a definition.yml file (case sensitive) to be present in the FGA User Scripts directory. For example, this path for Windows would be `C:\ProgramData\Nutanix\Frame\FGA\Scripts\User\definition.yml`. FGA reads this file at each lifecycle hook and will invoke scripts as defined in this file. ### Definition.yml The `definition.yml` file describes detailed script context and execution information: - Script **groups** -- a convenient way to group multiple scripts based on their context. - Lifecycle hooks or **run-policies** -- phases in Frame's lifecycle of VMs and Sessions. - Script **paths** and filenames -- only use relative paths (from the FGA Users Script directory) or filenames. Look out for typos! - **Pool-types** -- specifies which type of Frame VMs you'd like the scripts to execute on (Sandbox, Production, etc.) - **Error policies** -- specifies the behavior FGA should follow if an error is encountered: [continue or abort](#error-policy). Below is an example of a definition.yml file. ```yaml groups: - desc: Scripts on first boot name: first-boot timeout: 30 run-policy: first-boot pool-type: - sandbox - production scripts: - desc: My script A path: A.ps1 error-policy: continue timeout: 10 - desc: My script B path: B.ps1 error-policy: continue timeout: 10 - desc: Scripts on each boot name: every-boot timeout: 30 run-policy: every-boot pool-type: - sandbox - production scripts: - desc: My script C path: C.ps1 error-policy: continue timeout: 10 - desc: My script D path: D.ps1 error-policy: continue timeout: 10 - desc: Scripts before session is started name: pre-session timeout: 30 run-policy: pre-session pool-type: - sandbox - production scripts: - desc: My script before sessions is started path: before-session.ps1 error-policy: continue timeout: 20 - desc: Scripts after session is closed name: post-session timeout: 30 run-policy: post-session pool-type: - sandbox - production scripts: - desc: My script after sessions is closed path: after-session.ps1 error-policy: continue timeout: 20 ``` ## Script Execution Order Order in the definition.yml file is important. When executing the scripts, FGA iterates through the definition.yml file and executes scripts in order from top to bottom. This also applies to Script Groups. If you provide two script groups of the same type (pre-session, post-session, etc), the group that is higher in the YAML file will get executed before any groups that are lower in the file. In the following definition.yml example, Group 3 will get executed before Group 1 (since Group 3 is higher in the file). Also, `before-session-3.ps1` will get executed prior to `before-session-2.ps1` for the same reason: ```yaml groups: - desc: Group 3 - Scripts before session is started name: Group 3 Pre-session timeout: 30 run-policy: pre-session pool-type: - production scripts: - desc: The 3 pre-session script path: before-session-3.ps1 error-policy: continue timeout: 20 - desc: The 2 pre-session script path: before-session-2.ps1 error-policy: continue timeout: 20 - desc: Group 1 - Scripts after session is closed name: Group 1 pre-session timeout: 30 run-policy: pre-session pool-type: - production scripts: - desc: My script after sessions is closed path: after-session.ps1 error-policy: continue timeout: 20 ```**Important!** Each script will need to be fully completed before the next script is executed. (Sequential execution vs. parallel execution)
## Frame Lifecycle Hooks The following table outlines various Frame Lifecycle Hooks, used as values for run-policy in a definition.yml script group. Each lifecycle hook is optional. ### VM Lifecycle Hooks| Hook Name | Description | Applicable pool groups | User Context |
|---|---|---|---|
| `pre-generalization` | Executed before Domain-Join generalization process (which includes sysprep) is started. | shadow, persistent\_desktop\_shadow | **Frame** user |
| `post-generalization` | Executed after Domain-Join generalization process (which includes sysprep) is finished. | shadow, persistent\_desktop\_shadow | **Frame** user |
| `first-boot` | Executed only on the very first boot of the virtual machine, after it is created. This hook is available for all instance types, allowing scripts to make stateful changes right after instances are provisioned/created. For domain joined instances and enterprise profiles, the local user `frameuser` needs to have elevated privileges. | shadow, production, persistent\_desktop\_shadow, persistent\_desktop\_production | **Frame** user |
| `every-boot` | Executed upon every system/OS boot. This hook can be used to update the image before non-persistence is enabled (on shadow/production instances). | shadow, production, sandbox, utility | **Frame** user |
| Hook Name | Description | Applicable pool groups | User Context |
|---|---|---|---|
| `pre-session` | Executed right before a user session is started. **User Context info:** For example, if the workload VM is joined to the domain and the user authenticates to the Windows domain, then the scripts would run in the domain user context. Pre-session scripts are executed after the Windows login screen and before the onboarded application or desktop is displayed. Pre-session scripts never run in SYSTEM context. | sandbox, production, persistent\_desktop\_production, utility | **Currently logged in user** |
| `on-idle` | Executed when session goes to idle state (workload stops streaming). | sandbox, production, persistent\_desktop\_production, utility | **Currently logged in user** |
| `on-active` | Executed when session goes from idle to active state (workload resumes streaming). | sandbox, production, persistent\_desktop\_production, utility | **Currently logged in user** |
| `post-session` | Executed immediately after a session is closed. This occurs after the session has stopped streaming and before both the Windows logoff process and the profile disk unmount process. | sandbox, production, persistent\_desktop\_production, utility | **Currently logged in user** |
Newly published VMs that have been placed in the production pool will still be marked as `shadow` until they are rebooted.
#### scripts > Specifies the list of scripts that needs to be executed.**Did you know?** A “pool” in Frame's context is a grouping of VMs/instances associated with a Frame account.
### Script Item Properties #### desc > Description of the script. #### path > Script file location, relative to base user scripts directory. #### error-policy > Defines FGA strategies when script fails. > > Follow these three simple steps to get started creating scripts and customizing the VMs on first boot (or every boot) and your Frame sessions. > > **Error-policy values** > > - `continue` - FGA to proceed on even if the script fails. > - `abort` - FGA to abort the task if script fails; **use with caution.** > - For Session Lifecycle hooks, this will immediately end the session for the end-user. > - For VM Lifecycle hooks, this can prevent publishes from completing, or spinning up new instances when the pool's capacity is expanded #### timeout{#script-timeouts} > Integer value in seconds. Defines the maximum amount of time for the script to run. If the execution time of the script exceeds the timeout value, FGA will kill the running script. **Be sure that your script's combined timeouts are less than or equal to the group's timeout duration.** ## Getting Started Follow these three simple steps to get started creating scripts and customizing the VMs on first boot (or every boot) and your Frame sessions. ### 1. Create a Simple Script Create a new PowerShell file (hello-world.ps1) in the FGA Scripts User directory. ```powershell # Writing a simple text file with warm greeting. $timestamp = Get-Date -Format "dddd MM/dd/yyyy HH:mm K" "$timestamp - Hello, World!" | Out-File "C:\ProgramData\Nutanix\Frame\Logs\sandbox_greeting.txt" -Append ``` ### 2. Your *definition.yml* Next, you need to communicate to FGA about this script via a `definition.yml` file to specify which Frame Session Lifecycle hook will trigger this script, timeout settings, the pool type(s), etc. ```yaml groups: - desc: Simple script example name: A very simple pre-session script. timeout: 10 run-policy: pre-session pool-type: - sandbox scripts: - desc: Frame Hello World Example script! path: hello-world.ps1 error-policy: continue timeout: 10 ``` The `definition.yml` file specifies that we have one script group that only executes during the pre-session Lifecycle Hook. We also specify that this group should only execute on the sandbox instance *pool*. Next, we specify a single script called `hello-world.ps1`. This script can run for a maximum of 10 seconds before reaching either timeout value, causing FGA to quit waiting and continue on. ### 3. Testing and Debugging Finally, double-check to make sure the files are saved, named correctly, and are located in the correct locations. Next, quit your sandbox session. Now we're ready to test! Testing our script is simple. When starting a new Sandbox Session, you should see a file populated at `C:/sandbox_greeting.txt`, showing our execution timestamp and our greeting. ## Logging and Troubleshooting Logging can be incredibly useful for debugging. However, if you're using non-persistent desktops and trying to debug scripts in production, any logging you do on the VM is wiped out after the session. ### Logging tips for various environments 1. **Sandbox and Persistent Desktops**: Create any text file somewhere on C: with the output of your logs. 2. **Non-persistent Shadow and Production VMs**: External logging service, either on the public internet (like Loggly, Splunk, etc.) or perhaps a service running on an accessible Utility Server. ### Troubleshooting Tips - Be mindful of about [group](#group-timeouts) and [script](#script-timeouts) timeouts, how they're different, and that your values don't overlap. - Always take backups before scripting. - If your scripts reference any file paths, be sure to use absolute filepaths, even for files residing in the FGA User Scripts folder. - If possible, test by executing the Powershell code in the Sandbox using PowerShell ISE. - If your scripts contain any sensitive information or credentials, be sure to write a cleanup pre-session script that can execute after your credentials are used and *delete the sensitive script/files* before users are connected to a Session. - Use identifying elements from Frame environment variables to help understand who and when (if needed). - You can set and get environment variables or registry entries to help communicate between scripts and lifecycle hooks. - Avoid using `error-policy: abort` for sandbox scripts, as failing scripts can make the Sandbox inaccessible, requiring a restoration from a backup or termination (and recreation) of the Sandbox. - If your scripts need to run with Elevated Privilege in Windows 10, make sure that the below registry key value is set to `0`. Otherwise, your scripts will fail due to Microsoft Windows User Account Controls (UAC) preventing the script from executing in an elevated context. - Key: `SOFTWARE\Microsoft\Windows\CurrentVersion\Policies\System` - Value: "EnableLUA" - Type: `REG_DWORD` ### Environment Variables FGA populates environment variables via registry entries to `HKCU/Environment`. These values are dynamically set for each Frame session and are useful when used with logging.| Env Variable | Description |
|---|---|
| `FRAME_VENDOR_ID` | A unique identifier tied to the Frame Account the VM is associated with. |
| `FRAME_VENDOR_NAME` | The name of the instance's Account. |
| `FRAME_USER_EMAIL` | The current session user's email address. |
| `FRAME_SESSION_ID` | The unique Session ID associated with the current session. Useful for debugging and support purposes. |
| `FRAME_SESSION_INFO` | Provides additional session information represented within a JSON object: `colorspace` (`YUV420` or `YUV444`), `protocol` (`FRP7` or `FRP8`), and `connectionType` (`tcp` or `udp`) |
| `FRAME_SESSION_LABEL` | Custom value set in Session Settings through the [Advanced Server Argument](https://docs.difr.com/platform/session/session-settings#advanced-arguments) `-frame-session-label` |
| `FRAME_SESSION_TOKEN` | Unique token specific to the session. This token can be used to query user assertion/claims data, or base64 decoded to access various user and authentication-related data. |
| `FRAME_VENDOR_EMAIL` | Contrary to the name, this value is the unique GUID associated to the Frame account the VM belongs to. |
| `FRAME_MAX_SESSION_DURATION` | The maximum amount of time (in seconds) the user can be in the session. This value is set in the Account, Launchpad, Sandbox, and Utility Server session settings. |
| `FRAME_SESSION_START_TIME` | The date/time when the session started. |
| `FRAME_POOL_GROUP_TYPE` | Type of pool group the session is currently connected to (`sandbox`, `production`, `test`, `utility`). |
| `FRAME_POOL_NAME` | Name of instance pool the session is currently connected to as defined within *Dashboard* > *Capacity* |
| `FRAME_INSTANCE_TYPE` | The instance type name of the current instance. |
| `FRAME_IMAGE_FAMILY` | Image Family Name that the instance is based off of. |
| `FRAME_DATACENTER` | Name of the datacenter where the instance is located. |
| `FRAME_CLOUD_PROVIDER` | Name of the infrastructure provider (`ahv`, `azure`, `gcp`, `amazon`). |
As this tool was written for Windows, it only supports `.ps1` scripts.
### Import and Validation of the Definition.yml File Importing the definition.yml file can be accomplished in two ways: - **Automatically**: When launched the tool will search for a definition.yml file in `C:\ProgramData\Nutanix\Frame\FGA\Scripts\User` - **Manually**: By using the import section from toolbar menu: Configuration>ImportThe file will not be imported until any errors are resolved.
If the tool cannot find a definition.yml file at startup, it will display a prompt; you can still continue using the tool. All changes will be saved afterwards into a new definition.yml file. ### Edit the Definition.yml File All available Frame Lifecycle hooks ([see above](#-frame-lifecycle-hooks) for hook definitions) are displayed to the left of the tool window. To begin, select one of the hooks. By default, "first-fga-boot" is selected. Next to the name of the hook are two numbers. The first number represents the number of pool-type groups, the second represents the total number of scripts assigned to that hook. To attach your scripts to the selected hook, drag scripts files from File Explorer into the drop area at the top of the screen.Another way to import the scripts is to directly drag their file onto the existing pool-type group.
Next, a prompt will ask you to specify the pool-type groups for your scripts. Check the box next to each desired pool and click “Next” when all desired options are checked.  ### Changing Script Order To change the order of the scripts, simply drag a script to desired position in the pool-type group.Scripts can only be moved within the current group, not to another.
### Rearranging the Pool-Type Groups Order of the pool-types can be also changed. Each of the pool-type group "box" can be dragged over the other group. ### Export the Definition.yml File After making your changes, you can save your file by clicking “File” and then “Save”, or even export it to a new file from **Configuration > Export**.  ## Advanced Scripting ### Update Script (Windows only) If found, FGA will execute an “update” script right after a VM boots, but *before FGA User scripts are executed*. This allows Frame administrators to create custom update scripts to automated or dynamic maintenance operations on their custom scripts and files before user scripts defined in definition.yml are executed. The update script must be in the following path: `C:\ProgramData\Nutanix\Frame\FGA\Scripts\User\update.ps1` Updating the user scripts might include completely new packages of scripts or just a new definition.yml file. The following are best practices when it comes to updating your custom scripts using the Update script feature. 1. Make sure your updated scripts and/or definition.yml are packaged in a bundle. 2. Make sure your workload VMs are able to access and download that bundle. 3. Create an update script that downloads the package and checks if there is a need for the update to be applied. - If not, the "update" script should just exit. - If yes, the "update" script should perform the update (it can delete existing definition.yml and all script files and then recreate definition.yml file and/or scripts). 4. Place the update script content inside the update.ps1 (for Windows) and update.sh (for Linux). When the VM gets into boot phase, FGA is going to search for the "update" script. If it does not find the script, FGA will read the definition.yml file and run the scripts as they are defined in the definition.yml file. If the FGA finds the "update" script, FGA will execute the script first. Once the script is executed, FGA will proceed to execute the custom scripts following the definition.yml file. If the update script on Windows OS takes more than 10 minutes to execute, FGA will timeout and continue with its startup workflow. ## Example Scripts Below are some example use cases where a custom script and associated definition.yml file can customize the end user experience. ### Mount a Network Volume **Scenario**: A Frame administrator would like to mount an existing read-only file share once a user starts a Frame session in either the Sandbox (Frame administrator) or a production workload VM (user). The following simple PowerShell script "mount-read-only-volume.ps1" is placed in the scripts folder to be executed: ```batch echo off net use * /delete /Y net use K: \\10.0.0.5\Fileshare /user:username password ``` The corresponding **definition.yml** file: ```yaml groups: - desc: Scripts before session is started in either Sandbox or production workload VMs name: pre-session timeout: 30 run-policy: pre-session pool-type: - sandbox - production scripts: - desc: Pre-session script to mount a read-only volume path: mount-read-only-volume.ps1 error-policy: continue timeout: 20 ``` ### Exclusion/Inclusion Rules for Enterprise Profiles **Scenario**: A Frame administrator wishes to exclude specific folders from persisting and/or include specific folders to persist in users' enterprise profiles. The following PowerShell script “exclude-include-folders.ps1” is placed in the scripts folder to be executed: ```powershell # Exclude four folders in the %USERPROFILE% Add-ProfileDiskExclusion -SourcePath $env:USERPROFILE\Downloads -TargetPath C:\_Profile Add-ProfileDiskExclusion -SourcePath $env:USERPROFILE\Music -TargetPath C:\_Profile Add-ProfileDiskExclusion -SourcePath $env:LOCALAPPDATA\Autodesk -TargetPath C:\_Profile Add-ProfileDiskExclusion -SourcePath $env:LOCALAPPDATA\Spotify -TargetPath C:\_Profile # Include two separate folders C:\MyData and C:\MoreData to the user's enterprise profile. Add-ProfileDiskInclusion -SourcePath C:\MyData Add-ProfileDiskInclusion -SourcePath C:\MoreData ``` The corresponding definition.yml file specifies that this PowerShell script should only be executed in the context of production workload VMs where the user's enterprise profile volume is used (in a non-persistent Frame account): ```yaml groups: - desc: Scripts before session is started in production workload VMs name: pre-session timeout: 30 run-policy: pre-session pool-type: - production scripts: - desc: Pre-session script to include/exclude folders from the user's enterprise profile path: exclude-include-folders.ps1 error-policy: continue timeout: 20 ``` ### Autohide the Windows Task Bar in App Mode 2.0 **Scenario**: A Frame administrator wants to have the Windows Task Bar automatically hidden when using an Application Launchpad with App Mode 2.0. The Windows registry key that controls this behavior is at `HKEY_CURRENT_USER\Software\Microsoft\Windows\CurrentVersion\Explorer\StuckRects3`. The following PowerShell script is placed in the scripts folder to be executed: ```powershell $p='HKCU:SOFTWARE\Microsoft\Windows\CurrentVersion\Explorer\StuckRects3'; $v=(Get-ItemProperty -Path $p).Settings; $v[8]=1; Set-ItemProperty -Path $p -Name Settings -Value $v; Stop-Process -f -ProcessName explorer ``` The corresponding definition.yml file specifies that this PowerShell script should only be executed in the context of production workload VMs: ```yaml groups: - desc: Scripts before session is started in production workload VMs name: pre-session timeout: 30 run-policy: pre-session pool-type: - production scripts: - desc: Pre-session script to autohide the Windows Task Bar path: autohide-taskbar.ps1 error-policy: continue timeout: 20 ``` If you wish to show the Windows Task Bar, then the PowerShell script can be used: ```powershell $p='HKCU:SOFTWARE\Microsoft\Windows\CurrentVersion\Explorer\StuckRects3'; $v=(Get-ItemProperty -Path $p).Settings; $v[8]=2; Set-ItemProperty -Path $p -Name Settings -Value $v; Stop-Process -f -ProcessName explorer ``` ### Add Applications dynamically to the Frame Taskbar in App Mode 2.0 **Scenario**: A Frame administrator needs to dynamically add an application shortcut/launch link to the Frame Taskbar in App Mode 2.0. App Mode 2.0 allows you to dynamically modify the Frame Taskbar to any configuration you need (in real time). The following PowerShell script should be placed in the scripts folder to be executed. This is designed as a pre-session script that modifies the Frame Taskbar configuration before the session starts. The script will override any of the default Frame Taskbar configuration and show Notepad only (update-taskbar.ps1):Notice that any URI path requires two backslashes in the path (Within the JSON file only)
```powershell $jsonFilePath = 'C:\ProgramData\Nutanix\Frame\Config\server_launchpad_override.json' $jsonOverrideContent = @" { "name": "root", "order": 0, "applications": [ { "name": "Frame", "path": "C:\\Windows\\System32\\notepad.exe", "icon_url": "", "order": 0, "arguments": "" } ], "folders": [] } "@ Set-Content -Path $jsonFilePath -Value $jsonOverrideContent ``` The corresponding definition.yml file specifies that this PowerShell script should only be executed in the context of production workload VMs: ```yaml groups: - desc: Scripts before session is started in production workload VMs name: pre-session timeout: 30 run-policy: pre-session pool-type: - production scripts: - desc: Pre-session script to add Notepad into the Frame Taskbar icon/shortcut list path: update-taskbar.ps1 error-policy: continue timeout: 20 ``` ## Playing in the Sandbox In this example, we'll create a few more scripts, each set to execute at common session lifecycle hooks.Before continuing with any changes to your sandbox, please make a backup first! Sandbox scripts, if improperly configured, can cause undesired behaviors and in some cases can cause the sandbox to become unresponsive, requiring restoration from a backup or a fresh sandbox.
To get started, grab your shovel and connect to your Sandbox. Then, open up your favorite text editor and create the following **five** files in the **FGA User Scripts Directory**. **Pre-session script: pre-session.ps1** To test this, the scripts will create or append to a single log file created at `.\logs\sandbox_bucket.txt` with a timestamp and message from the script. ```powershell $RootPath = "C:\ProgramData\Nutanix\Frame\FGA\Scripts\User" If (!(test-path "$RootPath\logs")){ New-Item -Path "$RootPath\logs" -Type Directory } $timestamp = Get-Date -Format "dddd MM/dd/yyyy HH:mm K" "$timestamp - Hello from pre-session.ps1" | Out-File "$RootPath\logs\sandbox_bucket.txt" -Append ``` **Session Disconnect script: on-idle.ps1** ```powershell $RootPath = "C:\ProgramData\Nutanix\Frame\FGA\Scripts\User" If (!(test-path "$RootPath\logs")){ New-Item -Path "$RootPath\logs" -Type Directory } $timestamp = Get-Date -Format "dddd MM/dd/yyyy HH:mm K" "$timestamp - Hello from on-idle.ps1" | Out-File "$RootPath\logs\sandbox_bucket.txt" -Append ``` **Session Resume script: on-active.ps1** ```powershell $RootPath = "C:\ProgramData\Nutanix\Frame\FGA\Scripts\User" If (!(test-path "$RootPath\logs")){ New-Item -Path "$RootPath\logs" -Type Directory } $timestamp = Get-Date -Format "dddd MM/dd/yyyy HH:mm K" "$timestamp - Hello from on-active.ps1" | Out-File "$RootPath\logs\sandbox_bucket.txt" -Append ``` **Post-session script: post-session.ps1** ```powershell $RootPath = "C:\ProgramData\Nutanix\Frame\FGA\Scripts\User" If (!(test-path "$RootPath\logs")){ New-Item -Path "$RootPath\logs" -Type Directory } $timestamp = Get-Date -Format "dddd MM/dd/yyyy HH:mm K" "$timestamp - Hello from post-session.ps1" | Out-File "$RootPath\logs\sandbox_bucket.txt" -Append ``` Let's walk through each line in these files. - **Line 1**: This line declares the root path as a variable variable. We could also use `Set-Location`. - **Line 2**: Creates the log folder inside of the root path if it doesn't exist. - **Line 3**: Gets a timestamp in a readable format (based on the Sandbox's local time). - **Line 4**: Writes our timestamp and hello message to the specified "sandbox\_bucket" txt file. **Defining our scripts: definition.yml** We'll create four different script *groups* (one for each lifecycle hook). These scripts will only execute on the Sandbox; each will have a total of 5 seconds to execute (timeout); and if these scripts fail for any reason, FGA will continue with the next lifecycle procedures. ```yaml groups: - desc: Pre-session script name: Pre-session script group timeout: 5 run-policy: pre-session pool-type: - sandbox scripts: - desc: Example sandbox pre-session script. path: pre-session.ps1 error-policy: continue timeout: 5 - desc: On-idle disconnect script name: On-idle script group timeout: 5 run-policy: on-idle pool-type: - sandbox scripts: - desc: Example sandbox on-idle script. path: on-idle.ps1 error-policy: continue timeout: 5 - desc: On-active resume script name: On-active script group timeout: 5 run-policy: on-active pool-type: - sandbox scripts: - desc: Example sandbox on-active script. path: on-active.ps1 error-policy: continue timeout: 5 - desc: Post-session script name: Post-session script group timeout: 5 run-policy: post-session pool-type: - sandbox scripts: - desc: Example sandbox post-session script. path: post-session.ps1 error-policy: continue timeout: 5 ```Notice that we're only setting `- sandbox` for each \*\*pool-type\*\*. Publishing this Sandbox configured like this would ensure that these scripts will not execute on any other VM on this account (Shadow, non-persistent Production, Persistent VM instances).
### Testing our Sandbox scripts You made it this far, you have your scripts and definition.yml file in place on the Sandbox, great! Let's test. Before we do, **changes to the definition.yml are active in real-time**. The Frame Guest Agent (FGA) does a fresh read of the definition.yml at each Session lifecycle hook. This means that if you are in your Sandbox session right now, we can test the disconnect and resume scripts by disconnecting from your Sandbox using the Gear menu at the bottom left corner of the Frame Session. Next, resume the session -- we should see two new log entries in our `/logs/sandbox_bucket.txt` files. Let's test all four lifecycle hooks. 1. This time, **quit the session** via the Gear menu. Wait for the session to fully close. 2. Once you can, **start a new session**. 3. **Disconnect** from the Gear Menu. This will fire our disconnect or "on-idle" script. 4. **Resume the Session**. This will trigger our resume or "on-active" script. 5. **Close the session**. 6. Finally, **start one more session** to verify our `sandbox_bucket.txt` file contains messages and timestamps in order. That's it! If you run into any problems, here are a few basic troubleshooting steps before contacting Support: 1. Please ensure that your files are in the correct paths. 2. Please ensure that the file names match in the directory as well as in the definition.yml file. 3. Test your PowerShell scripts manually from the Sandbox.**Cleanup** Once you're done with testing these scripts and scenarios, all you need to do is remove the scripts from the definition.yml, delete the files, or customize them to your liking!
## Onboarding Applications via CLI Onboarding Windows applications to a Sandbox can be automated. If the applications are present on the Sandbox, we have a command-line utility that can be used to onboard a single application, multiple applications, or multiple apps defined in a file. Introducing ShellHandler! Find and run `ShellHandler.exe` located in `C:\Program Files\Nutanix\Frame\Server\`. Using the command-line arguments listed below, you can onboard applications in a number of ways: ### ShellHandler Arguments| <div style={ {width: "150px"} }>Command-line Argument | Description |
|---|---|
| `onboard` | Instructs the ShellHandler that we're onboarding an application or more. onboard must be the first argument and proceeded next by one of the three following onboard options. **Example:** `ShellHandler.exe onboard -i C:\MyApp.exe -s` |
| `--item` or `-i` | Onboard a single application item by filepath. **Example:** `ShellHandler.exe onboard --item C:\MyApp.exe -s` |
| `--list` or `-l` | Onboard multiple applications via a list of application filepaths. **Example:** `ShellHandler.exe onboard --list "C:\MyApp1.exe, C:\MyApp2.exe, C:\MyApp3.exe" -s` |
| `--file` or `-f` | Onboard multiple applications via a file containing a list of application filepaths. **C:\\ExampleAppList.txt:** C:\\MyApp1.exe C:\\MyApp2.exe C:\\Program Files\\TestApp\\HelloWorld.exe **Example:** `ShellHandler.exe onboard --file C:\ExampleAppList.txt -s` |
| `--silent` or `-s` | If present, application(s) filepaths will be onboarded without any user prompt. **Example:** `ShellHandler.exe onboard -i C:\MyApp.exe --silent` |
| **User Type** | **Required Peripherals** | **Recommended Approach** | **Additional Details** |
| **Standard Office User** | • Standard keyboards and mice • Webcams • Headsets/microphones • Basic document scanners | **Frame in browser** | • Provides standard peripheral support through browser APIs • Ideal for common office peripherals • Simplest deployment option • No additional software required |
| **CAD/AEC Professional** | • 3D mice/Space mice • Drawing tablets • Hardware security keys/dongles • Professional-grade input devices | **Frame App 7 with Generic USB enabled** | • Required for specialized input devices and security dongles • Ensures compatibility with professional design peripherals • Supports high-precision input requirements • Enables advanced device features |
| **Financial Services Professional** | • Smart card readers • Security tokens • Signature pads • Multi-card readers • Document scanners | **Frame App 7 with Generic USB enabled** | • Required for secure authentication devices • Ensures compliance with financial security requirements • Supports specialized financial hardware • Enables secure peripheral access |
| **Operating System** | **Chrome/Edge** | **Firefox** | **Safari** |
| Windows | Full peripheral support | Basic peripheral support\* | Not supported |
| macOS | Full peripheral support | Basic peripheral support\* | Basic peripheral support\* |
| Linux | Full peripheral support | Basic peripheral support\* | Not supported |
| iOS/Android | Limited support\*\* | Limited support\*\* | Limited support\*\* |
| **Argument** | **Type** | **Description** |
| -serialReadIntervalTimeout | int | Maximum read time in milliseconds between two bytes |
| -serialReadTotalTimeoutMultiplier | int | Read multiplier |
| -serialReadTotalTimeoutConstant | int | Total read time in milliseconds |
| -serialWriteTotalTimeoutConstant | int | Total write time in milliseconds |
| -serialWriteTotalTimeoutMultiplier | int | Write multiplier |
| **Argument** | **Type** | **Description** |
| serialPortDataBits | int | Default 8 |
| serialPortStopBits | int | Default 1 |
| serialPortParity | string | Default ‘none’ |